Access an SMB Switch CLI using SSH or Telnet
Available Languages
Objective
The Cisco Small Business Managed Switches can be remotely accessed and configured through the Command Line Interface (CLI). Accessing the CLI allows commands to be entered in a terminal-based window. If you prefer to configure using terminal commands on your switch through the CLI rather than the web-based utility, this would be an easier alternative. Certain tasks such as Layer 3 mode enabling can only be performed through the CLI.
In order to remotely access the CLI of your switch, you must use an SSH or Telnet client. You must also enable the Telnet and SSH service on your switch first before you can access it remotely.
Note: For instructions on how to configure the Transmission Control Protocol (TCP) and User Datagram Protocol (UDP) settings on your switch, click here.
This article provides instructions on how to access the CLI of your switch through SSH or Telnet using the following clients:
- PuTTY — A standard Telnet and SSH client. You can download an installer here and install in your Windows computer.
- Terminal — An application that is pre-installed in every Mac OS X computer. It is also known as the shell or the console.
Important: Before you make an SSH or Telnet connection to the switch, you must set the IP address for the switch. For instructions, click here.
Applicable Devices
- Sx300 Series
- Sx350 Series
- SG350X Series
- Sx500 Series
- Sx550X Series
Software Version
- 1.4.7.06 — Sx300, Sx500
- 2.2.8.04 — Sx350, SG350X, Sx550X
Access the CLI of the Switch through SSH
The SSH sessions disconnect automatically after the idle time configured in the switch has passed. The default idle session timeout for SSH is 10 minutes.
To make an SSH connection to the switch, choose your platform:
Access the CLI through SSH using PuTTY
Note: The images may vary according to the version of the Windows operating system you are using. In this example, the Windows 7 Ultimate is used and the PuTTY version is 0.63.
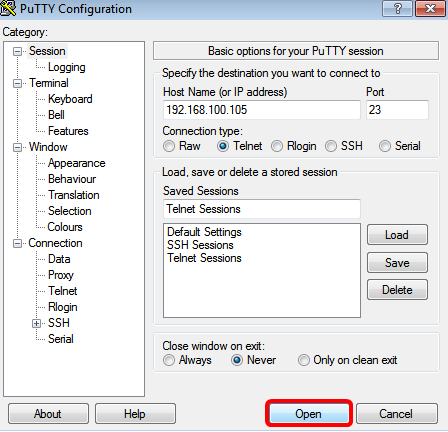
Step 1. Launch the PuTTY client on your computer.

Step 2. Enter the hostname or IP address of the switch that you want to remotely access in the Host Name (or IP address) field.

Note: In this example, 192.168.100.105 IP address is used.
Step 3. Enter 22 as the port number to be used for the SSH session in the Port field.

Step 4. In the Connection type area, click the SSH radio button to choose SSH as your method of connection with the switch.

Step 5. (Optional) To save the session, enter the session name in the Saved Sessions field.

Note: In this example, SSH Sessions is used.
Step 6. (Optional) Click Save to save the session.

Step 7. (Optional) In the Close window on exit area, click the radio button to choose the behavior of the SSH window upon exit.

Note: In this example, Only on clean exit is chosen.
Step 8. Click Open to start the session.

Step 9. If this is your first time using SSH to connect to the switch, you may receive a Security Breach Warning. This warning lets you know that it is possible that you are connecting to another computer pretending to be the switch. Once you have ensured you entered the correct IP address in the Host Name field in Step 4, click Yes to update the Rivest Shamir Adleman 2 (RSA2) key to include the new switch.

Step 10. Enter the username and password of the switch in the login as, User Name and Password fields accordingly.

You should now have successfully remotely accessed the CLI of your switch through SSH using PuTTY.
Access the CLI through SSH using Terminal
Note: The images may vary according to the version of the operating system of the Mac computer that you are using. In this example, the macOS Sierra is used and the Terminal version is 2.7.1.
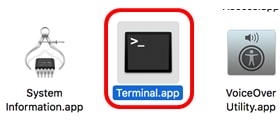
Step 1. Go to Applications > Utilities then launch the Terminal.app application.

Step 2. Enter the ssh command and then the IP address to access the CLI of the switch.


Note: In this example, 192.168.100.105.
Step 3. Once prompted by the message asking if you want to continue connecting, enter Yes.

Step 4. Enter the username and password of the switch in the User Name and Password fields accordingly.

You should now have successfully remotely accessed the CLI of your switch through SSH using the Terminal.
Access the CLI of the Switch through Telnet
The Telnet sessions disconnect automatically after the idle time configured in the switch has passed. The default idle session timeout for Telnet is 10 minutes.
To make a Telnet connection to the switch, choose your platform:
Access the CLI through Telnet using PuTTY
Note: The images may vary according to the version of the Windows operating system you are using. In this example, the Windows 7 Ultimate is used and the PuTTY version is 0.63.
Step 1. Launch the PuTTY client on your computer.

Step 2. Enter the hostname or IP address of the switch that you want to remotely access in the Host Name (or IP address) field.

Note: In this example, 192.168.100.105 is used.
Step 3. Enter 23 as the port number to be used for the Telnet session in the Port field.

Step 4. In the Connection type area, click the Telnet radio button to choose Telnet as your method of connection with the switch.

Step 5. (Optional) To save the session, enter the session name in the Saved Sessions field.

Note: In this example, Telnet Sessions is used.
Step 6. (Optional) Click Save to save the session.

Step 7. Optional) In the Close window on exit area, click the radio button to choose the behavior of the SSH window upon exit.

Note: In this example, Never is chosen.
Step 8. Click Open to start the session.

Step 9. Enter the username and password of the switch in the login as, User Name and Password fields accordingly.

You should now have successfully remotely accessed the CLI of your switch through Telnet using PuTTY.
Access the CLI through Telnet using Terminal
Note: The images may vary according to the version of the operating system of the Mac computer that you are using. In this example, the macOS Sierra is used and the Terminal version is 2.7.1.
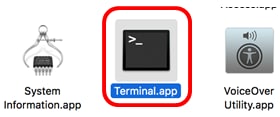
Step 1. Go to Applications > Utilities then launch the Terminal.app application.

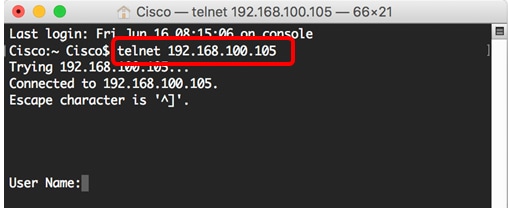
Step 2. Enter the telnet command and then the IP address to access the CLI of the switch.


Note: In this example, 192.168.100.105.
Step 3. Enter the username and password of the switch in the User Name and Password fields accordingly.

You should now have successfully remotely accessed the CLI of your switch through Telnet using the Terminal.
Revision History
| Revision | Publish Date | Comments |
|---|---|---|
1.0 |
11-Dec-2018 |
Initial Release |
 Feedback