Configure Dynamic Host Configuration Protocol (DHCP) Trusted Interface Settings on a Switch
Available Languages
Objective
Dynamic Host Configuration Protocol (DHCP) snooping provides a security mechanism to prevent receiving false DHCP response packets and to log DHCP addresses. It does this by treating ports on the device as either trusted or untrusted.
A trusted port is a port that is connected to a DHCP server and is allowed to assign DHCP addresses. DHCP messages received on trusted ports are allowed to pass through the device. Packets from these ports are automatically forwarded. If DHCP Snooping is not enabled, all ports are trusted by default.
An untrusted port is a port that is not allowed to assign DHCP addresses. By default, all ports are considered untrusted until you declare them trusted in the Interface Settings page.
This article aims to show you how to configure DHCP Trusted Interface Settings on your switch.
Applicable Devices
- Sx300 Series
- SG350X Series
- Sx500 Series
- SG500X
Software Version
- 1.4.7.06 — Sx300, Sx500, SG500X
- 2.2.8.04 — SG350X
Configure DHCP Trusted Interface Settings
Note: The appearance of your switch web-based utility may vary depending on the exact model of your device. The images below are taken from the SG350X-48MP.
Step 1. Access your switch web-based utility and choose IP Configuration > IPv4 Management and Interfaces.

Step 2. Choose DHCP Snooping/Relay > DHCP Snooping Trusted Interfaces.

Step 3. Under the Trusted Interfaces Table, click on the port or interface that you want to configure then click Edit.

Note: In this example, Port GE41 is chosen.
Step 4. In the Edit Interface Settings window, verify that the chosen port in the Interface area is the one you have chosen in the previous step. Otherwise, click on the drop-down arrow and choose the right port.

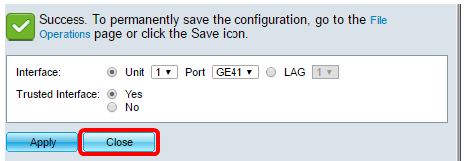
Step 5. In the Trusted Interface area, click on a radio button to set the specific port to trusted or not trusted, and then click Apply.

Note: In this example, Yes is chosen indicating that the port is configured to be a trusted port.
Step 6. Once the Success message appears, click Close.

Step 7. Verify in the Trusted Interfaces Table if the newly-configured settings on the chosen port are now applied.

Step 8. (Optional) To permanently save the configuration, click on the blinking  icon at the top portion of the page.
You should now have successfully configured the Trusted Interface Settings on your switch.
Revision History
| Revision | Publish Date | Comments |
|---|---|---|
1.0 |
13-Dec-2018 |
Initial Release |
 Feedback