Configuration of Port Security on Sx500 Series Stackable Switches
Available Languages
Objective
Port Security can be used with dynamically learned and static MAC addresses to limit the ingress traffic of a port, because it limits the MAC addresses which are allowed to send traffic to the port. When a secure MAC address is assigned to a secure port the port does not forward ingress traffic for those which have source MAC addresses that are not similar to the addresses which are defined.
The objective of this document is to explain the configuration of port security on Sx500 Series Switches.
Applicable Devices
• Sx500 Series Stackable Switches
Software Version
• v1.2.7.76
Configuration of Port Security
Step 1. Log in to the web configuration utility and choose Security > Port Security. The Port Security page opens:

Step 2. From the Filter: Interface Type drop-down list, choose the type of interface on which the packet is expected.

Step 3. Click Go, which displays the status of the interfaces.
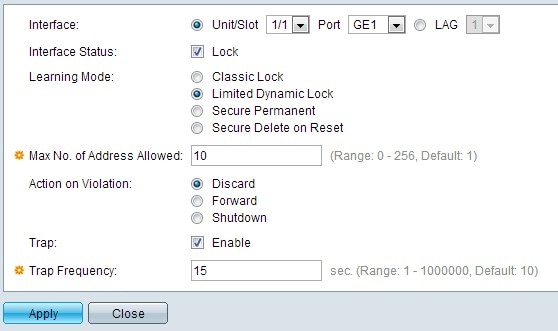
Step 4. Click the interface to be modified and click Edit. The Edit Port Security Interface Settings window appears.

Step 5. (Optional) To change the interface you configure, click the desired radio button in the Interface field and choose the desired interface from the drop-down list.

• Unit/Slot — From the Unit/Slot drop-down lists choose the appropriate Unit/Slot. The unit identifies whether the switch is active or a member in the stack. The slot identifies which switch is connected to which slot (slot 1 is SF500 and slot 2 is SG500). If you are unfamiliar with the terms used, check out Cisco Business: Glossary of New Terms.
• Port — From the Port drop-down list, choose the appropriate port to configure.
• LAG — Choose the LAG from the LAG drop-down list. A Link Aggregate Group (LAG) is used to link multiple ports together. LAGs multiply bandwidth, increase port flexibility, and provide link redundancy between two devices to optimize port usage
Step 6. (Optional) To lock the port immediately and not learn any new MAC addresses, check Lock in the Interface Status field.
Timesaver: If Lock is checked, skip to Step 9.
Step 7. Click the radio button that corresponds to the desired type of port locking needed from the Learning Mode field. There are four options.
• Classic Lock — Locks the port instantly with no consideration for the number of addresses that have already been learned. The port does not learn any new MAC addresses. The addresses which are learned cannot be re-learned or aged.
• Limited Dynamic Lock — Locks the port, removes the present dynamic MAC addresses related to the port, and then the port learns addresses up to its maximum limit. The port can be re-learned and aged.
• Secure Permanent — The current dynamic MAC address related to the port is kept and it learns the maximum number of permitted addresses on the port. This is set by the Max No. of Address Allowed field. Relearning and Aging are enabled.
• Secure Delete on Reset — Once the port is reset it deletes the current dynamic MAC address. MAC addresses can be learned based on the number of permitted addresses on the port. This is set by the Max No. of Address Allowed field. Relearning and Aging are disabled.
Step 8. If Classic Lock is not clicked in Step 7, enter the maximum number of MAC addresses that can be learned on a port if the Limited Dynamic Lock Learning mode is clicked. The number 0 indicates only static addresses are supported on the interface.
Step 9. If Lock is checked in Step 6, then click a radio button in the Action on Violation field to choose the action that is to be performed on the packets received at the locked port.
• Discard — Discards packets from any unlearned source.
• Forward — Forwards packets from an unknown source without knowing the MAC address.
• Shutdown — Drops packets from any unlearned source, and the port is shutdown. This port is kept shutdown until reactivated or until the switch is rebooted.
Step 10. (Optional) To enable traps when a locked port gets a packet, check Enable in the Trap field. It is applicable for lock violations. In case of Classic Lock, this is any new address received. In case of Limited Dynamic Lock, this is any new address which exceeds the number of permitted addresses.
Timesaver: If Enable is not checked in Step 10, skip to Step 12.
Step 11. Enter the minimum time, in seconds, which passes between traps in the Trap Frequency field.
Step 12. Click Apply to apply the settings.
Copy Settings
Step 1. Click the Interface to be modified and click Copy Settings. The Copy Settings window appears.

Step 2. Enter the interface(s) or range(s) of interfaces to which the configuration needs to be copied in the provided field.

Step 3. Click Apply to modify the port security and update the running configuration file.
Revision History
| Revision | Publish Date | Comments |
|---|---|---|
1.0 |
11-Dec-2018 |
Initial Release |
 Feedback