Quality of Service (QoS) Advanced Mode Global Settings Configuration on Sx500 Series Stackable Switches
Available Languages
Objectives
Quality of Service (QoS) advanced mode is used to enable a trust mode. A trust mode is used to define a specific domain in a network as trusted. Within that domain packets are marked with 802.1p priority and Differential Services Code Point (DSCP) to signal the type of service they require. The trust mode utilizes Class of Service (CoS/802.1p) and DSCP. CoS/802.1p is used to prioritize outgoing network traffic from the switch to the secure network. DSCP is used to evaluate the QoS level of the packet.
This article explains how to configure QoS Advanced Mode Global Settings on the Sx500 Series Stackable Switches.
Applicable Devices
• Sx500 Series Stackable Switches
Software Version
• 1.3.0.62
QoS Advanced Mode Global Settings
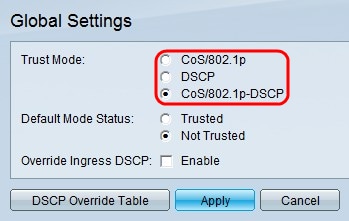
Step 1. Log in to the web configuration utility to choose Quality of Service > QoS Advanced Mode > Global Settings. The Global Settings page opens:

Step 2. Click the radio button that corresponds to the desired trust mode. If a packet CoS level and DSCP tag are mapped to separate queues, the trust mode determines the queue to which the packet is assigned.
• CoS/802.1p — Traffic is mapped to queues based on the VLAN Priority Tag (VPT) field in the VLAN tag. If there is no VLAN tag on the incoming packet, the traffic is mapped to queues based on the per-port default CoS/802.1p value. This is a Layer 2 QoS.
• DSCP — All IP traffic is mapped to queues based on the DSCP field in the IP header. If the traffic is not IP traffic, it is mapped to the best effort queue. This is a Layer 3 QoS.
• CoS/802.1p-DSCP — All non-IP traffic is mapped through the use of CoS/802.1p. All IP traffic is mapped through DSCP.

Step 3. Click the radio button that corresponds to the desired mode status. This provides a way to trust CoS/DSCP without the need to create a policy.
• Trusted — Trust CoS/DSCP.
• Not Trusted — Do not trust CoS/DSCP. The default CoS values configured on the interface are used to prioritize the traffic that arrives on the interface.
Note: If you have a policy on the interface then the Default Mode Status field is irrelevant. The interface prioritizes the policy settings.

Step 4. Check Enable in the Override Ingress DSCP field to override the original DSCP values in the incoming packets with the new values set in the DSCP Override Table. The switch will use the new DSCP values for egress queuing. It also replaces the original DSCP values in the packets with the new DSCP values.

Step 5. If Override Ingress DSCP is enabled, click DSCP Override Table to reconfigure DSCP. The DSCP Override Table page opens:

Step 6. Configure the DSCP Override Table.
• DSCP In — Displays the value of the incoming packet that needs to be remarked to an alternative value.
• DSCP Out — Choose the desired DSCP Out value for the corresponding DSCP In value from the DSCP Out drop-down list.

Step 7. (Optional) Click Restore Defaults to restore the DSCP Out values to default. The default is when the DSCP Out values are the same as the corresponding DSCP In values.
Step 8. Click Apply in the DSCP Override Table.

Step 9. Click Apply.
Revision History
| Revision | Publish Date | Comments |
|---|---|---|
1.0 |
13-Dec-2018 |
Initial Release |
 Feedback