Configure Simple Network Time Protocol (SNTP) Settings on a Switch through the Command Line Interface (CLI)
Available Languages
Objective
The objective of this document is to provide and explain the (CLI) steps to enable an SNTP server to synchronize time settings for a switch.
Introduction
Simple Network Time Protocol (SNTP) synchronizes the system time of a network device with an SNTP server of your choice. An SNTP server uses the Universal Time Clock (UTC). This is the standard coordinated time by which the world regulates its clocks and time. Using SNTP is helpful in administration activities because it ensures that when events are logged, they use a single source for timestamps. The collection of synchronous network events proves an accurate window into the sequence of events.
You must be connected to an SNTP server to utilize this service. If you enabled a different internet time source that is sufficient for your needs, you do not need to perform these steps. No matter which time source you use, it is beneficial to have each client use the same internet time source for authentication to work. If clients aren’t able to log in, the time settings would be a good first troubleshooting step.
The objective of this document is to provide and explain the (CLI) steps to enable an SNTP server to synchronize time settings for a switch. To configure these settings through the web-based utility of the switch, click here.
Note: The images shown below were taken from various switches, so the name of the device will vary and most likely not match your switch name. The commands after the hashtag symbol should be the same for configuration on your switch.
Applicable Devices
- Sx300 Series
- Sx350 Series
- SG350X Series
- Sx500 Series
- Sx550X Series
Software Version
- 1.4.7.05 - Sx300, Sx500
- 2.2.8.04 - Sx350, SG350X, Sx550X
Configure SNTP Mode on a Switch
Enable SSH and SNTP Unicast
Step 1. Secure Shell (SSH) and telnet are not enabled by default. In order to connect to the CLI of your switch using SSH, SSH Service must be enabled. Click here for instructions.
Step 2. Click, here for instructions on accessing a Cisco Small Business switch Command Line Interface (CLI) using SSH or Telnet.
Step 3. Access the CLI of the switch. The default username and password is cisco/cisco. If you have customized your credentials, enter your username and password instead.

Note: The commands or options may vary depending on the model of your device. In this example, PuTTY is used to access the CLI of the switch through the console. For more details on how to access PuTTY Using a Console Connection, click here.
Step 4. Switch to Global Configuration mode by entering the following command in the CLI:
SG350X#configure terminal
Step 5. By default, SNTP unicast is disabled. Unicast is communication between a single sender and a single receiver. SNTP unicast can be enabled by entering the following command:
SG350X(config)#sntp unicast client enable
Configure SNTP Mode
Step 1. Enable the SNTP Broadcast clients using the following command:
SG350X(config)#sntp broadcast client enable [both | ipv4 | ipv6]The options are:
- both — This specifies that the Internet Protocol version 4 (IPv4) and IPv6 SNTP Broadcast clients are enabled.
- Ipv4 — This specifies the IPv4 SNTP Broadcast clients are enabled.
- Ipv6 — This specifies that the IPv6 SNTP Broadcast clients are enabled.
Note: In this example, sntp broadcast client enable both is entered.

Step 2. Switch to Privileged EXEC mode by entering the following command:
SG350X(config)#exit
Step 3. Enter the following command in Privileged EXEC mode to save the configuration.
SG350X#copy running-config startup-config
Step 4. Press Y to save the settings in the startup configuration of the switch.

You should now have successfully configured the SNTP settings on your switch through the CLI.

Set SNTP Settings to Display Local Time
Your clock is now set to UTC. If you have locations throughout various time zones, UTC ensures consistency in time with all devices but will not display your local time. Follow these instructions to change your display time to your local time zone.
Step 1. Enter the following command to enter the Global Configuration mode.
SG350X#configure terminal
Step 2. Enter for your specific time zone and how many hours different your local time is compared to UTC. In this example, the time zone is set to Central Time, which is 6 hours behind UTC.
SG350X(config)#clock timezone CDT -6
Step 3. (optional) If your time zone follows daylight savings time, you can configure this by entering the following command.
SG350X(config)#clock summer-time web recurring usa
Step 4. Switch to Privileged EXEC mode by executing the following command:
SG350X(config)#exit
Step 5. Enter the following command in Privileged EXEC mode to save the configuration.
SG350X#copy running-config startup-config
Step 6. Press Y to save the settings in the startup configuration of the switch.

Verify SNTP Settings
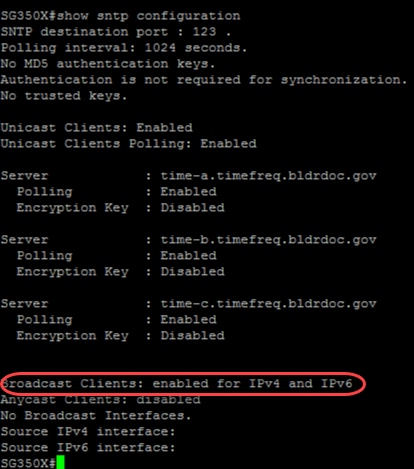
Step 1. Enter the following command to verify the SNTP configurations:
SG350X#show sntp configuration
Step 2. Verify that the Broadcast Clients are enabled.

Note: In this example SNTP Broadcast for IPv4 and IPv6 clients are enabled as a result of the steps provided above.
Step 3. Enter the following command to verify the time zone settings. This will show the running configurations.
SG350X#show run
Step 4. Verify that the time zone settings are enabled.

You have successfully enabled the SNTP mode on your switch.
 Feedback