Configure Network Address Translation (NAT) Support Parameters on SPA300/SPA500 Series IP Phones
Available Languages
Objective
Session Initiation Protocol (SIP) is a signaling protocol used to create, manage, and terminate sessions in an IP based network. SIP is a mechanism for call management. It also allows for the establishment of user location, provides for feature negotiation so that all of the participants in a session can agree on the features to be supported among them, and allows for changes to be made to features of a session while it is in progress.
Network Address Translation (NAT) modifies the IP address while it crosses through a traffic routing device in IP packet headers. It provides security to hide the internal IP address from view.
The objective of this document is to explain how to configure NAT Support Parameters on the SPA300 and SPA500 Series IP Phones.
Applicable Devices
• SPA300 Series IP Phone
• SPA500 Series IP Phone
NAT Support Parameters Configuration
Note: On the actual SPA300 or SPA500 Series IP Phone, to set signaling protocol as SIP, use the navigation keys to go to Device Administration > Call Control Settings > Signaling Protocol SIP.
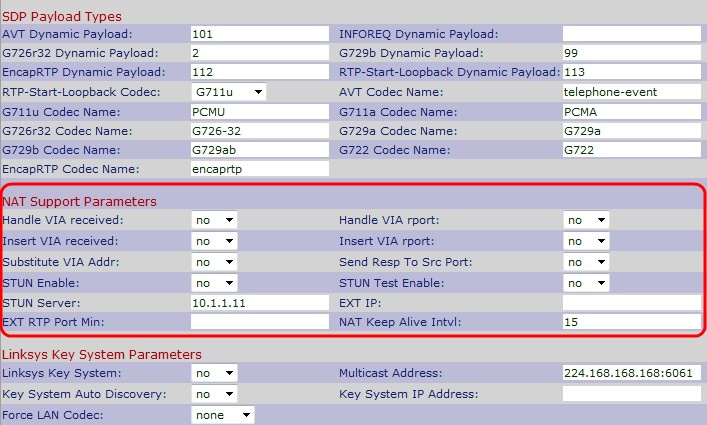
Step 1. Log in to the web configuration utility and choose Admin Login > Advanced > Voice > SIP. The SIP Parameters page opens:

Step 2. Scroll down to the NAT Support Parameters area.

Step 3. Choose Yes or No from the Handle VIA Received drop-down list. If you choose Yes the IP Phone will use the IP address when it gets any received parameters in a VIA header. The default is No.
Step 4. Choose Yes or No from the Handle VIA rport drop-down list. If you choose Yes the IP Phone will use the UDP port when it gets any rport parameters in a VIA header. The default is No.
Step 5. Choose Yes or No from the Insert VIA received drop-down list. If you choose Yes it will insert the received parameters in the VIA header when there is a difference between received-from IP and VIA sent-by IP. The default is No.
Step 6. Choose Yes or No from the Insert VIA rport drop-down list. If you choose Yes it will insert the rport parameters in the VIA header when there is a difference between received-from IP and VIA sent-by IP. The default is No.
Step 7. Choose Yes or No from the Substitute VIA Addr drop-down list. If you choose Yes a NAT-mapped IP will be used in the VIA header. The default is No.
Step 8. Choose Yes or No from the Send Resp To Src Port drop-down list. If you choose Yes the responses will be sent to the request source port instead of the VIA sent-by port. The default is No.
Step 9. Choose Yes or No from the STUN Enable drop-down list. If you choose Yes, STUN will be used to discover NAT mapping. The default is No.
Step 10. Choose Yes or No from the STUN Test Enable drop-down list. If you choose Yes the IP Phone will operate as a NAT-type operation. The IP Phone will contact with the STUN server and report a warning header in all Register requests. The default is No.
Step 11. Enter the IP address or the domain name of the STUN server in the STUN Server field. This helps NAT to map through the connection with the STUN server.
Step 12. Enter the external IP address in the EXT IP field to use in the place of the actual IP address of the IP Phone. The default is blank.
Step 13. Enter the minimal external port map number in the EXT RTP Port Min field to use in the place of the private UDP port of the IP Phone. The default is blank.
Step 14. Enter the maximum interval in seconds between two packets used to keep alive in the NAT Keep Alive Intvl field. The default is 15.
Step 15. Click Submit All Changes to save the settings.
 Feedback