Configure Profile on SPA300/SPA500 Series IP Phones
Available Languages
Objective
Session Initiation Protocol (SIP) is a signaling protocol used to create, manage and terminate sessions in an IP based network. SIP is a mechanism for call management. It also allows for the establishment of user location and provides for feature negotiation so that all of the participants in a session can agree on the features to be supported among them, and enables the ability to change features of a session while it is in progress.
The objective of this document is to show you how to configure a profile on SPA300 or SPA500 Series IP Phones.
Applicable Devices
• SPA300 Series IP Phones
• SPA500 Series IP Phones
Profile Configuration
Note: On the actual SPA300 or SPA500 Series IP Phones, to set signaling protocol as SIP, use navigation keys to go to Device Administration > Call Control Settings > Signaling Protocol > SIP.
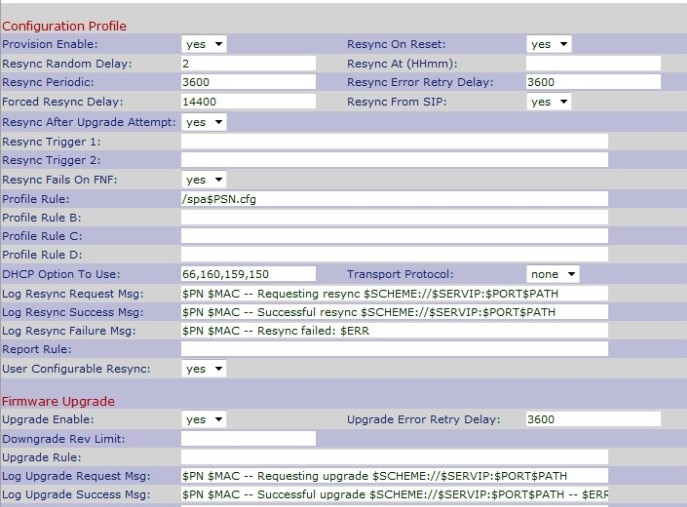
Step 1. Use the web configuration utility to choose Admin Login > Advanced > Voice > Provisioning. The Provisioning page opens:

Step 2. Choose Yes from Provision Enable drop-down list to allow resync actions. Otherwise, choose No. The default option is Yes.
Step 3. Choose Yes from Resync On Reset drop-down list to carry out a resync operation when the IP Phone powers-up and upgrades. Otherwise, choose No. The default option is Yes.
Step 4. Enter a random delay time in seconds in the Resync Random Delay field. It is the time which the IP Phone will follow for boot-up operation before reset. The default is 2 (40 seconds).
Step 5. Enter the time in 24-hour format (hhmm) in the Resync At (HHmm) field. It is the time which the IP Phone will follow for resync. The default entry is blank.
Step 6. Enter the random delay time in second in the Resync At Random Delay field. The IP Phone will delay in a random manner so that there is no collision in the server between resync requests from multiple IP Phones. The default entry is 600 seconds.
Step 7. Enter the time in second for periodic resync in Resync Periodic field. If this value is empty or zero the IP Phone will not resync in a periodic manner. The default entry is 3600 seconds.
Step 8. Enter an interval in second to resync after the failure of any resync in the Resync Error Retry Delay field. If the interval is zero the IP Phone will not resync after the failure of any resync. The default entry is 3600 seconds.
Step 9. Enter an interval in second to delay the resync of the IP Phone in the Forced Resync Delay field. This is the delay time which the IP Phone follows to delay the resync procedure as resync can occure only when the voice lines are idle to reboot firmware and terminate voice connection. The default entry is 14400 seconds.
Step 10. Choose Yes from Resync From SIP drop-down list to control the request to resync with the help of a SIP NOTIFY event which will be sent from the service provider proxy server. Otherwise, choose No. The default option is Yes.
Step 11. Choose Yes from Resync After Upgrade Attempt drop-down list to request a resync of the IP Phone after a failure upgrade attempt. Otherwise, choose No. The default option is Yes.

Step 12. Enter resync trigger 1 in the Resync Trigger 1 field. A resync operation operates when there is a conditional expression evaluates to true. The default entry is blank.
Step 13. Enter resync trigger 2 in the Resync Trigger 2 field. A resync operation operates when there is a conditional expression evaluates to true. The default entry is blank.
Step 14. Choose No from Resync Fails On FNF drop-down list to receive a file-not-found response as a successful resync from the server. Otherwise, choose Yes. The default option is Yes.
Step 15. Enter the parameter of the profile script in the Profile Rule field which identifies the protocol and a profile URL. The default value is /spa$PSN.cfg.
Step 16. Enter the parameter of the profile script in the Profile Rule B field which identifies the second resync command and profile URL. The default entry is blank.
Step 17. Enter the parameter of the profile script in the Profile Rule C field which identifies the third resync command and profile URL. The default entry is blank.
Step 18. Enter the parameter of the profile script in the Profile Rule D field which identifies the fourth resync command and profile URL. The default entry is blank.
Step 19. Enter DHCP in the DHCP Option To Use field to get back the the firmware and profile.

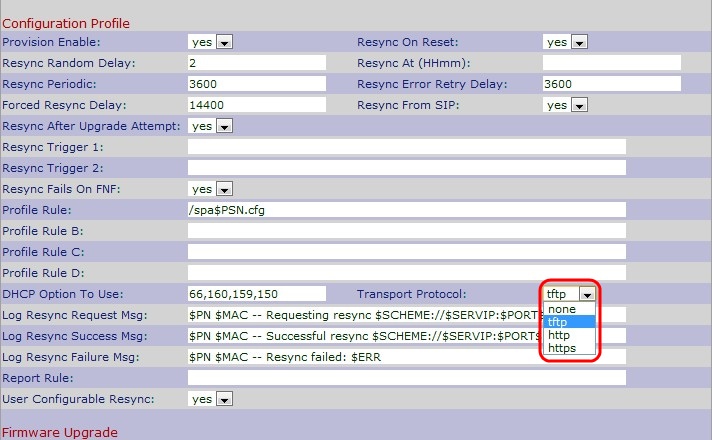
Step 20. Choose the desired transport protocol from the Transport Protocol drop-down list to get back firmware and profile. If you choose None TFTP will be assumed as profile and the IP address of the DHCP server will be used as the IP address of the TFTP server. The default option is None.
• None — TFTP will be assumed as profile and the IP address of the DHCP server will be used as the Ip address of the TFTP server. The default is None.
• TFTP — Trivial File Transfer Protocol (TFTP) is a simple protocol used for file and data transfer which use a very small amount of memory.
• HTTP — Hypertext Transfer Protocol (HTTP) is an application protocol which is the base of World Wide Web.
• HTTPS — Hypertext Transfer Protocol Secure (HTTPS) is a secure communication protocol.
Step 21. Enter the log resync request message in the Log Resync Request Msg field which will be sent to the syslog server when a resync will be started. The default is $PN $MAC – Requesting resync $SCHEME://$SERVIP:$PORT$PATH.
Step 22. Enter the log resync success message in the Log Resync Success Msg field which will be issued when the resync attempt is successful. The default is $PN $MAC –Successful resync $SCHEME://$SERVIP:$PORT$PATH -- $ERR.
Step 23. Enter the log resync failure message in the Log Resync Failure Msg field which will be issued when the resync attempt is failed. The default is $PN $MAC – Resyncfailed: $ERR.
Step 24. Enter the report in the Report Rule field to report the current internal configuration of the IP Phone. The default is empty.
Step 25. Choose Yes from the User Configurable Resync drop-down list to allow resync the phone from the IP Phone screen. Otherwise, choose No. The default is Yes.
Step 26. Click Submit All Changes to save the settings.
 Feedback