Configure Supplementary Services on SPA300/SPA500 Series IP Phones
Available Languages
Objective
Session Initiation Protocol (SIP) is a signaling protocol used to create, manage and terminate sessions in an IP based network. SIP is a mechanism for call management. It also allows for the establishment of user location and provides for feature negotiation so that all of the participants in a session can agree on the features to be supported among them, and enables the ability to change features of a session while it is in progress.
There are a lot of enhanced services, known as supplementary services or Star Services, that are available in SPA IP Phones. All these services are optional.
The objective of this article is to explain how to configure supplementary services on SPA300/SPA500 Series IP Phones.
Applicable Devices
• SPA300 Series IP Phone
• SPA500 Series IP Phone
Line Key LED Pattern Configuration
Note: On the actual SPA300 or SPA500 Series IP Phone, use the navigation keys to go to Device Administration > Call Control Settings > Signaling Protocol > SIP.
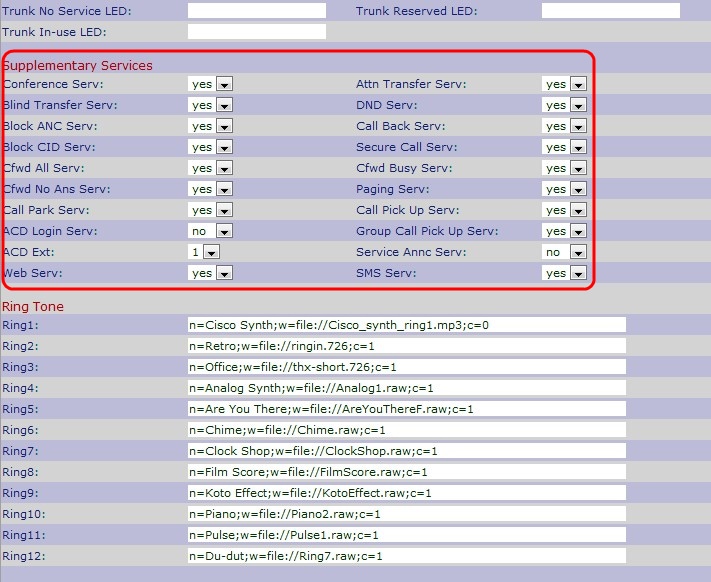
Step 1. Use the web configuration utility to choose Admin Login > Advanced > Voice > Phone. The Phone page opens:

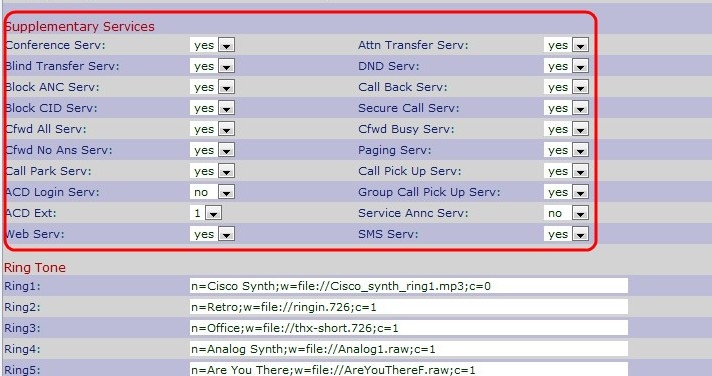
Step 2. Scroll Down to the Supplementary Services area.

Step 3. Choose Yes from the drop-down list in the Conference Serv field to enable three way conference services, otherwise choose No. The default option is Yes.
Step 4. Choose Yes from the drop-down list in the Attn Transfer Serv field to transfer the attended call service, otherwise choose No. The default option is Yes.
Step 5. Choose Yes from the drop-down list in the Blind Transfer Serv field to transfer the blind call service, else choose No. The default option is Yes.
Step 6. Choose Yes from the drop-down list in the DND Serv field to enable do-not-disturb service, else choose No. The default option is Yes.
Step 7. Choose Yes from the drop-down list in the Block ANC Serv field to block anonymous calls, else choose No. The default option is Yes.
Step 8. Choose Yes from the drop-down list in the Call Back Serv field to enable call back service, else choose No. The default option is Yes.
Step 9. Choose Yes from the drop-down list in the Block CID Serv field to block the caller ID of outbound calls, else choose No. The default option is Yes.
Step 10. Choose Yes from the drop-down list in the Secure Call Serv field to enable security in calls, else choose No. The default option is Yes.
Step 11. Choose Yes from the drop-down list in the Cfwd All Serv field to forward all calls, else choose No. The default option is Yes.

Step 12. Choose Yes from the drop-down list in the Cfwd Busy Serv field to forward a call when it is busy, else choose No. The default option is Yes.
Step 13. Choose Yes from the drop-down list in the Cfwd On No Ans Serv field to forward a call without any answer when it is busy, else choose No. The default option is Yes.
Step 14. Choose Yes from the drop-down list in the Paging Serv field list to enable paging, else choose No. The default option is Yes.
Step 15. Choose Yes from the drop-down list in the Call Park Serv field to enable call park, else choose No. The default option is Yes.
Step 16. Choose Yes from the drop-down list in the Call Pick Up Serv field to enable call pick up, else choose No. The default option is Yes.
Step 17. Choose Yes from the drop-down list in the ACD Login Serv field to enable ACD Login service which is used in call centers, else choose No. The default option is No.
Step 18. Choose Yes from the drop-down list in the Group Call Pick Up Serv field to receive group calls, else choose No. The default option is No.
Step 19. Choose appropriate extension from the drop-down list in the ACD Ext field to handle ACD calls. The available numbers are 1, 2, 3, 4, 5, and 6. You can configure your desired instructions under these numbers, which will handle the incoming calls and manage the calls according to your instructions. The default option is 1.
Step 20. Choose Yes from the drop-down list in the Service Annc Serv field to send an announcement request to the customer announcement server, else choose No. The default option is No.
Step 21. Choose Yes from the drop-down list in the Web Serv field to enable a web server, else choose No. The default option is Yes.
Note: Web Serv is applicable to only SPA525G and SPA525G2.
Step 22. Choose Yes from the drop-down list in the SMS Serv field to send a text message, else choose No. The default option is Yes.
Note: SMS Serv is applicable to only SPA525G and SPA525G2.
Step 23. Click Submit All Changes to save the settings.
 Feedback