Quick Setup for VOIP on SPA100 Series
Available Languages
Objective
A Voice over Internet Protocol (VoIP) is a method to carry voice calls over an Internet Protocol (IP) network such as the Internet. The administrator can use this page to configure the phone ports to ensure connectivity to the Voice over IP network. This article explains how to set up VoIP (Voice over IP) on the SPA100 Series when the user accesses the device for the first time.
Applicable Devices | Firmware Version
- SPA100 Series | 1.1.0 (Download latest)
VOIP Setup
Note: Internet connectivity is required to connect to the service provider network. The default settings of the ATA has automatic connectivity when a cable is connected from the WAN port of the ATA to a port on the router or broadband network device.
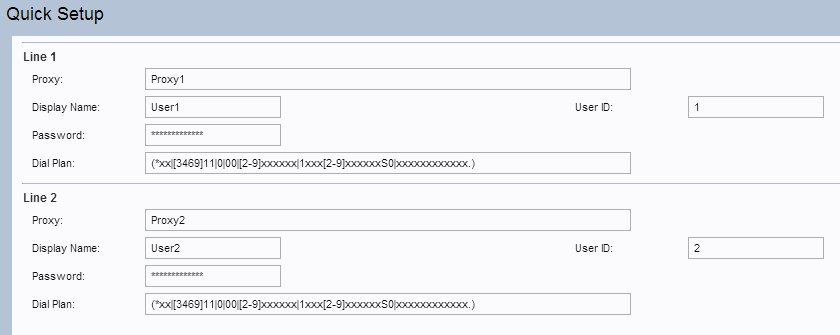
Step 1. Log in to the web configuration utility. The Quick Setup page is the very first page that opens:


Step 2. Enter a value in the Proxy field for Line 1. It is the domain name or URL of the service provider proxy server. Repeat the same for Line 2 if it is desired. The proxy name for both the fields should be different.

Step 3. Enter the display name to identify your account in the Display Name field for Line 1. It can also be used as a Caller ID name. Repeat the same for Line 2 if it is desired.

Step 4. Enter the User ID number to log in to your Internet account for Line1 user ID field. It can either be alphabetic or numeric. Repeat the same for Line2 if it is desired.

Step 5. Enter the desired password to log in to your Internet account for Line 1 in the Password field. Repeat the same for Line 2 if it is desired.

Step 6. Enter a dial plan that suits the administrator communication suite in the Dial Plan field. Otherwise the administrator can keep the default settings for Line 1 and Line 2.
Note: A dial plan contains a sequence of digits separated by the pipe character "I" The sequence is enclosed within parentheses. Each digit sequence in the dial plan include series of elements, which are individually matched to the keys that user presses. An example of a dial plan is: ([1-8]xx | 9, xxxxxxx | 9, <:1>[2-9]xxxxxxxxx | 8, <:1212>xxxxxxx | 9, 1 [2-9] xxxxxxxxx | 9, 1 900 xxxxxxx ! | 9, 011xxxxxx. | 0 | [49]11 )
- [1-8]xx — Allows a user dial any three-digit number that starts with the digits 1 through 8. If the system uses four-digit extensions, enter the alternative string: [1-8]xxx. This dial plan is associated with extensions on the system.
- 9, xxxxxxx — After the user presses 9, dial any seven-digit number, as in a local call. This dial plan is associated with local dialing with seven-digit number.
- 9, <:1>[2-9]xxxxxxxxx — This example is applicable where a local area code is required. After a user presses 9, enter a 10-digit number that begins with a digit 2 through 9. This dial plan is associated with local dialing with 3-digit area code and a 7-digit local number.
- 8, <:1212>xxxxxxx — This example is applicable where a local area code is required by the carrier but the majority of calls go to one area code. After the user presses 8, enter any seven-digit number. The system automatically inserts the 1 prefix and the 212 area code before transmitting the number to the carrier. This dial plan is associated with local dialing with an automatically inserted 3-digit area code.
- 9, 1 [2-9] xxxxxxxxx — After the user presses 9, enter any 11-digit number that starts with 1 and followed by a digit 2 through 9. This dial plan is associated with United States long distance call.
- 9, 1 900 xxxxxxx ! — This example is applicable to prevent users from dialing numbers that are associated with high tolls or inappropriate content, such as 1-900 numbers in the United States. After the user press 9, enter an 11-digit number. If the sequence starts with the digits 1900, the call is rejected. This dial plan is associated with blocked numbers.
- 9, 011xxxxxx. — After the user presses 9, enter any number that starts with 011. This dial plan is associated with international calls from the United States.
Step 7. Click Submit, the device is updated and the changes are configured.
Steps to Verify your Progress
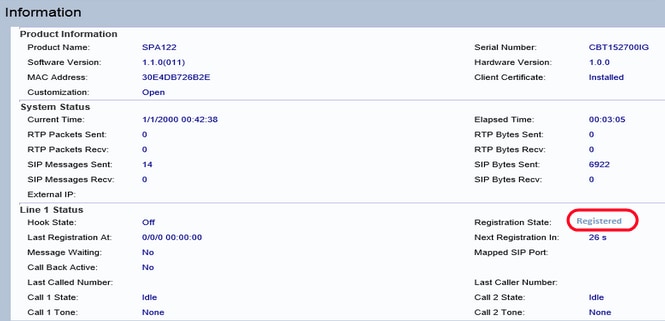
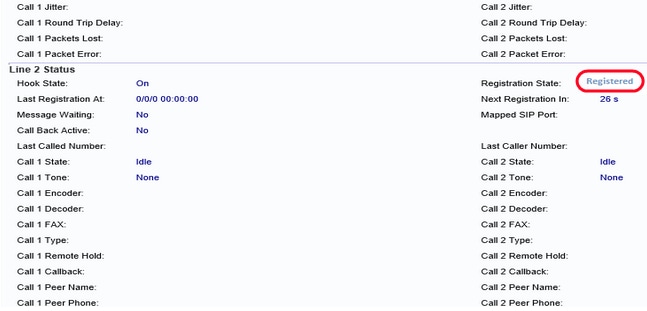
Step 1. Log in to the web configuration utility and choose Voice > Information to navigate to the Information page. Scroll down to the FXS1 or FXS2 Status section of the page. Verify that the Registration State is Registered. If the line is not registered, refresh the browser several times because it can take a few seconds for the registration to complete. Also verify that the Internet Settings and DNS server settings are configured based on the information from the ISP.


Step 2. Place an inbound call via external phone to the number which was assigned by the ITSP. If the phone rings, two-way audio on the call is enabled.