Add Port Forwarding on SPA122 Analog Telephone Adapter
Available Languages
Objective
Port Forwarding sets up public services on your network, such as web servers, FTP servers, e-mail servers, or other specialized Internet applications. It allows certain network applications to be accessed over the Internet which are remotely connected within a private network. It uses an external port and an internal port to forward the data. The administrator can use this feature to run a public HTTP server within a private LAN. The objective of this article is to explain how to configure the port forwarding manually on the SPA122 phone adapter.
Applicable Devices
• SPA122 Analog Telephone Adapter
Software Version
• v1.1.0
Port Forwarding
Step 1. Log in to the web configuration utility and choose Network Setup > Application > Port Forwarding. The Port Forwarding page opens.


Step 2. Click Add Entry to add a new entry for port forwarding.
Note: There are two types of Port Forwarding, Single Port Forwarding and Port Range Forwarding .
Single Port Forwarding

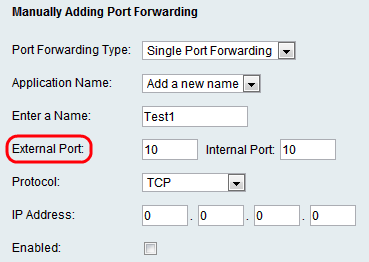
Step 1. Choose Single Port Forwarding from the Port Forwarding Type drop-down list. Single Port Forwarding forwards traffic for a specified port on to the same or to an alternative port on the target server in the LAN.

Step 2. Choose a standard application from the Application Name drop-down list. The standard applications are FTP, Telnet, SMTP, DNS, TFTP, Finger, HTTP, POP3, NNTP, and SNMP.
Note: Choose Add a new name from the drop down-list to enter an application that is not on the list. Then, enter the name of the new application. If the administrator chooses the standard application, fields such as Enter a Name, External port, Internal Port and Protocol are predetermined.
Time Saver: If the administrator chooses a standard application in Step 2 then move to Step 6.

Step 3. Enter the name of the Internet application in the Enter a Name field.

Step 4. Enter the internal port that you wish to forward in the Internal Port field, and the port to which you wish to forward it in the External port field.

Step 5. The Protocol field represents which protocol the port uses to send and receive the data. Choose the appropriate protocol from the Protocol drop-down list. The possible options are TCP, UDP, or TCP and UDP.

Step 6. Enter the static IP address of the server in the IP Address field.

Step 7. Check the Enabled check box to enable the application that is defined.
Step 8. Click Submit. The changes are configured and the device is updated.
Port Range Forwarding
Step 1. Choose Port Range Forwarding from the Port Forwarding drop-down list. Port Range Forwarding forwards traffic from a range of ports to the same ports on the target server in the LAN.

Step 2. Enter the name of the Internet application in the Enter a Name field.

Step 3. Enter the start and end port numbers that are used by the server or Internet application in the Start - End Port fields.

Step 4. The Protocol field represents which protocol the port uses to send and receive the data. Choose the appropriate protocol from the Protocol drop-down list. The possible options are TCP, UDP, or TCP and UDP.

Step 5. Enter the static IP address of the server in the IP Address field.

Step 6. Check the Enabled check box to enable the application that is defined.
Step 7. Click Submit. The changes are configured and the device is updated.
Contact Cisco
- Open a Support Case

- (Requires a Cisco Service Contract)

 Feedback