Create Wireless Local Area Network Via Web or Via App
Available Languages
Objective
The objective of this article is to create, view, and enable/disable a Wireless Local Area Network (WLAN) network using the Web User Interface (UI) of a Cisco Business Wireless (CBW) Primary Access Point (AP).
If you are unfamiliar with terms in this document, check out Cisco Business: Glossary of New Terms.
If you would like to learn the basics of mesh networking, check out:
- Cisco Business: Welcome to Wireless Mesh Networking
- Cisco Business Wireless: Frequently Asked Questions
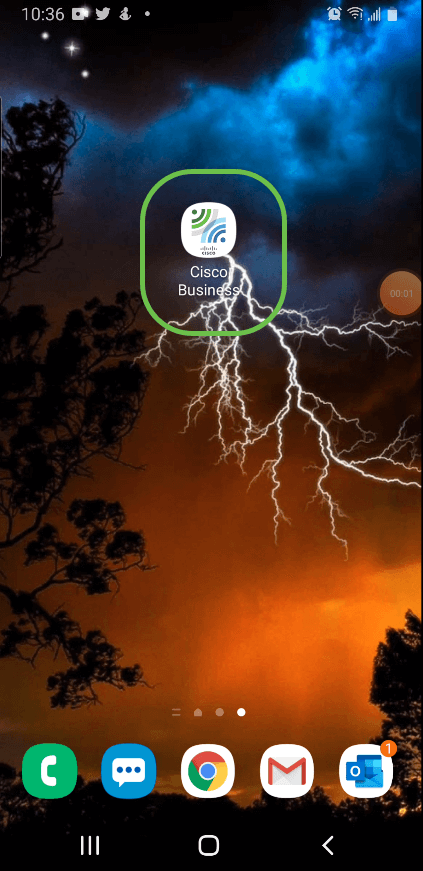
To create a WLAN using a mobile device application instead of the Web UI, click the toggle at the top of the article.
Applicable Devices | Firmware Version
- 140AC (Data Sheet) | 10.0.1.0 (Download latest)
- 145AC (Data Sheet) | 10.0.1.0 (Download latest)
- 240AC (Data Sheet) | 10.0.1.0 (Download latest)
Introduction
CBW APs are 802.11 a/b/g/n/ac (Wave 2) based, with internal antennas. These APs support the latest 802.11ac Wave 2 standard for higher performance, greater access, and higher-density networks.
This article uses the equipment for a mesh network. A CBW mesh network must include a Primary AP (140AC, 145AC, or 240AC) and at least one Mesh Extender.
When setting up a wireless network, creating a WLAN is essential!
Configuration Steps
Beginner Help
This toggled section highlights tips for beginners.
Logging In
Log into the Web User Interface (UI) of the Primary AP. To do this, open a web browser and enter https://ciscobusiness.cisco. You may receive a warning before proceeding. Enter your credentials.You can also access the Primary AP by entering https://[ipaddress] (of the Primary AP) into a web browser.
Tool Tips
If you have questions about a field in the user interface, check for a tool tip that looks like the
following: ![]()
Trouble locating the Expand Main Menu icon?
Navigate to the menu on the left-hand side of the screen, if you don’t see the menu button, click
this icon to open the side-bar menu.
Frequently Asked Questions
If you still have unanswered questions, you can check our frequently asked questions document. FAQ
Step 1
Power up the Access Point if it isn’t already on. Check the status of the indicator lights. When the LED light is blinking green, proceed to the next step.
Booting up the access point will take about 8–10 minutes. The LED will blink green in multiple patterns, alternating rapidly through green, red, and amber before turning green again. There may be small variations in the LED color intensity and hue.
Step 2
Log into the WEB UI of the Primary AP. Open a web browser and enter https://ciscobusiness.cisco. You may receive a warning before proceeding. Enter your credentials.
You can also access the WEB UI by entering the IP address of the Primary AP into a web browser or you can use the Cisco Business Wireless app for minor configuration changes.
Step 3
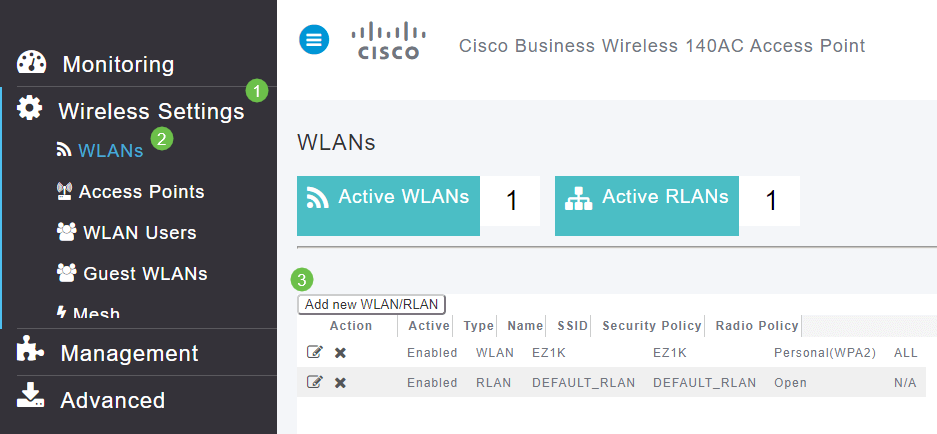
A WLAN can be created by navigating to Wireless Settings > WLANs. Then select Add new WLAN/RLAN.

Step 4
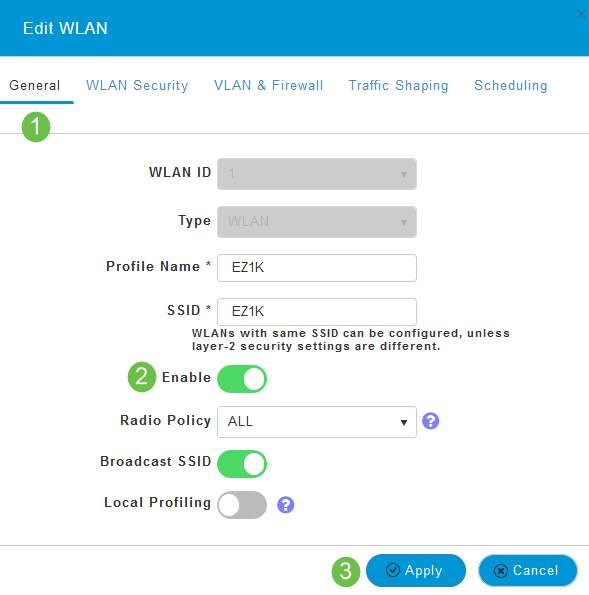
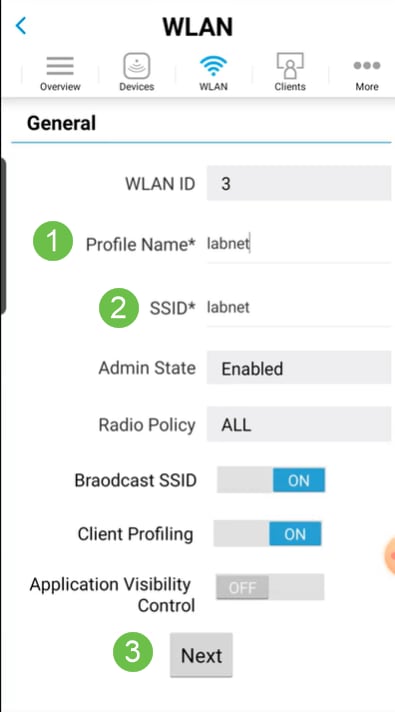
Under the General tab, enter the following information:
- WLAN ID – Select a number for the WLAN
- Type – Select WLAN
- Profile Name – When you enter a name, the SSID will auto-populate with the same name. The name must be unique and should not exceed 31 characters.
The following fields were left as default in this example, but explanations are listed in case you would like to configure them differently.
- SSID – The profile name also acts as the SSID. You can change this if you would like. The name must be unique and should not exceed 31 characters.
- Enable – This should be left enabled for the WLAN to work.
- Radio Policy – Typically you would want to leave this as All so that 2.4GHz and 5GHz clients can access the network.
- Broadcast SSID – Usually you would want the SSID to be discovered so you would want to leave this as Enabled.
- Local Profiling – You would only want to enable this option to view the Operating System that is running on the Client or to see the User name.
Click Apply.

Step 5
You will be taken to the WLAN Security tab.
In this example, the following options were left as the default:
- Guest Network, Captive Network Assistant, and MAC Filtering were left disabled.
- WPA2 Personal – Wi-Fi Protected Access 2 with Pre-shared Key (PSK) Passphrase Format – ASCII. This option stands for Wi-Fi Protected Access 2 with Pre-Shared Key (PSK).
WPA2 Personal is a method used for securing your network with the use of a PSK authentication. The PSK is configured separately both on the Primary AP, under the WLAN security policy, and on the client. WPA2 Personal does not rely on an authentication server on your network.
- Passphrase Format - ASCII is left as default.
The following fields were entered in this scenario:
- Show Passphrase – click the checkbox to be able to see the Passphrase you enter.
- Passphrase – Enter a name for the Passphrase (password).
- Confirm Passphrase – Enter the password again to confirm.
Click Apply. This will automatically activate the new WLAN.

Step 6
Be sure to save your configurations by clicking the Save icon on the top right panel of the WEB UI screen.

View the WLAN
To view the WLAN you created, select Wireless Settings > WLANs. You will see the number of Active WLANs raised to 2, and the new WLAN is displayed.

Enable or Disable a WLAN
When you clicked Apply at the end of setting up your WLAN, the WLAN automatically activated. If you ever need to disable the WLAN or enable a WLAN that has been disabled, follow these steps.
Step 1
Navigate to Wireless Settings > WLANs/RLANs. Click the Edit icon adjacent to the WLAN you want to enable or disable.

Step 2
In the Edit WLAN/RLAN window, under General, select Enabled or Disabled to enable/disable WLAN/RLAN. Click Apply.

Step 3
Be sure to save your configurations by clicking the Save icon on the top right panel of the WEB UI screen.

Conclusion
You have now created a WLAN on your CBW Network. Enjoy, and feel free to add more if it fits your needs.


