Port Configuration with RLANs in a CBW Network
Available Languages
Objective
The objective of this article is to create a Remote Local Area Network (RLAN) network and assign ports and access point groups on a Cisco Business Wireless (CBW) Primary Access Point (AP).
Applicable Devices | Software Version
- 145AC (Data Sheet) | 10.4.1.0 (Download latest)
- 240AC (Data Sheet) | 10.4.1.0 (Download latest)
Introduction
CBW APs are 802.11 a/b/g/n/ac (Wave 2) based, with internal antennas. These APs support the latest 802.11ac Wave 2 standard for higher performance, greater access, and higher-density networks.
The 145AC and 240AC APs referenced in this article have the ability to be used in a traditional or mesh network. This article uses the equipment for a traditional wireless network.
If you would like to learn the basics of mesh networking, check out Cisco Business: Welcome to Wireless Mesh Networking.
If you prefer to do port configuration in a mesh network, read Configure Ethernet Ports of Cisco Business Wireless Access Point in Mesh Mode.
In a traditional wireless network, an RLAN is used for authenticating wired clients using the primary AP. Once the wired client successfully joins the Primary AP, the LAN ports switch the traffic between central or local switching modes. The traffic from the wired client is treated as wireless client traffic.
The RLAN sends the authentication request to authenticate the wired client. The authentication of the wired client in an RLAN is similar to the central authenticated wireless client.
If you only need one Virtual Local Area Network (VLAN), you do not need to configure an RLAN. One RLAN comes on the AP by default, Native VLAN 1. It has open security, and all ports are assigned to this RLAN by default.
If you are unfamiliar with the terms used, check out Cisco Business: Glossary of New Terms.
RLANs do not work in a mesh network. Mesh is not enabled by default, so unless you previously had the AP running in mesh mode, you are set to go.
Configuration Steps
Beginner Help
This toggled section highlights tips for beginners.
Logging In
Log into the Web User Interface (UI) of the Primary AP. To do this, open a web browser and enter https://ciscobusiness.cisco. You may receive a warning before proceeding. Enter your credentials.You can also access the Primary AP by entering https://[ipaddress] (of the Primary AP) into a web browser.
Tool Tips
If you have questions about a field in the user interface, check for a tool tip that looks like the
following: ![]()
Trouble locating the Expand Main Menu icon?
Navigate to the menu on the left-hand side of the screen, if you don’t see the menu button, click
this icon to open the side-bar menu.
Cisco Business App
These devices have companion apps that share some management features with the web user interface. Not all features in the Web user interface will be available in the App.
Frequently Asked Questions
If you still have unanswered questions, you can check our frequently asked questions document. FAQ
Step 1
Power up the access point if it isn’t already on. Check the status of the indicator lights. When the LED light is blinking green, proceed to the next step.
Step 2
Log into the Web User Interface (UI) of the Primary AP. Open a web browser and enter https://ciscobusiness.cisco You may receive a warning before proceeding. Enter your credentials.
You can also access it by entering the IP address of the Primary AP into a web browser.
Step 3
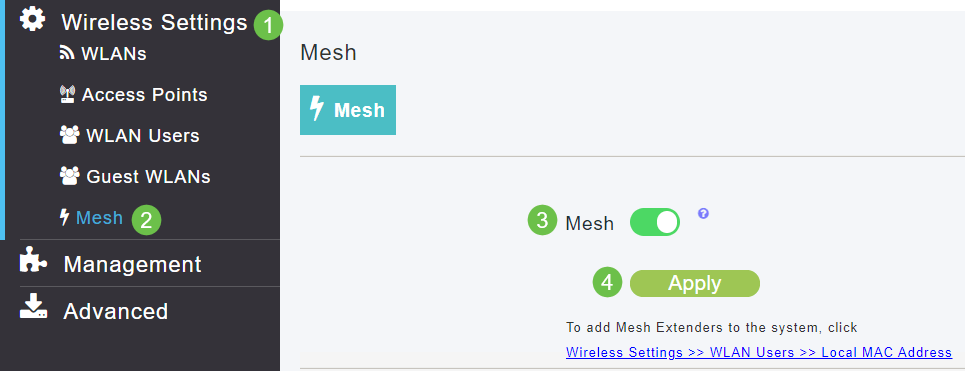
The AP can’t be in mesh mode for an RLAN to work. To turn mesh mode off, navigate to Wireless Settings > Mesh. Select to turn mesh off. If your AP is new or you know that mesh mode is not on, you can move on to Step 7.
Step 4
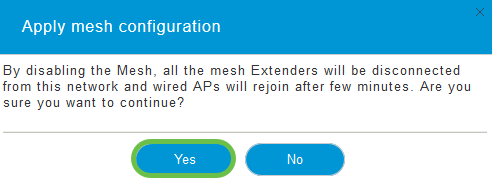
Confirm that you want to turn off mesh mode by clicking Yes.
Step 5
Be sure to save your configurations by clicking the Save icon on the top-right panel of the Web UI screen.

Step 6
Confirm the Save by clicking OK. The AP will reboot. This will take 8-10 minutes to complete.

Step 7
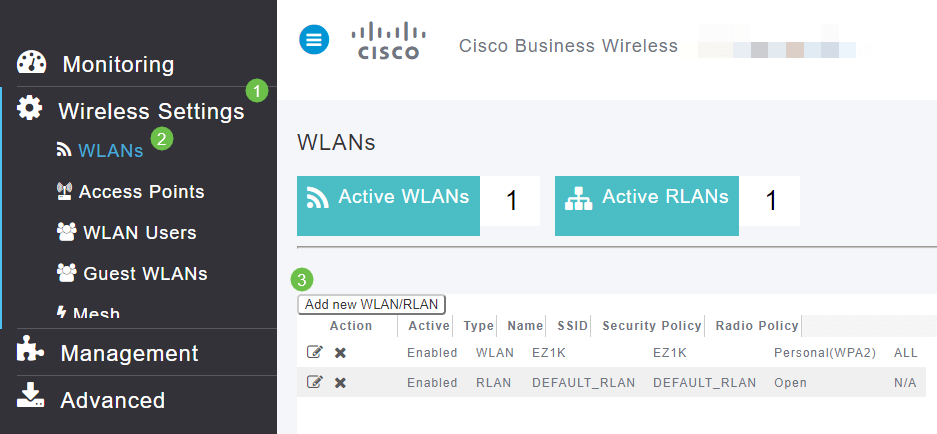
An RLAN can be created by navigating to Wireless Settings > WLANs. Then select Add new WLAN/RLAN.
Step 8
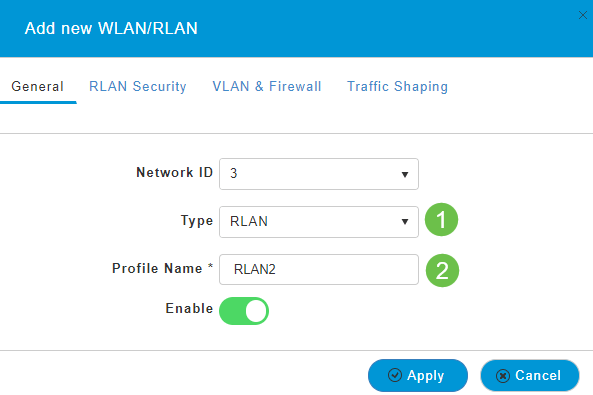
Select RLAN. Create a name for the Profile.
Step 9 (Using Open Security)
Under the RLAN Security tab. Under Security Type, you can select Open or 802.1X.
In this example, the Security Type was left as the default.
Click Apply. This will automatically activate this Open Security RLAN. Skip to Step 11.

Step 10a (Using 802.1X Security)
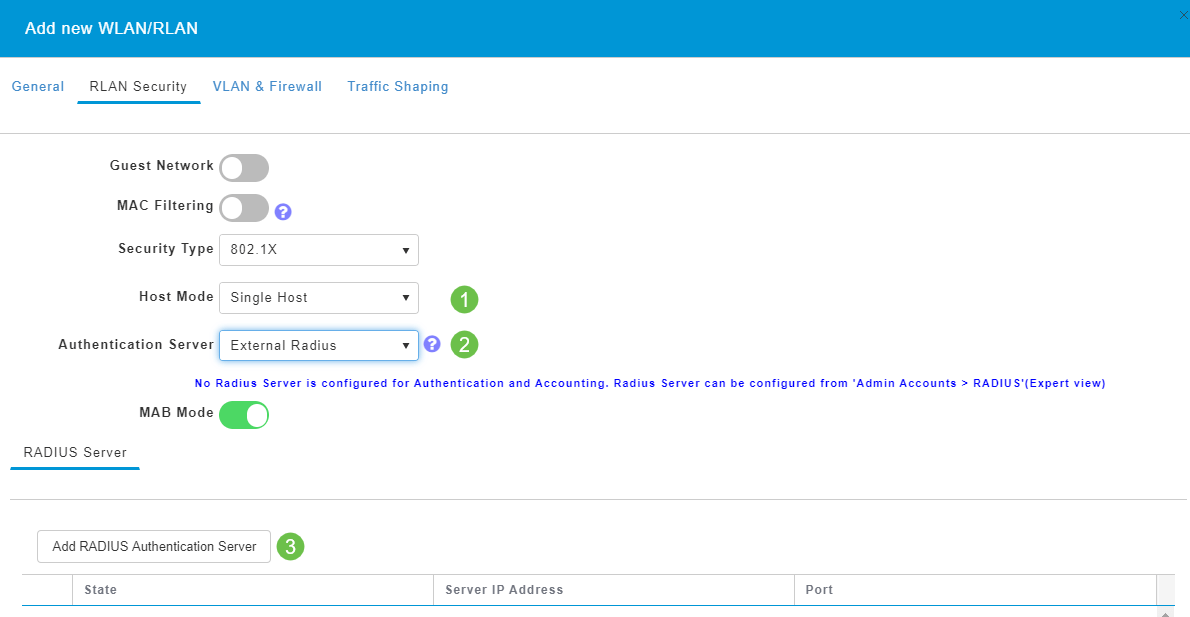
For setting up External Radius, you must have a Radius Server configured in Admin Accounts under RADIUS in Expert View. Click on the arrow icon on the top-right menu of the Web UI to switch to Expert View. For details on setting up a RADIUS server, check out Radius

Step 10b (Using 802.1X Security)
If you choose 802.1X for the Security Type, more options must be selected. You need to select the following:
- Host Mode - Single Host or Multi-Host
- Authentication Server - External Radius or AP
- MAB Mode – Enabled or Disabled. To add MAC addresses, follow the instructions in the next step.
Step 11 (Optional)
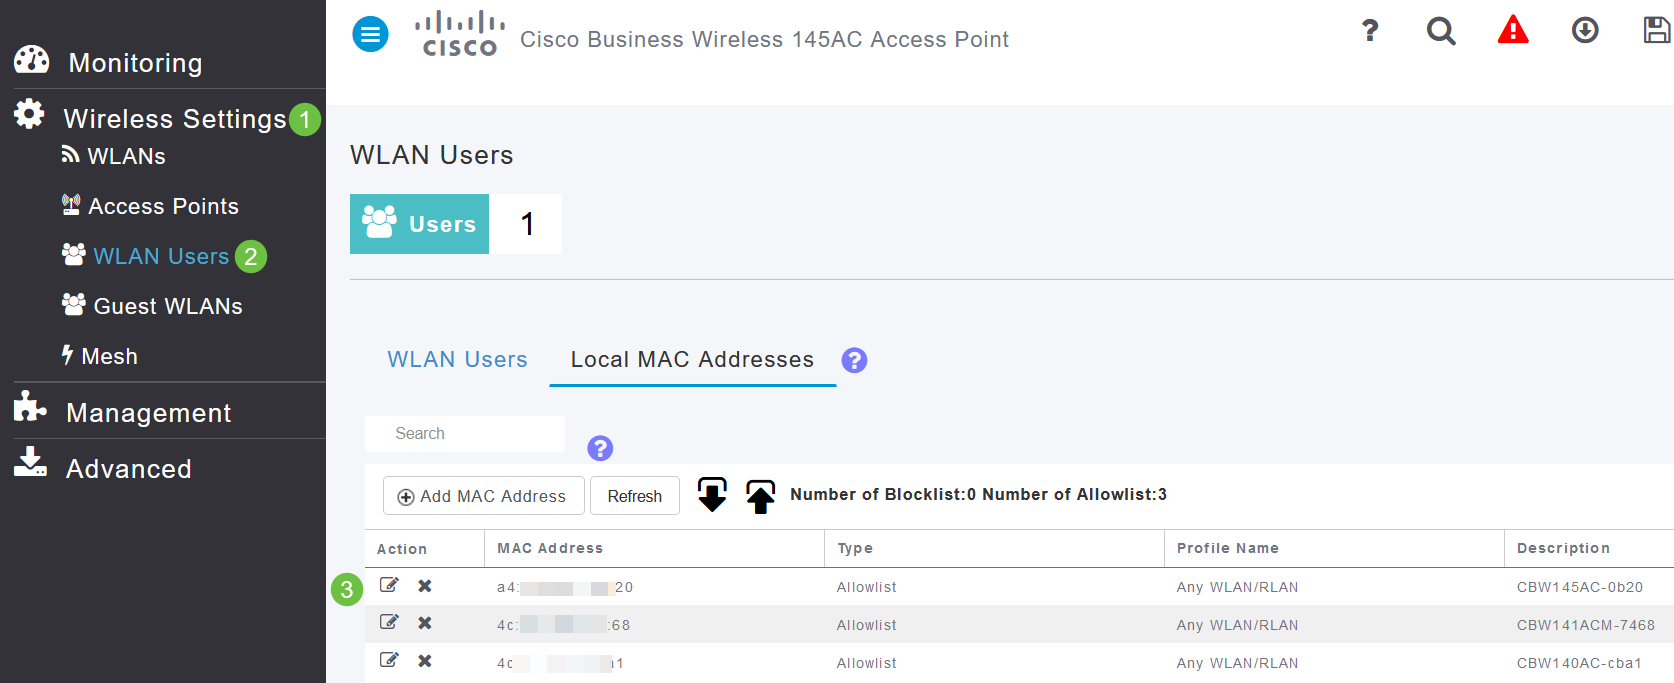
MAC Authentication Bypass (MAB) Mode means that if you have a MAC address listed under WLAN Users, the device doesn’t need to authenticate. The listed MAC addresses can bypass authentication to be given either automatic access to the network or automatically denied. This would be useful in a case where an IP phone is plugged into a PoE port on a switch.
You can label each MAC address one of two ways:
- Allowlisted – The device receives automatic access.
- Blocklisted – The device will automatically be denied access.
Step 12
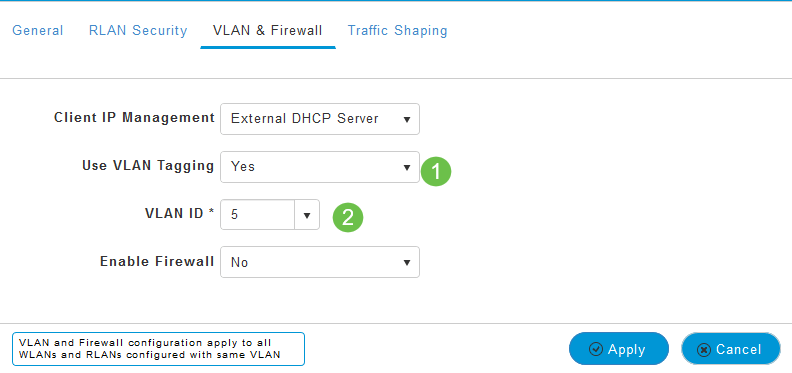
Under the VLAN & Firewall tab, you can select to Use VLAN Tagging and select a VLAN ID number.
Step 13 (Optional)
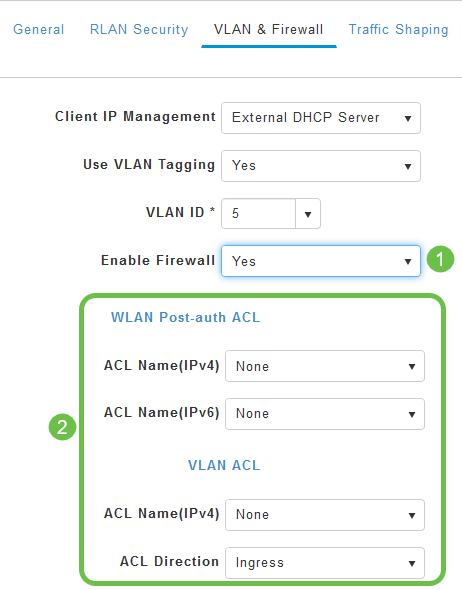
You can select Enable Firewall if you want to configure Access Control Lists (ACLs) which allows you to allow or reject access for specific IP addresses or VLANs. This is used if someone is plugging into the network port device to connect to the network.
Step 14 (Optional)
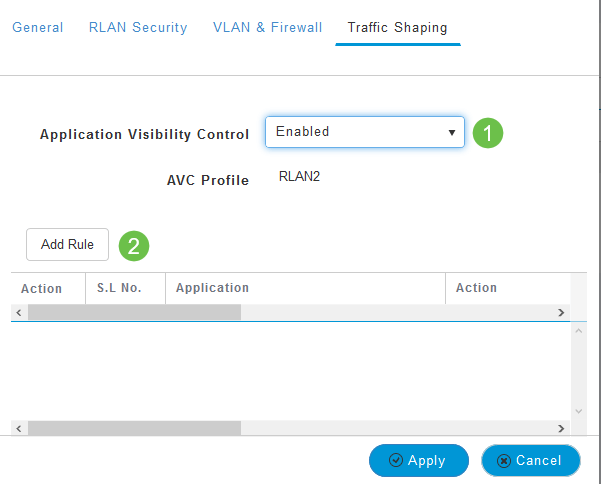
Under the Traffic Shaping tab, you can configure traffic shaping by Enabling Application Visibility Control. This sets traffic prioritization.
Step 15 (Optional)
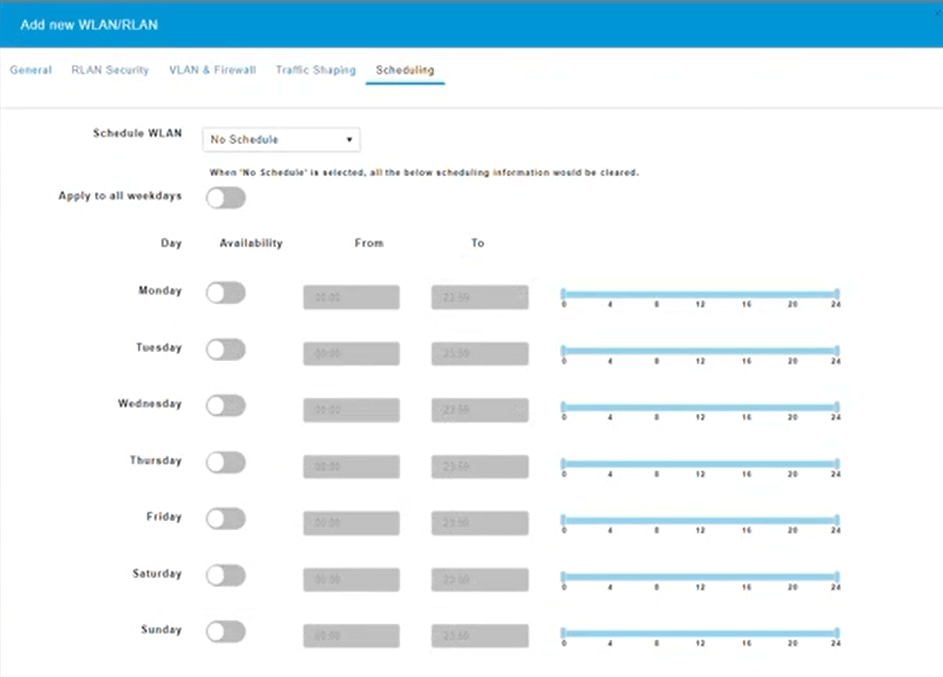
Under the Scheduling tab, you can select a schedule. This sets the times that the port will have the ability to be connected to the network.
Step 16 (Optional)
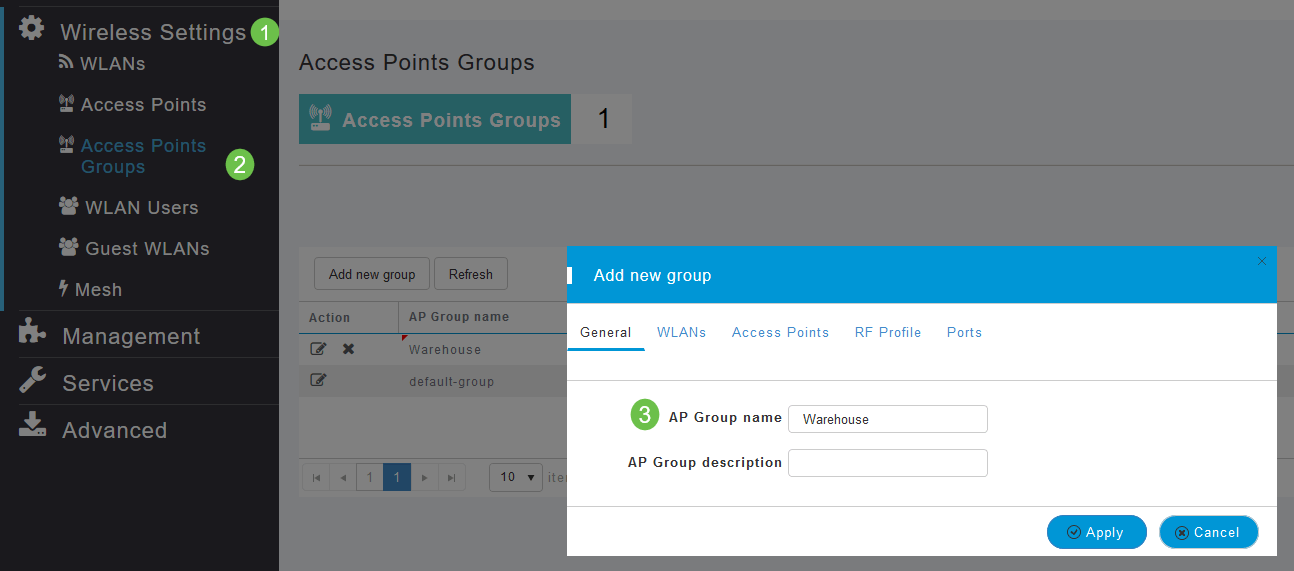
Now that the RLAN is created, you can navigate to Wireless Settings > Access Point Groups. This is where you can add or edit groups. To view this screen, you need to be in Expert View, which you selected in Step 10a.
Step 17
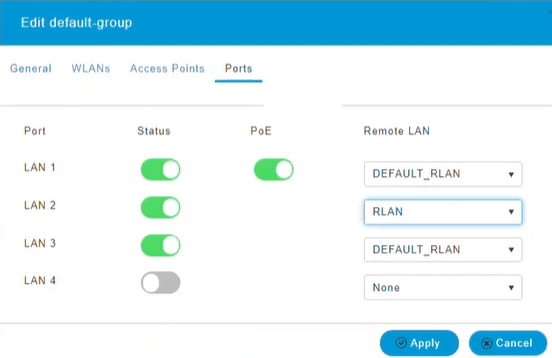
Under the Ports tab, you can assign the Ports on the AP to specific Remote LANs.
Step 18
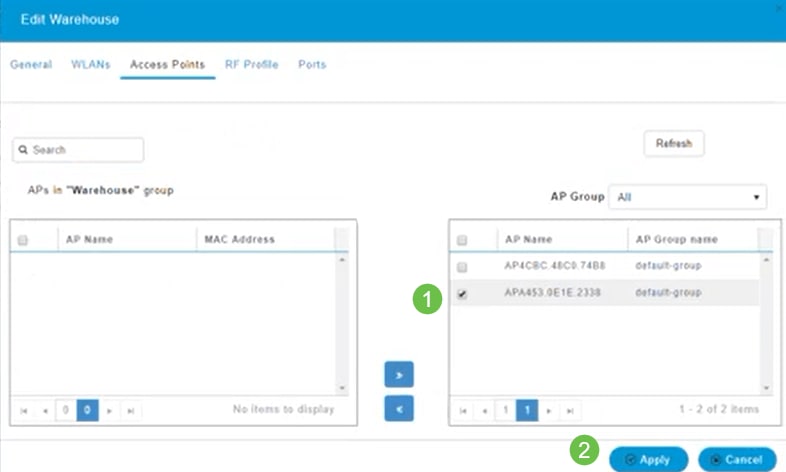
Under the Access Points tab, you need to assign a particular access point to that Access Point Group. Click Apply.
Step 19
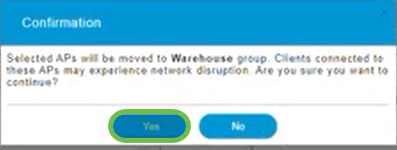
Select Yes to confirm.
Step 20
Be sure to save your configurations by clicking the Save icon on the top-right panel of the Web UI screen.

Step 21
Confirm the Save by clicking OK. The AP will reboot. This will take 8-10 minutes to complete.

View the RLAN
To view the RLAN you created, select Wireless Settings > WLANs. You will see the number of Active RLANs raised to 2 and the new RLAN is listed.

Edit the RLAN
When you clicked Apply at the end of setting up your RLAN, the RLAN automatically activated. If you ever need to disable the RLAN or make any other changes, follow these simple steps below.
Step 1
Select Wireless Settings > WLANs. Click on the edit icon.

Step 2
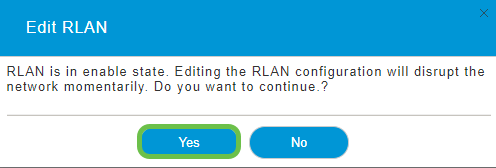
You will receive a Pop-up notifying you that editing the RLAN will disrupt the network momentarily. Confirm that you want to continue by clicking Yes.
Step 3 (Enable/Disable)
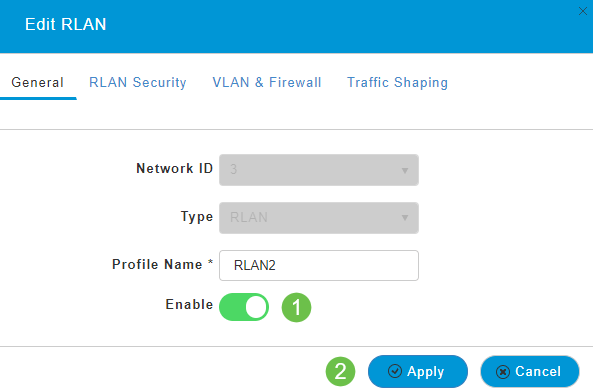
In the Edit WLAN/RLAN window, under General, select Enabled or Disabled to enable/disable the RLAN. Click Apply.
Step 4 (Editing other Settings)
Navigate to the RLAN Security, VLAN & Firewall, or Traffic Shaping tabs if you need to change settings. Click Apply once you have made changes.

Step 5
Be sure to save your configurations by clicking the Save icon on the top-right panel of the Web UI screen.

Conclusion
You have now created an RLAN on your CBW Network. Enjoy, and feel free to add more if it fits your needs.