Configure Time Settings in Cisco Business Wireless Access Point
Available Languages
Objective
The objective of this document is to show you how to configure time settings on your Cisco Business Wireless (CBW) Access Point (AP) either manually or automatically.
Applicable Devices | Software Version
- 140AC (Data Sheet) | 10.0.1.0 (Download latest)
- 145AC (Data Sheet) | 10.0.1.0 (Download latest)
- 240AC (Data Sheet) | 10.0.1.0 (Download latest)
Introduction
The CBW APs support the latest 802.11ac Wave 2 standard for higher performance, greater access, and higher-density networks. They deliver industry-leading performance with highly secure and reliable wireless connections, for a robust, mobile end-user experience.
The Time Settings page on the AP is used to set the system time manually or to configure the system to acquire its time settings from a preconfigured Network Time Protocol (NTP) server. By default, the AP is configured to obtain its time from a predefined list of NTP servers.
Why do we need to configure Time Settings on a device?
Configuring the time settings on your AP is important because it can help troubleshoot network issues such as system log services that display each and every log entry with a time stamp. Without synchronized time, accurate correlation of log files between devices is difficult to maintain.
The system time can be configured either manually or automatically. Manual configuration is helpful when your network is not connected to a NTP server. NTP is used to synchronize the client or server time with another server time or reference time source.
If you are ready to configure time settings on your CBW AP, let’s get started!
Setting Date and Time
The date and time on the CBW Master AP is first set when running the initial configuration setup wizard. You can enter the date and time manually or you can specify a NTP server that sets the time and date.
Configuring Date and Time Manually
Step 1
Login to the CBW AP using a valid username and password.

Step 2
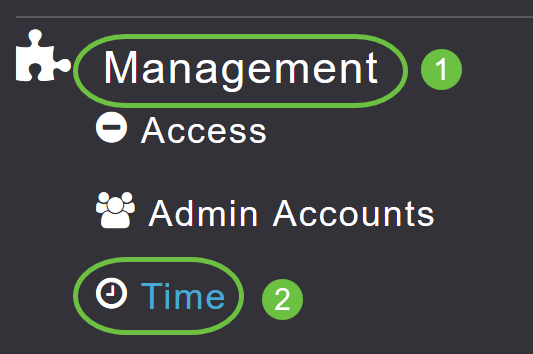
Choose Management > Time.

Step 3
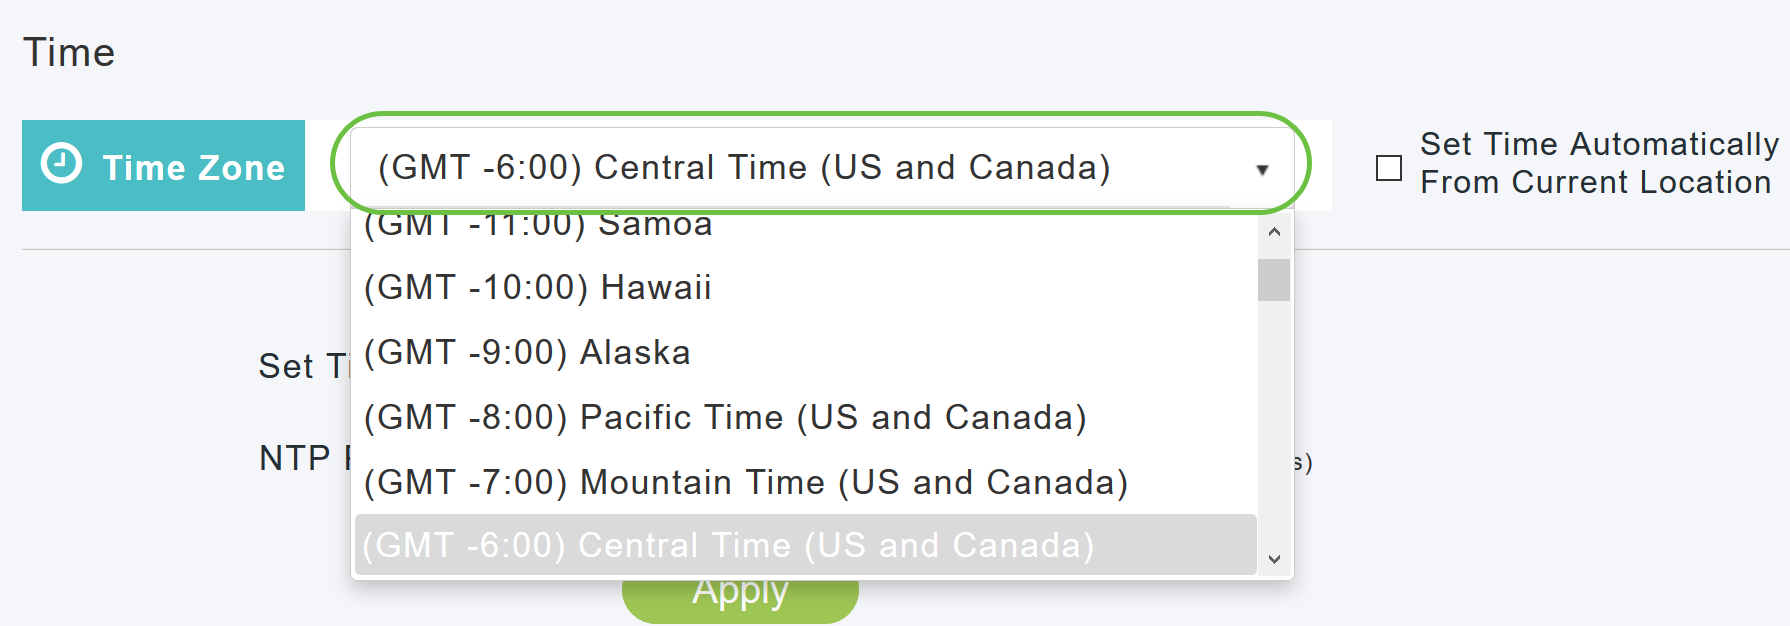
From the Time Zone drop-down list, choose your local time zone. When you choose a time zone that uses Daylight Saving Time (DST), the automatically sets its system clock to reflect the time change when DST occurs.

In the U.S., DST starts on the second Sunday in March and ends on the first Sunday in November.
Step 4
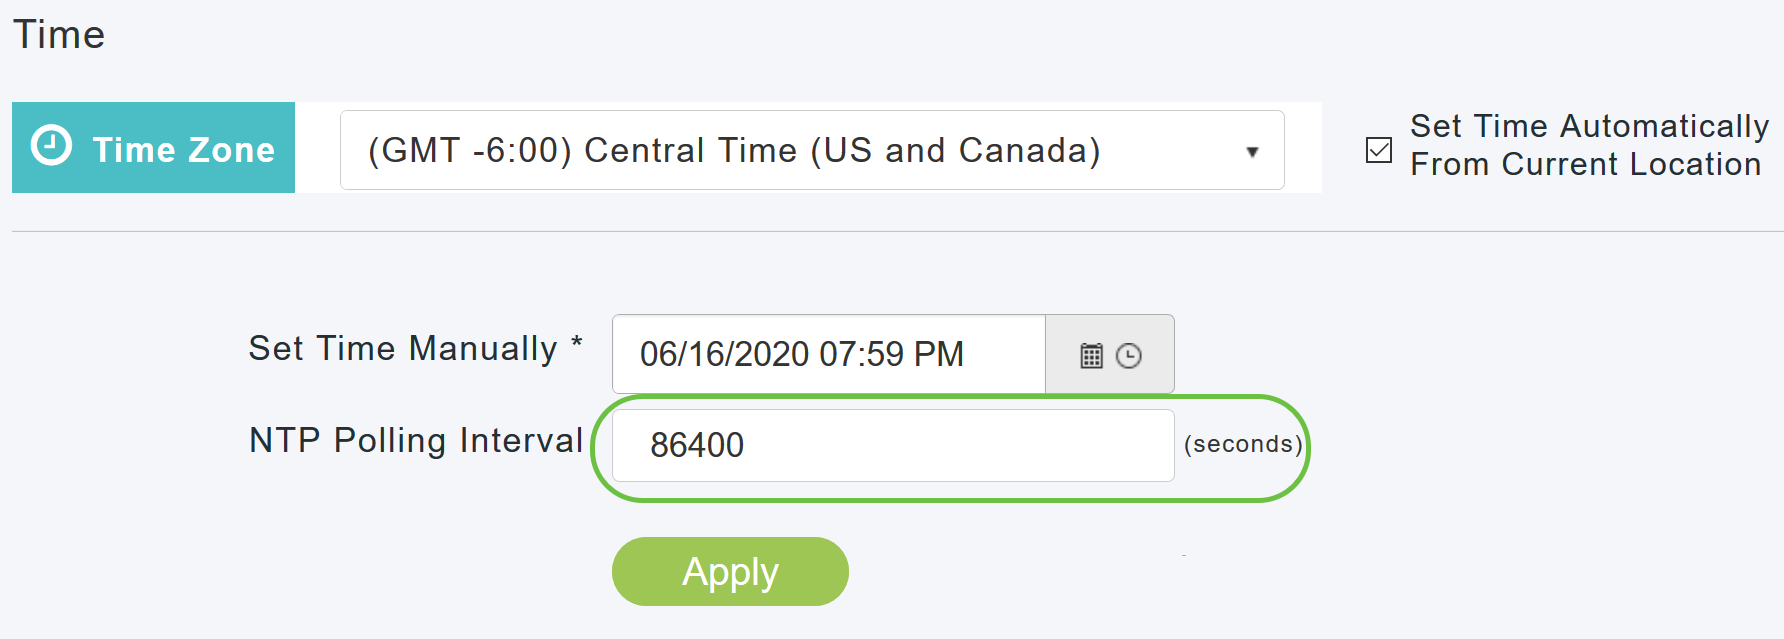
Select the Set Time Automatically from Current Location checkbox to set the time based on the time zone specified.

Step 5
In the Set Time Manually field:
- Click the calendar icon and choose the month, day, and year.
- Click the clock icon and specify the time, in hour and minutes.


Step 6
Click Apply.

Using NTP Servers to Automatically Set the Date and Time
You can have upto three NTP servers, to which the Master AP can automatically sync to set the date and time.
By default three NTP servers are automatically created. The default fully qualified domain names (FQDN) of the NTP servers are:
- 0.ciscome.pool.ntp.org, with NTP Index value 1
- 1.ciscome.pool.ntp.org, with NTP Index value 2
- 2.ciscome.pool.ntp.org, with NTP Index value 3
Adding and Editing NTP Servers
Step 1
Choose Management > Time.

The Time Settings window is displayed, with the set timezone shown at the top of the page. The current date and time are displayed in the Set Time Manually field. Existing NTP servers, if any, are listed in the order of their NTP Index values.
Step 2
In the NTP Polling Interval field, specify the polling interval, in seconds.

Step 3
To edit an existing NTP server, click its adjacent Edit icon.

To add a new NTP server, click Add New NTP Server.

Step 4
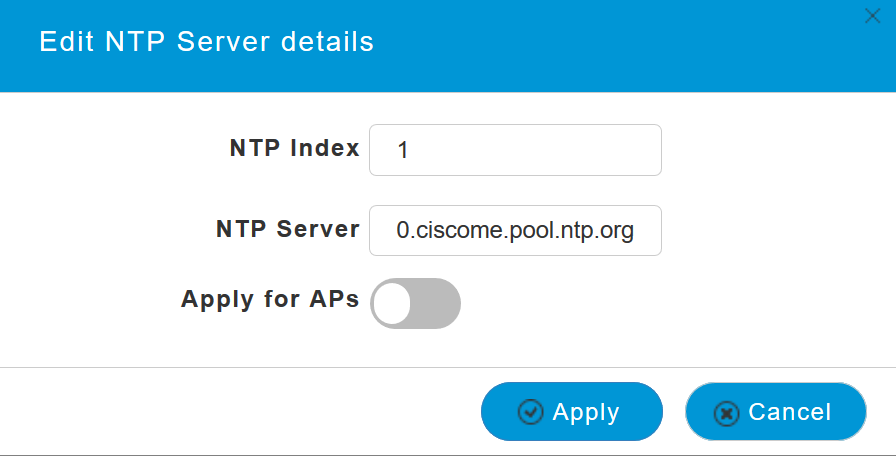
You can add or edit the following values for an NTP server:
NTP Index – Specify an NTP Index value to set the priority of the NTP server. NTP Index values can be set from 1 to 3, in the order of decreasing priority. The Master AP will try and sync with the NTP server with the highest priority first, until the specified polling interval time runs out. If the sync is successful, the Master AP will not continue trying to sync with any of the remaining NTP servers. If the sync is unsuccessful, then the Master AP will try to sync with the next NTP server.
NTP Server – Specify the IPv4 address or the FQDN for the NTP server. When you specify an FQDN, a DNS lookup is done. If the lookup fails, an error will be logged in the Syslog server. The Master AP will continue to resolve this FQDN and errors will be logged until you change the NTP configuration or specify a valid FQDN.

Step 5
Click Apply.

NTP Server Status
The NTP server table on the Time settings page, displays the status of the connection to each NTP server in the NTP Status column. The status may be one of the following:
- Not Tried - A sync has not been attempted yet.
- In Sync - The Master AP time is in sync with the NTP server.
- Not Synched - The Master AP time is not in sync with the NTP server.
- In Progress - A sync is being attempted.

Deleting and Disabling NTP Servers
To delete an NTP server
Step 1
Choose Management > Time.

Step 2
In the Time settings page, click the Delete icon adjacent to the NTP server you want to delete.

Step 3
Click OK in the confirmation dialog.

To disable the option of setting up the date and time using NTP servers, you will need to delete all configured NTP servers by following the above process.
Conclusion
You are all set! You have now successfully configured the time settings in your CBW AP.