HTTP/HTTPS Service Configuration and Management of Secure Socket Layer (SSL) Certificate on the WAP121 and WAP321 Access Points
Available Languages
Objective
The access point can be managed through both HTTP and HTTP Secure (HTTPS) connections when the HTTP/HTTPS servers are configured. Hyper Text Transfer Protocol Secure (HTTPS) is a more secure transfer protocol than HTTP. Some web browsers use HTTP while others use HTTPS. An Access Point must have a valid SSL certificate to use HTTPS service. An SSL certificate is a digitally signed certificate by a certificate authority that allows the web browser to have a secure encrypted communication with the web server.
This article explains how to configure the HTTP/HTTPS Service on the WAP121 and WAP321 access points.
Applicable Devices
• WAP121
• WAP321
Software Version
• 1.0.3.4
HTTP/HTTPS Service
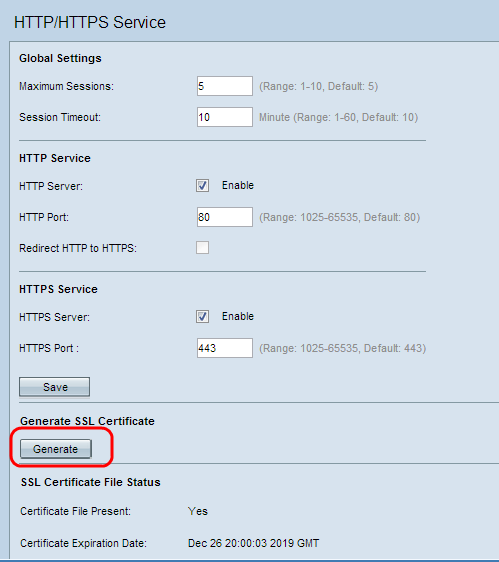
Step 1. Log in to the web configuration utility and choose Administration > HTTP/HTTPS Service. The HTTP/HTTPS Service page opens:

Step 2. Enter the maximum number of web sessions which includes the HTTP and HTTPS session to be in used at the same time in the Maximum Sessions field. A session is created each time a user logs on to the device. If the maximum session is reached then the next user who attempts to log on into the device with HTTP or HTTPS service is rejected.
Step 3. Enter the maximum amount of time in minutes that an inactive user remains logged on to the AP web interface in the Session Timeout field.

Step 4. Check the Enable check box in the HTTP Server field to enable web access via HTTP.
Note: If the HTTP Server is disabled, any current connections that use HTTP will be disconnected.
Step 5. Enter the port number to use for HTTP connections in the HTTP Port field. The port number ranges from 1025 to 65535.
Step 6. (Optional) To redirect management HTTP access attempts on the HTTP port to the HTTPS port, check the Redirect HTTP to HTTPS check box. This field is available only when HTTP access is disabled.
Step 7. Check the Enable check box of the HTTPS Server to enable web access via HTTPS.
Note: If the HTTPS Server is disabled, any current connections that use HTTPS will be disconnected.
Step 8. Enter the port number to use for HTTPS connections in the HTTPS Port field. The port number ranges from 1025 to 65535.
Step 9. Click Save to save the settings.
Generation of an SSL Certificate
Generation of a new HTTP SSL certificate for the secure web server should be done after the AP has acquired an IP address. This ensures that the common name for the certificate matches the IP address of the AP. Generation of a new SSL certificate restarts the secure web server. The secure connection does not work until the new certificate is accepted on the browser. Follow the steps given below to generate the SSL certificate.

Step 1. Click Generate to generate a new SSL certificate. The alert message appears.

Step 2. Click OK to continue with the generation of the SSL certificate.

The SSL Certificate File Status area displays the following information:
• Certificate File Present — Indicates whether the HTTP SSL certificate file is present or not. The default is no.
• Certificate Expiration Date — Displays the expiration date of the HTTP SSL certificate.
• Certificate Issuer Common Name — Displays the common name of the certificate issuer.
Download the SSL Certificate

Step 1. Click the appropriate SSL certificate file from the Download Method radio button in the Download SSL Certificate (From Device to PC) area.
• HTTP/HTTPS — Click this radio button if the SSL Certificate is to be downloaded from a web server.
• TFTP — Click this radio button if the SSL Certificate is to be downloaded from a TFTP server.
Note: Skip to Step 4 if HTTP/HTTPS is clicked in the previous step.

Step 2. If TFTP is clicked in Step 2, then enter the file name in the File Name field.
Step 3. Enter the TFTP server address in the TFTP Server IPv4 Address field.
Step 4. Click Download to download the certificate file.
Upload the SSL Certificate
Follow the steps given below to upload the SSL Certificate.

Step 1. Click the appropriate Upload Method radio button in the Upload SSL Certificate (From PC to Device) area.
• HTTP/HTTPS — Click this radio button if the SSL Certificate is to be uploaded with a web server.
• TFTP — Click this radio button if the SSL Certificate is to be uploaded with a TFTP server.
Note: Skip to Step 4 if TFTP is clicked in the previous step.
Step 2. If HTTP/HTTPS is clicked, then click Choose File or Browse based on your browser to browse for the file.

Step 3. Click Upload to upload the file that is chosen. Skip the last Steps as these Steps only apply to TFTP.

Step 4. If TFTP is clicked in Step 2, then enter the file name in the File Name field.
Step 5. Enter the TFTP server address in the TFTP Server IPv4 Address field.
Step 6. Click Upload to upload the certificate file.
Revision History
| Revision | Publish Date | Comments |
|---|---|---|
1.0 |
11-Dec-2018 |
Initial Release |
 Feedback