Configure Wireless Distribution System (WDS) on the WAP131, WAP351, WAP150, or WAP361 Access Point
Available Languages
Objective
A Wireless Distribution System (WDS) lets you connect multiple access points together. WDS allows the connected access points to communicate with each other via wireless connection. This feature enables clients who roam to have a seamless experience. This makes it easier to manage multiple wireless networks as well as reduces the amount of cables required to connect the networks.
The Wireless Access Point (WAP) can act as a single point-to-point mode access point, point-to-multipoint bridge, or as a repeater. In the point-to-point mode, a single WAP accepts connections from clients and other devices in the network. In a point-to-multipoint bridge mode, a single WAP behaves as a common link between many access points. A WAP can also act as a repeater, where it can establish a connection between access points that are far apart from each other. Wireless clients can connect to this repeater. A WDS role system can be compared similar to the role of the repeater.

Note: When using WDS, it is possible that the maximum wireless throughput may be halved after the first hop since one of the WAPs in a pair has to retransmit the information during the communication of the two sides.
This article explains how to configure WDS Bridge in order to connect multiple access points together and applies to the specific devices mentioned below.
Applicable Devices
- WAP131
- WAP351
- WAP150
- WAP361
Software Version
- 1.0.2.8 — WAP131, WAP351
- 1.1.0.5 — WAP150, WAP361
Guidelines in configuring WDS:
- WAP121 with WAP321
- WAP131 with WAP351
- WAP150 with WAP361
- WAP551 with WAP561
- Multiple WAP371
- Multiple WAP571
- Multiple WAP571E
Note: If you operate a bridge in the 802.11n 2.4 GHz band, set the Channel Bandwidth to 20 MHz instead of default 20/40 MHz in order to detect any 20 MHz WAP devices. The mismatched channel bandwidth causes the disconnection of the links.
Configure WDS
Note: The images may slightly vary depending on the exact model of your WAP. Images in this article are taken from the WAP361.
Step 1. Log in to one of the WAP web-based utility and choose Wireless > WDS Bridge.

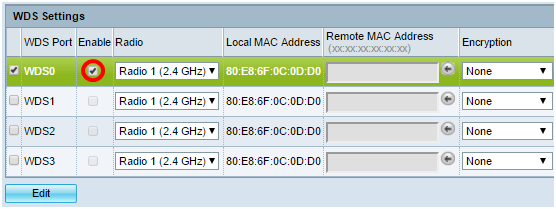
Step 2. Check the check box beside the WDS Port that you want to configure then click the Edit button.

Step 3. Check the Enable check box to enable WDS.

Step 4. Under Radio, click on the drop-down menu to choose which Radio interface you want to apply the WDS settings.
Note: In this example, Radio 1 (2.4 GHz) is chosen.

Note: The Local MAC Address area displays the MAC address of the current WAP being used.
Step 5. Enter the MAC address of the destination WAP in the Remote MAC Address field. This is the access point on the opposite end of the WDS Bridge.

Note: You can also click the left arrow button beside the field to choose the MAC address instead. The left arrow would show the list of all MAC addresses of the neighboring WAPs along with their network names or Service Set Identifiers (SSIDs).
Step 6. Choose the desired option from the Encryption drop-down list. This will be the type of encryption that can be used for the WDS link. The options are:
- None — No encryption is used. This option is available to all radio modes. This is used if there are no security concerns in your network or you have devices that do not support WPA. If you chose this option, skip to Step 9.
Note: It is recommended that you configure the security on each remote access point you add.
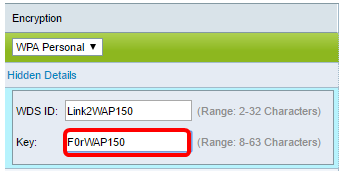
- WPA Personal — WPA uses a pre-shared key to authenticate between two access points. This option is available with all radio modes.

Note: In this example, WPA Personal is chosen.
Step 7. (Optional) Enter the WDS ID for authentication of WAP in the WDS ID field. This ID serves as the identifier of your link and should be the same in all the WAP devices that connect to a WDS. The range is from 2 to 32 characters.

Note: In this example, Link2WAP150 is used.
Step 8. Enter the key for authentication for WAP in the Key field. This key should be the same in all the WAP devices that connect to a WDS. The range is from 8 to 63 characters.

Note: In this example, F0rWAP150 is used.
Step 9. Click the  button.
Step 10. Click OK on the Confirm window to continue.

Note: Repeat all the steps above for the other WAPs you would like to connect to the WDS Bridge. A maximum of four WDS Interfaces can be added.
You should now have successfully connected your access points together through WDS.
Revision History
| Revision | Publish Date | Comments |
|---|---|---|
1.0 |
11-Dec-2018 |
Initial Release |
 Feedback