Configure a Class Map on a Wireless Access Point (WAP)
Available Languages
Objective
A Class Map identifies the traffic that need to be policed. It works as a component of a Policy Map. Class Maps contain conditions that traffic need to match, in order to be forwarded or dropped. There can be many Class Maps in a Policy Map where either 1 class map can be matched, or all Class Maps should be matched for the action specified in the Policy Map to take place. A Class Map and a Policy Map are to be created to complete the Quality of Service (QoS) configuration on an access point. For instructions on how to configure QoS, click here. For instructions on how to create a policy map, click here.
This article illustrates how to configure a class map to identify ICMP packets when configuring a class map for an access point.
Applicable Devices
- WAP131
- WAP150
- WAP351
- WAP361
- WAP571
- WAP571E
Software Version
- 1.0.1.3 — WAP131, WAP351
- 1.0.1.7 — WAP150, WAP361
- 1.0.0.17 — WAP571, WAP571E
Configure a Class Map
Create a New Class Map
Step 1. On the WAP131, WAP150, WAP351, or WAP361, log in to the web-based utility and choose Quality of Service > Class Map.
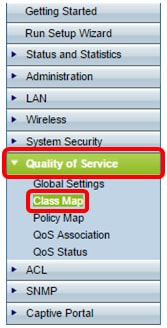
If you are using the WAP571 or WAP571E, log in to the web-based utility and choose Client QoS > Class Map.

Step 2. In the Class Map Configuration area, enter a name for the new class map in the Class Map Name field.
Note: In this example, the name is Class_Map_1.
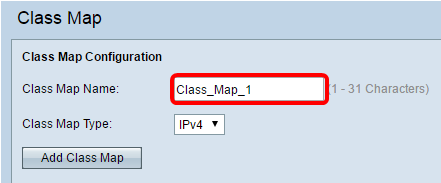
Step 3. In the Class Map Type drop-down menu, choose the type of traffic that the class map will look at. The options are:
- IPv4 — This option lets the class map look only at IPv4 traffic.
- IPv6 — This option lets the class map look only at IPv6 traffic.
- MAC — This option lets the class map analyze MAC addresses.
Note: In this example, IPv4 is chosen.

Step 4. Click Add Class Map.

You should now have created a new class map on the wireless access point.
Configure an Existing Class Map
Options to configure an existing class map varies depending on its class map type. For IPv4 class map type, click here for instructions. If the class map has an IPv6 type, click here or click here if it is a MAC type class map.
Step 1. Navigate to the Match Criteria Configuration area. In the Class Map Name drop-down list, choose the name of the class map type.
Note: In this example, Class_Map_1 is chosen.

Step 2. (Optional) Verify that the Match Every Packet check box is checked. This means that every IPv4 packet will be treated as a match to the criteria. No other fields in the section will need to be configured when this option is checked. If you leave this option checked, skip to Step 9. Otherwise, proceed to Step 3.
Note: In this example, Match Every Packet is not checked.
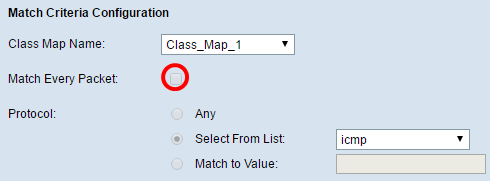
Step 3. In the Protocol area, choose a protocol that will be treated as a match to the criteria by clicking the radio button beside it. The options are:
- Any — This option indicates that any protocol will be a match. If chosen, all fields will be unavailable and match every packet will be checked.
- Select from List — This option allows you to choose an option from the drop-down menu. You can choose IP, ICMP, IGMP, TCP, and UDP from the list.
- Match to Value — This option allows you to match a protocol that is not listed by name by entering a protocol ID as defined by the Internet Assigned Numbers Authority (IANA). The list of protocol IDs can be found here.
Note: In this example, ICMP is chosen from the list.

Step 4. In the Source IParea, choose an option to determine the source IP address a packet needs to contain to be considered a match. The options are:
- Any — This option allows any source IP address to be a match.
- User Defined — This option lets you specify an IP address and subnet mask in the Source IP Address and Source IP Mask fields.
Note: In this example, Any is chosen.

Step 5. In the Source Port area, choose an option to determine the source port a packet needs to have in order to be considered a match. The options are:
- Any — This option considers any source port a match.
- Select From List — This option lets you match a keyword associated with the source port which becomes translated into its equivalent port number. These keywords are ftp, ftpdata, http, smtp, snmp, telnet, tftp, and www.
- Match to Port — This option lets you specify a source port number which will be matched in the datagram header to an IANA port number that you specified if you chose Match to Value in Step 3. It can be from 0 to 65535.
Note: In this example, Any is chosen.

Step 6. In the Destination IP area, choose an option to determine the destination IP address a packet needs to be considered a match. The options are:
- Any — This option treats any destination IP address as a match.
- User Defined — This option lets you specify an IP address and subnet mask in the Destination IP Address and Destination IP Mask fields.
Note: In this example, 10.10.100.123 is specified as the destination IP address and 255.0.0.0 is specified as the destination IP mask.

Step 7. In the Destination Port area, choose an option to determine what a packet needs to be considered a match. The options are:
- Any — This option treats any destination port as a match.
- Select From List — This option matches the destination port in the datagram header with the selected keyword: ftp, ftpdata, http, smtp, snmp, telnet, ftp and www. Each of these keywords translate into its equivalent port number.
- Match to Port — This option lets you specify a destination port number which will be matched in the datagram header to an IANA port number that you specified if you chose Match to Value in Step 3. It can be from 0 to 65535.
Note: In this example, Any is chosen. If you are configuring an IPv6 class map, skip to Step 9.

Step 8. In the Service Type area, choose an option to specify the type of service to use when matching packets to the class criteria. The options are:
- Any — This option treats any type of service as a match.
- IP DSCP Select From List — This option lets you choose a DSCP value to use as match criterion.
- IP DSCP Match to Value — This option lets you enter a custom DSCP value from 0 to 63.
- IP Precedence — This option matches the IP precedence value of the packet to the IP precedence value defined in this field. The IP precedence range is from 0 to 7.
- IP TOS Bits — This option uses the Type of Service (TOS) bits of the packet in the IP header as the match criteria. The IP TOS bit value ranges between (00 to FF). The high-order three bits represent the IP precedence value. The high-order six bits represent the IP DSCP value.
- IP TOS Mask — This option allows you to enter a TOS Mask value to identify the bit positions in the IP TOS Bits value that are used for comparison against the IP TOS field in a packet. The IP TOS Mask value is a two-digit hexadecimal number from 00 to FF, representing an inverted mask. The zero-valued bits in the IP TOS Mask denote the bit positions in the IP TOS Bits value that are used for comparison against the IP TOS field of a packet. For example, to check for an IP TOS value having bits 7 and 5 set and bit 1 clear, where bit 7 is most significant, use an IP TOS Bits value of 0 and an IP TOS Mask of 00.

Step 9. (Optional) If you need to delete the current class map, check the Delete Class Map check box. A class map cannot be deleted if it is attached to a policy.

Step 10. Click Save.

The configuration means that IPv4 ICMP traffic coming from any port, going to the 10.10.100.123 IP address will be treated as a match.
You should now have successfully configured an IPv4 class map type.
Step 1. Navigate to the Match Criteria Configuration area. In the Class Map Name drop-down list, choose the name of the class map type.
Note: In this example, Class_Map_2 is chosen.
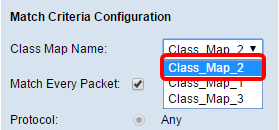
Step 2. (Optional) Verify that the Match Every Packet check box is checked. This means that every IPv6 packet will be treated as a match to the criteria. No other fields in the section will need to be configured when this option is checked. If you leave this option checked, skip to Step 10. Otherwise, proceed to Step 3.
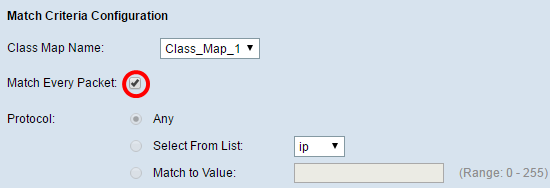
Step 3. In the Protocol area, choose a protocol that will be treated as a match to the criteria by clicking the radio button beside it. The options are:
- Any — This option indicates that any protocol will be a match. If chosen, all fields will be unavailable and match every packet will be checked.
- Select from List — This option allows you to choose an option from the drop-down menu. You can choose IP, ICMP, IGMP, TCP, and UDP from the list.
- Match to Value — This option allows you to match a protocol that is not listed by name by entering a protocol ID as defined by the Internet Assigned Numbers Authority (IANA). The list of protocol IDs can be found here.
Note: In this example, Any is chosen.

Step 4. In the Source IPv6 area, choose an option to determine the source IP address a packet needs to contain to be considered a match. The options are:
- Any — This option allows any source IP address to be a match.
- User Defined — This option lets you specify the source IPv6 address and source IPv6 prefix length in the Source IPv6 Address and Source IPv6 Prefix Length fields.
Note: In this example, Any is chosen.

Step 5. In the Destination IPv6 area, choose an option to determine the destination IPv6 address a packet needs to be considered a match. The options are:
- Any — This option treats any destination IP address as a match.
- User Defined — This option lets you specify an IPv6 address and subnet mask in the Destination IPv6 Address and Destination IPv6Prefix Length fields.
Note: In this example, Any is chosen.

Step 6. In the IPv6 Flow Label area, choose an option that an IPv6 packet needs to have as its label in order to be treated as a match. The options are:
- Any — This option treats any IPv6 packet a match.
- User Defined — This option lets you specify a 20-bit number that is unique to an IPv6 packet. It is used by end stations to signify QoS handling in routers. The range is from 0 to 1048575.
Note: In this example, Any is chosen.

Step 7. In the IP DSCP area, choose the Differentiated Services Code Point (DSCP) value as a match criterion.
- Any — This option treats any DSCP value a match.
- Select From List — This option lets you choose a DSCP type from the list.
- Match to Value — This option lets you specify a custom DSCP value from 0 to 63.
Note: In this example, Any is chosen.

Step 8. In the Source Port area, choose an option to determine the source port a packet needs to have in order to be considered a match. The options are:
- Any — This option considers any source port a match.
- Select From List — This option lets you match a keyword associated with the source port which becomes translated into its equivalent port number. These keywords are ftp, ftpdata, http, smtp, snmp, telnet, tftp, and www.
- Match to Port — This option lets you specify a source port number which will be matched in the datagram header to an IANA port number that you specified if you chose Match to Value in Step 3. It can be from 0 to 65535.
Note: In this example, Any is chosen.

Step 9. In the Destination Port area, choose an option to determine what a packet needs to be considered a match. The options are:
- Any — This option treats any destination port as a match.
- Select From List — This option matches the destination port in the datagram header with the selected keyword: ftp, ftpdata, http, smtp, snmp, telnet, ftp and www. Each of these keywords translate into its equivalent port number.
- Match to Port — This option lets you specify a destination port number which will be matched in the datagram header to an IANA port number that you specified if you chose Match to Value in Step 3. It can be from 0 to 65535.

Step 10. If you need to delete the class map, check the Delete Class Map check box.

Step 11. Click Save.

You should now have successfully configured an IPv6 class map type.
Step 1. Navigate to the Match Criteria Configuration area. In the Class Map Name drop-down list, choose the name of the class map type.

Step 2. (Optional) Check or uncheck the Match Every Packet check box. When checked, every Layer 2 packet will be treated as a match to the criteria. No other fields in the Match Criteria Configuration area except for Delete Class Map will need to be configured when this option is checked. This option is checked by default. Should you want to leave this checked, skip to Step 7. Otherwise, proceed to Step 3.

Step 3. In the EtherType area, choose an Ethertype that would determine the values in the headers of Ethernet frames to be considered a match.
- Any — This option treats any value a match.
- Select From List — This options lets you choose the header from common Ethernet protocols and then translates that into the filter value.
- Match to Value — This option lets you enter a four-digit hexadecimal protocol identifier ranging from 0600 to FFFF. A list of protocols can be found here.

Step 4. In the Class of Service area, choose an option to specify the 802.1p user priority value to consider a match. The options are:
- Any — This option treats any value a match.
- User Defined — This option lets you enter a value for the match from 0 to 7.

Step 5. In the Source MAC area, choose an option to determine the source MAC address a packet must have to be considered a match. The options are:
- Any — This option treats any source MAC address a match.
- User Defined — This option allows you to specify a MAC address and a MAC mask in the Source MAC Address and Source MAC Mask fields.

Step 6. In the Destination MAC area, choose an option to determine the destination MAC address a packet must have to be considered a match. The options are:
- Any — This option treats any destination MAC address a match.
- User Defined — This option allows you to specify a MAC address and a MAC mask in the Destination MAC Address and Destination MAC Mask fields.

Step 7. In the VLAN ID area, choose an option to determine the VLAN ID that a packet needs to have in order to be considered a match. The options are:
- Any — This option treats any VLAN ID a match.
- User Defined — This option lets you enter a value from 0 to 4095 for a match.

Step 8. (Optional) If you need to delete the current class map, check the Delete Class Map check box. A class map cannot be deleted if it is attached to a policy.
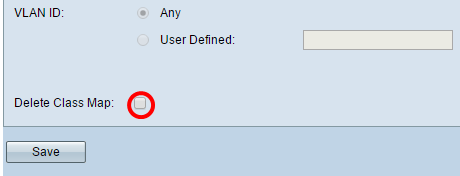
Step 9. Click Save.
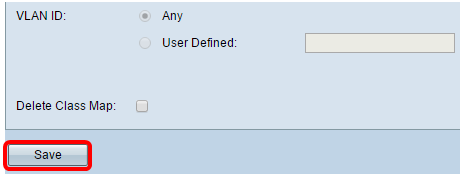
You should now have configured a class map on your WAP.
Revision History
| Revision | Publish Date | Comments |
|---|---|---|
1.0 |
13-Dec-2018
|
Initial Release |
 Feedback