Wall Mount the WAP150 Access Point
Available Languages
Objective
The WAP150 Wireless-AC/N Dual Radio Access Point with PoE can be physically installed in two ways:
-
Horizontally place the WAP150 on a flat surface.
-
Wall mount the WAP150.
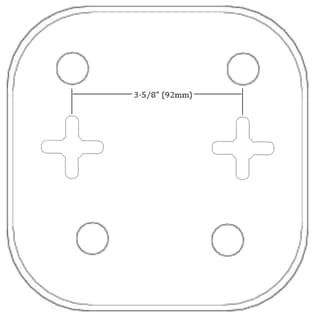
This article provides instructions on how to mount the WAP150 using the wall-mount slots on the bottom cover.
Note: The wall-mounting accessories are user-supplied.
Applicable Devices
- WAP150
Software Version
- 1.0.0.13
Wall Mount your WAP150
Placement Tips
-
Ambient temperature should not exceed 104°F (40°C) to prevent the WAP150 from overheating.
-
Ensure adequate air flow around the device.
-
The WAP150 should be level, stable, and secure to prevent it from sliding or shifting out of position.
Wall Mount your WAP
Caution: Insecure mounting might damage the device or cause injury. Cisco is not responsible for damages incurred by insecure wall-mounting.
Step 1. Determine where you want to mount the WAP150.
Step 2. Drill two pilot holes into the surface 3-5/8” (92 mm) apart from your WAP.
Step 2. Drill two pilot holes into the surface 3-5/8” (92 mm) apart from your WAP.

Step 3. Insert a tox (1-2) into each hole, leaving a gap between the surface and the base of the tox head. Below are the dimensions:
-
1 — .32 in/8.0 mm
-
2 — .87 in/22.0 mm

Step 4. Insert a screw (3-4) into each lower hole. Below are the dimensions:
-
3 — .26 in/6.5 mm
-
4 — 0.69 in/17.4 mm

Step 5. Tighten each screw and leave a gap between the surface of the wall and the head of the screw.
Step 6. Slide the WAP into the screws. Tighten or loosen the screws as needed for a perfect fit.
You should now have successfully mounted the WAP150 on the wall.
 Feedback