Connect Clients with Class A and B Subnets to the RV016, RV042, RV042G and RV082 VPN Routers
Available Languages
Objective
This document explains how to connect two clients with Class A and B subnets to the RV042, RV042G and RV082 VPN Routers. The topology used to represent the situation is as follows:

Applicable Devices
• RV016
• RV042
• RV042G
• RV082
Software Version
• v4.2.2.08
Connect Clients in Multiple Subnets
Step 1. Log in to the web configuration utility and choose Setup > Network. The Network page opens:

Step 2. Check the Enable check box to enable Multiple Subnets.
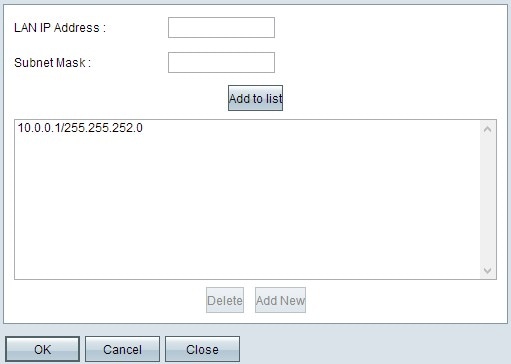
Step 3. Click Add/Edit to add or edit multiple subnets. The Multiple Subnet Management window appears.

Step 4. Enter the LAN address in the LAN IP Address field. For example, if you want the same configuration as is shown in the objective, enter 10.0.0.1.
Step 5. Enter the Subnet Mask in the Subnet Mask field. For the example above, enter 255.255.252.0.
Step 6. Click Add to List to enter the fields into the list.
Step 7. (Optional) To delete a subnet, choose it from the table and click Delete.
Step 8. Click Save once you are finished to save the settings.
Verify the Configuration
NOTE: This Configuration is applicable only for Windows operating systems
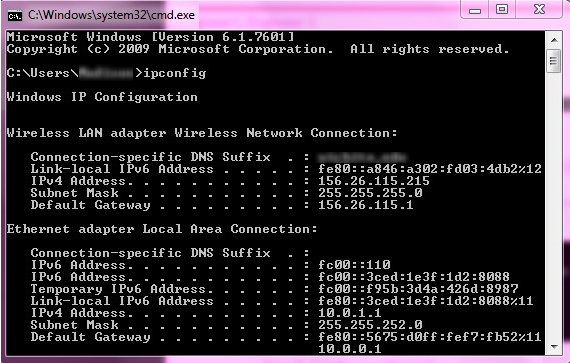
Step 9. Type cmd into the search bar of the first client and choose the option to open the Command Prompt window.

Step 10. Type in the command ipconfig and press Enter. Under the Ethernet Adapter Local Area Connection area, check if the IP address and subnet mask match with the routers configuration. If the IP addresses match skip to Step 20.

Step 11. If the IP addresses do not match, navigate to Control Panel > Network and Internet > Network and Sharing Center.

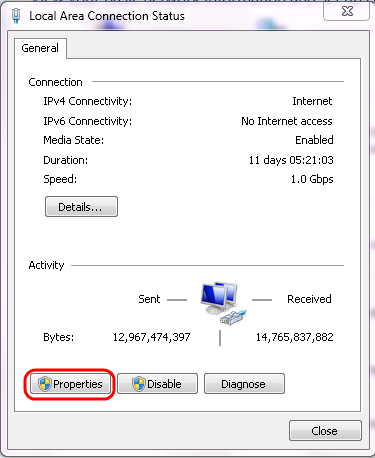
Step 12. Locate the network supplied by the RV042/RV082. Click Local Area Connection to the right of the RV042/RV082 network. The Local Area Connection Status window appears.

Step 13. Click Properties. The Local Area Connection Properties window appears.

Step 14. Choose Internet Protocol Version 4 (TCP/IPv4) and click Properties to open the Internet Protocol Version 4 (TCP/IPv4) Properties window.

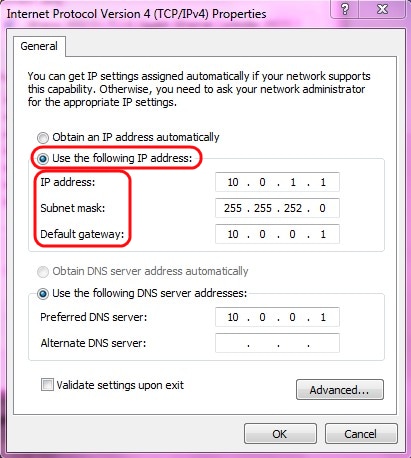
Step 15. Click the Use the following IP address radio button and you are now able to configure your IP address, subnet mask, and default gateway for that LAN connection.
Step 16. Enter the desired IP address of the device into the IP address field (10.0.1.1).
Step 17. Enter the corresponding subnet mask into the Subnet mask field (255.255.252.0).
Step 18. Enter the desired gateway into the Default Gateway field (10.0.0.1). This is address that the client will use to communicate with clients outside its subnet, and should typically be the IP Address specified in Step 4.
Step 19. Repeat Steps 6 through 15 for your additional clients.
Step 20. To verify that this setup works, send out a ping through command prompt through both of the clients. Use the command ping followed by any web address you want to ping to check if the network works

Revision History
| Revision | Publish Date | Comments |
|---|---|---|
1.0 |
11-Dec-2018 |
Initial Release |
 Feedback