Single Point Setup Channel Management on WAP551 and WAP561 Access Points
Available Languages
Objective
The Single Point Setup is used to control the wireless service across multiple devices. It is used to create a cluster of wireless devices, once the cluster is created then other wireless access points can join the cluster. The Channel Management page displays the current and planned assignments of channel for the WAP devices in the cluster. The device with channel management enabled automatically assigns radio channels to the other WAP devices in the cluster. It helps to reduce interference and increase the bandwidth.
This article shows how to assign channels for devices in a cluster on the WAP551 and WAP561 access points.
Note: To enable Single Point Setup refer article Single Point Setup Configuration on WAP551 and WAP561 Access Points.
Applicable Devices
• WAP551
• WAP561
Software Version
• 1.0.4.2
Channel Management
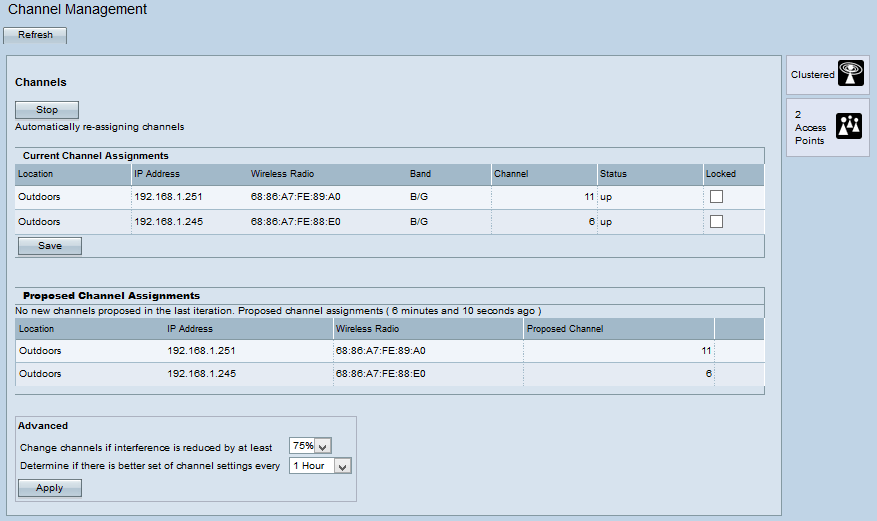
Step 1. Log in to the web configuration utility and choose Single Point Setup > Channel Management. The Channel Management page opens:

Step 2. Click Start to start automatic channel assignment. The automatic channel management is used to reassign channels to the WAP devices in order to reduce the interference among WAP devices.
Step 3. (Optional) To stop the automatic channel assignment, click Stop.

The Current Channel Assignments Table displays the following information:
• Location — Location of the device.
• IP Address — IP address for the access point.
• Wireless Radio — MAC address of the radio.
• Band — Band on which the access point is broadcasted.
• Channel — Current channel of the access point.
• Status — Status of the access point.
• Locked — Access Point is forced to remain in the current channel. If a channel is locked it displays the same channel for the Current Channel Assignments table and Proposed Channel Assignments table.
Step 4. (Optional) To keep the channel locked, click Save.

The Proposed Channel Assignments Table displays the following information:
• Location — Location of the device.
• IP Address — IP address for the access points.
• Wireless Radio — MAC address of the radio.
• Proposed Channel — The channel to which the WAP device would be reassigned.

Step 5. From the first drop-down list of the Advanced area, choose the desired option. This specifies the percent at which the channel reassignment occurs.
Step 6. From the second drop-down list of the Advanced area, choose the desired option. This specifies the time interval between updates.
Step 7. Click Apply.
Step 8. (Optional) To keep the device updated with the current channel information, click Refresh.
Revision History
| Revision | Publish Date | Comments |
|---|---|---|
1.0 |
12-Dec-2018 |
Initial Release |
 Feedback