Configure Captive Portal on a WAP571 or WAP571E
Available Languages
Objective
A Captive Portal (CP) allows you to restrict access to your wireless network until wireless users have been verified. When a user opens a web browser, they are redirected to a login page where they must enter their username and password. Two types of users can be authorized to access your network; authenticated users, and guests. Authenticated users must provide a username and password that matches either a local database, or the database of a RADIUS server. Guests do not need to provide a username or password.
This article explains how to configure captive portal on your Wireless Access Point (WAP).
Applicable Devices
- WAP500 Series - WAP571, WAP571E
Software Version
- 1.0.0.15 - WAP571, WAP571E
Configure Captive Portal
The basic settings of the Captive Portal can be set up through the setup wizard, while the advanced settings can be configured through the web-based utility. For fast and basic setup, you can use the setup wizard to enable the feature. See steps below:
Note: The images below are captured from WAP571.
Using the Setup Wizard
Step 1. Log in to the web-based utility and then click Run Setup Wizard.

Note: If this is the first time you are setting up your WAP, the setup wizard will automatically pop-up.
Step 2. Follow the instructions in the setup wizard screens. For a step-by-step configuration of your WAP using the setup wizard, click here for instructions.

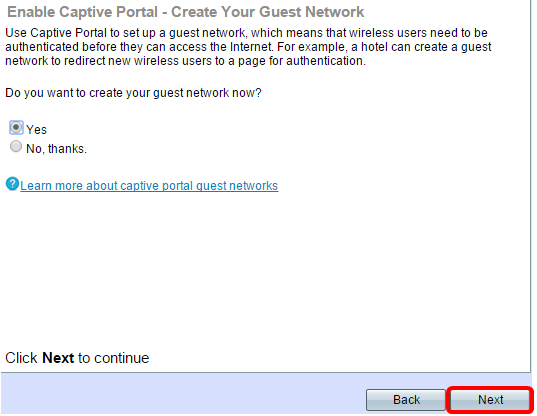
Step 3. Once the Enable Captive Portal – Create Your Guest Network screen appears, choose Yes then click Next.
Step 4. Enter the guest network name then click Next.
Note: The default Guest Network Name is ciscosb-guest.

Step 5. Choose a security type for your wireless guest network.
Note: Best security (WPA2 Personal - AES) is chosen as an example below.

Step 6. Enter your security key then click Next.

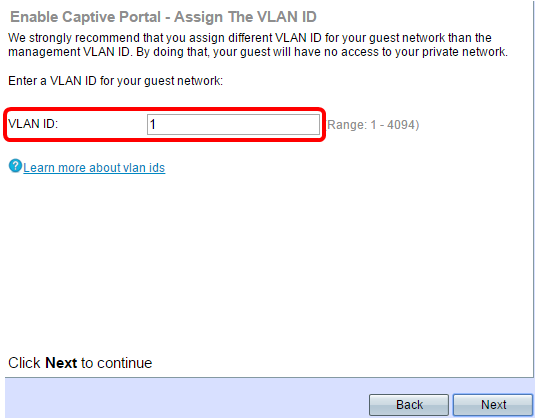
Step 7. Enter a VLAN ID for your guest network then click Next.
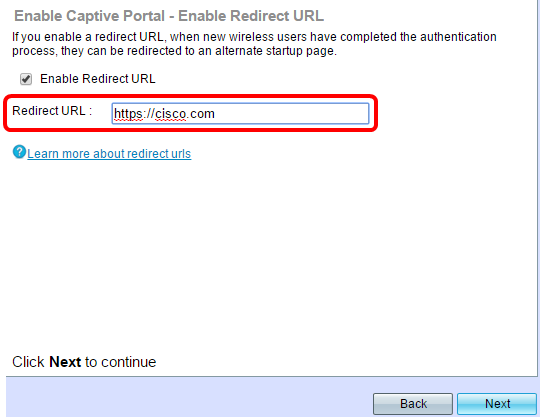
Step 8. (Optional) If you have a specific web page you want to show after users accept the terms of service from the welcome page, check the Enable Redirect URL check box. Enter the URL and then click Next.
Note: The URL can be your company website.
Step 9. Review and confirm your settings and then click Submit.

Step 10. Once the Device Setup Complete screen appears, click Finish to close the setup wizard.
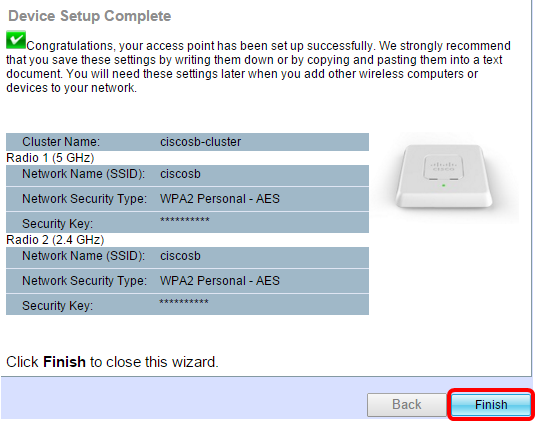
You should now have configured the basic settings of the Captive Portal feature of your WAP.
Using the Web-based Utility
To configure the advanced settings of the captive portal on the WAP, you must follow several steps:
-
Globally Enable the Captive Portal — This allows captive portals to take effect.
-
Create a Captive Portal Instance — A captive portal instance is a set of parameters that controls how a user logs on to a virtual access point (VAP).
-
Associate a Captive Portal Instance with a VAP — Users who attempt to access the VAP have to follow the parameters that are configured for the instance.
-
Customize the Web Portal — The web portal is the web page where users are redirected when they attempt to log on to the VAP.
-
Create Local Group — The local group can be assigned to an instance, which accepts users who belong to that group.
-
Create Local User — Local users are added to a local group and are allowed to access the captive portal that the group is configured to.
Globally Enable the Captive Portal
Step 1. In the web-based utility, choose Captive Portal > Global Configuration.

Step 2. (Optional) Enter the number of seconds that the user has to enter authentication information before the WAP closes the authentication session in the Authentication Timeout field.

Step 3. (Optional) If you would like for the HTTP information between the WAP and the client to use a different port besides the default, enter the HTTP port number you would like to add in the Additional HTTP Port field. HTTP and other Internet protocols use ports to make sure devices know where to find a certain protocol. The options are 80, between 1025 and 65535, or enter 0 to disable. The HTTP port and HTTPS port cannot be the same.
Step 4. (Optional) If you would like for the HTTP information between the WAP and the client to use a different port besides the default, enter the HTTPS port number you would like to add in the Additional HTTPS Port field. The options are 443, between 1025 and 65535, or enter 0 to disable. The HTTP port and HTTPS port cannot be the same.
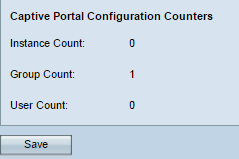
The following information is displayed in the Captive Portal Configuration Counters area and cannot be configured.
-
Instance Count — The number of CP instances configured on the WAP device. A maximum of two CPs can be configured on the WAP.
-
Group Count — The number of CP groups configured on the WAP device. Up to two groups can be configured. The Default Group cannot be deleted.
-
User Count — The number of CP users configured on the WAP device. A maximum of 128 users can be configured on the WAP.
Step 5. Click Save.
Note: The changes are saved to the Startup Configuration.

Instance Configuration
Step 6. In the web-based utility, choose Captive Portal > Instance Configuration.

Step 7. In the Captive Portal Instances drop-down list, you should notice the wiz-cp-inst1 instance. You can choose this name or create a new name for your Instance Configuration.
Step 8. (Optional) In the Instance Name field, enter a name for the configuration then click Save.
Note: In this example, a new instance is created.

Note: You can create a maximum of up to two configurations. If you have already created two instances, you have to choose an instance to edit.
Step 9. The Instance Configuration window displays additional information. The Instance ID is a non-configurable field that shows the instance ID of the current instance.
Step 10. Check the Enable check box in the Administrative Mode to enable the CP instance.

Step 11. From the Protocol drop-down list, choose the protocol you would like to use for the authentication process.
-
HTTP —Does not encrypt information used in the authentication process.
-
HTTPS —Provides encryption for information used in the authentication process.
Note: In this example, HTTP is used.
Step 12. Choose an authentication method for CP to use from the Verification drop-down list.
-
Guest —The user does not need to provide any authentication.
-
Local —The WAP checks the authentication information provided by the user against a local database that is stored on the WAP.
-
RADIUS —The WAP checks the authentication information provided by the user against the database of a remote RADIUS server.
Timesaver: If you choose Local or Guest, skip to Step 28.
Step 13. (Optional) If you want to redirect users who are verified to a configured URL, check the Enable Redirect check box. If this option is disabled, verified users will see a locale-specific welcome page.

Step 14. (Optional) Enter the URL to which you would like to redirect verified users to.
Note: This step is only applicable if you enabled Redirect in Step 13.
Step 15. In the Away Timeout field, enter the amount of time (in minutes) that a user can be disassociated from the WAP and remain on the WAP authenticated client list. If the user is not connected to the WAP for longer then the Away Timeout value, they have to be reauthorized before they can use the WAP.
Step 16. In the Session Timeout field, enter the amount of time (in minutes) that the WAP waits before it terminates the session. A value of 0 means the timeout is not enforced.
Step 17. In the Maximum Bandwidth Upstream field, enter the maximum upload speed (in Mbps) that a client can send data via the captive portal.
Step 18. In the Maximum Bandwidth Downstream field, enter the maximum download speed (in Mbps) that a client can receive data via the captive portal.
Step 19. From the User Group Name drop-down list, choose the group that you wish to assign to the CP instance. Any user that is a member of the group you choose is allowed to access the WAP.
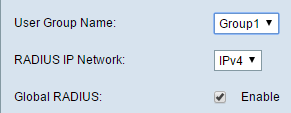
Note: The Verification mode in Step 12 must be either Local or RADIUS to assign a group.
Step 20. From the RADIUS IP Network drop-down list, choose the type of Internet protocol that is used by the RADIUS client.
IPv4 —The address of the RADIUS client will be in the format xxx.xxx.xxx.xxx (192.0.2.10).
IPv6 —The address of the RADIUS client will be in the format xxxx:xxxx:xxxx:xxxx:xxxx:xxxx:xxxx:xxxx (2001:DB8::CAD5:7D91).
Step 21. (Optional) Check the Enable Global RADIUS check box if you want to use the global RADIUS server list for authentication. If you want to use a separate set of RADIUS servers, leave the check box unchecked and configure the RADIUS servers on this page.
Timesaver: Skip to Step 28 if you enable Global RADIUS.
Note: In this example, Global RADIUS is not enabled.
Step 22. (Optional) Check the Enable RADIUS Accounting check box if you want to track and measure the time and data usage of the clients on the WAP network.
Note: If the Global RADIUS check box was enabled in Step 21, you do not need to configure additional RADIUS servers.
Step 23. In the Server IP Address-1 field, enter the IP address of the RADIUS server which you want to use as the primary server. The IP address should conform with the respective address format of IPv4 or IPv6.

Step 24. (Optional) You can configure up to three backup RADIUS servers which will be checked in sequence until a match is found. If no match is found, the user will be denied access. In the Server IP Address-(2 to 4) fields, enter the IP address of the backup RADIUS servers to use if authentication fails with the primary server.
Step 25. In the Key-1 field, enter the shared secret key that the WAP device uses to authenticate to the primary RADIUS server. This needs to be the same key that was configured on the RADIUS server.

Step 26. In the rest of the Key fields (2-4), enter the shared secret key that the WAP device uses to authenticate to the respective backup RADIUS servers.
Note: Locale Count is a non-configurable field that displays the number of locales associated with this instance.
Step 27. (Optional) To delete the current instance, check the Delete Instance check box.
Step 28. Click Save.
Associate Instance with VAP
Step 29. In the web-based utility, choose Captive Portal > Instance Association.
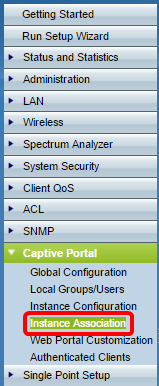
Step 30. Click the radio button of the radio to which you would like to associate an instance in the Radio area.
Note: In this example, Radio 1 (5 GHz) is chosen.
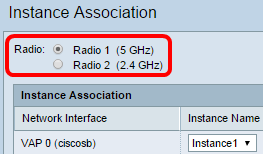
Step 31. Choose an instance configuration from the Instance Name drop-down list to associate with the given VAP.
Note: In this example, the created Instance1 in Step 8 is used for VAP 1 (Virtual Access Point 2).
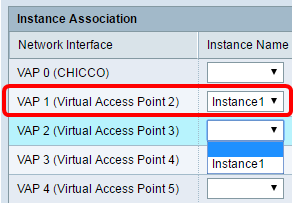
Step 32. Click Save.

Customize Web Portal
A locale (authentication web page) is the web page that the WAP user sees when they attempt to access the Internet. The Web Portal Customization page allows you to customize a locale and assign it to a captive portal instance.
Step 33. In the web-based utility, choose Captive Portal > Web Portal Customization.

Step 34. Choose Create from the Captive Portal Web Locale drop-down list to create a new locale.

Step 35. Enter the name of the locale in the Web Locale Name field.

Step 36. Choose a captive portal instance that the locale is associated with from the Captive Portal Instances drop-down list. You may associate multiple locales to a single captive portal instance. The user can click a link to switch to a different locale.

Step 37. Click Save to create a new locale.
Note: The Web Portal Customization page displays additional information.

-
Locale ID is a non-configurable field that displays the ID number of the current locale.
-
Instance Name is a non-configurable field that displays the captive portal instance name that is associated with the locale.
Step 38. From the Background Image Name drop-down list, choose an image to display in the locale background. Click the Upload/Delete Custom Image button to add your own image. Go to the section Upload/Delete Custom Image for more information.
Step 39. From the Logo Image Name drop-down list, choose an image to display in the top left corner of the page.
Step 40. In the Foreground Color field, enter the 6-digit Hyper Text Transfer Protocol (HTML) code for the foreground color of the locale.
Step 41. In the Background Color field, enter the 6-digit HTML code for the background color of the locale.
Step 42. In the Separator field, enter the 6-digit HTML code for the color of the horizontal line that separates the page header from the page body.
Step 43. Enter a descriptive name for the locale in the Locale Label field. If you have multiple locales, this is the name of the link you click to change between locales. For example, if you have an English and Spanish locale, you may want to signify that in your locale name.
Step 44. Enter an abbreviation for the locale in the Locale field.
Step 45. From the Account Image drop-down list, choose an image to display above the login field.

Step 46. In the Account Label field, enter the instructions that request the user to enter their username.
Step 47. In the User Label field, enter the label for the user name text box.
Step 48. In the Password Label field, enter the label for the password text box.
Step 49. In the Button Label field, enter the label for the button that the users click to submit their username and password.
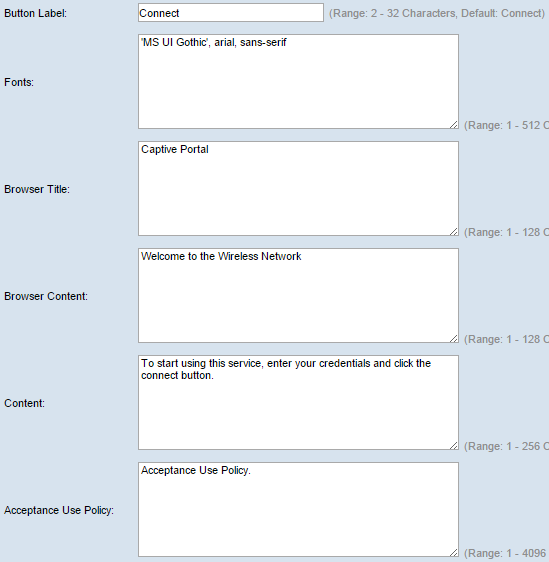
Step 50. In the Fonts field, enter the font name used for the locale. You may enter several font names separated by a comma. If the first font style is not found by the client device, the next font is used. If a font name has multiple words separated by spaces, use single quotes to surround the font name. For instance, 'MS UI Gothic', arial, sans-serif, and so on.
Step 51. In the Browser Title field, enter the text you would like to display in the browser title bar.
Step 52. In the Browser Content field, enter the text you would like to display in the page header.
Step 53. In the Content field,enter the text that instructs the user on what to do. This field is shown below the user name and password text boxes.
Step 54. In the Acceptance Use Policy field, enter the terms that users must agree to if they want to access the WAP.
Step 55. In the Accept Label field, enter the text that instructs users to check that they have read and accepted the Acceptance Use Policy.
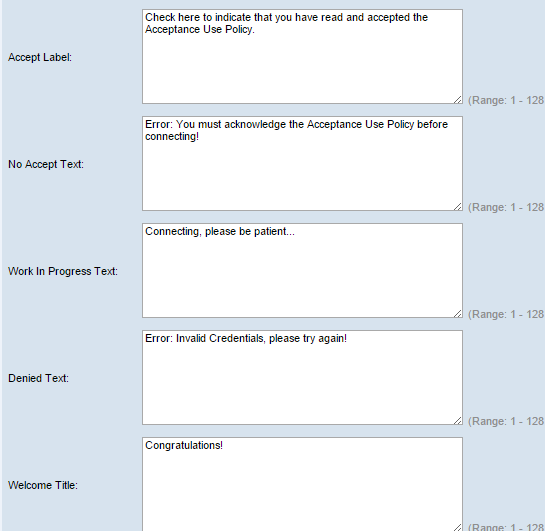
Step 56. In the No Accept Text field, enter the text that prompts a user if they submit login credentials but do not accept the Acceptance Use Policy.
Step 57. In the Work In Progress Text field, enter the text that is shown while the WAP checks the given credentials.
Step 58. In the Denied Text field, enter the text that is shown when a user fails authentication.
Step 59. In the Welcome Title field, enter the title text that is shown when a client is successfully authenticated.
Step 60. In the Welcome Content field, enter the text that is shown to a client who has connected to the network.

Step 61. (Optional) To delete the current locale, check the Delete Locale check box.
Step 62. Click Save.
Step 63. (Optional) To view your current locale, click Preview. If you make changes, click Save before you preview to update the changes.
Note: The captive portal login screen looks similar to the following image:

Create Local Group
A non-guest captive portal requires users to log in based on their username and password. The WAP creates a local group that contains a group of local users. The local group is then attached to an instance. Local users that are a member of the local group are able to gain access through the captive portal. The Default local group is always active and cannot be deleted. Up to two additional local groups can be added to the WAP.
Step 64. In the web-based utility, choose Captive Portal > Local Groups/Users.

Step 65. Choose Create from the Captive Portal Groups drop-down list.
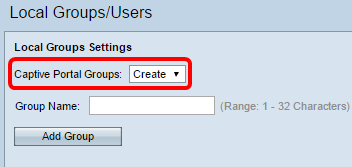
Step 66. Enter the name of the local group in the Group Name field.

Step 67. Click Add Group to save the group.
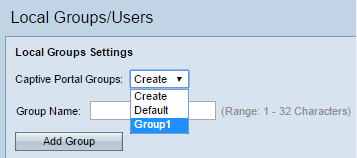
Note: You can assign a local group to an instance in Step 19 of the section titled Instance Configuration.
Create Local User
Local users are added to a local group. These users are able to access a captive portal that has an instance with their local group configured. Some information that is configured in the Local Users page is also configured in the Instance Configuration page. The value configured for a local user has precedence over the value configured for an instance. You can configure up to 128 authorized users in the local database.
Step 68. Choose Create from the Captive Portal Users drop-down list.
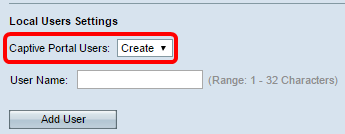
Step 69. In the User Name field, enter the user name you want to add.

Step 70. Click Add User to create the new user. The Local Users Settings window displays additional information.
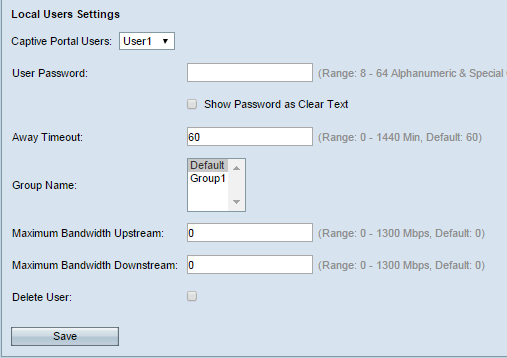
Step 71. In the User Password field, enter the password associated with the user.
Step 72. (Optional) To have the password be displayed in clear text, check the Show Password as Clear Text check box. If the check box is unchecked, the password is masked.
Step 73. In the Away Timeout field, enter the amount of time (in minutes) a user can be disassociated from the WAP and remain on the WAP authenticated client list. If the user is not connected to the WAP for longer then the Away Timeout, they have to be reauthorized before they can use the WAP.
Step 74. In the Group Name field, click the local group you would like the user to join.
Step 75. In the Maximum Bandwidth Upstream field, enter the maximum upload speed in Mbps that a client can send data via the captive portal.
Step 76. In the Maximum Bandwidth Downstream field, enter the maximum download speed in Mbps that a client can receive data via the captive portal.
Step 77. (Optional) To delete a local user, check the Delete User check box.
Step 78. Click Save.
You should now have configured the advanced Captive Portal settings of your WAP571 or WAP571E.
 Feedback