Manage the Rogue AP Detection List on the WAP125 or WAP581 Access Point
Available Languages
Objective
A Rogue Access Point (AP) is an access point that is installed on a secure network without the consent of the network administrator. Rogue APs can pose a security threat because anyone who installs a wireless router within the range of your network can potentially gain access to your network. The Rogue AP Detection page in the web-based utility of the AP provides information about the wireless networks that are within range.
This article aims to show you how to create, import, and backup or download an AP list on an access point.
Applicable Devices
- WAP125
- WAP581
Software Version
- 1.0.0.5 — WAP125
- 1.0.0.4 — WAP581
Create Trusted AP List
Enable Rogue AP Detection
Step 1. Log in to the access point web-based utility by entering your Username and Password in the fields provided and then click Login.

Note: The default username/password is cisco/cisco.
Step 2. Choose System Configuration > Security.

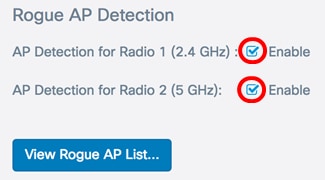
Step 3. Under Rogue AP Detection section, check the check boxes of the radio interfaces you want to enable Rogue AP detection. This is disabled by default. In this example, both radio interfaces are enabled.
Note: If you are using the WAP581, Radio 1 shows 5 GHz and Radio 2 is 2.4 GHz.

Step 4. Click  .
.
Create Trusted AP List
Step 5. Click the View Rogue AP List…button.

Step 6. In the Rogue AP Detection window, click the Rogue AP List tab.

The following information about the detected access points are displayed. Due to the excess width, the image below has been split into two.

- MAC Address — The MAC address of the rogue AP.
- Radio — The physical radio on the rogue AP that you can join.
- Beacon Interval (Msec.) — The beacon interval that is used by the rogue AP. Every AP sends beacon frames at regular intervals to advertise the existence of their wireless network.
- Type — The type of the detected device can be either AP or Ad hoc.
- SSID — The Service Set Identifier (SSID) of the rogue AP, also known as the network name.
- Privacy — Indicates whether or not security is enabled on the rogue AP. Off indicates that the rogue AP has no security enabled while On indicates that the rogue AP does have security measures enabled.

- WPA — Indicates whether WPA security is enabled (On) or disabled (off) for the rogue AP.
- Band — This is the IEEE 802.11 mode that is used on the rogue AP. It can be either 2.4 or 5.
- Channel — Displays the channel that the detected AP is currently broadcasting on.
- Rate — Shows the rate at which the detected AP current broadcasts in Mbps.
- Signal — Shows the strength of the radio signal from the AP.
- Beacons — Displays the total number of beacons received from the AP since it was first detected. Beacon frames are transmitted by an AP at a regular interval to announce the existence of the wireless network.
- Last Beacon — Displays the date and time of the last beacon received from the AP.
- Rates — Lists the supported and basic rates of the detected AP in megabits per second.
Step 7. If you trust or recognize an AP that was detected, check the check box of the entry. You can select more than one detected AP at a time.

Step 8. Click the Move to Trusted AP List button above the Detected Rogue AP List. This adds the corresponding AP to the Trusted AP List, and removes it from the Detected Rogue AP List. Trusting an AP only adds it to the list, and has no impact on the operation of the AP. The lists are organizational tool that can be used to take further action.

View the Trusted AP List
Step 9. The Trusted AP List table is populated once an AP has been trusted. To view the entries, click the Trusted AP List button.

Step 10. (Optional) Check the check box of the applicable entry to move to the Rogue AP List. You can select more than one entry at a time.

Step 11. (Optional) Click the Move to Rogue AP List button. The entry is moved back to the Rogue AP list.

Download/Backup Trusted AP List
Step 12. In the Download/Backup Trusted AP List area, choose a radio button to either download an existing Trusted AP List configuration file to the AP from the computer or backup to download the list from the AP to the computer.
Note: In this example, Download (PC to AP) is chosen. If you chose Backup (AP to PC), skip to Step 15.

Step 13. In the Source File Name area, click on Browse… to select a file on your computer to download to the AP.
Note: For this example, Rogue2.cfg was chosen.

Step 14. In the File Management Destination area, choose a radio button to either replace or merge the file with the existing list. The options are
- Replace — Replaces existing list of Rogue APs.
- Merge — Merges existing list with new list.
Note: For this example, Replace was chosen.

Step 15. Click  .
.
You have now created, backed up or downloaded, and imported a Trusted AP List on an Access Point.
 Feedback