Use Catalyst Center APIs with Python
Available Languages
Download Options
Bias-Free Language
The documentation set for this product strives to use bias-free language. For the purposes of this documentation set, bias-free is defined as language that does not imply discrimination based on age, disability, gender, racial identity, ethnic identity, sexual orientation, socioeconomic status, and intersectionality. Exceptions may be present in the documentation due to language that is hardcoded in the user interfaces of the product software, language used based on RFP documentation, or language that is used by a referenced third-party product. Learn more about how Cisco is using Inclusive Language.
Introduction
This document describes how to use the different APIs available on Cisco Catalyst Center using Python.
Prerequisites
Requirements
Basic Knowledge on:
- Cisco Catalyst Center
- APIs
- Python
Components Used
- Cisco Catalyst Center 2.3.5.x
- Python 3.x.x
The information in this document was created from the devices in a specific lab environment. All of the devices used in this document started with a cleared (default) configuration. If your network is live, ensure that you understand the potential impact of any command.

Note: The Cisco Technical Assistance Center (TAC) does not provide technical support for Python. If you experience issues with Python, please contact Python Support for technical assistance.
Configure
Overview
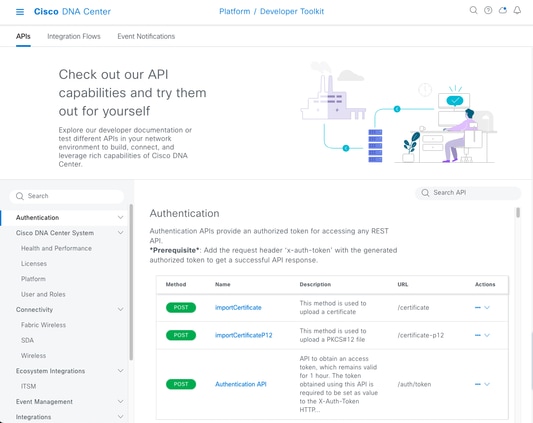
Cisco Catalyst Center has many APIs available. To verify which APIs can be used, on Catalyst Center, navigate to Platform > Developer Toolkit > APIs.
 Catalyst Center APIs Page
Every API has its own purpose, depending on the information or the action that needs be performed on Catalyst Center. For the APIs to work, as a prerequisite, a token must be used to authenticate properly to Catalyst Center and get a successful API response. The token identifies the privileges for the REST caller accordingly.
It is also important to identify the components that make up an API which are as follows:
- URL: Endpoint that provides access to a specific resource.
- Method: All APIs must include a method. It defines the action/operation that the client would like to perform to the specific endpoint. Examples: POST, GET, PUT, DELETE.
- Header: Provides additional information about the request in key-value pairs format. For example, authorization header provides an authentication method using credentials.
- Parameters: Variables that provide specific instructions to the endpoint by using the API. The parameters can be part of the URL of the endpoint.
- Payload: Data that requires to be sent to the endpoint during the API call.

Note: For more detailed information about each API available on Catalyst Center, refer to the API Reference guide.
Modules
Python modules used:
- requests:This module allows to send HTTP/1.1 requests to specific URLs. For more information about the module, consult the request module guide.
- base64: Provides encoding and decoding functions. For more information about the module, consult the base64 module guide.
- json: This module allows getting specific data from APIs response. For more information about the module, consult the json module guide.

Note: For more information about how to install Python modules, consult Installing Python Modules documentation.
Generate Token
The API called Authentication API must be used to generate a new token.
Authentication API:
POST https://<CatalystCenterIP>/dna/system/api/v1/auth/tokenIt is important to mention that the token that is generated is valid for 1 hour. After 1 hour, a new token must be generated using the same API mentioned above.
In a new Python file, import the modules (requests, base64 and json) followed by creating four variables:
import requests
import base64
import json

user = 'user'    # User to login to Catalyst Center
password = 'password'    # Password to login to Catalyst Center
token = ''    # Variable to store the token string
authorizationBase64 = ''   # Variable that stores Base64 encoded string of "username:password"
Authentication API supports Basic Auth as Authorization Token in the header. Basic Auth is a method that can be used to authenticate to an endpoint, providing a username and password separated by a colon (username:password). Both values are base64-encoded, and the endpoint decodes the login credentials and check, if the user can access, or not.
To create the Base64-econded string for our username and password, the base64 module is used. To accomplish this, b64encode function is used.
byte_string = (f'{user}:{password}').encode("ascii")
authorizationBase64 = base64.b64encode(byte_string).decode()
From the code above, a byte_string variable was created using the ‘.encode(“ascii”)’ function. This is because the base64.b64encode function requires a bytes-like object. Also notice that user and password variables were used to keep the string format ‘user:password’. Finally, a base64-encoded byte string was created with the user and password. Using, the ‘decode()’ method, the value was converted to str object.
To verify it, you can print the value for the authorizationBase64 variable:
print(authorizationBase64)Output example:
am9yZ2QhbDI6Sm9yZ2VhbDXxXxXx
Caution: base64 is not an encryption algorithm. It must not be used for security purposes. The Authentication API also supports AES key encryption as Authorization token in header which provides more security.
Now that a base64-encoded string was created using the user and password to authenticate to, Catalyst Center, it is time to proceed with the API Authentication API call using the module requests. Also, the function called request allows, to get a response object which contains the text of the request.
Syntaxis of the method:
requests.request(“method”, “url”, **kwargs)**kwargs means any parameter passed into the request, for example, cookies, user-agents, payload, headers, and so on.
The Authentication API specifies that the method is POST, the URL is “/dna/system/api/v1/auth/token” and the basic auth needs to be specified in the Header.
These variables are created to use them for the request() function.
url = https://<CatalystCenterIP>/api/system/v1/auth/token
headers = {
	‘content-type’: “application/json”,
	‘Authorization’: ‘Basic ’ + authorizationBase64
	}
For the headers variable, two things were specified. The first one is the content-type, which specifies the media type of the resource sent to the endpoint (this helps for the endpoint to accurate parsing and processing the data). The second one is Authorization, which, in this case, the variable authorizationBase64 (which stores our base64-econded string) is sent as parameter to authenticate to Catalyst Center.
Now, proceed to use the request() function to perform the API call. The next code shows the syntaxis of the function:
response = requests.request(“POST”, url, headers=headers)The response variable was created to store the data of our API call made.
To print the response obtained, use the print function along with the text() method in the response variable. The text() method generates a str object with the response received from Catalyst Center.
print(response.text)Output Example:
{“Token”:“eyJhbGci0iJSUzI1NiIsInR5JK09s1zVmNjk0NjhkNTFhNDJ1ZWeLCU291cmNlIjoiaW50ZXJuYWwiLCW2vMPUbU0JNlqxOXNe1jMzY1LTQ5MWEtODljNC0yZmE2YjVhM2
!--- Output is supressed
Note: If Catalyst Center is using a self-signed certificate, the API request can fail with the next error:
requests.exceptions.SSLError: HTTPSConnectionPool(host='X.X.X.X', port=443): Max retries exceeded with url: /api/system/v1/auth/token (Caused by SSLError(SSLCertVerificationError(1, '[SSL: CERTIFICATE_VERIFY_FAILED] certificate verify failed: self-signed certificate in certificate chain (_ssl.c:1000)')))To fix this issue, you need to add the verify parameter as False to the request function. This ignores verifying the SSL certificate from the endpoint (Catalyst Center).
response = requests.request(“POST”, url, headers=headers, verify=False)From the response received from the API authentication call, note that the structure is similar to a dictionary in Python however, it is a str object.
To validate the type of an object, use the type() function.
print(type(response.text))Which returns the next output:
<class 'str'>For practical purposes, only the token value needs to be extracted from the response received from the API, not the whole string, since, in order to use the other Catalyst Center APIs, only the token must be passed as parameter.
Since the response received from the API call has a structure similar to a dictionary in Python but the object type is str, the said object needs to be converted into a dictionary using the json module. This extracts the token value from the whole string received from the API.
To accomplish this, the function json.loads() converts the string into a dictionary to later extract just the token value and assign it directly into our token variable.
token = json.loads(response.text)  # Converting the response.text string value into a dictionary (It is creating a JSON object).
token = (token["Token"])  # Extracting just the token value by specifying the key as a parameter.
To verify that the token variable has only the token as its value, proceed to print it.
print(token)Output Example:
eyJhbGci0iJSUzI1NiIsInR5JK09s1zVmNjk0NjhkNTFhNDJ1ZWeLCU291cmNlIjoiaW50ZXJuYWwiLCW2vMPUbU0JNlqxOXNe1jMzY1LTQ5MWEtODljNC0yZmE2YjVhM2
!--- Output is supressed
Tip: Since each generated token expires in 1 hour by default, a Python method that contains the code to generate a token can be created and called every time a token expires,without having to run the entire program by just calling the created method.
Testing an API
Now that the token has been successfully assigned to the token variable, Catalyst Center APIs available can be used.
In this case, the Cisco DNA Center Nodes Configuration Summary API is tested.
Cisco DNA Center Nodes Configuration Summary
GET https://<CatalystCenterIP>/dna/intent/api/v1/nodes-configThis API provides details about the current configuration of Catalyst Center such as, NTP server configured, node name, intra-cluster link, LACP mode, and so on.
The Cisco DNA Center Nodes Configuration Summary API specifies, in this case, that the method used is GET, the URL is “/dna/intent/api/v1/nodes-config” and, since token string has been extracted and assigned to the token variable, this time the token is passed as a variable in the header of the API call as ‘X-Auth-Token’: followed by the token.
This authenticates the request to Catalyst Center for every API call that is performed. Remember that each token last 1 hour. After 1 hour, a new token must be generated to continue making API calls to Catalyst Center.
Proceed to create the variables to test the API:
nodeInfo_url = "https://<CatalystCenterIP>/dna/intent/api/v1/nodes-config"
nodeInfo_headers = {
    'X-Auth-Token': token
}

nodeInfoResponse = requests.request("GET", nodeInfo_url, headers=nodeInfo_headers)
nodeInfo_url variable was created to store the URL of our API. nodeInfo_headers variable stores the headers for our API. In this case, ‘X-Auth-Token:’ and the token variable were passed as parameters to authenticate the request successfully to Catalyst Center. Finally, nodeInfoResponse variable stores the response of the API.
To validate the response received, you can use the print() function.
Output Example:
{"response": {"nodes": [{"name": "Catalyst Center", "id": "ea5dbec1-fbb6-4339-9242-7694eb1cXxXx", "network": [{"slave": ["enp9s0"], "lacp_supported": true, "intra_cluster_link": false, "interface": "enterprise", "inet6": {}, "inet": {"routes": [{"netmask": "255.255.0.0"
!--- Output is supressed
Note: In case a self-signed certificate is being in use in Catalyst Center, the API request can fail with the next error:
requests.exceptions.SSLError: HTTPSConnectionPool(host='X.X.X.X', port=443): Max retries exceeded with url: /api/system/v1/auth/token (Caused by SSLError(SSLCertVerificationError(1, '[SSL: CERTIFICATE_VERIFY_FAILED] certificate verify failed: self-signed certificate in certificate chain (_ssl.c:1000)')))To fix this issue, you need to add the verify parameter as False to the request. This suppresses the verification of SSL certificate from the endpoint (Catalyst Center).
nodeInfoResponse = requests.request("GET", nodeInfo_url, headers=nodeInfo_headers, verify=False)The response received from the API can be difficult to read. Using the json() module, the response can be printed in a more readable string. First, the API response must be loaded into a JSON object using the json.loads() function followed by the json.dumps() function:
jsonFormat = (json.loads(nodeInfoResponse.text)) # Creating a JSON object from the string received from the API response.
print(json.dumps(jsonFormat, indent=1)) # Printing the response in a more readable string using the dumps() function.
json.dumps: This function returns the JSON object took as a parameter in a JSON formatted string.
indent: This parameter defines the indent level for the JSON formatted string.
Output Example:
{
  "response": {
    "nodes": [
      {
        "name": "X.X.X.X",
        "id": "ea5dbec1-fbb6-4339-9242-7694eb1xXxX",
        "network": [
          {
            "slave": [
              "enp9s0"
            ],
            "lacp_supported": true,
            "intra_cluster_link": false,
!--- Output is supressed
APIs with Header Parameters
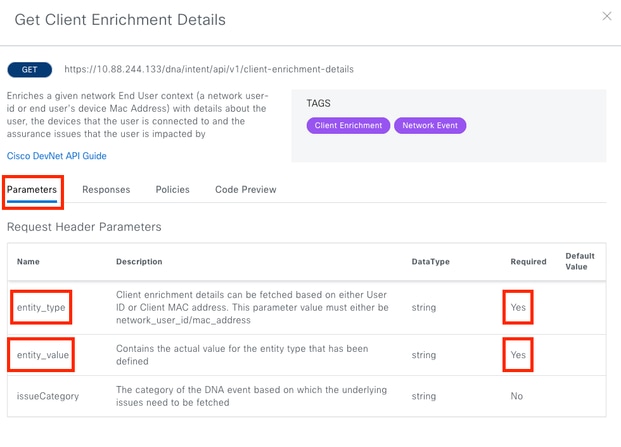
There are some APIs that require some parameters to be sent in the Header to work as expected. In this case, the Get Client Enrichment Details API is tested.
GET https://<CatalystCenterIP>/dna/intent/api/v1/client-enrichment-detailsTo verify which Headers Parameters are required for the API to work as expected, navigate to Platform > Developer Toolkit > APIs > Get Client Enrichment Details and click the name of the API. A new window is opened and under Parameters option, Headers Parameters that are required for the API to work are displayed.

In this case, for the entity_type parameter, according to the description, the value can be either network_user_id or mac_address and the entity_value parameter must contain the value for the entity type that has been defined.
To proceed with it, two new variables are defined, entity_type and entity_value with their corresponding values:
entity_type = 'mac_address'   #This value could be either 'network_user_id' or 'mac_address'.
entity_value = 'e4:5f:02:ff:xx:xx'    #Depending of the 'entity_type' used, need to add the corresponding value for 'entity_value'. In this case, 'mac_address' value was chosen for 'entity_type' parameter so, a MAC Address was assigned to the 'entity_value' parameter.
New variables are also created to perform the API call. The URL of the API call is stored in userEnrichment_url variable. Headers are stored in userEnrichmentHeaders variable. The response received is stored in userEnrichmentResponse variable.
userEnrichment_url = "https://<CatalystCenterIP>/dna/intent/api/v1/user-enrichment-details"

userEnrichmentHeaders = {
'X-Auth-Token': token,
'entity_type': entity_type,
'entity_value': entity_value,
}

userEnrichmentResponse = requests.request("GET", userEnrichment_url, headers=userEnrichmentHeaders)
As you can see, from the userEnrichmentHeaders, entity_type and entity_value variables were passed as Header parameters for the API call, along with the token variable.
To validate the response received, use the print() function.
print(userEnrichmentResponse.text)Output Example:
[ {
  "userDetails" : {
    "id" : "E4:5F:02:FF:xx:xx",
    "connectionStatus" : "CONNECTED",
    "tracked" : "No",
    "hostType" : "WIRELESS",
    "userId" : null,
    "duid" : "",
    "identifier" : "jonberrypi-1",
    "hostName" : "jonberrypi-1",
    "hostOs" : null,
    "hostVersion" : null,
    "subType" : "RaspberryPi-Device",
    "firmwareVersion" : null,
    "deviceVendor" : null,
    "deviceForm" : null,
    "salesCode" : null,
    "countryCode" : null,
    "lastUpdated" : 1721225220000,
    "healthScore" : [ {
      "healthType" : "OVERALL",
      "reason" : "",
      "score" : 10
    }, {
      "healthType" : "ONBOARDED",
      "reason" : "",
      "score" : 4
!--- Output is suppressed
APIs with Query Parameters
Query parameters can be used to filter specific number of results returned by an API. These parameters are added into the URL of the API.
The Get Device List API call is tested.
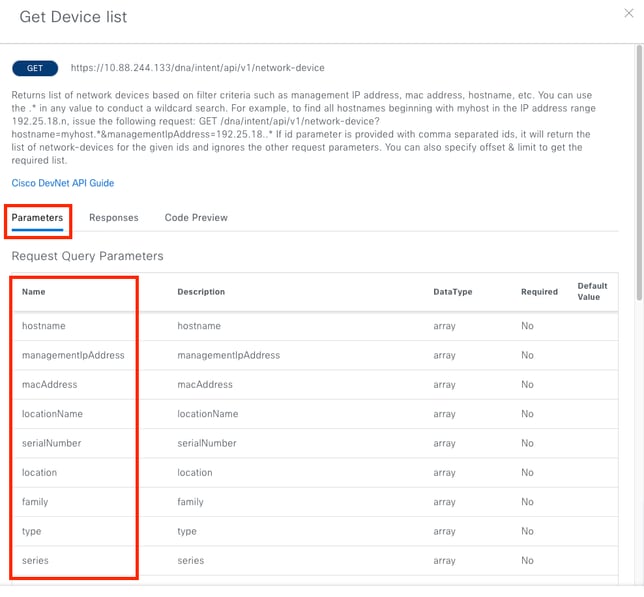
GET https://10.88.244.133/dna/intent/api/v1/network-deviceThe Get Device List API returns a list of all devices that are added in Catalyst Center. If details for a specific device are requested, query parameters can help to filter specific information.
To verify which query parameters are available for the API, navigate to Platform > Developer Toolkit > APIs > Get Device List and click on the name of the API. A new window is opened and under Parameters option, query parameters available for the API are displayed.

In this example, managementIpAddress and serialNumber query parameters are used (take in consideration that is not necessary to use all query parameters for the API call). Proceed to create and assign the corresponding values for both query parameters.
managementIpAddress = '10.82.143.250'
serialNumber = 'FDO25160X9L'
As it was mentioned above, the query parameters are added in the URL of the API, specifically at the end of the it, using a ‘?’ followed by the query parameters.
In case of multiple query parameters are going to be used, an ‘&’ sign is placed in between them to form what is called a query string.
The next example shows how to add the query parameters to the deviceListUrl variable which stores the URL of the API call.
deviceListUrl = "https://<CatalystCenterIP>/dna/intent/api/v1/network-device?managementIpAddresss=" + managementIpAddress + "&serialNumber=" + serialNumberNotice that the variables previously created were appended to the URL string. In other words, the whole string of the URL looks like this:
deviceListUrl = "https://<CatalystCenterIP>/dna/intent/api/v1/network-device?managementIpAddresss=10.82.143.250&serialNumber=FDO25160X9L"Continue with the API call, the deviceListHeaders variable is created to store the API Headers along with the token variable passed as parameter and the deviceListResponse variable stores the API response.
deviceListHeaders = {
            'X-Auth-Token': token,
        }

deviceListResponse = requests.request("GET", deviceListUrl, headers=deviceListHeaders)
To validate the response received, you can use the print() function.
print(deviceListResponse.text)Output Example:
{"response":[{"family":"Switches and Hubs","description":"Cisco IOS Software [Cupertino], Catalyst L3 Switch Software (CAT9K_IOSXE), Version 17.9.4a, RELEASE SOFTWARE (fc3) Technical Support: http://www.cisco.com/techsupport Copyright (c) 1986-2023 by Cisco Systems, Inc. Compiled Fri 20-Oct-23 10:44 by mcpre","lastUpdateTime":1721205664979,"deviceSupportLevel":"Supported","softwareType":"IOS-XE","softwareVersion":"17.9.4a","serialNumber":"FDO25160X9L","inventoryStatusDetail":"<status><general code=\"SUCCESS\"
!--- Output is suppressed
Tip: To print the response in a more readable way, you can use, json.loads() and json.dumps() functions described in Testing API section.
Revision History
| Revision | Publish Date | Comments |
|---|---|---|
1.0 |
23-Jul-2024 |
Initial Release |
Contributed by Cisco Engineers
- Jorge Luis Alvarado DuranTechnical Consulting Engineer
Contact Cisco
- Open a Support Case

- (Requires a Cisco Service Contract)
 Feedback