Introduction
This document describes how to deploy a virtual service on Cloud Services Platform (CSP) 2100. CSP 2100 is a x86 Software and Hardware Platform designed to host and manage any KVM-based network virtual service.
CSP-2100 is configurable by:
ConfD CLI
REST API
Graphical User Interface (web based GUI)
Prerequisites
Requirements
Cisco Recommends you to have a knowledge of ,
- Basic understanding of CSP 2100
- Knowledge to access CSP 2100 through GUI & CLI
- Basic understanding of curl to run REST API
Components Used
The information in this document is based on these software and hardware versions-
- CSP 2100 - Version - 2.1 (or higher)
- Curl
The information in this document was created from the devices in a specific lab environment. All of the devices used in this document started with a cleared (default) configuration. If your network is live, make sure that you understand the potential impact of any changes or configurations.
Configure
Network Diagram
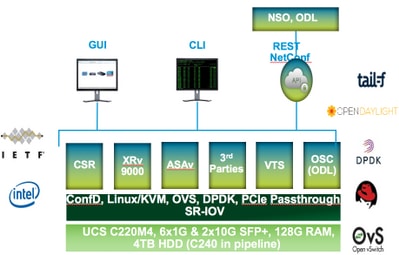
- CSP 2100 provides the DC Network Team with a turn-key & open x86 KVM software & hardware platform to run any Cisco or 3rd party virtual service.
- It has three ways to manage GUI, CLI and REST/NetConf API.
- CSP 2100 is built on Open platform using x86 Hardware and Linux/KVM Software.
Configurations
Method 1: Using CSP 2100 GUI
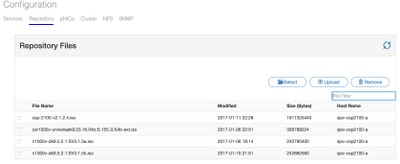
Step 1. Navigate to Configuration > Repository. Check and confirm that the Virtual service image/ISO is present.
Step 2. Browse to Configuration > Services and click Create.
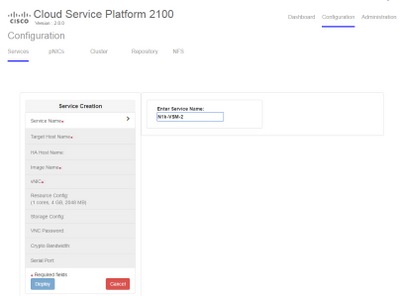
Step 3. Complete the configuration parameters and steps like Hostname, Image name (from repository), vNICs for the Virtual service, Resources for the virtual service and click deploy.
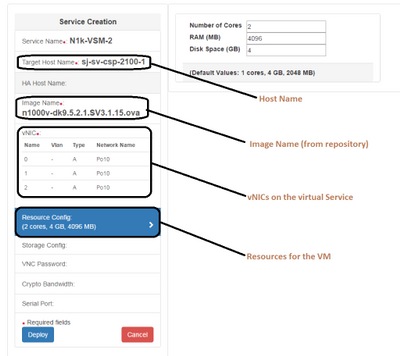
Method 2: Using ConfD CLI
Step 1. Login to the CLI of the CSP 2100.
Step 2. Use an already existing virtual Service configuration. Identify the configuration by using the command- show running-config service.
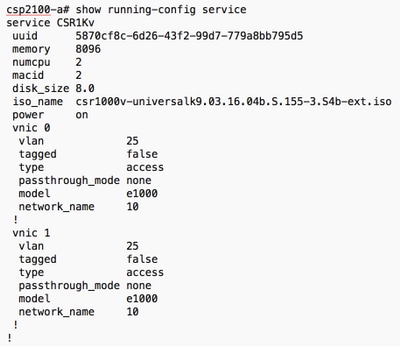
Step 3. Copy the existing configuration and modify the parameters of - memory, numcpu, disk_size, iso_name and the vnic details as required for the new Virtual Service.
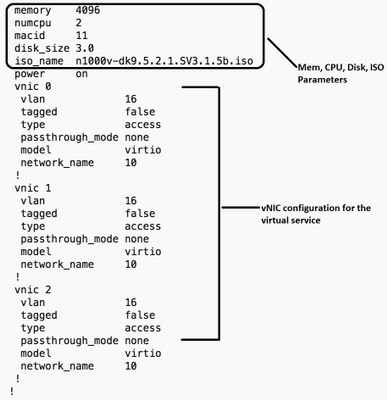
Step 4. Create a new service name as required. Here we are creating Nexus 1000v (VSM - VSM_N1K_CLI) and Copy Paste the above configuration and perform a commit.
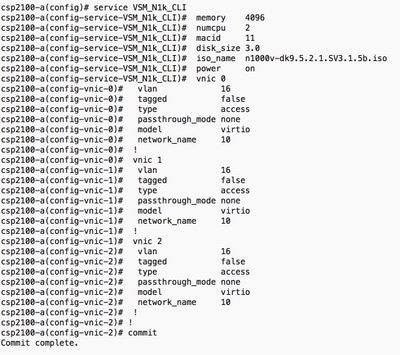
Method 3: Using CSP 2100 REST API
You can perform operations on the Cisco CSP 2100 objects using the Representational State
Transfer (REST) API. The Cisco CSP 2100 REST APIs support create, retrieve, update, and delete (CRUD) operations.
To call any REST function, you can use tools such as a web browser, the cURL tool, or Windows PowerShell.
- If you are using a web browser, type the URL.
- If you are using cURL or Windows PowerShell, use the format: curl –u username:password -X method https://ip-address:port_number/api/module locator
Step 1. Refer the CSP 2100 REST API Guide- CSP 2100 Rest API Guide
Step 2. Two examples which shows how to create service with and without VLAN:
With VLAN-
curl -ku admin:P@ssword123 -X POST https://<IP Address of CSP 2100>:443/api/running/services -H "Content-Type: application/vnd.yang.data+json" -d '{"service": {"name":"VSM_N1k_API3", "iso_name":"n1000v-dk9.5.2.1.SV3.1.5b.iso","power":"on","memory":"4096","disk_size":"3","vnics": { "vnic": [{ "nic":"0","vlan":"18","type":"access","network_name":"10"}]}}}'
Without VLAN-
curl -ku admin:P@ssword123 -X POST https://<IP Address of CSP 2100>:443/api/running/services -H "Content-Type: application/vnd.yang.data+json" -d '{"service": {"name":"VSM_N1k_API3", "iso_name":"n1000v-dk9.5.2.1.SV3.1.5b.iso","power":"on","memory":"4096","disk_size":"3","vnics": { "vnic": [{ "nic":"0","type":"access","network_name":"10"}]}}}'
Verify
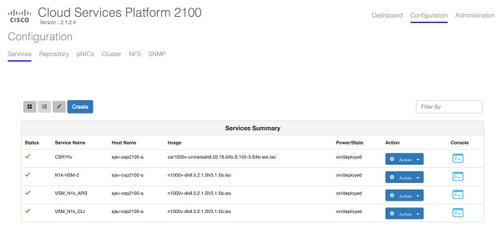
In order to verify that the services are deployed. Please browse to the CSP 2100 GUI.
Navigate to Configuration > Services. Check and confirm if the Service shows as on/deployed
