Configure and Claim Standalone Nexus for Intersight Connectivity
Available Languages
Download Options
Bias-Free Language
The documentation set for this product strives to use bias-free language. For the purposes of this documentation set, bias-free is defined as language that does not imply discrimination based on age, disability, gender, racial identity, ethnic identity, sexual orientation, socioeconomic status, and intersectionality. Exceptions may be present in the documentation due to language that is hardcoded in the user interfaces of the product software, language used based on RFP documentation, or language that is used by a referenced third-party product. Learn more about how Cisco is using Inclusive Language.
Contents
Introduction
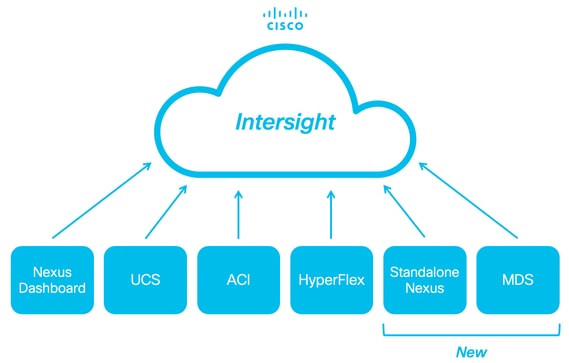
This document describes the steps required to enable and claim standalone Nexus switch(es) in Intersight for enhanced Cisco TAC support.
Prerequisites
You must have an account on Intersight.com, no license is required for Cisco NX-OS® claiming. If a new Intersight account needs to be created, see Account Creation.
Requirements
Cisco recommends that you have knowledge of these topics:
On the Standalone Nexus switch, NXDC has these guidelines and limitations:
- Cisco NX-OS must be running release 10.2(3)F or later
- DNS must be configured under the proper Virtual Routing and Forwarding (VRF)
svc.intersight.commust get resolved and allow outbound initiated HTTPS connections on port 443. This can be checked withopenssland curl. Internet Control Message Protocol (ICMP) requests are ignored.- If a proxy is required for an HTTPS connection to
svc.intersight.com, the proxy can be configured in the Nexus Switch Device Connector (NXDC) configuration. For proxy configuration, refer to Configuring NXDC.
Components Used
The information in this document is based on these software and hardware versions:
- Cisco Nexus N9K-C93240YC-FX2
- Cisco NX-OS 10.3(4a)M
The information in this document was created from the devices in a specific lab environment. All of the devices used in this document started with a cleared (default) configuration. If your network is live, ensure that you understand the potential impact of any command.
Background Information
Cisco Intersight is a cloud operations platform that consists of optional, modular capabilities of advanced infrastructure, workload optimization, and Kubernetes services. Visit Intersight Overview for more information.
Devices are connected to the Intersight portal through a NXDC that is embedded in the Cisco NX-OS image of each system. Beginning with Cisco NX-OS release 10.2(3)F, the Device Connector feature is supported which provides a secure way for the connected devices to send information and receive control instructions from the Cisco Intersight portal, using a secure Internet connection.
Connectivity Benefits
Intersight connectivity provides these features and benefits for the Cisco NX-OS-based platforms:
- Automated collection of
show tech-support detailsvia Rapid Problem Resolution (RPR for the TAC Service Requests open) - Remote on-demand collection of
show tech-support details - Future features include:
- Opening proactive TAC SRs based on telemetry or hardware failure
- Remote on-demand collection of individual show commands and more
Quickstart Video
Manually Claim an NXOS Device
Connectivity Verification

Note: Ping responses are suppressed (ICMP packets are dropped).
In order to check Transport Layer Security (TLS) and HTTPS connectivity, enabling bash and executing openssl and curl commands in the desired VRF (ip netns exec <VRF>) is recommended.
! Enable bash

config terminal ; feature bash ; end

! Verify TLS

run bash ip netns exec management openssl s_client -connect svc.intersight.com:443

! Verify https

run bash ip netns exec management curl -v -I -L -k https://svc.intersight.com:443

run bash ip netns exec management curl -v -I -L -k https://svc.intersight.com:443  --proxy [protocol://]host[:port]
TLS Verification with OpenSSL Client
Using OpenSSL, you can check the TLS connectivity to svc.intersight.com:443. When successful, retrieve the public signed certificate by the server and display the Certificate Authority chain.

Note: The next example executes the openssl s_client command in the VRF management. Replace the desired in the ip netns exec <VRF> construct.
Switch# run bash ip netns exec management openssl s_client -connect svc.intersight.com:443
CONNECTED(00000004)
depth=2 C = US, O = Amazon, CN = Amazon Root CA 1
verify return:1
depth=1 C = US, O = Amazon, CN = Amazon RSA 2048 M01
verify return:1
depth=0 CN = us-east-1.intersight.com
verify return:1
---
Certificate chain
 0 s:CN = us-east-1.intersight.com
   i:C = US, O = Amazon, CN = Amazon RSA 2048 M01
 1 s:C = US, O = Amazon, CN = Amazon RSA 2048 M01
   i:C = US, O = Amazon, CN = Amazon Root CA 1
 2 s:C = US, O = Amazon, CN = Amazon Root CA 1
   i:C = US, ST = Arizona, L = Scottsdale, O = "Starfield Technologies, Inc.", CN = Starfield Services Root Certificate Authority - G2
 3 s:C = US, ST = Arizona, L = Scottsdale, O = "Starfield Technologies, Inc.", CN = Starfield Services Root Certificate Authority - G2
   i:C = US, O = "Starfield Technologies, Inc.", OU = Starfield Class 2 Certification Authority
---
Server certificate
-----BEGIN CERTIFICATE-----
MIIGfzCCBWegAwIBAgIQD859tBjpT+QUyVOXqkG2pzANBgkqhkiG9w0BAQsFADA8
MoKXXrXrkESkWgbQadlEo3H545Zsix+mu83r7Gmv5L3+WFKzfUmLgeB2+z1Dk0Kg
UlNBIDIwNDggTTAxMB4XDTIzMDQwNTAwMDAwMFoXDTI0MDUwMzIzNTk1OVowIzEh
MB8GA1UEAxMYdXMtZWFzdC0xLmludGVyc2lnaHQuY29tMIIBIjANBgkqhkiG9w0B
AoKXXrXrkESkWgbQadlEo3H545Zsix+mu83r7Gmv5L3+WFKzfUmLgeB2+z1Dk0Kn
BDM+MCNnvmgNDlGnU6/t1jOC780QpKXr2ksbGC0FzHfMvNjEk9kMCUe179dummrs
pOOFzvIrJGqYvkIXT5WLtiU9aP3+VSEWQO1kTeDHoDfLLJLON42cKjskYt0jCTwE
poKXXrXrkESkWgbQadlEo3H545Zsix+mu83r7Gmv5L3+WFKzfUmLgeB2+z1Dk0KI
elf3tYBhuQK3y4DoSqg1/gptnUOlNwSqMu4zXjI7neGyHnzjsPUyI8qilXbPS9tV
KoKXXrXrkESkWgbQadlEo3H545Zsix+mu83r7Gmv5L3+WFKzfUmLgeB2+z1Dk0Kw
HwYDVR0jBBgwFoAUgbgOY4qJEhjl+js7UJWf5uWQE4UwHQYDVR0OBBYEFM7X7s7c
NoKXXrXrkESkWgbQadlEo3H545Zsix+mu83r7Gmv5L3+WFKzfUmLgeB2+z1Dk0Kp
Z2h0LmNvbYIac3ZjLXN0YXRpYzEuaW50ZXJzaWdodC5jb22CGioudXMtZWFzdC0x
LoKXXrXrkESkWgbQadlEo3H545Zsix+mu83r7Gmv5L3+WFKzfUmLgeB2+z1Dk0K1
Y3MtY29ubmVjdC5jb22CE3N2Yy51Y3MtY29ubmVjdC5jb22CDmludGVyc2lnaHQu
Y29tghJzdmMuaW50ZXJzaWdodC5jb20wDgYDVR0PAQH/BAQDAgWgMB0GA1UdJQQW
MBQGCCsGAQUFBwMBBggrBgEFBQcDAjA7BgNVHR8ENDAyMDCgLqAshipodHRwOi8v
YoKXXrXrkESkWgbQadlEo3H545Zsix+mu83r7Gmv5L3+WFKzfUmLgeB2+z1Dk0KI
BgZngQwBAgEwdQYIKwYBBQUHAQEEaTBnMC0GCCsGAQUFBzABhiFodHRwOi8vb2Nz
coKXXrXrkESkWgbQadlEo3H545Zsix+mu83r7Gmv5L3+WFKzfUmLgeB2+z1Dk0Ku
cjJtMDEuYW1hem9udHJ1c3QuY29tL3IybTAxLmNlcjAMBgNVHRMBAf8EAjAAMIIB
fgYKKwYBBAHWeQIEAgSCAW4EggFqAWgAdwDuzdBk1dsazsVct520zROiModGfLzs
3oKXXrXrkESkWgbQadlEo3H545Zsix+mu83r7Gmv5L3+WFKzfUmLgeB2+z1Dk0K5
CSFqTpBjlOdOLQ4YuQIhAO10VDrLJMM+9EtOwmZd8Q1MRHJlOlr2VWmOTF6GGkCV
AHUAc9meiRtMlnigIH1HneayxhzQUV5xGSqMa4AQesF3crUAAAGHUp9iOwAABAMA
RjBEAiAFPPLvt7TN7mTRnQZ+FZLGR/G04KQqSjYuszDNPArT3wIgf/sQbQqNjCk7
joFUuL9cEPYfNm7n1nZIFIRAK6UqwG0AdgBIsONr2qZHNA/lagL6nTDrHFIBy1bd
LoKXXrXrkESkWgbQadlEo3H545Zsix+mu83r7Gmv5L3+WFKzfUmLgeB2+z1Dk0K8
MXtts5t/C5lYw5peGAIgK0eFmxTptEfMkBZti39vepUxb5meDvKaZdtXVvFpkCMw
DQYJKoZIhvcNAQELBQADggEBANl6HKZ9P6AIufr7qdNCcW+DXClY6dqX1KN0sCh+
UoKXXrXrkESkWgbQadlEo3H545Zsix+mu83r7Gmv5L3+WFKzfUmLgeB2+z1Dk0KM
z5R1VV+81gN2HHiuUsEOFwHDbbhiGBJiJteFm0blpruKHennx8HQYfC7bup4N5JH
YoKXXrXrkESkWgbQadlEo3H545Zsix+mu83r7Gmv5L3+WFKzfUmLgeB2+z1Dk0Kb
LKFl6c+EN0Y76YaCV8doujG3qD/bO9VDx7dhvbSEECYuzbYyPDGnb7Drmhny0Eki
smLUZ3TVcCvPc+1dE/jrbBzPeIY7jGr8eL7masFCuZZn2lM=
-----END CERTIFICATE-----
subject=CN = us-east-1.intersight.com

issuer=C = US, O = Amazon, CN = Amazon RSA 2048 M01

---
No client certificate CA names sent
Peer signing digest: SHA256
Peer signature type: RSA
Server Temp Key: ECDH, P-256, 256 bits
---
SSL handshake has read 5754 bytes and written 442 bytes
Verification: OK
---
New, TLSv1.2, Cipher is ECDHE-RSA-AES128-GCM-SHA256
Server public key is 2048 bit
Secure Renegotiation IS supported
Compression: NONE
Expansion: NONE
No ALPN negotiated
SSL-Session:
    Protocol  : TLSv1.2
    Cipher    : ECDHE-RSA-AES128-GCM-SHA256
    Session-ID: 66D0B69FAA7EB69FAA7EC54C9764966ED9A1289650B69FAA7EB69FAA7E9A5FD5ADE
    Session-ID-ctx:
    Master-Key: B69FAA7E45891555D83DFCAEB69FAA7EB69FAA7EA3A99E7689ACFB69FAA7EAD7FD93DB69FAA7EB1AF821
    PSK identity: None
    PSK identity hint: None
    SRP username: None
    TLS session ticket lifetime hint: 86400 (seconds)
    TLS session ticket:
    0000 - 36 12 b2 36 b3 53 07 29-54 ac 56 f0 06 83 4f b1   6..6.S.)T.V...O.
    0010 - 49 35 51 40 22 07 bd 7e-59 d7 7e 44 29 ff c6 2a   I5Q@"..~Y.~D)..*
    0020 - ec bc 11 e1 d3 5d 69 e8-7a d2 f1 c2 08 f6 5b 8f   .....]i.z.....[.
    0030 - 2c 5b 5e 50 e3 e2 8f e7-c4 44 8f e4 6d 45 d2 64   ,[^P.....D..mE.d
    0040 - 93 98 f5 e8 b0 f7 1d 00-26 4b 88 ea 2d 7d 42 58   ........&K..-}BX
    0050 - 05 9f 71 3a fe ac f0 15-a5 5c 1d 74 74 bf 32 1b   ..q:.....\.tt.2.
    0060 - d8 a8 23 84 08 cc f9 3e-54                        ..#....>T

    Start Time: 1707515659
    Timeout   : 7200 (sec)
    Verify return code: 0 (ok)
    Extended master secret: yes
---
HTTPS Reachability Verification
In order to check the HTTPS connectivity, use the curl command with the -v verbose flag (displays whether a proxy is used or not).

Note: In order to check the impact of enabling or disabling a proxy, you can add the options --proxy [protocol://]host[:port] or --noproxy [protocol://]host[:port].
The construct ip netns exec <VRF> is used to execute curl in the desired VRF; for example, ip netns exec management for VRF management.
run bash ip netns exec management curl -v -I -L -k https://svc.intersight.com:443

run bash ip netns exec management curl -v -I -L -k https://svc.intersight.com:443  --proxy [protocol://]host[:port]
# run bash ip netns exec management curl -v -I -L -X POST https://svc.intersight.com:443 --proxy http://proxy.esl.cisco.com:80Connected to proxy.esl.cisco.com (10.201.255.40) port 80
Trying 10.201.255.40:80... ** CONNECT tunnel: HTTP/1.1 negotiated * allocate connect buffer * Establish HTTP proxy tunnel to svc.intersight.com:443 > CONNECT svc.intersight.com:443 HTTP/1.1 > Host: svc.intersight.com:443 > User-Agent: curl/8.4.0 > Proxy-Connection: Keep-Alive >< HTTP/1.1 200 Connection establishedHTTP/1.1 200 Connection established < snip >
Configure
Claim the Device within intersight.com
In order to claim a new target in Intersight, accomplish the mentioned steps.
On the Nexus Device
Issue the Cisco NX-OS command show system device-connector claim-info.

Note: For releases prior to NX-OS 10.3(4a) use "show intersight claim-info" command

Note: Nexus generated claim-info maps to these Intersight claim fields:
Serial Number = Intersight Claim ID
Device-ID Security Token = Intersight Claim Code
# show system device-connector claim-info
SerialNumber: FDO23021ZUJ
SecurityToken: 9FFD4FA94DCD
Duration: 599
Message:
Claim state: Not Claimed
The Duration reported here is in seconds.
On Intersight Portal

Note: Note: The Cisco Intersight Device Claim functionality is not available for EMEA region. These steps only apply to the North America Region.
1. Within 10 minutes login to Intersight with the Account Administrator, Device Administrator, or Device Technician privileges.
2. From the Service Selector drop-down list, choose System.

3. Navigate to ADMIN > Targets > Claim a New Target.
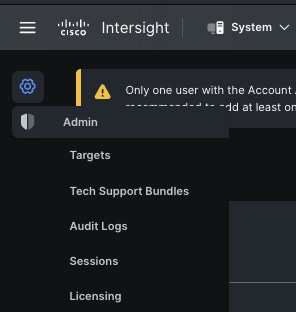
3.1. Click Claim a New Target as shown in the image.

4. Choose Available for Claiming and choose the target type (for example, Network) you want to claim. Click Start.
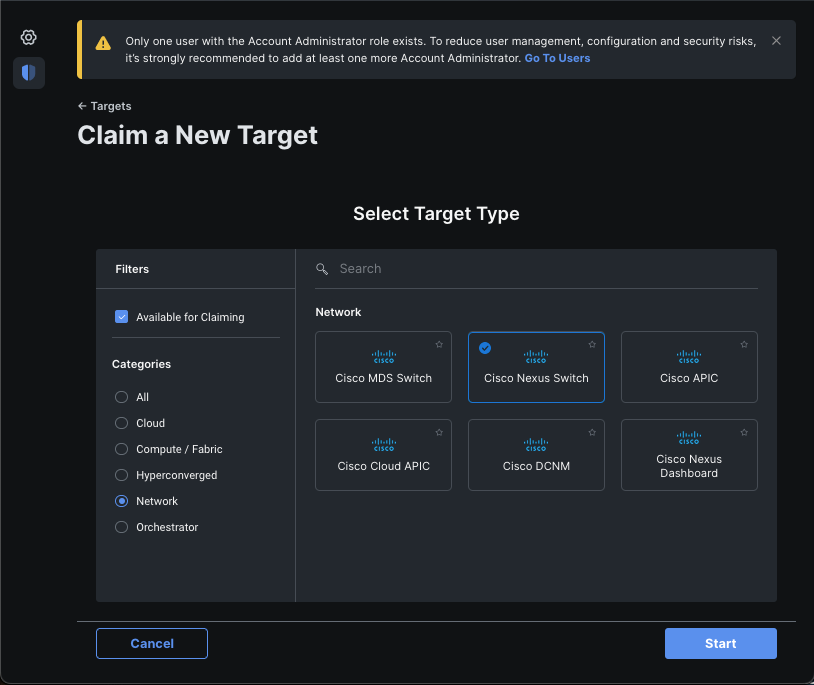
5. Enter the required details and click Claim in order to complete the claiming process.

Note: The Security Token on the switch is used as the Claim Code and the Serial Number of the switch is the Device ID.

Note: The Security Token expires. You must complete the claim before or the system prompts you to regenerate one.

Claim One to Many Standalone Nexus Devices within intersight.com using Ansible®
In order to claim one to many Nexus devices, an Ansible playbook can be run.
- The ansible inventory and playbook can be git cloned from https://github.com/datacenter/ansible-intersight-nxos.
- In the Ansible
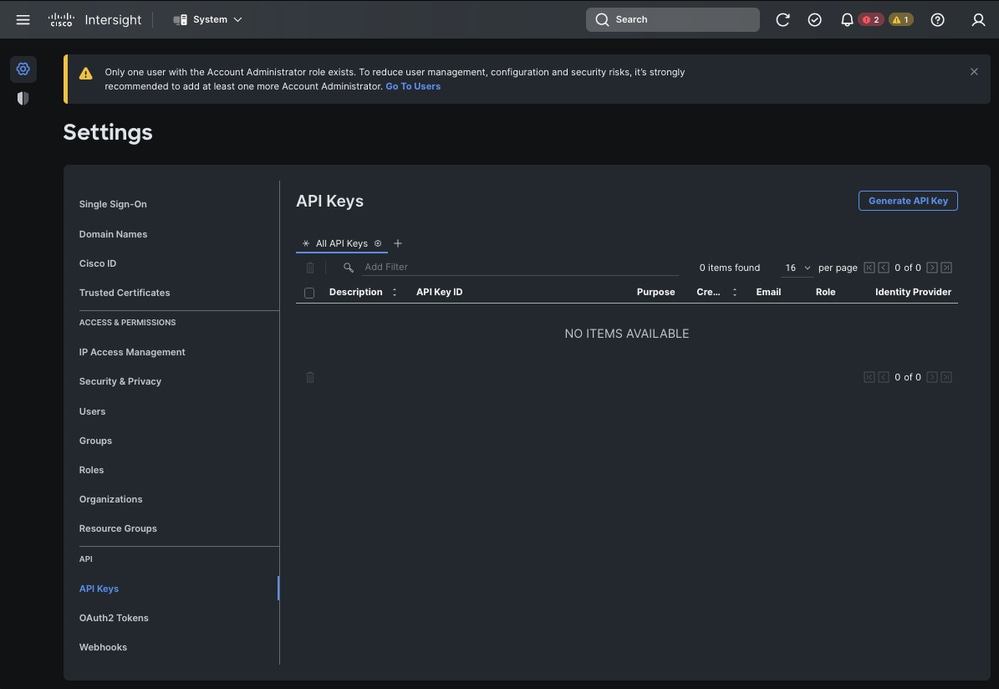
inventory.yaml, theansible_connectiontype is set toansible.netcommon.network_cliin order to send commands to the Nexus switch. This can be changed toansible.netcommon.httpapiin order to allow connectivity through NXAPI. - Ansible connection to the Intersight endpoint requires an API key, which can be generated from your intersight.com account.
Configure Nexus NXAPI (Only used if Using ansible.netcommon.httpapi)

Note: In the case when a system-level proxy is configured (HTTP(S)_PROXY) and Ansible must not use a proxy in order to connect with the Nexus NXAPI endpoint, it is desirable to set ansible_httpapi_use_proxy: False (Default is True).
# configure terminal
# cfeature nxapi
# nxapi port 80
# no nxapi https port 443
# end

# show nxapi
nxapi enabled
NXAPI timeout 10
NXAPI cmd timeout 300
HTTP Listen on port 80
HTTPS Listen on port 443
Certificate Information:
    Issuer:   issuer=C = US, ST = CA, L = San Jose, O = Cisco Systems Inc., OU = dcnxos, CN = nxos
    Expires:  Feb 10 22:30:38 2024 GMT
In order to independently verify the HTTP connectivity to the NXAPI endpoint, you can attempt to send a show clock. In the next example, the switch authenticates the client using basic authentication. It is also possible to configure the NXAPI server in order to authenticate clients based on X.509 user certificate.

Note: Basic Authentication hash is obtained from base64 encoding of username:password. In this example, admin:cisco!123 base64 encoding is YWRtaW46Y2lzY28hMTIz.
curl -v --noproxy '*' \
     --location 'http://10.1.1.3:80/ins' \
     --header 'Content-Type: application/json' \
     --header 'Authorization: Basic YWRtaW46Y2lzY28hMTIz' \
     --data '{
                "ins_api": {
                    "version": "1.0",
                    "type": "cli_show",
                    "chunk": "0",
                    "sid": "sid",
                    "input": "show clock",
                    "output_format": "json"
                 }
            }'
Curl Response:
* Trying 10.1.1.3...
* TCP_NODELAY set
* Connected to 10.1.1.3 (10.1.1.3) port 80 (#0)
> POST /ins HTTP/1.1
> Host: 10.1.1.3
> User-Agent: curl/7.61.1
> Accept: */*
> Content-Type: application/json
> Authorization: Basic YWRtaW56Y2lzY28hBNIz
> Content-Length: 297
>
* upload completely sent off: 297 out of 297 bytes
< HTTP/1.1 200 OK
< Server: nginx/1.19.6
< Date: Fri, 09 Feb 2024 23:17:10 GMT
< Content-Type: text/json; charset=UTF-8
< Transfer-Encoding: chunked
< Connection: keep-alive
< Set-Cookie: nxapi_auth=dzqnf:xRYwR0l1Tra64VfOMVuD4oI4=; Secure; HttpOnly;
< anticsrf: /i3vzCvxhOr4w2IrKP+umbDnzHQ=
< Strict-Transport-Security: max-age=31536000; includeSubDomains
< X-Frame-Options: SAMEORIGIN
< X-Content-Type-Options: nosniff
< Content-Security-Policy: block-all-mixed-content; base-uri 'self'; default-src 'self'; script-src 'self' 'nonce-zHx12KP1tervan1s6lrFQz7N6PF0rh'; style-src 'self' 'nonce-zHx12KP1tervan1s6lrFQz7N6P40rh'; img-src 'self'; connect-src 'self'; font-src 'self'; object-src 'self'; media-src 'self'; form-action 'self'; frame-ancestors 'self';
<
{
    "ins_api":    {
        "type":    "cli_show",
        "version":    "1.0",
        "sid":    "eoc",
        "outputs":    {
            "output":    {
                "input":    "show clock",
                "msg":    "Success",
                "code":    "200",
                "body":    {
                    "simple_time":    "23:17:10.814 UTC Fri Feb 09 2024\n",
                    "time_source":    "NTP"
                }
            }
        }
    }
* Connection #0 to host 10.1.1.3 left intact
}%
Generate Intersight API Keys
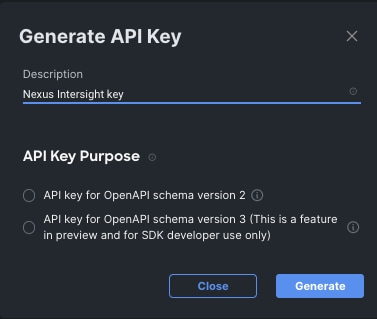
Refer to the README.md section on how to obtain the API Key from the Intersight System > Settings > API keys > Generate API Key.
Example: Ansible inventory.yaml

Note: In the next example, ansible was configured in order to ignore the operating system proxy settings with ansible_httpapi_use_proxy: False. If you need your Ansible server to use a proxy in order to reach the switch, you can remove that configuration or set it to True (default).

Note: The API key ID is a string. The API private key includes the full path to a file that contains the private key. For the production environment, it is recommended to use the Ansible vault.
---
all:
  hosts:
    switch1:
      ansible_host: "10.1.1.3"
      intersight_src: "mgmt0"
      intersight_vrf: "management"

  vars:
      ansible_user: "admin"
      ansible_password: "cisco!123"
      ansible_connection: ansible.netcommon.network_cli
      ansible_network_os: cisco.nxos.nxos
      ansible_httpapi_use_proxy: False
      remote_tmp: "/bootflash"
      proxy_env:
         - no_proxy: "10.1.1.3/24"
      intersight_proxy_host: 'proxy.cisco.com'
      intersight_proxy_port: '80'


      api_key_id: "5fcb99d97564612d33fdfcal/5fcb99d97564612d33fdf1b2/65c6c09d756461330198ce7e"
      api_private_key: "/home/admin/ansible-intersight-nxos/my_intersight_private_key.txt"
...
Example: playbook.yaml Execution
For further information on programming standalone Nexus devices with Ansible see the Applications/Using Ansible with the Cisco NX-OS section of the Cisco Nexus 9000 Series NX-OS Programmability Guide for your current release.
❯ ansible-playbook -i inventory.yaml playbook.yaml

PLAY [all] *********************************************************************************************************************************************************

TASK [Enable feature intersight] ***********************************************************************************************************************************
[WARNING]: To ensure idempotency and correct diff the input configuration lines should be similar to how they appear if present in the running configuration on
device
changed: [switch1]

TASK [Configure proxy] *********************************************************************************************************************************************
ok: [switch1]

TASK [Unconfigure proxy] *******************************************************************************************************************************************
skipping: [switch1]

TASK [Configure src interface] *************************************************************************************************************************************
ok: [switch1]

TASK [Unconfigure src interface] ***********************************************************************************************************************************
skipping: [switch1]

TASK [Configure src vrf] *******************************************************************************************************************************************
ok: [switch1]

TASK [Unconfigure src vrf] *****************************************************************************************************************************************
skipping: [switch1]

TASK [Await connection to Intersight] ******************************************************************************************************************************
FAILED - RETRYING: [switch1]: Await connection to Intersight (10 retries left).
FAILED - RETRYING: [switch1]: Await connection to Intersight (9 retries left).
FAILED - RETRYING: [switch1]: Await connection to Intersight (8 retries left).
FAILED - RETRYING: [switch1]: Await connection to Intersight (7 retries left).
FAILED - RETRYING: [switch1]: Await connection to Intersight (6 retries left).
FAILED - RETRYING: [switch1]: Await connection to Intersight (5 retries left).
FAILED - RETRYING: [switch1]: Await connection to Intersight (4 retries left).
ok: [switch1]

TASK [Get show system device-connector claim-info] *****************************************************************************************************************
ok: [switch1]

TASK [Set claiminfoDict] *******************************************************************************************************************************************
ok: [switch1] => (item=SerialNumber: FDO21112E2L)
ok: [switch1] => (item=  SecurityToken: 0A70886FE1B8)
ok: [switch1] => (item=  Duration: 599)
ok: [switch1] => (item=  Message: )
ok: [switch1] => (item=  Claim state: Not Claimed)

TASK [claim device - PROXY] ****************************************************************************************************************************************
skipping: [switch1]

TASK [claim device - NO PROXY] *************************************************************************************************************************************
changed: [switch1]

PLAY RECAP *********************************************************************************************************************************************************
switch1                    : ok=8    changed=2    unreachable=0    failed=0    skipped=4    rescued=0    ignored=0
Verify
In order to verify the claim of a new target, accomplish this:
On the Nexus Switch
Releases Prior to 10.3(4a)M
# run bash sudo cat /mnt/pss/connector.db
Nexus# run bash sudo cat /mnt/pss/connector.db
{
  "AccountOwnershipState": "Claimed",
  "AccountOwnershipUser": "bpaez@cisco.com",
  "AccountOwnershipTime": "2024-04-25T22:37:25.173Z",
  "AccountOwnershipId": "TAC-DCRS",
  "DomainGroupMoid": "6620503275646133014ec978",
  "AccountMoid": "6620503275646133014ec977",
  "CloudDns": "svc.ucs-connect.com",
  "CloudDnsList": [
    "svc.intersight.com",
    "svc-static1.intersight.com",
    "svc.ucs-connect.com",
    "svc-static1.ucs-connect.com"
  ],
  "CloudCert": "",
  "UserCloudCerts": {},
  "Identity": "662adb256f72613901e8bc19",
  "AccessKeyId": "98facfdbf3855bcfd340f2bbb0c388f8",
  "AccessKey": "",
  "PrivateAccessKey": "-----BEGIN RSA PRIVATE KEY-----
-CUT-
5Do\nD18Ta5YvuIYFLZrYlHLyCDOhS5035AUEGNtEceiPhQjOCvRumyJD\n-----END RSA PRIVATE KEY-----\n",
  "CloudEnabled": true,
  "ReadOnlyMode": false,
  "LocalConfigLockout": false,
  "TunneledKVM": false,
  "HttpProxy": {
    "ProxyHost": "proxy.cisco.com",
    "ProxyPort": 8080,
    "Preference": 0,
    "ProxyType": "Manual",
    "Targets": [
      {
        "ProxyHost": "proxy.cisco.com",
        "ProxyPort": 8080,
        "Preference": 0
      }
    ]
  },
  "LogLevel": "info",
  "DbVersion": 1,
  "AutoUpgradeAdminState": "Automatic"
Releases Beginning with 10.3(4a)M
# show system device-connector claim-info
N9k-Leaf-2# show system device-connector claim-info
  SerialNumber: FDO23021ZUJ
  SecurityToken:
  Duration: 0
  Message: Cannot fetch claim code for already claimed device
  Claim state: Claimed
  Claim time: 2024-02-09T15:38:57.561Z
  Claimed by: brvarney@cisco.com
  Account: ACI-DCRS-TAC
  Site name:
  Site ID:
# show system internal intersight info
# show system internal intersight info
Intersight connector.db Info:
ConnectionState         :Connected
ConnectionStateQual     :
AccountOwnershipState   :Claimed
AccountOwnershipUser    :brvarney@cisco.com
AccountOwnershipTime    :2024-02-09T15:38:57.561Z
AccountOwnershipId      :ACI-DCRS-TAC
DomainGroupMoid         :5eb2e1e47565612d3079fe9a
AccountMoid             :5eb2e1e47565612d3079fe92
CloudDns                :svc.ucs-connect.com
CloudDnsList:
        1.              :svc.ucs-connect.com
        2.              :svc.intersight.com
        3.              :svc-static1.intersight.com
        4.              :svc-static1.ucs-connect.com
Identity                :65c647116f72513501e75530
CloudEnabled            :true
ReadOnlyMode            :false
LocalConfigLockout      :false
TunneledKVM             :false
HttpProxy:
        ProxyHost       :proxy.cisco.com
        ProxyPort       :8080
        Preferenc       :0
        ProxyType       :Manual
    Target[1]:
        ProxyHost       :proxy.cisco.com
        ProxyPort       :8080
        Preference      :0
LogLevel                :info
DbVersion               :1
AutoUpgradeAdminState   :Automatic
Ansible
It is possible to add a task at the end of the playbook.yaml in order to obtain the switch intersight information.
 - name: Get intersight info
    nxos_command:
      commands:
      - show system internal intersight info
    register: intersightInfo_claimed
    retries: 10
    delay: 10
    until: intersightInfo.stdout is search("Connecte")

  - name: Display intersight info
    vars:
      msg: |-
           output from {{ inventory_hostname }}:
           {{ intersightInfo_claimed.stdout | join("") }}
    debug:
      msg: "{{ msg.split('\n') }}"
Here is the corresponding output:
TASK [Get intersight info] ***************************************************************************************************
ok: [switch1]

TASK [Display intersight info] ***********************************************************************************************
ok: [switch1] => {
    "msg": [
        "output from switch1:",
        "Intersight connector.db Info:",
        "ConnectionState         :Connected",
        "ConnectionStateQual     :",
        "AccountOwnershipState   :Claimed",
        "AccountOwnershipUser    :vricci@cisco.com",
        "AccountOwnershipTime    :2024-02-10T01:00:28.516Z",
        "AccountOwnershipId      :vricci",
        "DomainGroupMoid         :5fcb98d97565612d33fdf1ae",
        "AccountMoid             :5fcb98d97565612d33fdf1ac",
        "CloudDns                :svc.intersight.com",
        "CloudDnsList:           ",
        "        1.              :svc.intersight.com",
        "        2.              :svc-static1.intersight.com",
        "        3.              :svc.ucs-connect.com",
        "        4.              :svc-static1.ucs-connect.com",
        "Identity                :65c6caac6f72613901f841c1",
        "CloudEnabled            :true",
        "ReadOnlyMode            :false",
        "LocalConfigLockout      :false",
        "TunneledKVM             :false",
        "HttpProxy:              ",
        "        ProxyHost       :proxy.cisco.com",
        "        ProxyPort       :80",
        "        Preferenc       :0",
        "        ProxyType       :Manual",
        "    Target[1]:          ",
        "        ProxyHost       :proxy.cisco.com",
        "        ProxyPort       :80",
        "        Preference      :0",
        "LogLevel                :info",
        "DbVersion               :1",
        "AutoUpgradeAdminState   :Automatic"
    ]
}
Disable Device Connector
| Command or Action | Purpose | |
|---|---|---|
|
Step 1 |
no feature intersight Example: switch(config)# no feature intersight |
Disables the intersight process and removes all NXDC configuration and logs store. |
Revision History
| Revision | Publish Date | Comments |
|---|---|---|
4.0 |
30-Sep-2024 |
Added EMEA Region notice to 'Configure - On Intersight Portal' Section |
3.0 |
15-May-2024 |
Added Quickstart Video for Manually Claiming your NXOS Deice |
2.0 |
02-Apr-2024 |
Added "Disable Device Connector" Section |
1.0 |
22-Feb-2024 |
Initial Release |
Contributed by Cisco Engineers
- Branden VarneyTechnical Leader
- Vincent RicciTechnical Leader
- Yogesh RamdossPrincipal Engineer
Contact Cisco
- Open a Support Case

- (Requires a Cisco Service Contract)
 Feedback