Introduction
This document describes the installation of a release key to a Cisco Expressway Series device via the web interface and the Command Line Interface (CLI).
Contributed by Michael Wall, Cisco TAC Engineer.
Prerequisites
Requirements
Cisco recommends that you have knowledge of these topics:
Expressway Installation
Have Installed successfully the Expressway and applied a valid IP address that is reachable via web interface and or CLI.
Have applied for and received a release key valid for the Expressway serial number.
Have access to the Expressway with both root (by CLI) and an admin account by web interface or CLI.
Have downloaded an Expressway software upgrade image from Cisco.com.
Note: Installation guides can be found here: Install and Upgrade Guides
Components Used
The information in this document is based on these software versions:
Expressway Version x8.7.3 and x8.8.3
Expressway C x7.X and x8.X releases
Expressway E x7.X and x8.X releases
PuTTY (terminal emulation software)
---Alternatively, you could use any terminal emulation software that supports SSH such as Secure CRT, TeraTerm, and so on.
PSCP (PuTTY Secure Copy Protocol client)
---You can use any client that supports SCP.
Licensing email with a Release Key or Upgrade Key.
A web browser. In this example, Firefox is used, Internet Explorer and Chrome work equally as well.
The information in this document was created from the devices in a specific lab environment. All of the devices used in this document started with a cleared (default) configuration. If your network is live, ensure that you understand the potential impact of any command.
Configure
Web Interface Release Key Installation Example
Here you have two options:
Option one, you can set the release key.
Option two, you can add the release key as part of the upgrade process.
Either option works and we show the set option first followed by the upgrade option next.
Note: Both options require an Expressway restart.
Option one shows the set option.
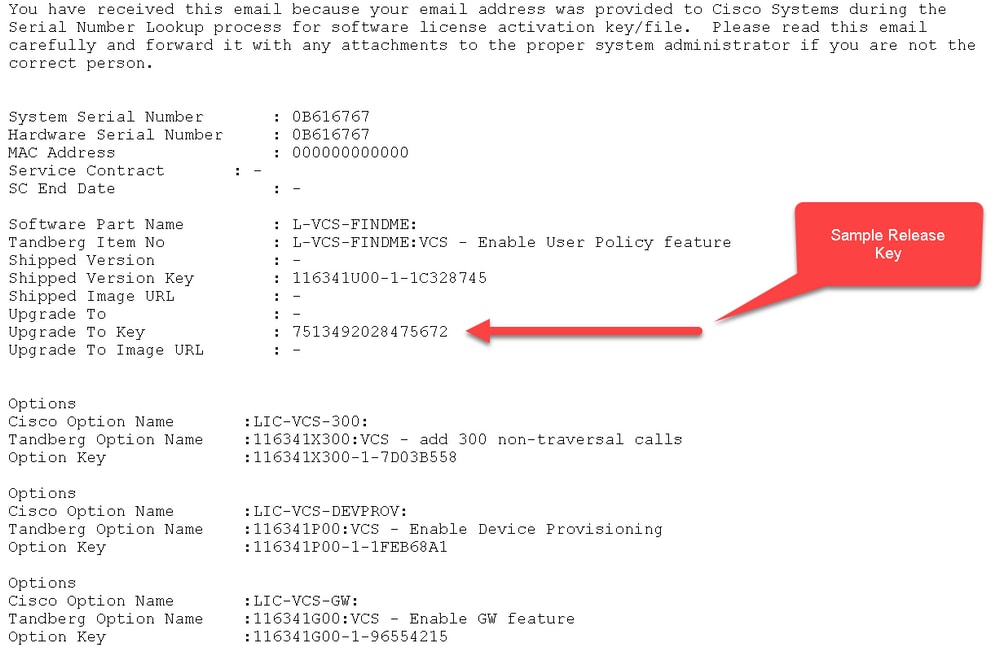
Step 1: Once you have installed your Expressway, have your serial number, and applied for your release key use your PAK and serial number, you receive a license email from the Cisco licensing team which can or can not contain a release key, and option keys.
Note: The example email is for a VCS, this is ok, the email for an Expressway Series looks the same.
Note: Examples of PAK are outside the scope of this document.
EMAIL EXAMPLE
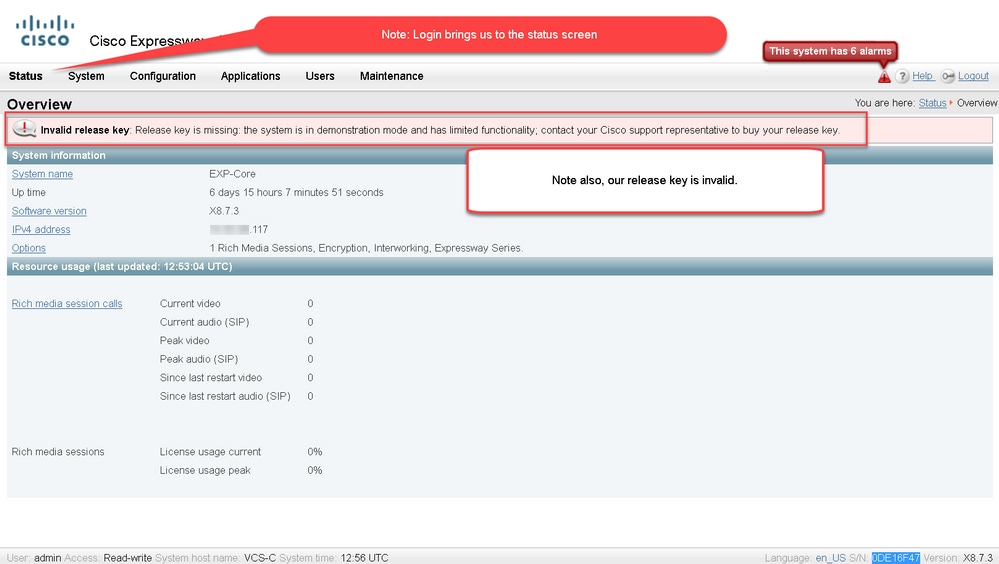
Step 2: Access the web interface of the Expressway with a web browser. Log in with an admin account and you are taken to the Expressway Status screen.
Note: Some digits are purposely blurred throughout this document.
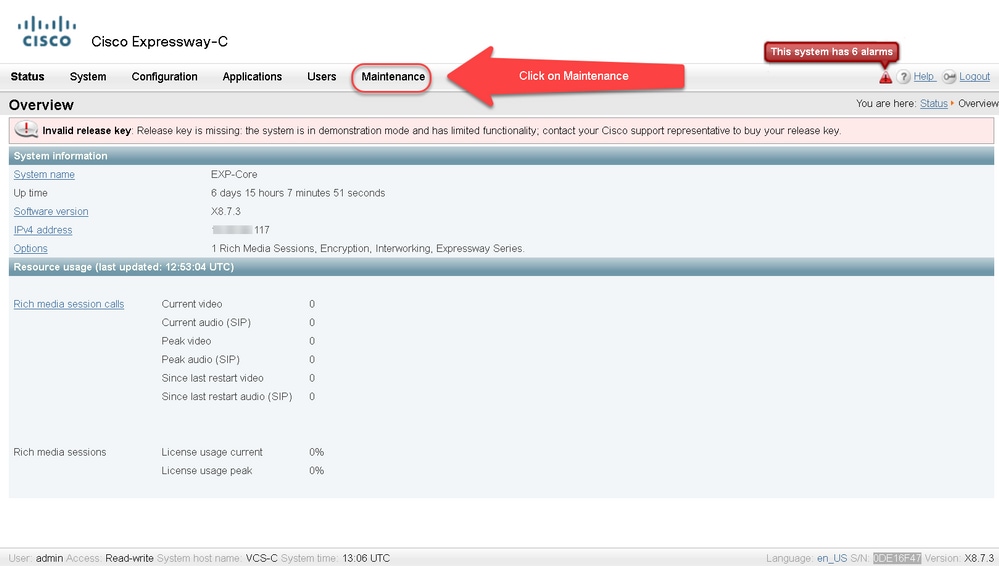
Step 3: Navigate to the appropriate screen in order to install your release key. Hover over the maintenance tab.
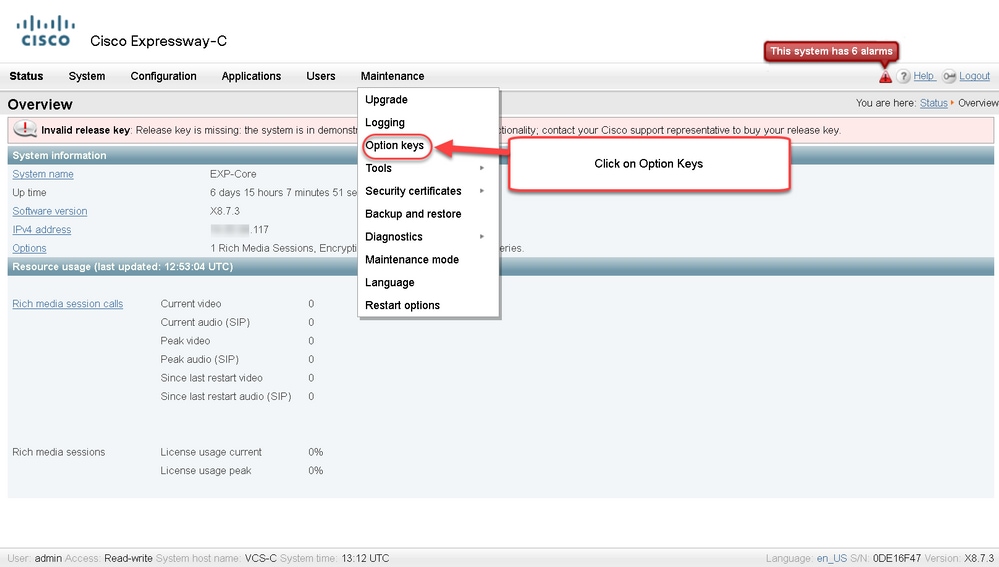
Step 4: When the menu pops up, click Option Keys.
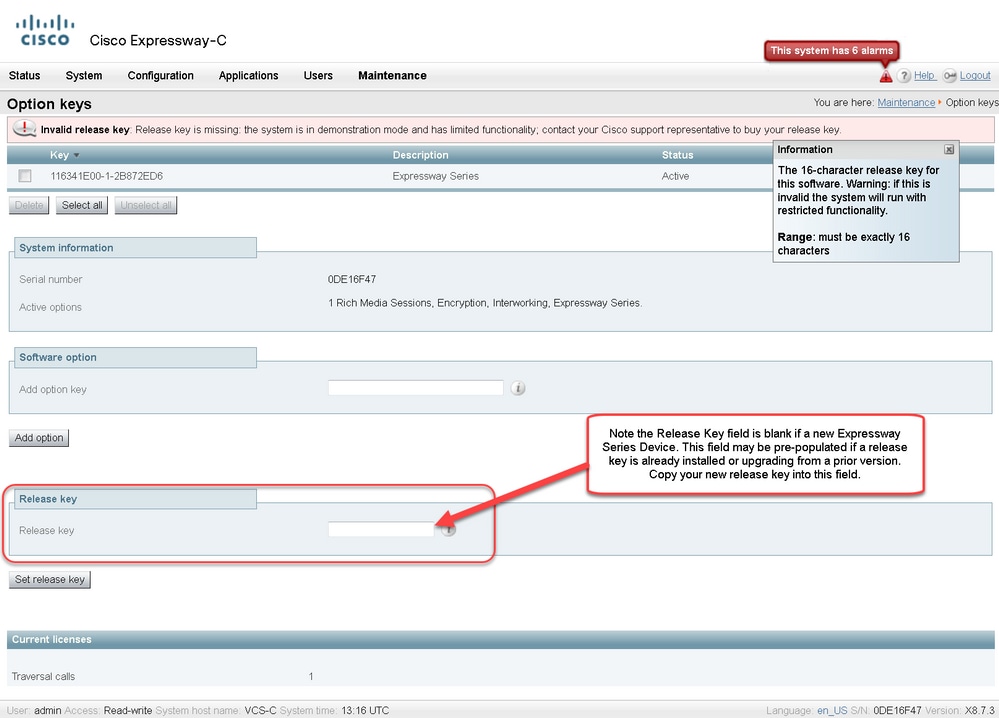
Step 5: Observe the Release key section and if this is a new install, there is a blank release key field. The Release key field for another Expressway installation is pre-populated with the current release key value. You use the Upgrade option to set the release key in that case.
Note: The release key does not change between minor version upgrades. The release key only changes between major version upgrades such as x7.X to x8.X.
Copy and paste your release key into the Release key field:
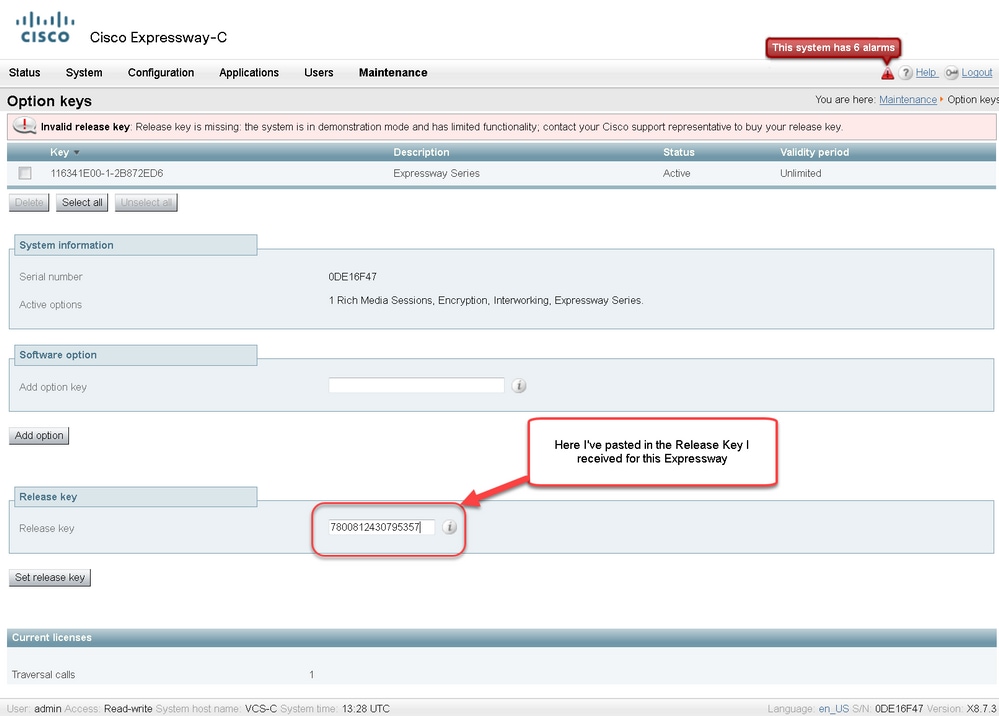
Step 6: You can see the release key pasted into the Release key field.
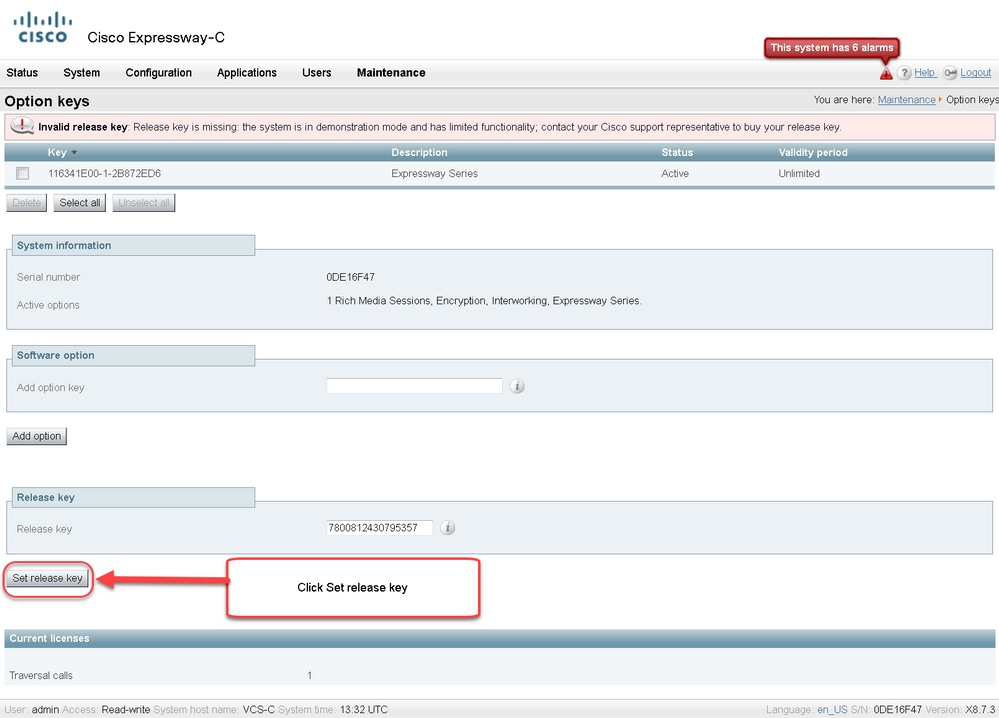
Step 7: Click Set release key.
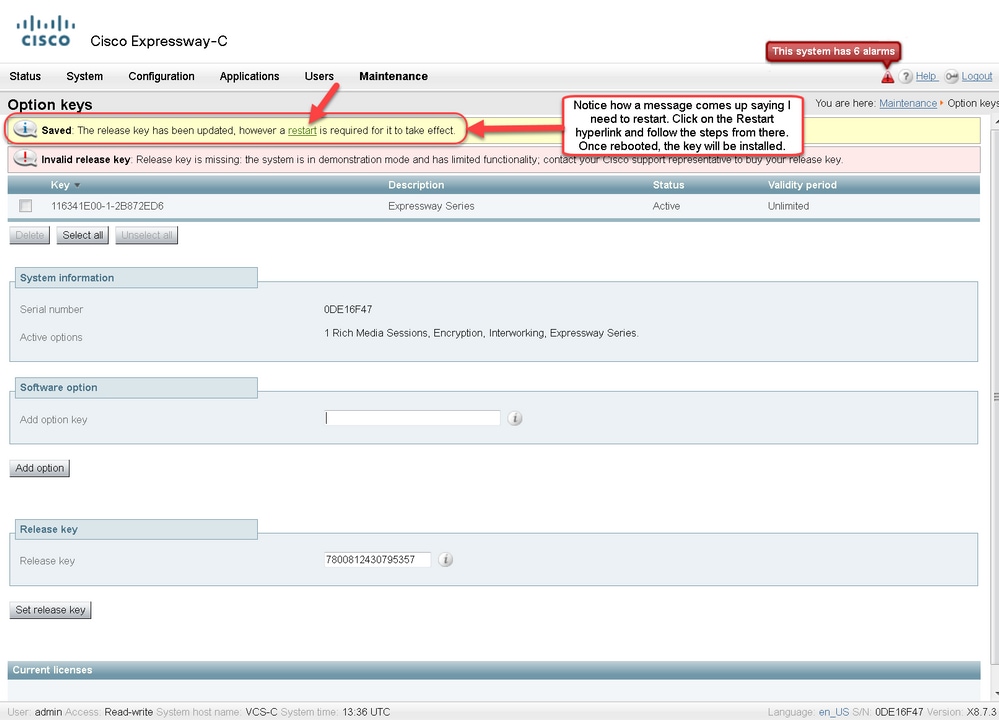
Step 8: Click the restart hyperlink in the prompt that appears at the top of the page to restart the Expressway.
Option Two: Upgrade option to install your release key
Step 1: From the Web interface, Click Maintenance as before and then Upgrade in the menu pop-up.
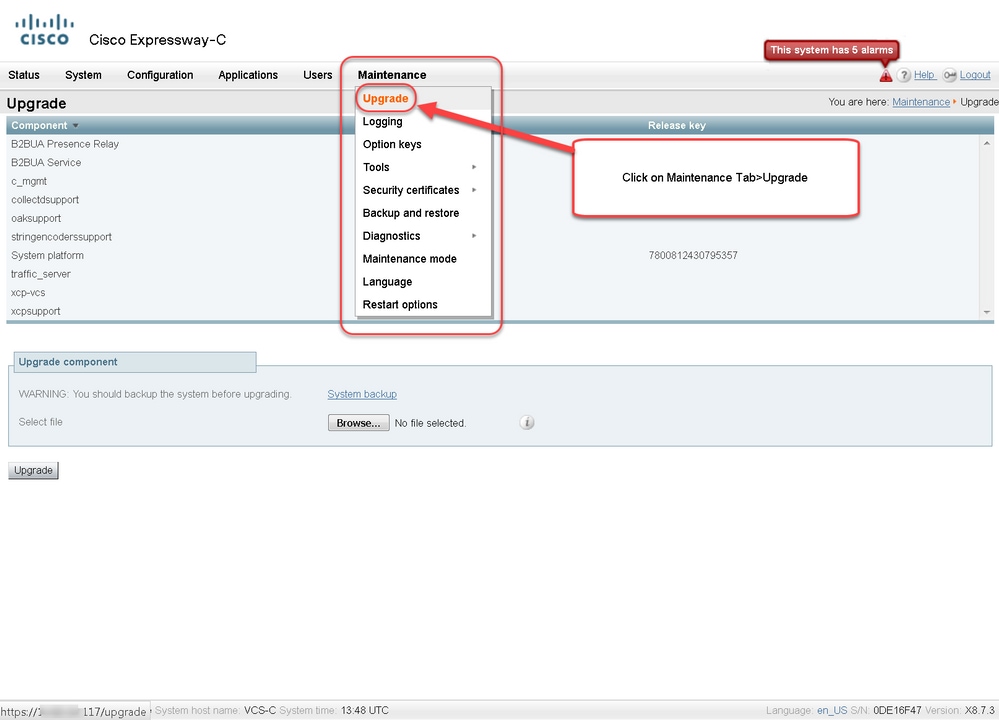
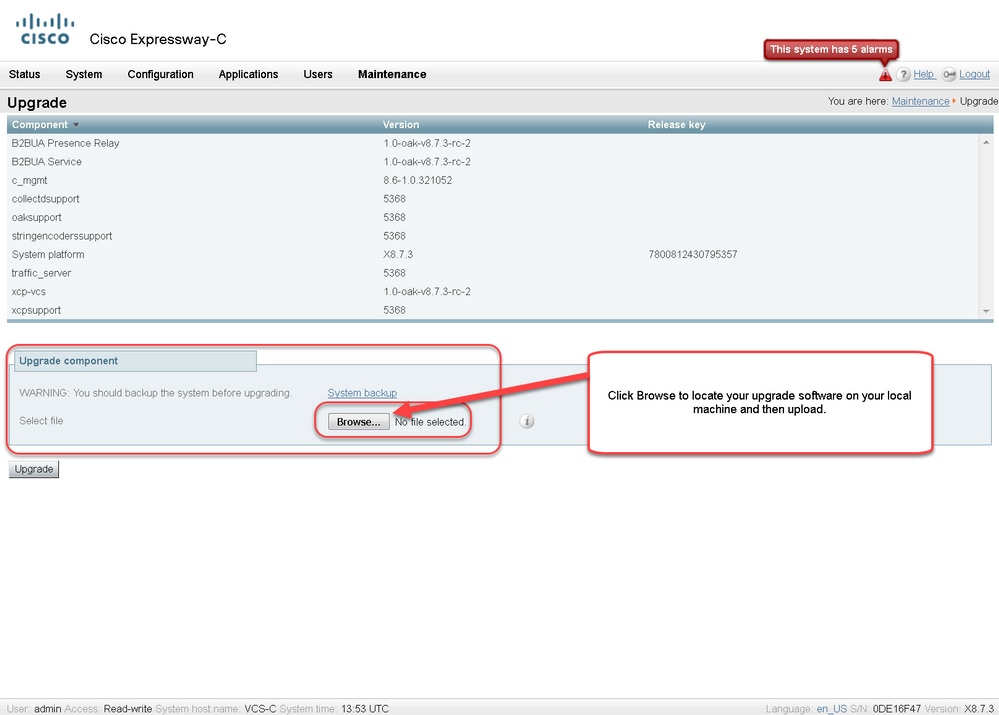
Step 2: On the Upgrade screen, you see an Upgrade Component section.
Note: This document assumes you have downloaded an Expressway software upgrade image to your local computer.
Click Browse to locate your downloaded Expressway upgrade image:
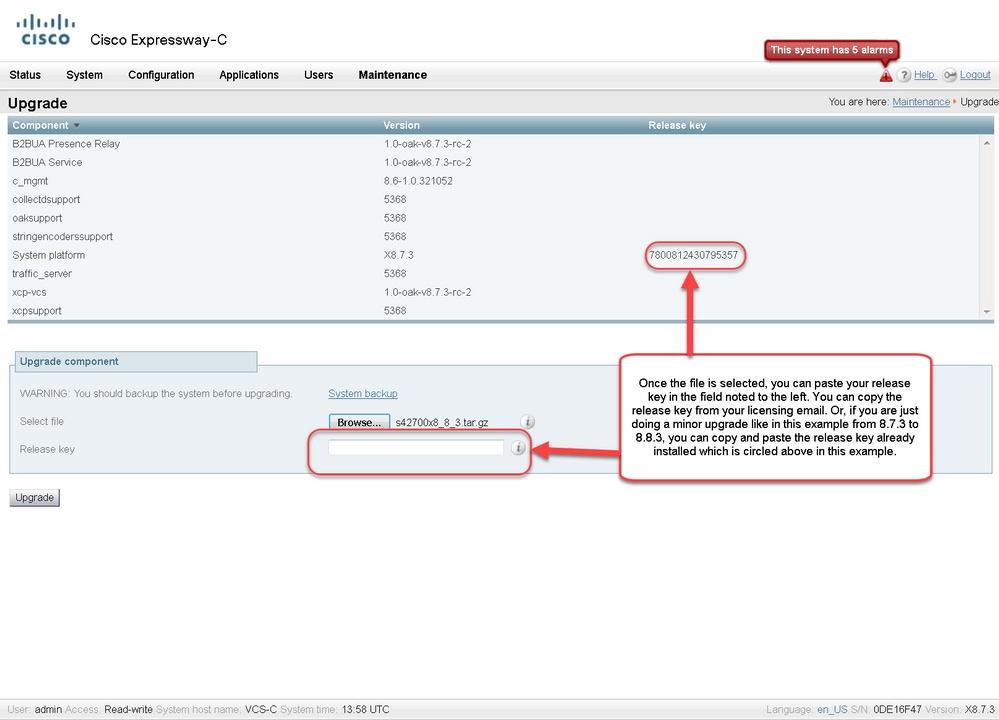
Step 3: Enter the release key value into the Release key field when prompted. Copy and paste from the email or if this is a minor upgrade such as in this case, x8.7.3 to x8.8.3, copy and paste it from the same screen.
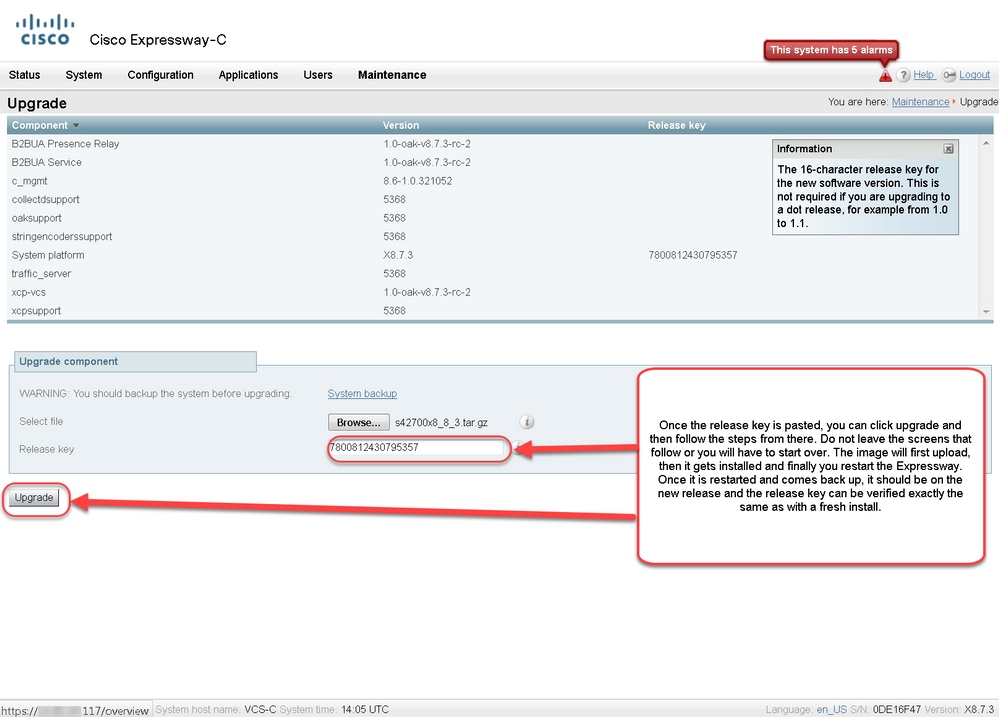
Step 4: Click the Upgrade button. Watch the process that follows and do not navigate away from the process, or you have to start over. The image is uploaded, then it is been installed. Click restart when prompted.
Verify the release has been installed properly, once the Expressway has restarted. Use the two methods noted in the Verify section of this document.
CLI Release Key Installation Example
Install a release key via the CLI. This is a two-part process that involves the use of an SCP client (PSCP in this example from command (CMD) prompt in Windows and a terminal emulation software application such as PuTTY.
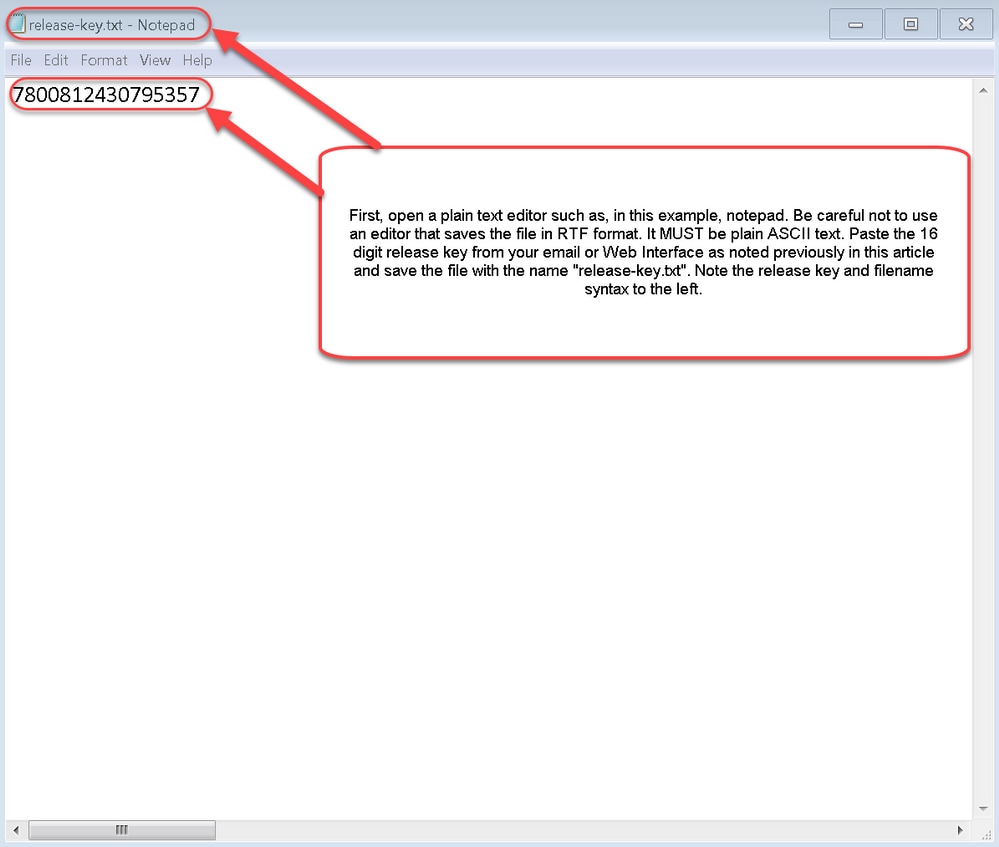
Step 1: Copy your release key into a plain ASCII text file. Ensure there are no spaces before or after the release key value. Copy the release key into your text editor application save the file as release-key.txt:
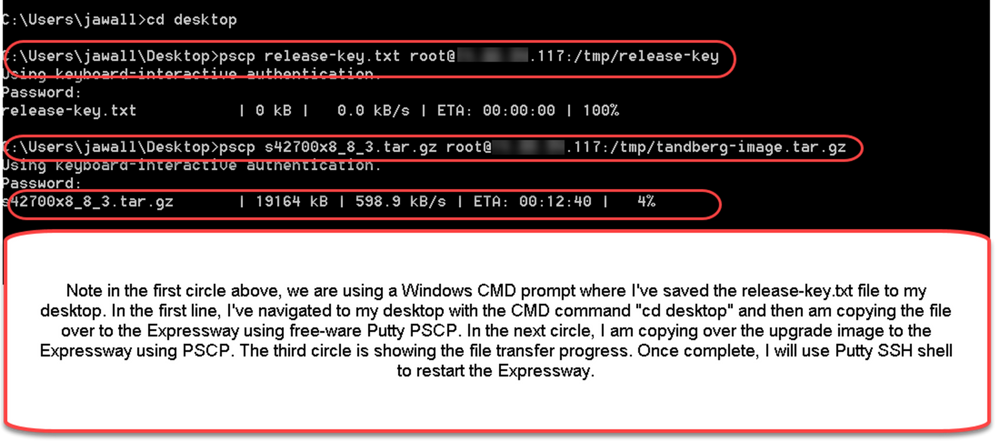
Step 2: Place the release-key.txt file and PSCP.exe in the same directory on your computer. Navigate to that directory with a command (CMD) prompt in Windows and copy the release key to a temp directory on the Expressway. Use the root account for the PSCP transaction. Enter the root account password when prompted. Verify the transfer completed as indicated by 100%. Here is an example:
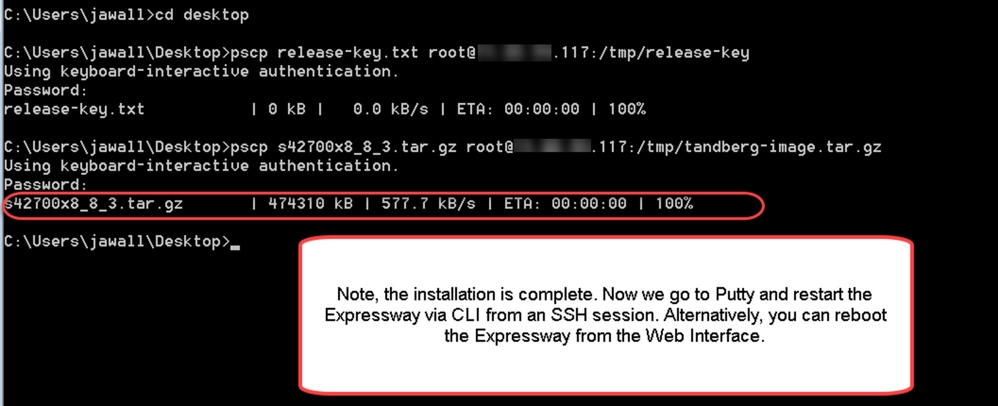
Step 3: Copy the image you want to upgrade to, such as 8.8.3 used here. Copy this image over PSCP. Verify the status shows at 100%, which means the software of the image has been transferred over to the Expressway and you are ready to reboot the Expressway.
Step 4: Reboot the Expressway via an SSH session to the Expressway. Open PuTTY and type in the IP address of the Expressway. Click SSH to open.
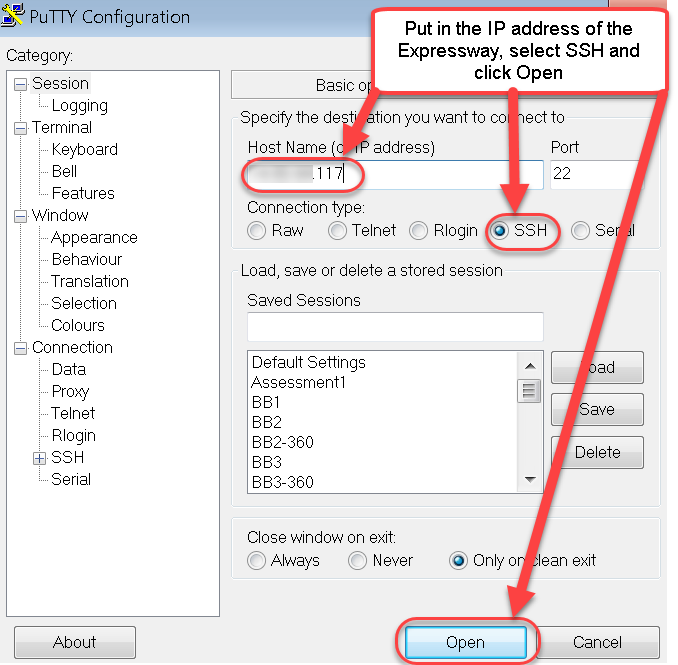
Step 5: Click Open and log in to the Expressway with an admin account when prompted. Enter the admin account password when prompted. Verify you have the right command to reboot the Expressway. Enter the command followed by a space and question mark to ensure you have it correct. The Expressway confirms that xCommand Boot is been restarted. Enter the command xCommand Boot to reboot the Expressway.
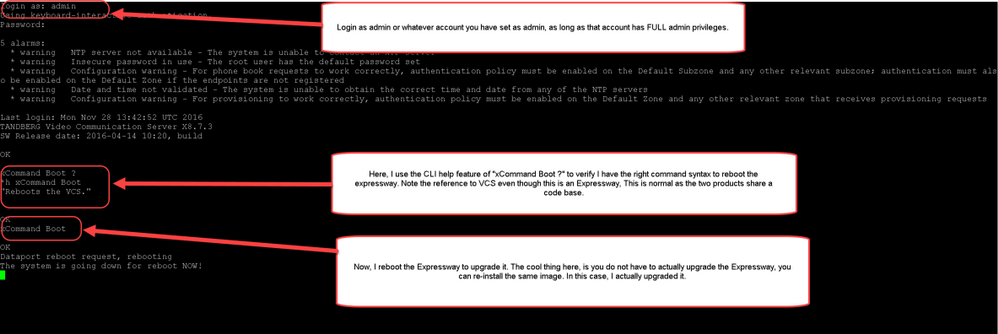
The Expressway flashes that it is in reboot process and your PuTTY session closes. This behavior is normal because the connection is terminated when the Expressway reboots. The Expressway takes about three to five minutes to reboot. Once complete, verify the release key installed correctly either via the web interface or the CLI as noted in the Verify section of this document.
Verify
Web Interface Verification of Release Key Installation
There are two ways you can verify the Release Key installed in the web interface:
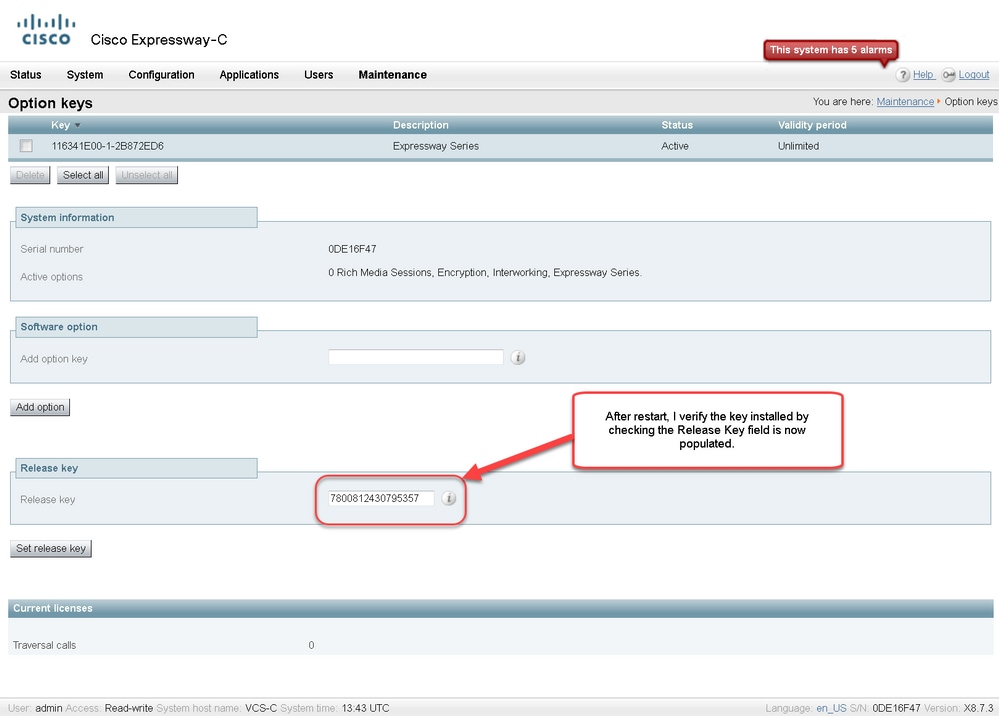
Option 1: Look at the Options Key Page as noted previously and check the Release key field.
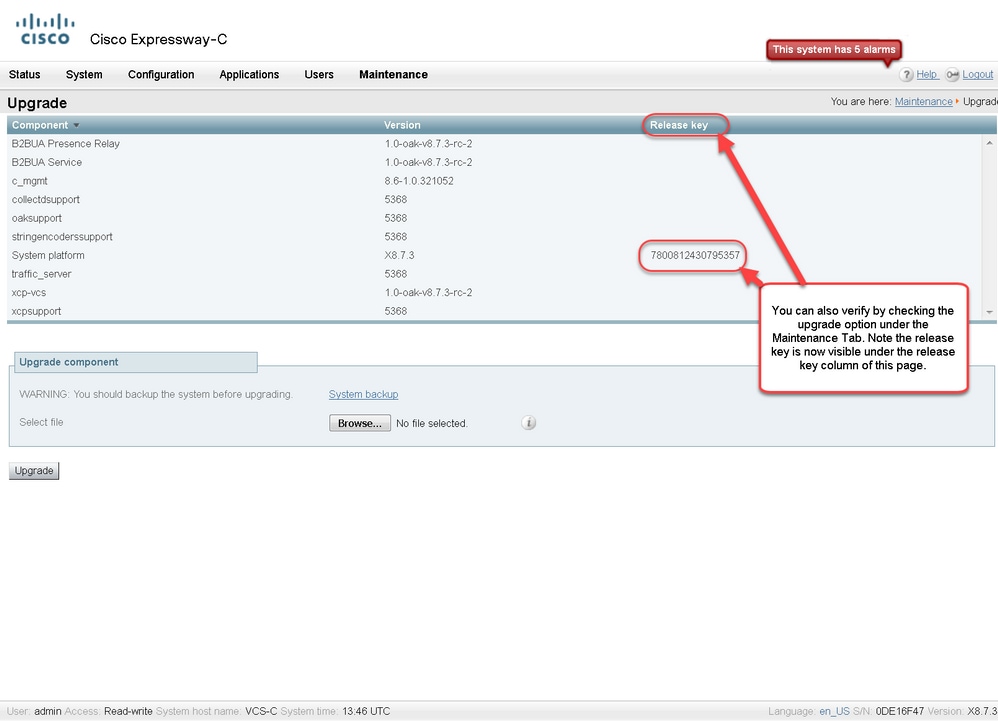
Option 2: Check the Upgrade Page as noted previously:
CLI Interface Verification of Release Key Installation
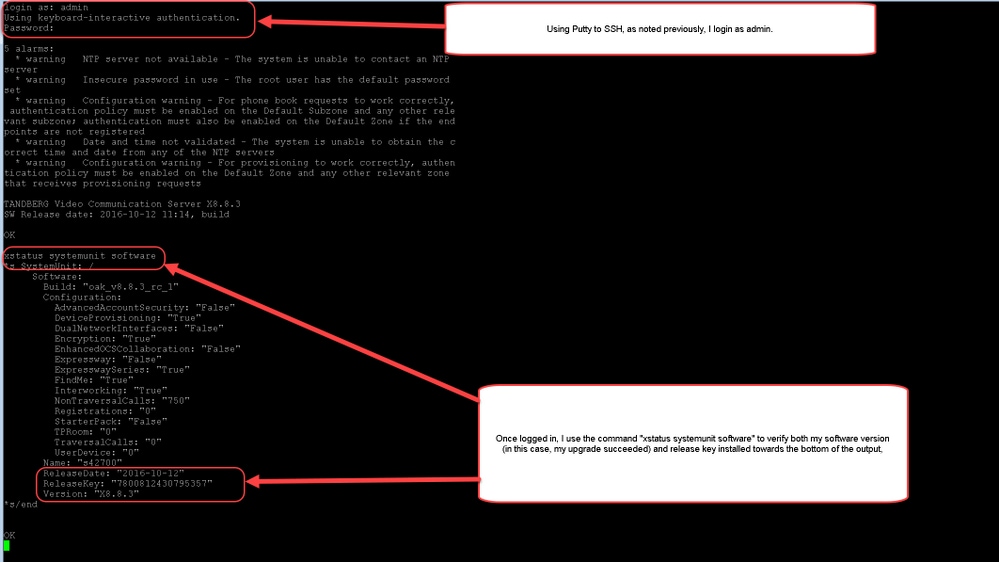
Verify the Release Key installed via the CLI interface by an SSH session to the CLI. Log in with an admin account as noted previously in this document. Once there, you enter the command xStatus SystemUnit Software. You observe the upgrade was successful and the release key is installed:
Troubleshoot
You do not have any issues when you install a release key onto a Cisco Expressway. Enter an option key in the Release key field of the Expressway or enter an option key when you upgrade are the most common causes for failure. The email example cited at the beginning of this article shows option keys in addition to the release key. An error occurs when an option key is entered in the Release Key field:
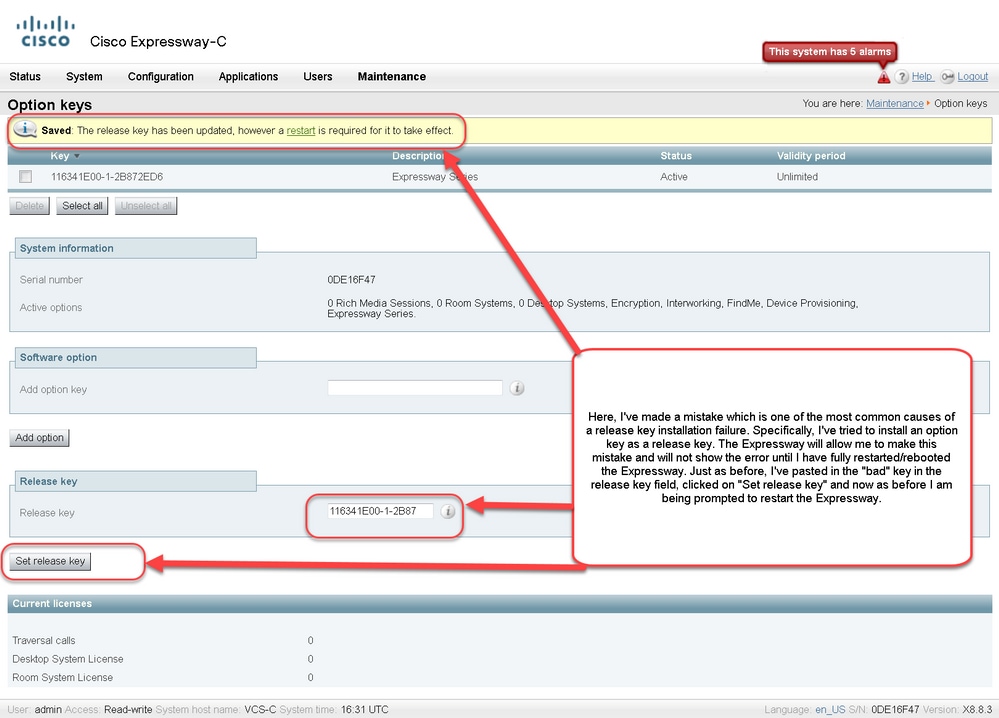
An Expressway accepts any value in the Release key field. Reboot the Expressway with an incorrect value entered and you receive an error "Invalid release key":
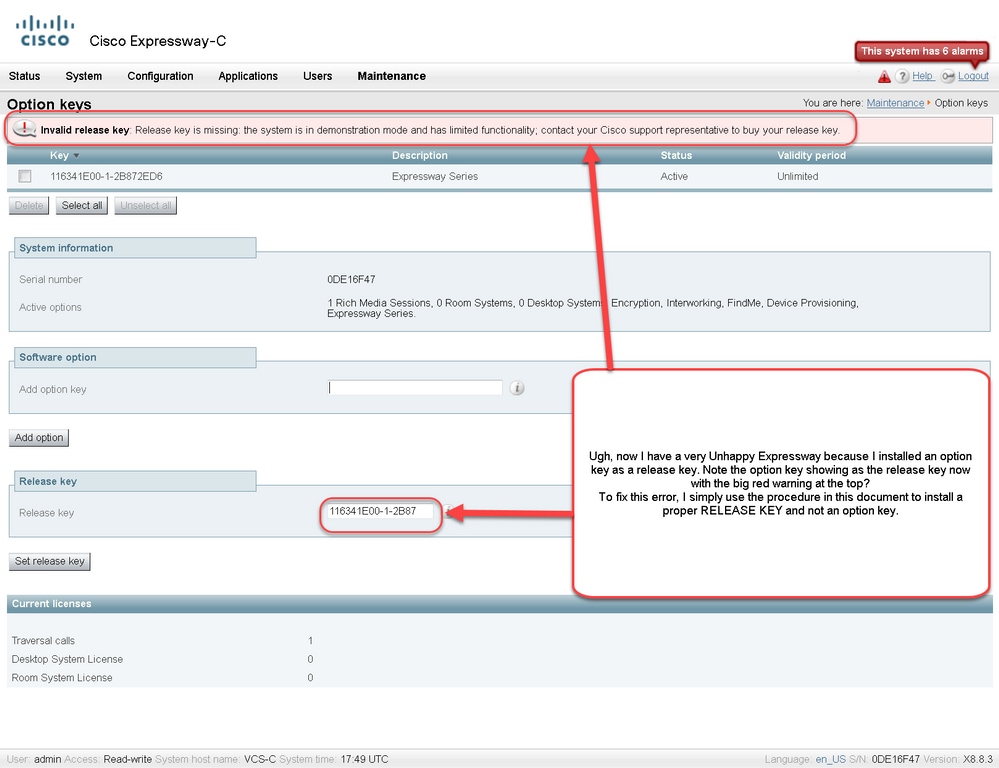
Install a release key as noted in this document to correct this condition.
Note: The release keys and option keys are tied to the serial number seen on the bottom right corner of the web interface, if the serial changes (which can happen with hardware changed of the virtual machine) the release key and options would need to be re-generated and re-installed)
Engage Cisco TAC for assistance for any other types of failure.


 Feedback