Configure Packet Capture on Content Security Appliance
Available Languages
Download Options
Bias-Free Language
The documentation set for this product strives to use bias-free language. For the purposes of this documentation set, bias-free is defined as language that does not imply discrimination based on age, disability, gender, racial identity, ethnic identity, sexual orientation, socioeconomic status, and intersectionality. Exceptions may be present in the documentation due to language that is hardcoded in the user interfaces of the product software, language used based on RFP documentation, or language that is used by a referenced third-party product. Learn more about how Cisco is using Inclusive Language.
Contents
Introduction
This document describes packet capture on Cisco Secure Web Appliance (SWA), Email Security Appliance (ESA) and Security Management Appliance (SMA).
Prerequisites
Requirements
Cisco recommends that you have knowledge of these topics:
- Cisco Content Security Appliance administration.
Cisco recommends that you have:
- Physical or Virtual SWA/ESA/SMA Installed.
- Administrative Access to the SWA/ESA/SMA Graphical User Interface (GUI).
- Administrative Access to the SWA/ESA/SMA Command Line Interface (CLI)
Components Used
This document is not restricted to specific software and hardware versions.
The information in this document was created from the devices in a specific lab environment. All of the devices used in this document started with a cleared (default) configuration. If your network is live, ensure that you understand the potential impact of any command.
Perform Packet Capture from GUI
To perform packet capture from GUI, use these steps:
Step 1. Log in to the GUI.
Step 2. From the top right of the page choose Support and Help.
Step 3. Select Packet Capture.
 Image- Packet Capture
Step 4. (Optional) To edit the current filter choose Edit Settings. (For more information about the filters, please check the Filters section in this document)
Step 5. Start the capture.
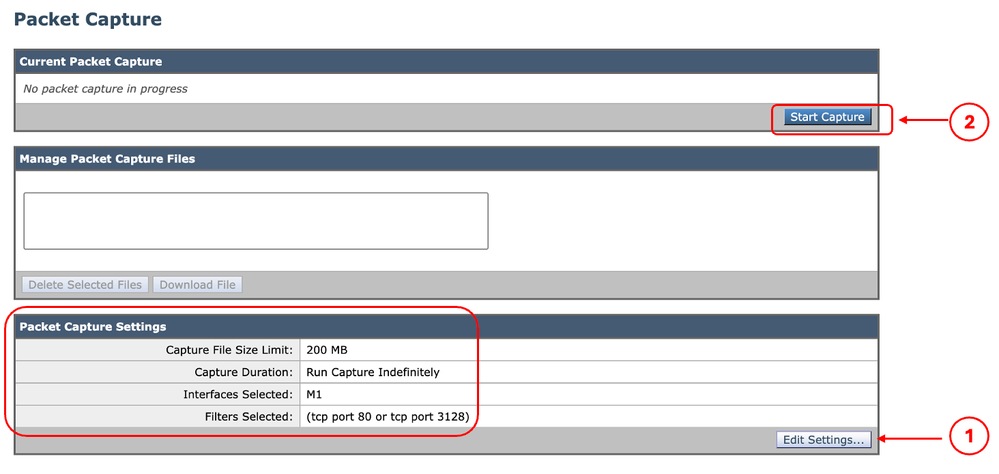 Image - Packet Capture status and filters

Note: The Packet Capture file size limit is 200MB. When the file size reached 200MB, the Packet Capture stops.
The Current Packet Capture section shows the Packet Capture status, including the file size and applied filters.
 Image - Packet Capture Status
Step 6. To Stop the running packet capture, click on Stop Capture.
Step 7. To download the Packet Capture file, choose the file from the Manage Packet Capture Files list and click Download File.
 Image- Download Packet Capture

Tip: The latest file is located on top of the list.
Step 8. (Optional) To delete any Packet Capture file, choose the file from Manage Packet Capture Files list and click Delete Selected Files.
Perform Packet Capture from CLI
You can start the Packet Capture from CLI as well by using these steps:
Step 1. Log in to the CLI.
Step 2. Type packetcapture and press Enter.
Step 3. (Optional) To edit the current filter type SETUP. (For more information about the filters, please check the Filters section in this document.)
Step 4. Choose START to start the capture.
SWA_CLI> packetcapture
Status: No capture running

Current Settings:
 Max file size:      200 MB
 Capture Limit:      None (Run Indefinitely)
 Capture Interfaces: Management
 Capture Filter:     (tcp port 80 or tcp port 3128)

Choose the operation you want to perform:
- START - Start packet capture.
- SETUP - Change packet capture settings.
Step 5. (Optional) You can view the status of the Packet Capture by choosing STATUS:
Choose the operation you want to perform:
- STOP - Stop packet capture.
- STATUS - Display current capture status.
- SETUP - Change packet capture settings.
[]> STATUS

Status: Capture in progress
File Name: S100V-420DFA7B8265ED011535-71BAE3E9E084-20241006-130426.cap
File Size: 0K
Duration:  45s

Current Settings:
 Max file size:      200 MB
 Capture Limit:      None (Run Indefinitely)
 Capture Interfaces: Management
 Capture Filter:     (tcp port 80 or tcp port 3128)
Step 6. To stop the Packet Capture, type STOP and press Enter:

Note: To download the Packet Capture file(s) collected from CLI, you can download them from GUI or connect to the appliance via File Transfer Protocol (FTP) and download them from Captures folder.
Filters
Here are some guides about the filters you can use in the Content Security appliances.
Filter by Host IP Address
Filter by Host IP in the GUI
To filter by host IP address, from the GUI, there are two options:
- Predefined Filters
- Custom Filters
To use Predefined Filters from the GUI:
Step 1. In the Packet Capture page, choose Edit Settings.
Step 2. From Packet Capture Filters, select Predefined Filters.
Step 3. You can enter the IP address in the Client IP or the Server IP section.

Note: Choosing between Client IP or Server IP is not limited to Source Address or Destination Address. This filter captures all the packets with the IP address defined as source or destination.
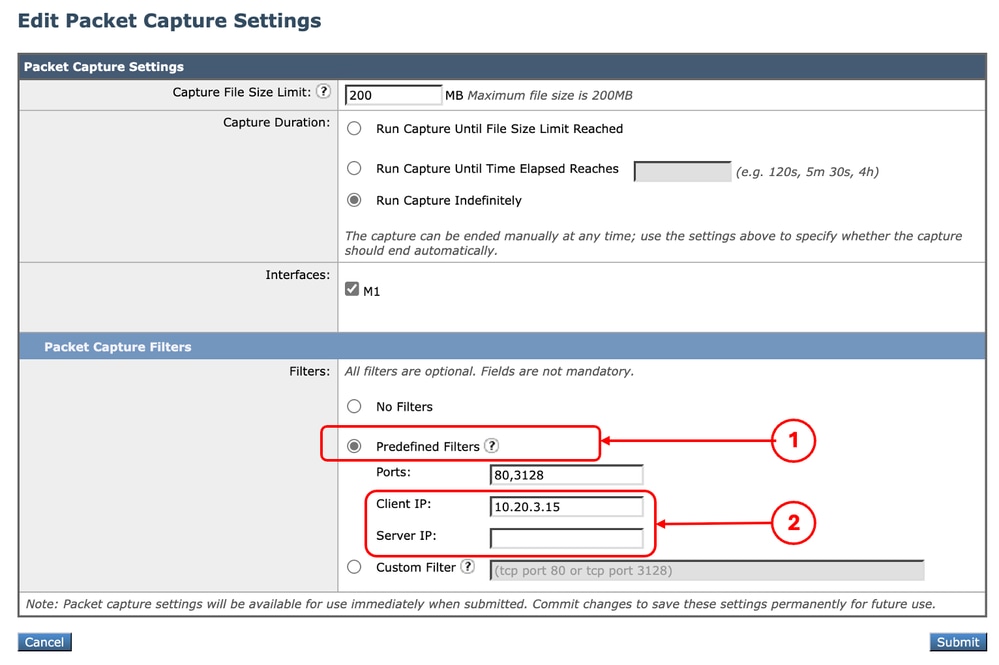 Image- Filter by Host IP from GUI Predefined Filters
Step 4. Submit the changes.
Step 5. Start the capture.

Tip: There is no need to Commit Changes, the newly added filter applied on the current capture. Committing the changes helps to save the filter for future use.
To use Custom Filters and Predefined Filters from the GUI:
Step 1. In the Packet Capture page, Choose Edit Settings.
Step 2. From Packet Capture Filters select Custom Filter.
Step 3. Use host syntax followed by the IP address.
Here is an example to filter all the traffic with source or destination IP address 10.20.3.15
host 10.20.3.15
Tip: To filter by more than one IP address you can use logical operands such as or and and (lowercase letters only).
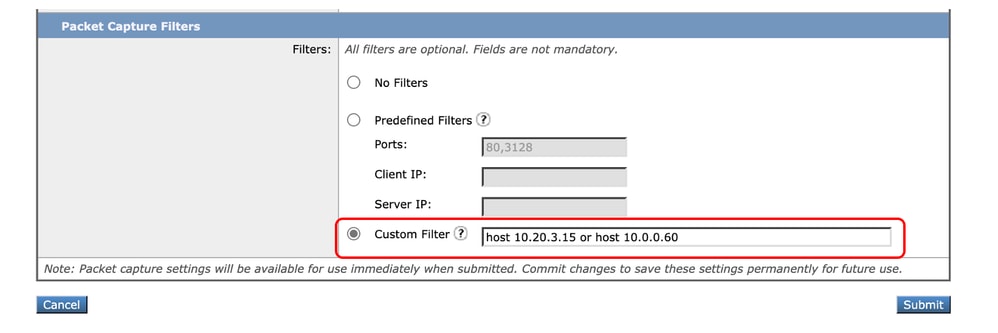 Image- Custom Filter for tow IP addresses
Step 4. Submit the changes.
Step 5. Start the capture
Filter by Host IP in CLI
To filter by the host IP address from CLI:
Step 1. Log in to the CLI.
Step 2. Type packetcapture and press Enter.
Step 3. To edit the current filter type SETUP.
Step 4. Answer the questions until you reach Enter the filter to be used for the capture
Step 5. You can use the same Filter string as the Custom Filter in the GUI.
Here is an example of filtering all the traffic with source or destination IP address 10.20.3.15 or 10.0.0.60
SWA_CLI> packetcapture

Status: No capture running (Capture stopped by user)
File Name: S100V-420DFA7B8265ED011535-71BAE3E9E084-20241006-130426.cap
File Size: 4K
Duration:  2m 2s

Current Settings:
 Max file size:      200 MB
 Capture Limit:      None (Run Indefinitely)
 Capture Interfaces: Management
 Capture Filter:     (tcp port 80 or tcp port 3128)

Choose the operation you want to perform:
- START - Start packet capture.
- SETUP - Change packet capture settings.
[]> SETUP

Enter maximum allowable size for the capture file (in MB)
[200]>

Do you want to stop the capture when the file size is reached? (If not, a new file will be started and the older capture data will be discarded.)
[N]> y

The following interfaces are configured:
1. Management
Enter the name or number of one or more interfaces to capture packets from, separated by commas:
[1]>

Enter the filter to be used for the capture.
Enter the word "CLEAR" to clear the filter and capture all packets on the selected interfaces.
[(tcp port 80 or tcp port 3128)]> host 10.20.3.15 or host 10.0.0.60
Filter by Port Number
Filter by Port Number in GUI
To filter by Port Number(s), from the GUI there are two options:
- Predefined Filters
- Custom Filters
To use Predefined Filters from GUI:
Step 1. In the Packet Capture page, Choose Edit Settings.
Step 2. From Packet Capture Filters select Predefined Filters.
Step 3. In the Ports section, type the port numbers you would like to filter.

Tip: You can add multiple port number by separating them with comma " , ".
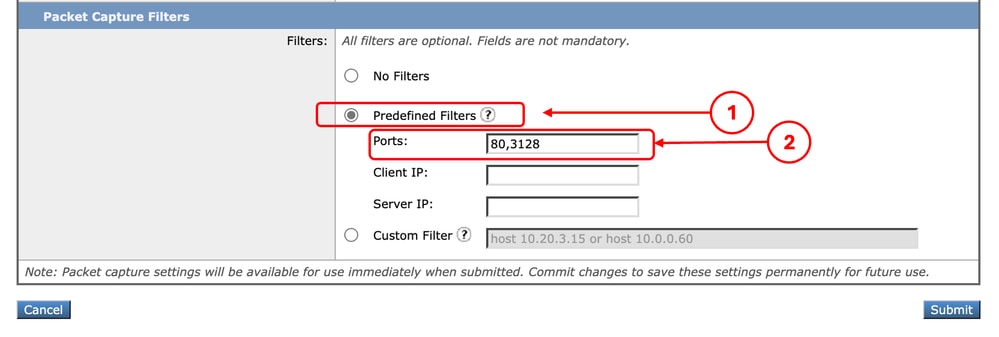 Image - Filter by Port Number
Step 4. Submit the changes.
Step 5. Start the capture.

Caution: This approach captures only TCP traffic with the defined port numbers. To capture the UDP traffic, use Custom Filter.
To use Custom Filters from the GUI:
Step 1. In the Packet Capture page, Choose Edit Settings.
Step 2. From Packet Capture Filters select Custom Filter.
Step 3. Use port syntax followed by the port number.
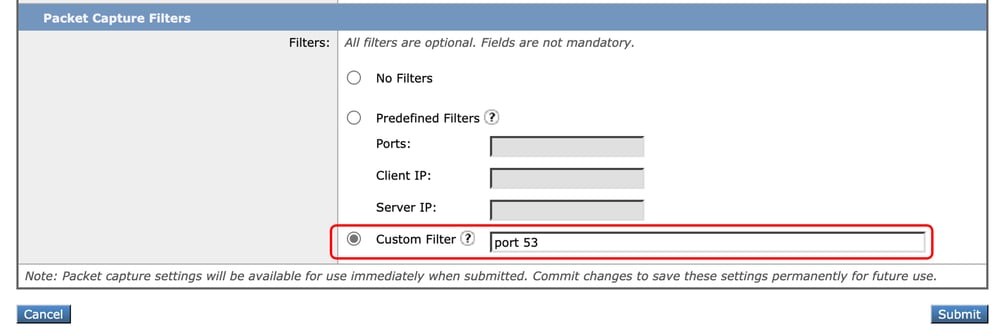 Image - Custom Filter by Port Number

Note: If you just use port, this filter covers both TCP and UDP ports.
Step 4. Submit the changes.
Step 5. Start the capture.
Filter by Port Number in CLI
To filter by the Port Number from CLI:
Step 1. Log in to the CLI.
Step 2. Type packetcapture and press Enter.
Step 3. To edit the current filter type SETUP.
Step 4. Answer the questions until you reach Enter the filter to be used for the capture
Step 5. You can use the same Filter string as the Custom Filter in the GUI.
Here is an example of filtering all the traffic with source or destination port number 53, for both TCP and UDP ports:
SWA_CLI> packetcapture
Status: No capture running

Current Settings:
 Max file size:      200 MB
 Capture Limit:      None (Run Indefinitely)
 Capture Interfaces: Management
 Capture Filter:     (tcp port 80 or tcp port 3128)

Choose the operation you want to perform:
- START - Start packet capture.
- SETUP - Change packet capture settings.
[]> SETUP

Enter maximum allowable size for the capture file (in MB)
[200]>

Do you want to stop the capture when the file size is reached? (If not, a new file will be started and the older capture data will be discarded.)
[N]>

The following interfaces are configured:
1. Management
Enter the name or number of one or more interfaces to capture packets from, separated by commas:
[1]>

Enter the filter to be used for the capture.
Enter the word "CLEAR" to clear the filter and capture all packets on the selected interfaces.
[(tcp port 80 or tcp port 3128)]> port 53
Filter in SWA with Transparent Deployment
In SWA with Transparent deployment, while the Web Cache Communication Protocol (WCCP) connectivity is via Generic Routing Encapsulation (GRE) tunnels, the source and destination IP addresses in the packets coming to or going out of SWA are the router IP address and SWA IP address.
To be able to collect the Packet Capture with IP Address or Port number from GUI there are two options:
- Predefined Filters
- Custom Filters
Filter in SWA with Transparent Deployment in GUI
Step 1. In the Packet Capture page, choose Edit Settings.
Step 2. From Packet Capture Filters, select Predefined Filters.
Step 3. You can enter the IP address in the Client IP or the Server IP section.
 Image - Configuring IP Address in Predefine Filters
Step 4. Submit the changes.
Step 5. Start the capture.

Note: You can see after submitting the filter, SWA added extra conditions in the Filter Selected section.
 Image - Extra Filters Added by SWA to Collect Packets Inside GRE Tunnel
To use Custom Filters from the GUI:
Step 1. In the Packet Capture page, choose Edit Settings.
Step 2. From Packet Capture Filters, select Custom Filter
Step 3. Add this string first, then followed by the filter you are planning to implement by adding or after this string:
(proto gre && ip[40:4] = 0x0a14030f) or (proto gre && ip[44:4] = 0x0a14030f) or (proto gre && ip[40:4] = 0x0a00003c) or (proto gre && ip[44:4] = 0x0a00003c) For example. if you are planning to filter by the host IP equal to 10.20.3.15 or the port number equal to 8080, you can use this string:
(proto gre && ip[40:4] = 0x0a14030f) or (proto gre && ip[44:4] = 0x0a14030f) or (proto gre && ip[40:4] = 0x0a00003c) or (proto gre && ip[44:4] = 0x0a00003c) or host 10.20.3.15 or port 8080Step 4. Submit the changes.
Step 5. Start the capture.
Filter in SWA with Transparent Deployment in CLI
To filter in transparent proxy deployment from CLI:
Step 1. Log in to the CLI.
Step 2. Type packetcapture and press Enter.
Step 3. To edit the current filter type SETUP.
Step 4. Answer the questions until you reach Enter the filter to be used for the capture
Step 5. You can use the same Filter string as the Custom Filter in the GUI.
Here is an example to filter by the host IP equal to 10.20.3.15 or the port number equal to 8080:
SWA_CLI> packetcapture
Status: No capture running

Current Settings:
 Max file size:      200 MB
 Capture Limit:      None (Run Indefinitely)
 Capture Interfaces: Management
 Capture Filter:     (tcp port 80 or tcp port 3128)

Choose the operation you want to perform:
- START - Start packet capture.
- SETUP - Change packet capture settings.
[]> SETUP

Enter maximum allowable size for the capture file (in MB)
[200]>

Do you want to stop the capture when the file size is reached? (If not, a new file will be started and the older capture data will be discarded.)
[N]>

The following interfaces are configured:
1. Management
Enter the name or number of one or more interfaces to capture packets from, separated by commas:
[1]>

Enter the filter to be used for the capture.
Enter the word "CLEAR" to clear the filter and capture all packets on the selected interfaces.
[(tcp port 80 or tcp port 3128)]> (proto gre && ip[40:4] = 0x0a14030f) or (proto gre && ip[44:4] = 0x0a14030f) or (proto gre && ip[40:4] = 0x0a00003c) or (proto gre && ip[44:4] = 0x0a00003c) or host 10.20.3.15 or port 8080
Most Common Filters
Here is a table that lists most common filters:
|
Description |
Filter |
|
Filter by Source IP Address equal 10.20.3.15 |
src host 10.20.3.15 |
|
Filter by Destination IP Address equal 10.20.3.15 |
dst host 10.20.3.15 |
|
Filter by Source IP Address equal 10.20.3.15 and Destination IP Address equal 10.0.0.60 |
(src host 10.20.3.15) and (dst host 10.0.0.60) |
|
Filter by Source or Destination IP Address equal 10.20.3.15 |
host 10.20.3.15 |
|
Filter by Source or Destination IP Address equal 10.20.3.15 or equal 10.0.0.60 |
host 10.20.3.15 or host 10.0.0.60 |
|
Filter by TCP Port number equal 8080 |
tcp port 8080 |
|
Filter by UDP Port number equal 53 |
udp port 53 |
|
Filter by port number equal to 514 (TCP or UDP) |
port 514 |
|
Filter only UDP Packets |
udp |
|
Filter only ICMP Packets |
icmp |
|
Main filter to use for every capture in Transparent deplyment |
(proto gre && ip[40:4] = 0x0a14030f) or (proto gre && ip[44:4] = 0x0a14030f) or (proto gre && ip[40:4] = 0x0a00003c) or (proto gre && ip[44:4] = 0x0a00003c) |

Caution: All filters are cases sensitive.
Troubleshoot
"Filter Error" is one of the most common errors while performing the packet capture.
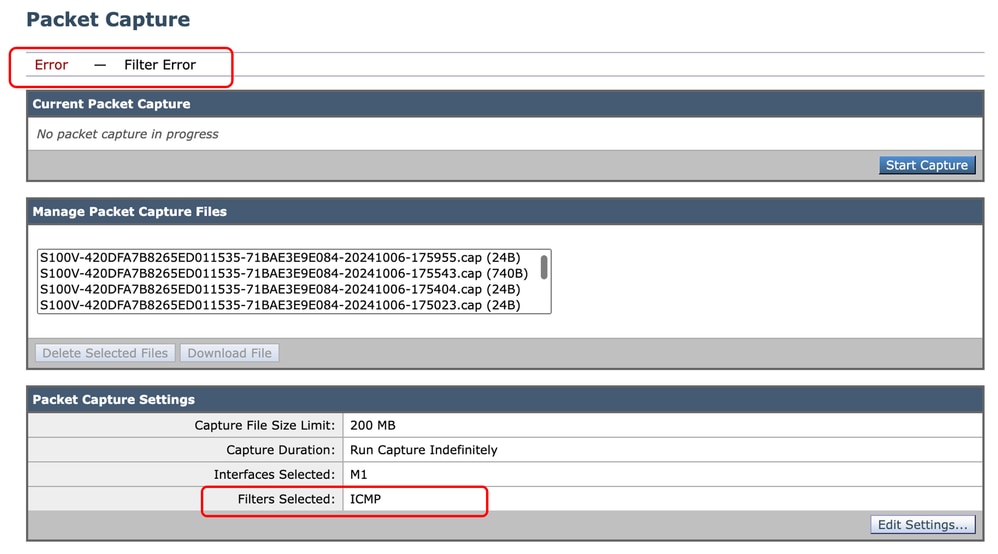 Image - Filter Error
This error is usually related to wrong filter implementation. In the preceding example, the ICMP filter is with uppercase characters. That is the reason you are receiving Filter Error. To fix this issue, you need to edit the filter and replace the ICMP with icmp.
Related Information
Revision History
| Revision | Publish Date | Comments |
|---|---|---|
1.0 |
18-Oct-2024 |
Initial Release |
Contributed by Cisco Engineers
- Amirhossein MojarradTechnical Consulting Engineer
Contact Cisco
- Open a Support Case

- (Requires a Cisco Service Contract)
 Feedback