Introduction
This document describes how to upload the root and intermediate certificates of CAs that signed Expressway-C certificates to the CUCM publisher.
Background Information
Due to improvements in traffic server service on Expressway in X14.0.2, Expressway-C sends its client certificate whenever a server (CUCM) requests it for services that run on ports other than 8443 (for example, 6971,6972), even if CUCM is in non-secure mode. Because of this change, it is required that the Expressway-C certificate signing Certificate Authority (CA) is added in CUCM as both tomcat-trust and callmanager-trust.
Failure to upload the Expressway-C signing CA on CUCM causes MRA log in to fail after an upgrade of Expressways to X14.0.2 or higher.
In order for CUCM to trust the certificate that Expressway-C sends, the tomcat-trust and callmanager-trust must include the root CA and any intermediary CAs involved in signing the Expressway-C certificate.
Configuration
Step 1. Get the Root and Intermediate Certificates that Signed the Expressway-C Server Certificate
When you initially received the server certificate from a CA that signed that server certificate, you also have the root and intermediate certificates for that server certificate and stored them in a safe place. If you still have these files or can download them again from your CA, you can move to step 2 where you can find instructions how to upload them onto CUCM.
If you no longer have these files, you can download them from the Expressway-C web interface. This is a bit complicated, so it is highly recommended that you reach out to your CA to download the trust store from them, if possible.
On the Expressway-C, navigate to Maintenance > Security > Server certificate, and click the Show (decoded) button next to Server certificate. This opens a new window/tab with the contents of the Expressway-C server certificate. You look for the Issuer field there :
Certificate:
    Data:
        Version: 3 (0x2)
        Serial Number:
            55:00:00:02:21:bb:2d:41:60:55:d7:b2:27:00:01:00:00:02:21
    Signature Algorithm: sha256WithRSAEncryption
        Issuer: O=DigiCert Inc, CN=DigiCert Global CA-1
        Validity
            Not Before: Dec  8 10:36:57 2021 GMT
            Not After : Dec  8 10:36:57 2023 GMT
        Subject: C=BE, ST=Flamish-Brabant, L=Diegem, O=Cisco, OU=TAC, CN=vcs-c1.vngtp.lab
        Subject Public Key Info:
...
In this example, the Expressway-C server certificate is issued by an Organization, DigiCert Inc. with common name DigiCert Global CA-1.
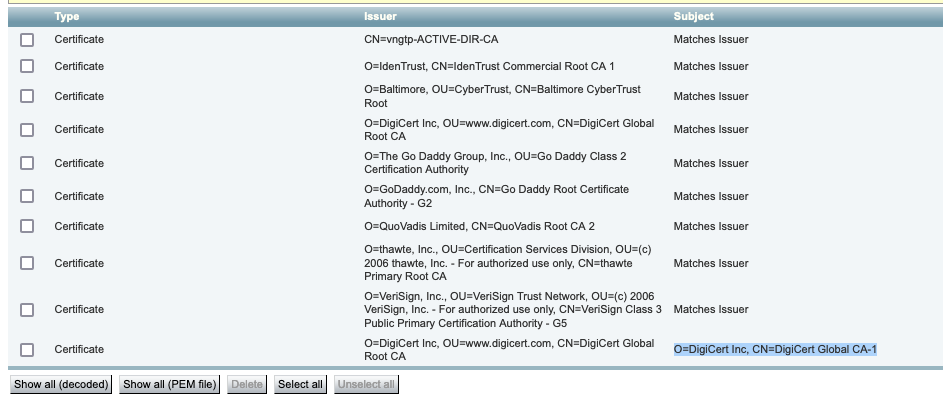
Now, navigate to Maintenance > Security > Trusted CA certificate, and look in the list to see if you have a certificate there with the exact same value in the Subject field. In this example, that is O=DigiCert Inc, CN=DigiCert Global CA-1 in the Subject field. If you find a match, that means this is an intermediary CA. You need this file, and you need to continue looking until you find the root CA.
If you are unable to find a match, search for a certificate with this value in the Issuer field with a Subject of Matches Issuer. If you find a match, that means this is the root CA file and this is the only file we will need.
 Expressway Trust Store
In this example, after finding the certificate, you notice that the Subject field does not match the Issuer field. This means that this is an intermediate CA certificate. You need this certificate in addition to the root certificate. If the Subject said Matches Issuer then you would know this is the root certificate authority and the only certificate youould need to trust.
If you have an intermediate certificate you need to continue until we find the root certificate. To do this, look at the Issuer field for your intermediate certificate. Then look for a certificate with the same value in the Subject field. In our case this is O=DigiCert Inc, OU=www.digicert.com, CN=DigiCert Global Root CA - You look for a certificate with this value in the Subject field. If you are unable to find a matching certificate then you look for this value in the Issuer field with a Subject of Matches Issuer.
In this example, you can see our Expressway-C server certificate was signed by intermediate CA O=DigiCert Inc, CN=DigiCert Global CA-1 which was signed by root CA O=DigiCert Inc. OU=www.digicert.com, CN=DigiCert Global Root CA. Since you have found the root CA you are done. If, however you found another intermediate CA, you would need to continue this process until you have identified every intermediate CA and the root CA.
In order to download the root and intermediate certificate files, click the Show all (PEM file) button under the list. This shows you all the root and intermediate certificates in PEM format. Scroll down until you find a certificate matching one of your intermediate certificates or the root certificate. In this example, the first one you find is O=DigiCert Inc, CN=DigiCert Global Root CA - you are going to copy this certificate to a file and save it locally.
...
Epn3o0WC4zxe9Z2etiefC7IpJ5OCBRLbf1wbWsaY71k5h+3zvDyny67G7fyUIhz
ksLi4xaNmjICq44Y3ekQEe5+NauQrz4wlHrQMz2nZQ/1/I6eYs9HRCwBXbsdtTLS
R9I4LtD+gdwyah617jzV/OeBHRnDJELqYzmp
-----END CERTIFICATE-----

O=DigiCert Inc, CN=DigiCert Global Root CA
-----BEGIN CERTIFICATE-----
MIIDrzCCApegAwIBAgIQCDvgVpBCRrGhdWrJWZHHSjANBgkqhkiG9w0BAQUFADBh
MQswCQYDVQQGEwJVUzEVMBMGA1UEChMMRGlnaUNlcnQgSW5jMRkwFwYDVQQLExB3
d3cuZGlnaWNlcnQuY29tMSAwHgYDVQQDExdEaWdpQ2VydCBHbG9iYWwgUm9vdCBD
QTAeFw0wNjExMTAwMDAwMDBaFw0zMTExMTAwMDAwMDBaMGExCzAJBgNVBAYTAlVT
MRUwEwYDVQQKEwxEaWdpQ2VydCBJbmMxGTAXBgNVBAsTEHd3dy5kaWdpY2VydC5j
b20xIDAeBgNVBAMTF0RpZ2lDZXJ0IEdsb2JhbCBSb290IENBMIIBIjANBgkqhkiG
9w0BAQEFAAOCAQ8AMIIBCgKCAQEA4jvhEXLeqKTTo1eqUKKPC3eQyaKl7hLOllsB
CSDMAZOnTjC3U/dDxGkAV53ijSLdhwZAAIEJzs4bg7/fzTtxRuLWZscFs3YnFo97
nh6Vfe63SKMI2tavegw5BmV/Sl0fvBf4q77uKNd0f3p4mVmFaG5cIzJLv07A6Fpt
43C/dxC//AH2hdmoRBBYMql1GNXRor5H4idq9Joz+EkIYIvUX7Q6hL+hqkpMfT7P
T19sdl6gSzeRntwi5m3OFBqOasv+zbMUZBfHWymeMr/y7vrTC0LUq7dBMtoM1O/4
gdW7jVg/tRvoSSiicNoxBN33shbyTApOB6jtSj1etX+jkMOvJwIDAQABo2MwYTAO
BgNVHQ8BAf8EBAMCAYYwDwYDVR0TAQH/BAUwAwEB/zAdBgNVHQ4EFgQUA95QNVbR
TLtm8KPiGxvDl7I90VUwHwYDVR0jBBgwFoAUA95QNVbRTLtm8KPiGxvDl7I90VUw
DQYJKoZIhvcNAQEFBQADggEBAMucN6pIExIK+t1EnE9SsPTfrgT1eXkIoyQY/Esr
hMAtudXH/vTBH1jLuG2cenTnmCmrEbXjcKChzUyImZOMkXDiqw8cvpOp/2PV5Adg
06O/nVsJ8dWO41P0jmP6P6fbtGbfYmbW0W5BjfIttep3Sp+dWOIrWcBAI+0tKIJF
PnlUkiaY4IBIqDfv8NZ5YBberOgOzW6sRBc4L0na4UU+Krk2U886UAb3LujEV0ls
YSEY1QSteDwsOoBrp+uvFRTp2InBuThs4pFsiv9kuXclVzDAGySj4dzp30d8tbQk
CAUw7C29C79Fv1C5qfPrmAESrciIxpg0X40KPMbp1ZWVbd4=
-----END CERTIFICATE-----

O=The Go Daddy Group, Inc.
-----BEGIN CERTIFICATE-----
MIIEADCCAuigAwIBAgIBADANBgkqhkiG9w0BAQUFADBjMQswCQYDVQQGEwJVUzEh
MB8GA1UEChMYVGhlIEdvIERhZGR5IEdyb3VwLCBJbmMuMTEwLwYDVQQLEyhHbyBE
...
For each of the root and eventual intermediate certificates, copy everything that starts with (included) -----BEGIN CERTIFICATE----- and ends with (included) -----END CERTIFICATE-----. Put each of them in a separate text file and add 1 extra empty line at the bottom (after the line with -----END CERTIFICATE-----). Save these files with .pem extension : root.pem, intermediate1.pem, intermediate2.pem, ... You need a separate file for each root/intermediate certificate. For the previous example, our root.pem file would contain:
-----BEGIN CERTIFICATE-----
MIIDrzCCApegAwIBAgIQCDvgVpBCRrGhdWrJWZHHSjANBgkqhkiG9w0BAQUFADBh
MQswCQYDVQQGEwJVUzEVMBMGA1UEChMMRGlnaUNlcnQgSW5jMRkwFwYDVQQLExB3
d3cuZGlnaWNlcnQuY29tMSAwHgYDVQQDExdEaWdpQ2VydCBHbG9iYWwgUm9vdCBD
QTAeFw0wNjExMTAwMDAwMDBaFw0zMTExMTAwMDAwMDBaMGExCzAJBgNVBAYTAlVT
MRUwEwYDVQQKEwxEaWdpQ2VydCBJbmMxGTAXBgNVBAsTEHd3dy5kaWdpY2VydC5j
b20xIDAeBgNVBAMTF0RpZ2lDZXJ0IEdsb2JhbCBSb290IENBMIIBIjANBgkqhkiG
9w0BAQEFAAOCAQ8AMIIBCgKCAQEA4jvhEXLeqKTTo1eqUKKPC3eQyaKl7hLOllsB
CSDMAZOnTjC3U/dDxGkAV53ijSLdhwZAAIEJzs4bg7/fzTtxRuLWZscFs3YnFo97
nh6Vfe63SKMI2tavegw5BmV/Sl0fvBf4q77uKNd0f3p4mVmFaG5cIzJLv07A6Fpt
43C/dxC//AH2hdmoRBBYMql1GNXRor5H4idq9Joz+EkIYIvUX7Q6hL+hqkpMfT7P
T19sdl6gSzeRntwi5m3OFBqOasv+zbMUZBfHWymeMr/y7vrTC0LUq7dBMtoM1O/4
gdW7jVg/tRvoSSiicNoxBN33shbyTApOB6jtSj1etX+jkMOvJwIDAQABo2MwYTAO
BgNVHQ8BAf8EBAMCAYYwDwYDVR0TAQH/BAUwAwEB/zAdBgNVHQ4EFgQUA95QNVbR
TLtm8KPiGxvDl7I90VUwHwYDVR0jBBgwFoAUA95QNVbRTLtm8KPiGxvDl7I90VUw
DQYJKoZIhvcNAQEFBQADggEBAMucN6pIExIK+t1EnE9SsPTfrgT1eXkIoyQY/Esr
hMAtudXH/vTBH1jLuG2cenTnmCmrEbXjcKChzUyImZOMkXDiqw8cvpOp/2PV5Adg
06O/nVsJ8dWO41P0jmP6P6fbtGbfYmbW0W5BjfIttep3Sp+dWOIrWcBAI+0tKIJF
PnlUkiaY4IBIqDfv8NZ5YBberOgOzW6sRBc4L0na4UU+Krk2U886UAb3LujEV0ls
YSEY1QSteDwsOoBrp+uvFRTp2InBuThs4pFsiv9kuXclVzDAGySj4dzp30d8tbQk
CAUw7C29C79Fv1C5qfPrmAESrciIxpg0X40KPMbp1ZWVbd4=
-----END CERTIFICATE-----

Note: There must be a single empty line at the bottom.
Step 2. Upload the Root and Intermediate Certificates on CUCM (If Applicable)
- Log in to the Cisco Unified OS Administration page of your CUCM Publisher.
- Navigate to Security > Certificate Management.
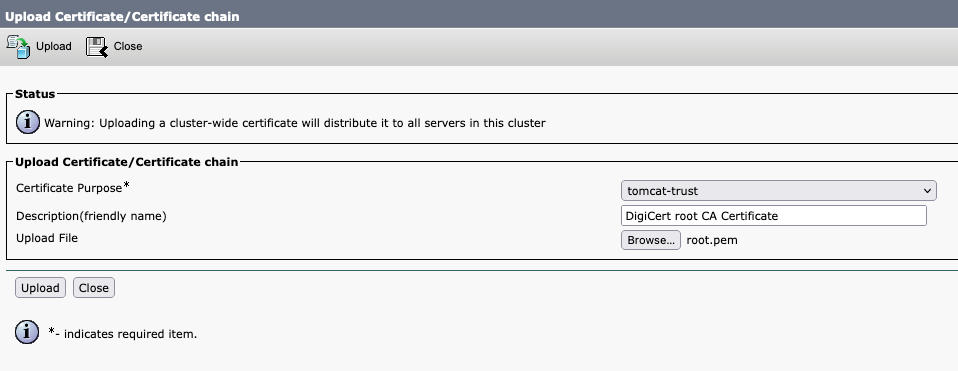
- Click the button Upload Certificate/Certificate chain.
- In the new window, start to upload the root certificate from Step 1. Upload it to tomcat-trust.

- Click the Upload button, and next you must see Success: Certificate Uploaded. Ignore the message asking you to restart Tomcat for now.
- Upload the same root file now with CallManager-trust for the Certificate Purpose.
- Repeat previous steps (uploading to tomcat-trust and CallManager-trust) for all intermediate certificates in use on the Expressway-C.
Step 3. Restart the Necessary Services on CUCM
These services need to be restarted on each CUCM node in your CUCM cluster:
- Cisco CallManager
- Cisco TFTP
- Cisco Tomcat
Cisco CallManager and Cisco TFTP can be restarted from the Cisco Unified Serviceability pages of CUCM:
- Log in to the Cisco Unified serviceability page of your CUCM Publisher.
- Navigate to Tools > Control Center - Feature Services.
- Choose your Publisher as the server.
- Choose Cisco CallManager service, and click the Restart button.
- After the Cisco CallManager service is restarted, choose Cisco TFTP service, and click the Restart button.
Cisco Tomcat can only be restarted from CLI:
- Open a command line connection to your CUCM Publisher.
- Use the command utils service restart Cisco Tomcat.
Related Information
Technical Support and Documentation - Cisco Systems


 Feedback