Introduction
This document describes how to download Jabber profile photo from Windows LDAP (Lightweight Directory Access Protocol) server user.
Prerequisites
Requirements
Cisco recommends that you have knowledge of these topics.
Cisco Unified Communication Manager (CUCM)
Cisco Jabber
Windows Server
Components Used
The information in this document is based on these software versions.
CUCM version 12.5.1.14900-63
Cisco Jabber version 14.1.5.57909
Windows server version 2016
The information in this document was created from the devices in a specific lab environment. All of the devices used in this document started with a cleared (default) configuration. If your network is live, ensure that you understand the potential impact of any command.
Configure
Configurations
These are the configuration steps to download Jabber profile picture from Windows LDAP server user.
1. Install "CodeTwo Active Directory Photos" software.
2. Search the LDAP user in "CodeTwo Active Directory Photos".
3. Upload the profile picture.
4. Verify the profile picture in "CodeTwo Active Directory Photos".
5. Verify the user profile picture association in the Active Directory.
6. Ensure the LDAP server is added as Directory service in the UC Service Profile of the end User.

Caution: Please ensure the Jabber is logged in using the LDAP synced users and not local user in the CUCM.
1. Install "CodeTwo Active Directory Photos" software.
Download "CodeTwo Active Directory Photos" software using this link - CodeTwo Active Directory Photos .
Install the software in the Windows LDAP server.
2. Search the LDAP user in "CodeTwo Active Directory Photos".
Open the software after the installation completes.
You must see all the users under specific OU (Organizational Unit) as shown in this screenshot.
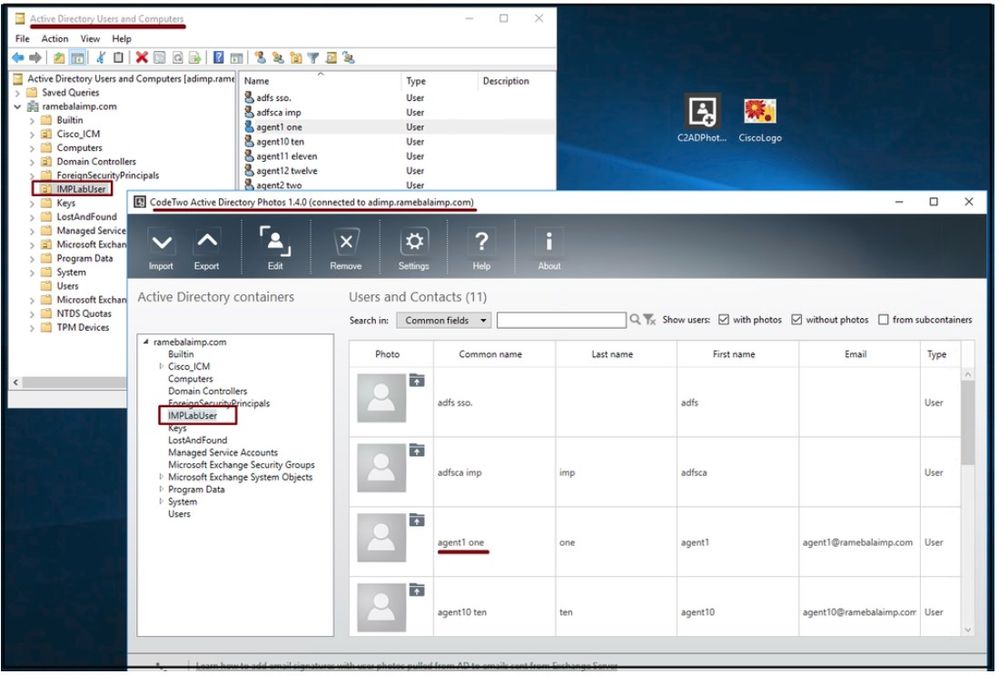 Users from the LDAP server show up in the 'CodeTwo Active Directory Photos' software interface.
3. Upload the profile picture.
Ensure the photo dimensions match the requirements before uploading the photo to the LDAP server.
Click on the upload icon for the user, browse the photo and then click the OK button to complete upload operation.
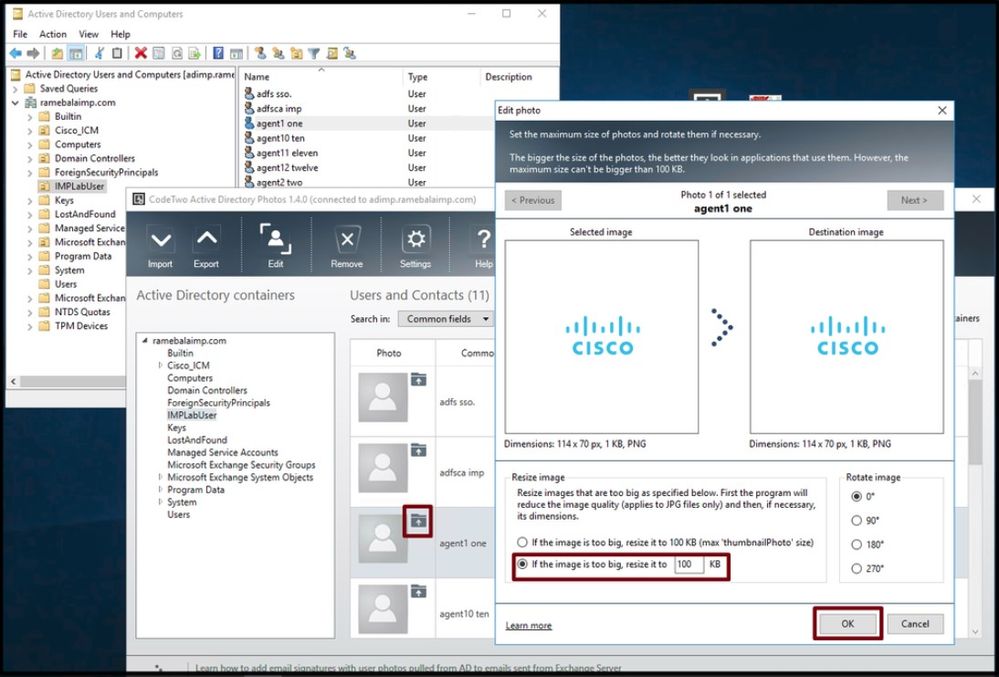 Upload an image to a user.
4. Verify the profile picture in "CodeTwo Active Directory Photos".
After uploading the photo, it shows up in front of the user as shown in this screenshot.
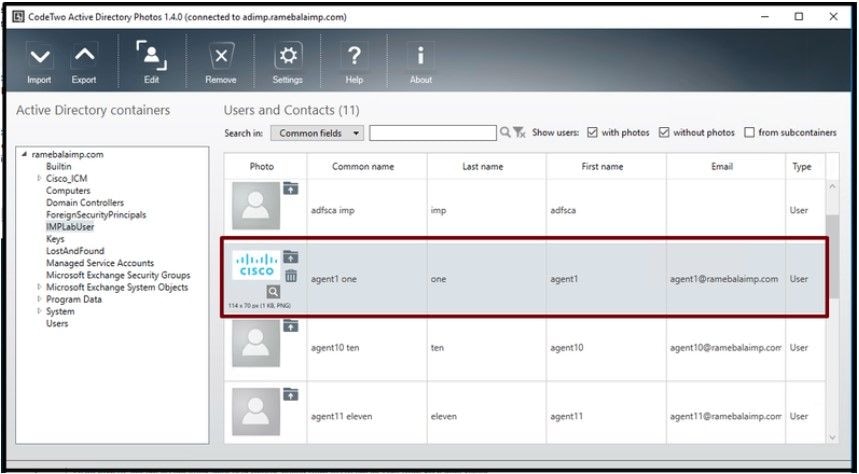 Image updated for the user.
5. Verify the user profile picture association in the Active Directory.
In the "Active Directory Users and Computers" window click on the "View" tab and check the "Advanced Features" option

Note: After this step, you see a tick mark before "Advanced Features" under View Tab.
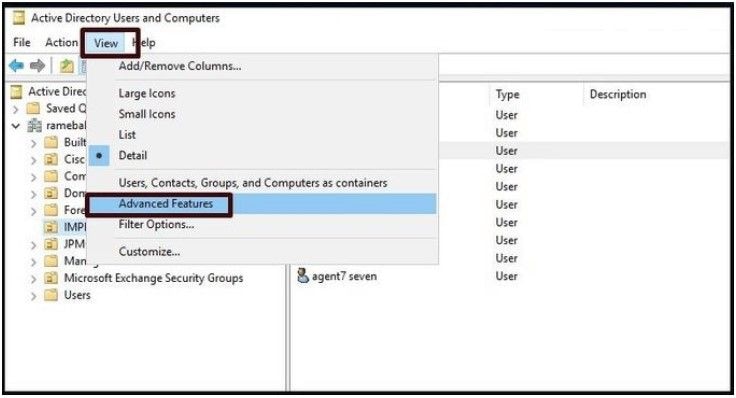 Enable Advanced Features for Active Directory Users and Computers.
Search for the end-user via Organizational Unit under the domain.
Right-click on the user and choose "Properties".
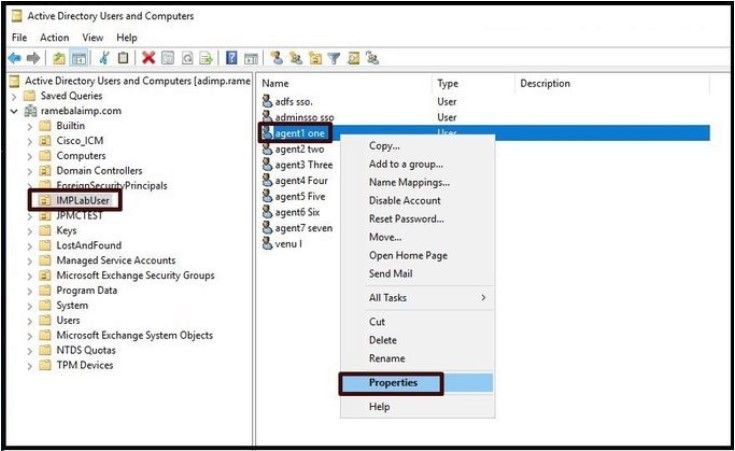 Open the properties for the user.
Click on the "Attribute Editor" tab and ensure a value is seen under the "thumbnailPhoto" section as shown in this screenshot. This confirms you that the photo is associated to the LDAP user successfully.
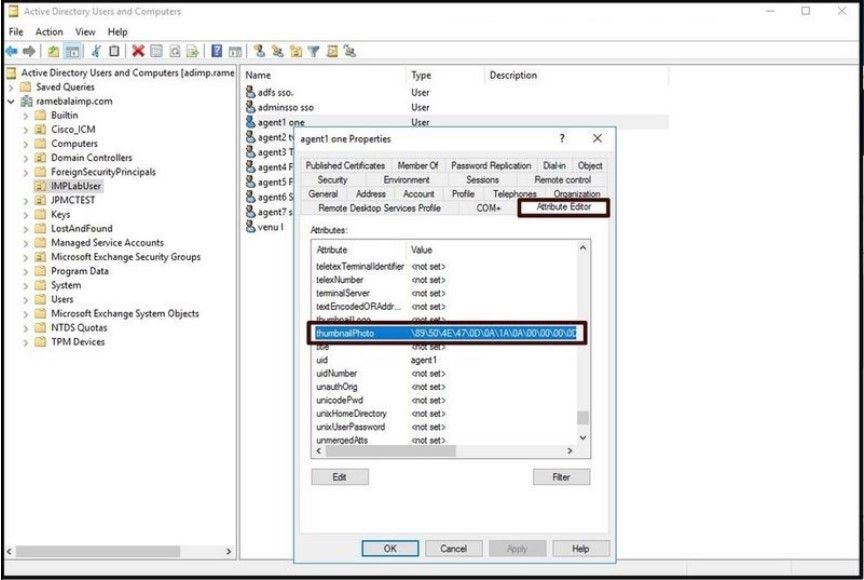 Confirm thumbnailPhoto field is updated with a value.
6. Ensure the LDAP server is added as Directory service in the UC Service Profile of the End User.
Log in to the CUCM Administration web interface and then Navigate to User Management > User Settings > UC Service.
Add a directory service with the LDAP server information.
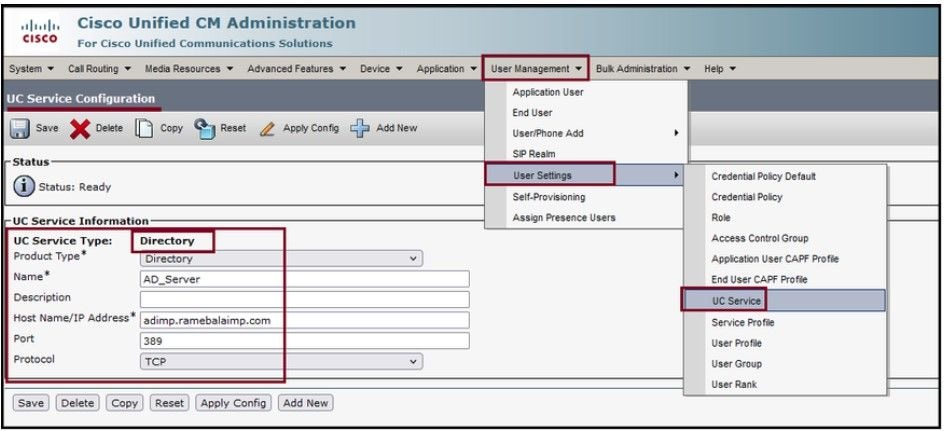 Add a Directory service.
Navigate to User Management > User Settings > Service Profile.
Open the Service profile which is assigned to the End User and then assign the created directory profile to the Service Profile.
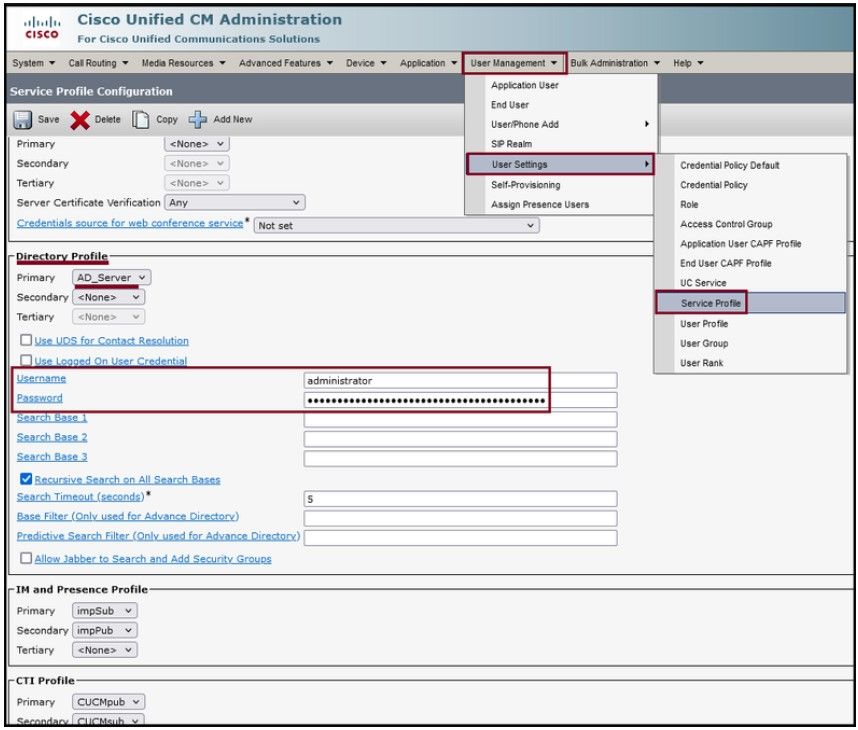 Assign the created directory profile to the Service Profile.
Ensure the same UC Service Profile (with the Directory Profile) is associated to the End User.
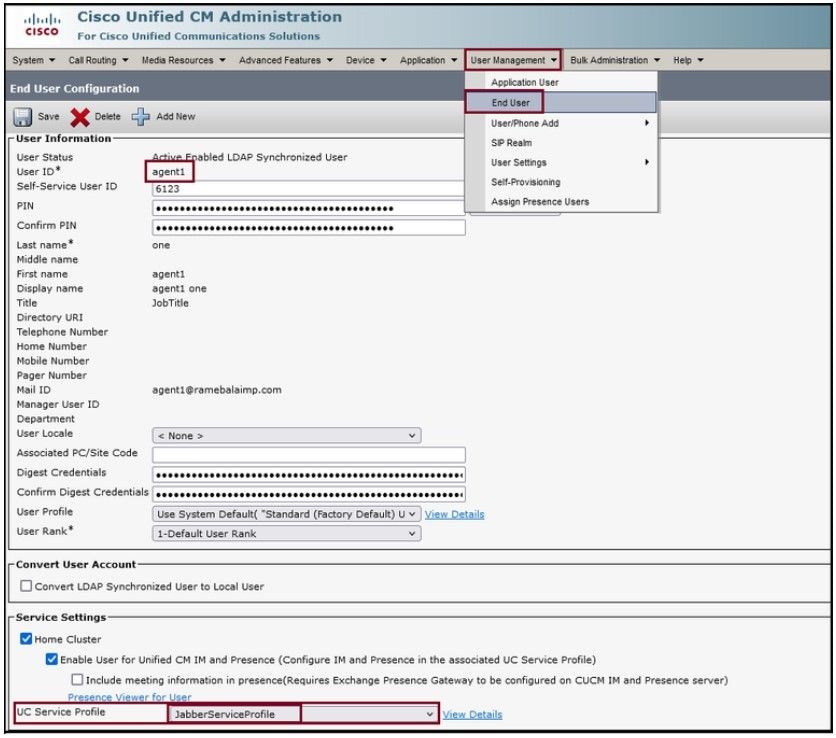 Ensure the UC Service Profile is assigned to the End User.
Reset the Jabber and log in.
Verify
After successful log in, you see the uploaded profile photo in your jabber.
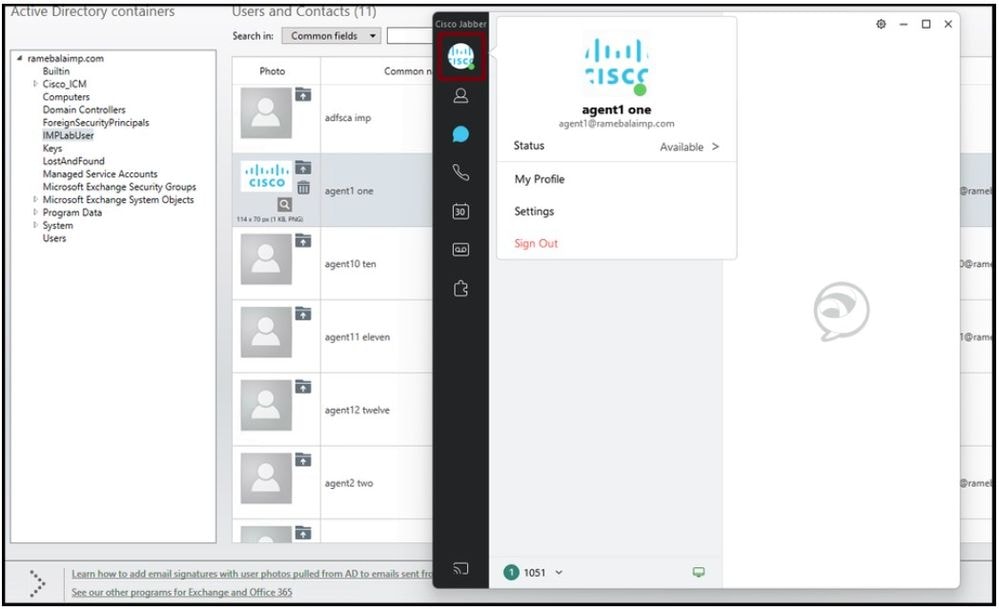 Profile photo shows up in the Jabber.
Troubleshoot
There is currently no specific troubleshooting information available for this configuration.
I hope this article is helpful !


 Feedback