Introduction
This document describes how to customize the Cisco Media Services Interface (MSI) installer for jabber using MS Orca.
MS Orca is a Windows MSI installer editor. It is a database table editor for creating and editing Windows Installer packages and merge modules.
Prerequisites
Requirements
There are no specific requirements for this document.
Components Used
The information in this document is based on these software versions.
- Microsoft Orca : Windows SDK 7.1 or later.
- Cisco Jabber installer version 9.0 and above.
The information in this document was created from the devices in a specific lab environment. All of the devices used in this document started with a cleared (default) configuration. If your network is live, make sure that you understand the potential impact of any command.
Configure
This is the procedure to customize MS installer.
Step 1. Dowload and Intall Microsoft Orca.
Step 2. Download the installer of jabber that you want to customize alog with the adminisrator package from the cco page.
Step 3. Unzip the installer and the adminisrator package in a single folder.
Step 4. Launch Microsoft Orca.

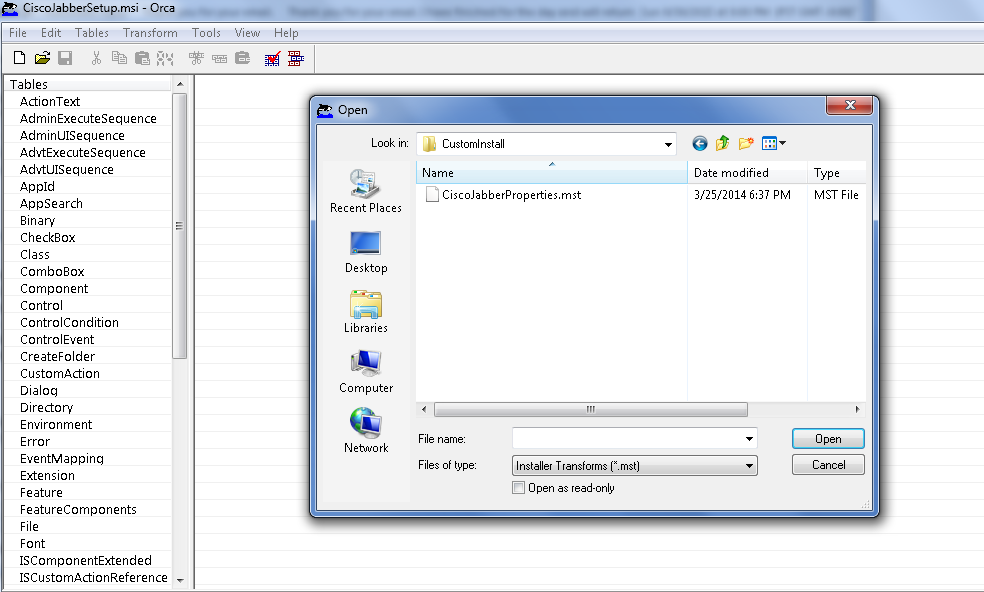
Step 5. As shown in the image, open the jabber msi installer, CiscoJabberSetup.msi in Orca.

Step 6. Remove all the language codes except for 1033(English).
Note: This restriction is because MS Orca doesn't retain any languages except for the default,which is 1033. If all language codes are not removed from the custom installer, the installer cannot run on any operating system where the language is other than English.

Step 7. Navigate to Transform > Apply Transform, browse to the location of the transform file in the file system. Select the transform file and then click on Open, as shown in the image. To create a custom installer, a transform file is needed. Transform files contain installation properties which are applied to the installer.

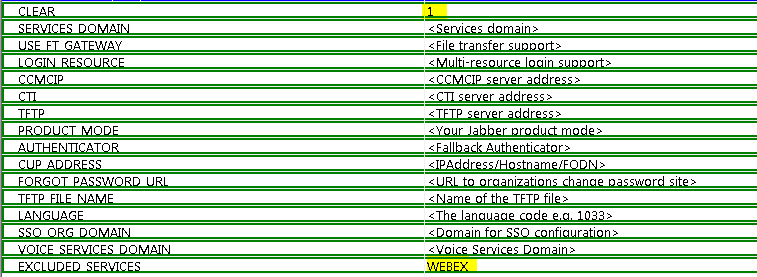
Step 8. As shown in the image, navigate to Tables > Property, a list of properties can be visible in the right panelout of which the ones with green background lines are the customizable properties

Step 9. Specify the values to the properties as per requirements.

Step10. Delete all the other properties that are not required.
It is important to delete the properties not being set, or the required properties shall not take effect.
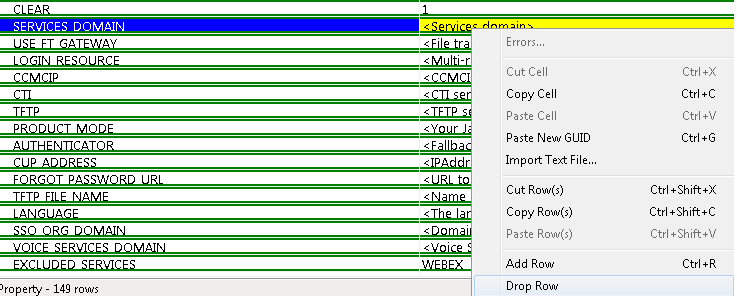
For deleting the non-required properties go the property to be dropped and right click on it.
Select Drop Row and select OK, as shown in the image:

Step 11. Retain the properties that are required to be altered.

Step 12. The transformed file generated also can be saved and used to modify the properties of the installer.
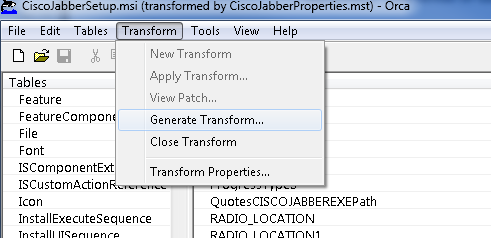
To save the transformed file, navigate to Transform > Generate Transform, as shown in the image.
This transformed file can be saved in the format filename.mst.

Step 13. Enable the installer to save the embedded streams.
Navigate to Tools > Options and under Database tab, check Copy embeded streams during 'Save As' and then click inApply and OK, as shown in the image:

Step 14. Save the customized installer as you navigate to File > Save Transformed As. Specify a suitable name and click in Save.
This customized installer can be used with the group policy deployment.
