Introduction
This document describes the procedure used in order to capture HTTPS (Hyper Text Transfer Protocol Secure) traffic with the Macintosh(Mac) program Charles proxy.
Prerequisites
Requirements
Cisco recommends that you have knowledge of Apple OS X.
Components Used
The information in this document is based on the Charles application available from the author's source.
The information in this document is based on Apple OS X.
The information in this document was created from the devices in a specific lab environment. All of the devices used in this document started with a cleared (default) configuration. If your network is live, ensure that you understand the potential impact of any command.
Background Information
This would be essential for troubleshooting Single Sign-On (SSO) traffic which cannot be captured with normal network traffic tools.
Configure
Step 1. Download Charles proxy and then install Charles - Download Charles Web Debugging Proxy Application
Step 2. Open Charles
Step 3. Navigate to Proxy > select MAC OS X Proxy
Step 4. Navigate to Proxy > Proxy Settings > enable Use a dynamic port
Step 5. Navigate to Help > SSL Proxying > Install Charles Root Certificate
Step 6. The Charles Proxy certificate will be installed under login, but move it to System keystore

Step 7. Input site URL in browser and then Charles will capture the logs with the site information.

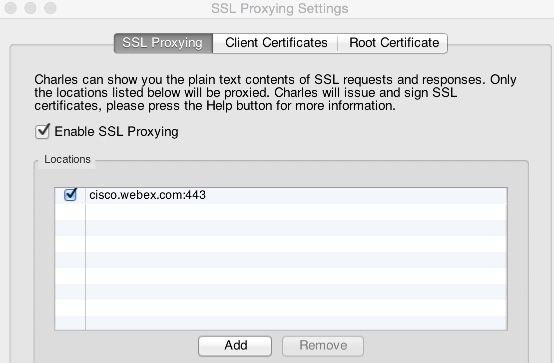
Step 8. Right click the site URL http://cisco.webex.com and then select Enable SSL Proxying
Step 9. Select Proxy > SSL Proxying Settings > Verify you see this image

Charles will now begin to capture the HTTPS traffic for the site URL. In order to capture other site URL, repeat steps 7, 8, 9 and ensure the URL is added to the SSL Proxying.
Related Information
