Introduction
This document provides instructions on how correctly configure Lightweight Directory Access Protocol (LDAP) as a Directory Contact source for Cisco Jabber on all platforms. This article also introduces the concept of Cisco Directory Integration (CDI).
Contributed by Fareed Warrad, Cisco TAC Engineer.
Prerequisites
Requirements
Cisco recommends that you have knowledge of these topics:
Components Used
This document is not restricted to specific software and hardware versions.
The information in this document was created from the devices in a specific lab environment. All of the devices used in this document started with a cleared (default) configuration. If your network is live, ensure that you understand the potential impact of any command.
Background Information
Previously Jabber relied on two types of Directory Integrations, Bridged Directory Integration or Basic Directory Integration (BDI) and Enhanced Directory Integration (EDI). Enhanced Directory Integration was a Windows exclusive, and was only used in situations where you wanted to specify a specific LDAP configuration. The reason behind this is because for Windows, Directory Integration is automatic. Windows connects to your domain controller, and authenticate with your Windows username and password. BDI on the other hand were for all other platforms such as Mac, Android and IOS
In Cisco Jabber, the Jabber Development team removed support for BDI and created CDI which is essentially EDI. This means for all Cisco Jabber 11.8 clients and higher, no matter what platform Jabber administrators can now have one set of configuration for Directory Contact Source for all of their users irrespective of what platform they use. This means that for plenty of Jabber Admins who only configured only BDI in their Jabber environment due to the fact that they had Windows users on the Domain, they experience issues such as not being able to connect to the LDAP server in Jabber on non-Windows platforms. This guide shows how to configure CDI in the Service Profile and in the Jabber Configuration extended markup language (XML) File.
Configuration with the Service Profile
Step 1. To access the service profile in CUCM navigate to User Management > User Settings > Service Profile.

Step 2. Select Find.

Step 3. For some environments, if Cisco Jabber 11.8 is not being used, you can duplicate the current Service Profile. The administrator can choose to delete the older ones later. Select the current working profile (in this case it’s Instant Messaging and Presence (IMP) Service Profile).

Step 4. Select Copy and change the name of the profile to differentiate it. For this case it is IMP Service Profile CDI. Uncheck the Make this the default service profile for the system option and select Save.

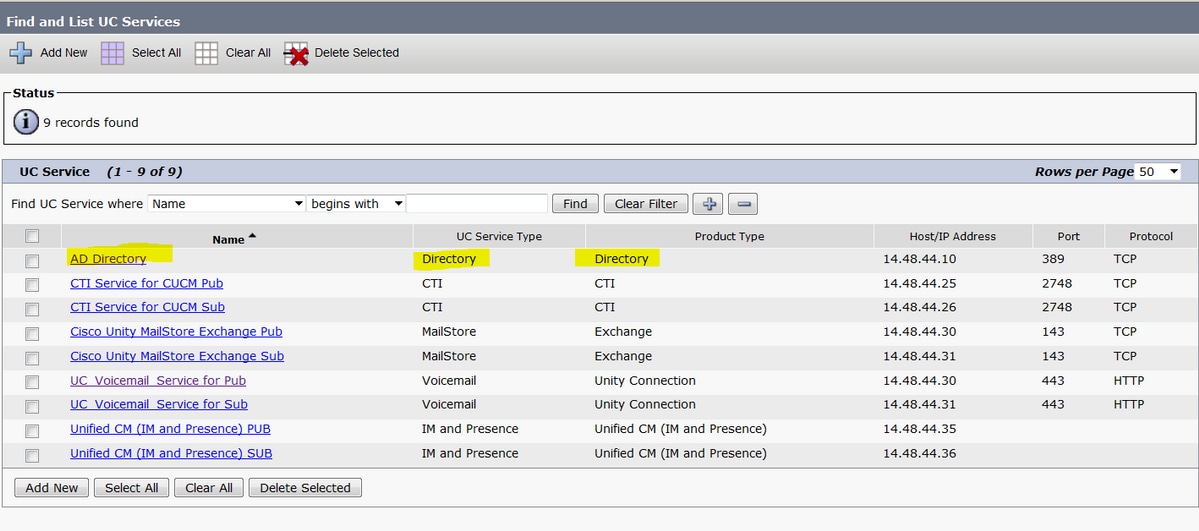
Step 5. Navigate to the Unified Communications (UC) Service page to make the appropriate changes. Then select User Management > User Settings > UC Service > Find

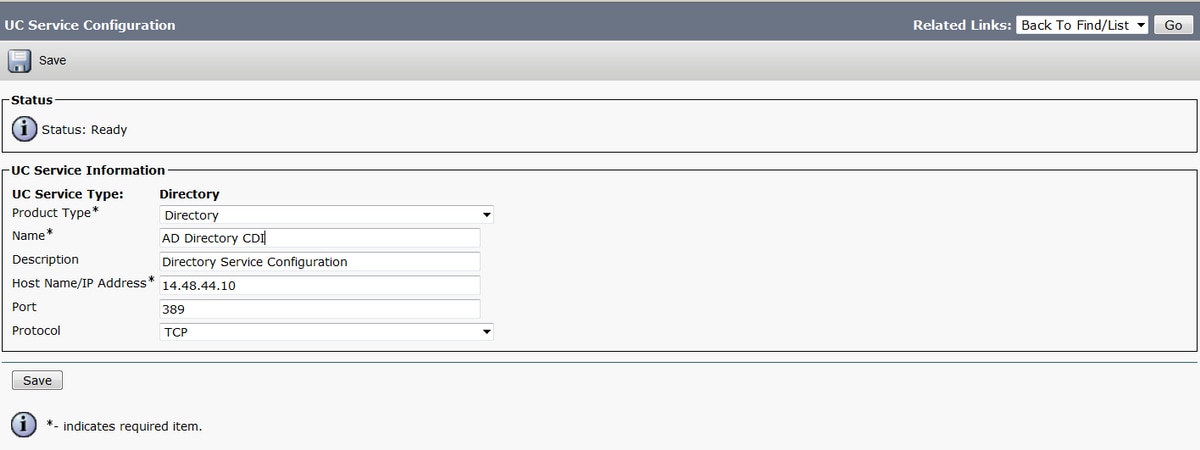
Step 6. In this example, Directory type is AD Directory. Under Product Type it is listed as Directory and is no longer supported in Cisco Jabber 11.8 or above so change the name to AD Directory CDI.

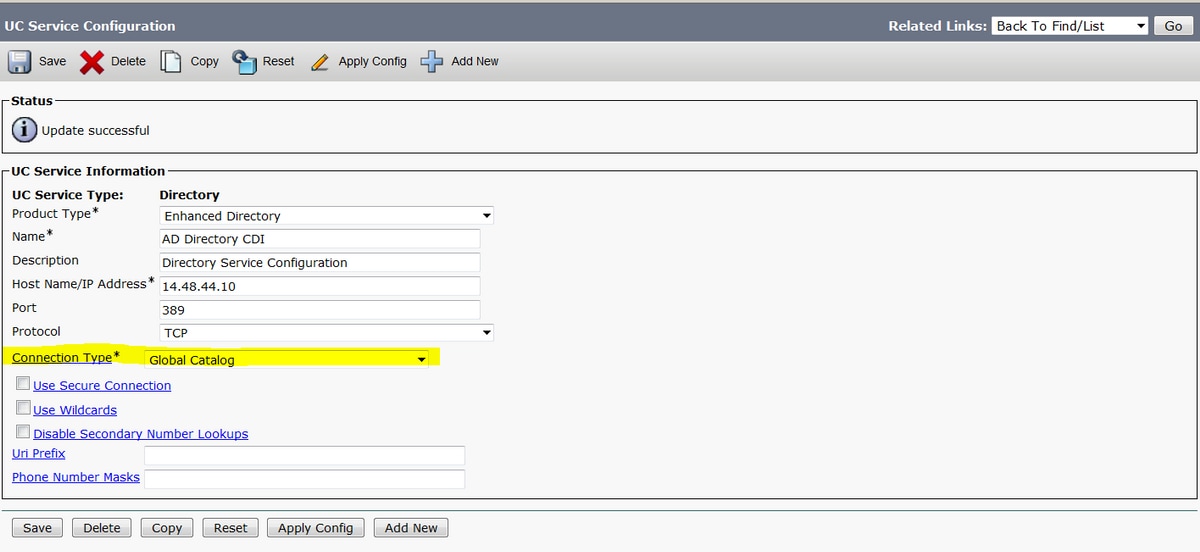
Step 7. Change the Product Type to Enhanced Directory, uncheck Use Secure Connection unless you want to use secure connection, then select Save.

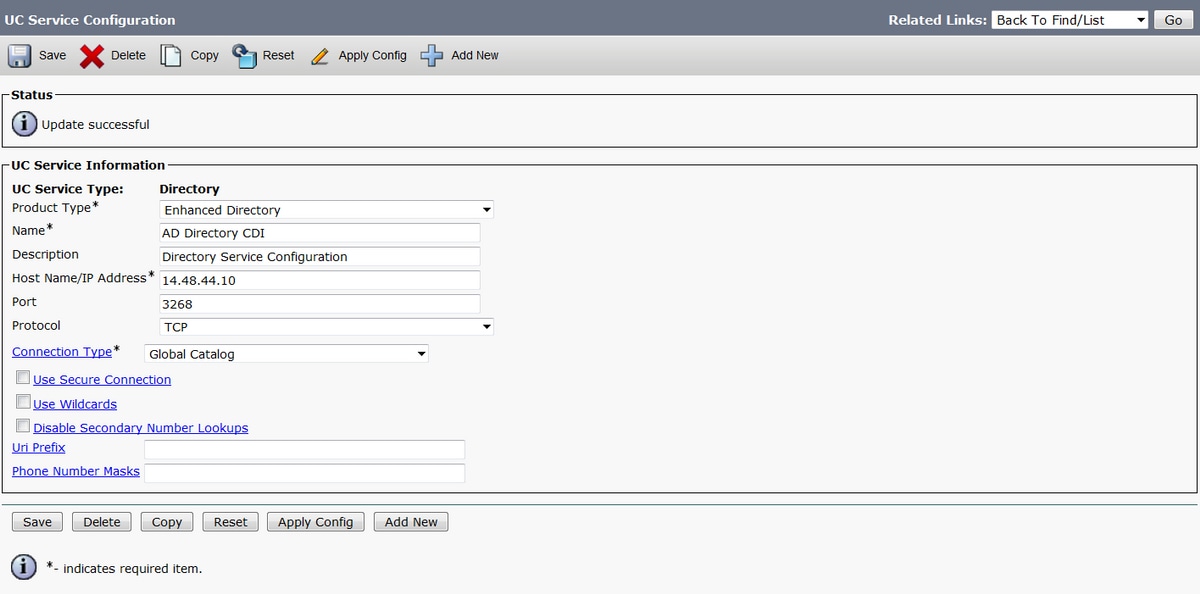
Step 8. Chose the connection type and pick the correct port for the connection type. Global Catalog = 3268, and LDAP = 389. Global Catalog is much faster than LDAP and does not cause any timeouts but it has to be configured on the LDAP server in order to function.

Step 9. Navigate to User Management > User Settings > Service Profile > Find. Select the new profile created earlier and scroll down to Directory Profile section.

Step 10. Change the Primary Server to the new UC Service and select Save.

Step 11. Assign the end users the new Service Profile. Once assigned, upgrade to Cisco Jabber 11.8 to make the Directory connection work. Select User Management > End User > Find > Select a user.


Change the UC Service Profile to the new one we created and click Save.

Configuration with the Jabber Configuration File
Below is the sample standard configuration for CDI with Simple Authentication & No Secure Socket Layer (SSL) in the Jabber Configuration File. If SSL is needed change the False to a True in the <UseSSL></UseSSL> tag.
<?xml version="1.0" encoding="utf-8"?>
<config version="1.0">

<Directory>

  <DirectoryServerType>AD</DirectoryServerType>
  <PresenceDomain>farewarr.com</PresenceDomain>
  <PrimaryServerName>x.x.x.x</PrimaryServerName>
  <ServerPort1>PortNumberHere</ServerPort1>
  <ConnectionUsername>usernamehere</ConnectionUsername>
  <ConnectionPassword>passwordhere</ConnectionPassword>
  <UseSSL>False</UseSSL>
  <SearchBase1>CN=users,DC=farewarr,DC=com</SearchBase1>

</Directory>

</config>
After changes are made, upload file to the Trivial File Transfer Protocol (TFTP) server and restart the TFTP service on all TFTP nodes. Sign out of Jabber and sign back in for the changes to take effect.
Verify
There is currently no verification procedure available for this configuration.
Troubleshoot
There is currently no specific troubleshooting information available for this configuration.
Related Information
