Introduction
This document describes how to configure SIP Transport Layer Security (TLS) between Cisco Unified Communication Manager (CUCM) and Cisco Unified Border Element (CUBE) with Certificate Authority (CA)-signed certificates.
Prerequisites
Cisco recommends having knowledge of these subjects
- SIP protocol
- Security Certificates
Requirements
- Date and time must match on the endpoints (it is recommended to have the same NTP source).
- CUCM must be in mixed mode.
- TCP connectivity is required (Open port 5061 on any transit firewall).
- The CUBE must have the security and Unified Communication K9 (UCK9) licenses installed.
Note: For Cisco IOS-XE version 16.10 onawards the platform has moved to smart licensing.
Components Used
- SIP
- Certificate Authority signed certificates
-
Cisco IOS and IOS-XE Gateways
2900 / 3900 / 4300 / 4400 / CSR1000v / ASR100X Versions: 15.4+
-
Cisco Unified Communications Manager (CUCM)
Versions: 10.5+
Configure
Network Diagram

Configuration
Step 1. You are going to create an RSA key matching the certificate length of the Root certificate using command:
Crypto key generate rsa label TestRSAkey exportable modulus 2048
This command creates an RSA key with a length of 2048 bits (maximum is 4096).
Step 2. Create a trustpoint to hold our CA-signed certificate using commands:
 Crypto pki trustpoint CUBE_CA_CERT
   serial-number none
   fqdn none
   ip-address none
   subject-name cn=ISR4451-B.cisco.lab !(this has to match the router’s hostname  [hostname.domain.name])
   revocation-check none
   rsakeypair TestRSAkey !(this has to match the RSA key you just created)
Step 3. Now that you have our trustpoint, you are going to generate our CSR request with the commands below:
Crypto pki enroll CUBE_CA_CERT
Answer the questions on the screen, then copy the CSR request, save it to a file and then send it to the CA.
Step 4. You need to find out if the Root certificate chain has any intermediate certificates; in case there are no intermediate certificate authorities, jump to step 7, otherwise, continue on step 6.
Step 5. Create a trust point to hold the Root certificate, plus, create a trust point to hold any intermediate CA until the one that is signing our CUBE certificate (see image below).

In this example, the 1st level is the Root CA, the 2nd level is our first intermediate CA, the 3rd level is the CA that is signing our CUBE certificate, and thus, you need to create a trustpoint to hold the first 2 certificates with these commands.
Crypto pki trustpoint Root_CA_CERT
Enrollment terminal pem
Revocation-check none

Crypto pki authenticate Root_CA_CERT
Paste the X.64 based certificate here

Crypto pki trustpoint Intermediate_CA
Enrollment terminal
Revocation-check none

Crypto pki authenticate Intermediate_CA
<Paste the X.64 based certificate here>
Step 6. After receiving our CA-signed certificate, you are going to authenticate the trustpoint, the trustpoint needs to hold the certificate of the CA right before CUBE certificate; the command that allows to import the certificate is,
Crypto pki authenticate CUBE_CA_CERT
 <Paste the X.64 based certificate here>
Step 7. Once you have our Certificate installed, you need to run this command in order to import our CUBE certificate
  Crypto pki import CUBE_CA_CERT cert
  <Paste the X.64 based certificate here>
Step 8. Configure SIP-UA to use the trustpoint you created
  sip-ua
  crypto signaling default trustpoint CUBE_CA_CERT
Step 9. Configure dial peers as shown below:
  dial-peer voice 9999 voip
  answer-address 35..
  destination-pattern 9999
  session protocol sipv2
  session target dns:cucm10-5
  session transport tcp tls
  voice-class sip options-keepalive
  srtp
With this, the CUBE configuration is complete.
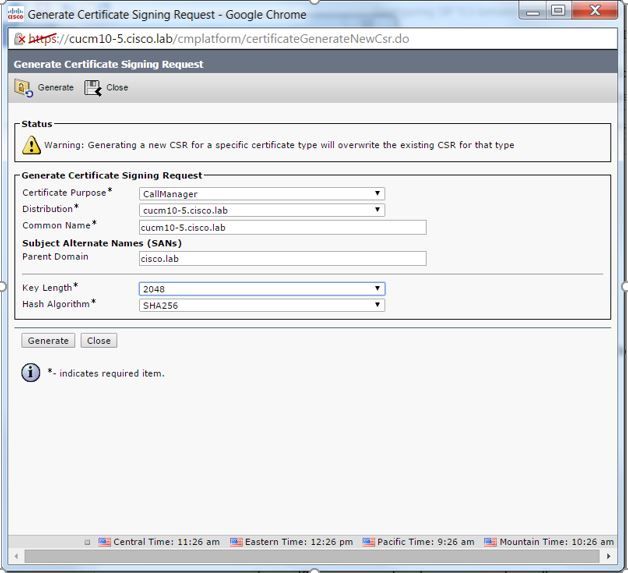
Step 10. Now, you are going to generate our CUCM CSR, follow the instructions below
- Log in to CUCM OS administrator
- Click on security
- Click on certificate management.
- Click on generate CSR
The CSR request needs to look as the one below:

Step 11. Download the CSR and send it to the CA.
Step 12. Upload the CA-signed certificate chain to the CUCM , steps are:
- Click on security and then certificate management.
- Click on upload certificate/certificate chain.
- On the certificate purpose drop-down menu, select call manager.
- Browse to your file.
- Click on upload.
Step 13. Log in to the CUCM CLI and run this command
utils ctl update CTLFile
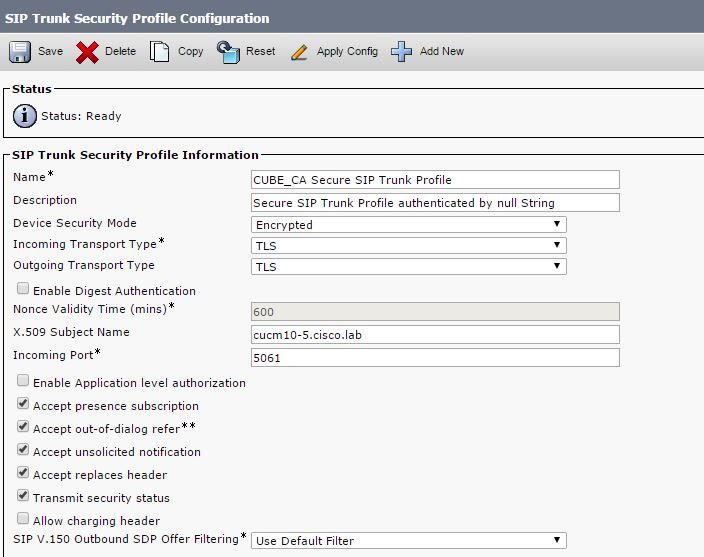
Step 14. Configure a CUCM SIP trunk security profile
- Click on system, then security and then sip trunk security profile
- Configure the profile as shown in the image,

Note:In this case, the X.509 subject name has to match the CUCM certificate subject name as shown in the highlighted portion of image.

Step 15. Configure a SIP trunk as you would normally do on the CUCM
- Ensure the SRTP Allowed check box is checked.
- Configure the proper destination address and ensure to replace port 5060 with port 5061.
- On the SIP trunk security profile, ensure to select the SIP profile name created on step 14.

Verify
At this time, if all configuration is OK,
On CUCM the SIP trunk status shows Full Service , as shown in the image,

On CUBE the dial peer shows this status:
TAG    TYPE  MIN  OPER PREFIX    DEST-PATTERN      FER THRU SESS-TARGET    STAT PORT    KEEPALIVE

9999   voip  up   up             9999               0  syst dns:cucm10-5                  active
This same process applies to other routers, the only difference is that instead of step to upload the CUCM certificate, upload the certificate provided by third party.
Troubleshoot
Enable these debugs on CUBE
debug crypto pki api
debug crypto pki callbacks
debug crypto pki messages
debug crypto pki transactions
debug ssl openssl errors
debug ssl openssl msg
debug ssl openssl states
debug ip tcp transactions
