Introduction
This document describes how to collect Cisco CallManager (CCM) traces through the Command Line Interface (CLI) of the server's Operating System (OS) for any Linux based system, in case you cannot access the Real-Time Monitoring Tool (RTMT) application.
Contributed by Christian Nuche (cnuche), Cisco TAC Engineer.
Background Information
What is it?
CCM traces are logs that the call control process (Cisco CallManager process) generates, these should be set to detail and ensure you have the appropriate checkboxes enabled to collect the information you want.
What is it helpful for?
This is helpful to troubleshoot a variety of issues on the system like, call route issues, interoperability with other systems, SIP or SCCP issues, GW related issues, these will basically show you what CUCM does internally when it receives or makes a request.
Prerequisites
Components
Collect the files
Step 1. Open Putty, and log in to the CUCM CLI
Note: You need to perform the same procedure on all servers you want to collect traces from
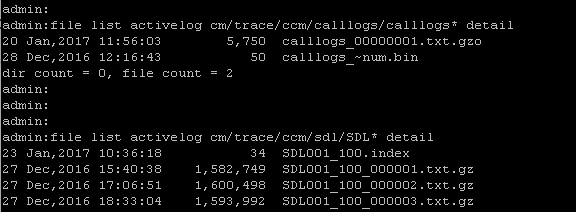
Step 2. In order to verify the files you need use the file list command.
file list { activelog | inactivelog | install } file-spec [ page | detail | reverse ] [ date | size ]
* The location of the files are:
activelog cm/trace/ccm/sdl/SDL*
activelog cm/trace/ccm/calllogs/calllogs*
activelog cm/trace/ccm/sdi/ccm* (CUCM 7.x and older)
If you need to download other type of files, you can find a useful list of file locations on: Communications Manager RTMT Trace Locations in CLI
https://supportforums.cisco.com/document/65651/communications-manager-rtmt-trace-locations-cli
Example
file list activelog cm/trace/ccm/sdl/SDL* detail

This shows you the date, time, size and filename, you can download only the files you need based on this information or you can collect all the files in the folder.
Step 3. Download the files with the command file get
file get { activelog | inactivelog | install } file-spec [ reltime | abstime ] [ match regex ] [recurs] [compress]
Example
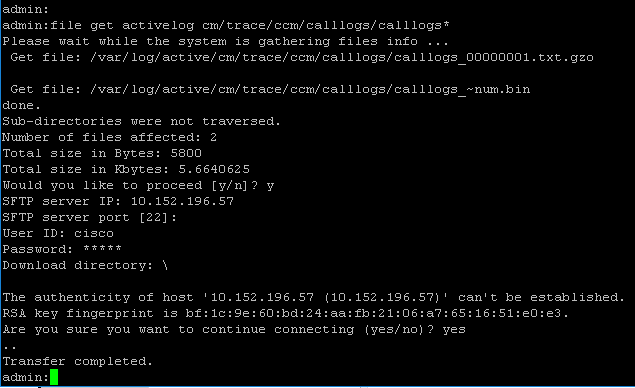
file get activelog cm/trace/ccm/calllogs/calllogs*
This command downloads all files in the folder, the system prompts you for the SFTP server details, remember that in order to use the SFTP root on windows based SFTP servers you use backslash (\), and for Linux based SFTP servers you use forwardslash (/) see below:

If you get any .gzo files those are files that were open at the time you download them, you probably wont be able to open them but the rest of the files should be .gz that you can extract with 7-zip (http://www.7-zip.org/) in case you want to open the files.

If you need to open the gzo files you can use the CLI command file view and use the entire path, and include the filename, in this case you need to copy the output and paste it on a text editor that supports Unix end of lines, like Notepad++

You can also use any linux box to get the content, in this case use the command zcat <filename>

Step 3. Once you have all the files you need, create a zip file and add all the folders that contains the files you just download, then upload them to your TAC case through the case file uploader tool: https://cway.cisco.com/csc
Step 4. Notify the TAC engineer you work with that you have uploaded the files.
Tip: Remember to add the IPs, MACs, and hostnames of the involved devices, date and time of the test / event, source and destination numbers, (if apply), and a detailed description of what happened. If the TAC engineer does not know what he/she should look for it can get harder to find, and it can take a lot more time to find it, so please include that information
