Introduction
This document describes the correct process to update Adaptative Security Appliance (ASA) certificate on Cisco Unified Communications Manager (CUCM) for phones over Virtual Private Network (VPN) with AnyConnect feature to avoid phone service interruption.
Prerequisites
Requirements
Cisco recommends that you have knowledge of these topics:
- Phone VPN with AnyConnect feature.
- ASA and CUCM Certificates.
Components Used
The information in this document is based on these software and hardware versions:
- Cisco Unified Communications Manager 10.5.2.15900-8.
- Cisco Adaptive Security Appliance Software Version 9.8(2)20.
- Cisco IP Phone CP-8841.
The information in this document was created from the devices in a specific lab environment. All of the devices used in this document started with a cleared (default) configuration. If your network is live, ensure that you understand the potential impact of any command.
Background Information
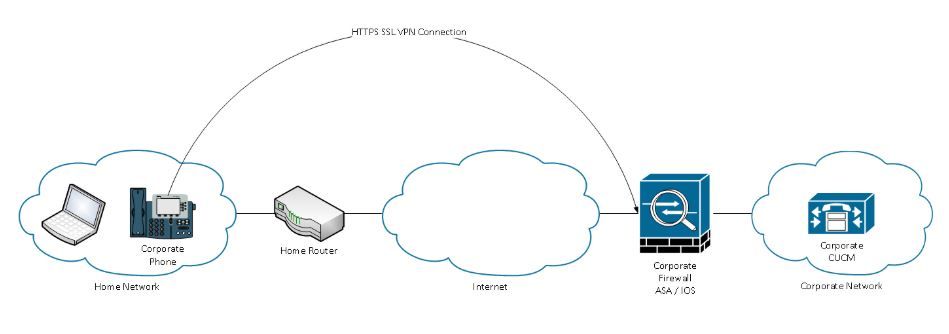
Phone VPN feature with AnyConnect allows the provision of phone service over VPN connection.
Before the phone is ready for VPN, it must first be provisioned in the internal network. This requires direct access to the CUCM TFTP (Trivial file transfer Protocol) server.
The first step after the ASA is fully configured, is to take the ASA Hypertext Transfer Protocol Secure (HTTPS) Certificate and upload it to the CUCM server as Phone-VPN-trust, and assign it to the correct VPN Gateway in CUCM. This allows the CUCM server to build an IP phone config file that tells the phone how to get to the ASA.
The phone has to be provisioned inside the network before it can be moved outside the network and use the VPN feature. After the phone has been provisioned internally, it can be moved to the external network for VPN access.
The phone connects on TCP port 443 over HTTPS to the ASA. The ASA responds back with the configured certificate, and it verifies the presented certificate.

How to Update the ASA Certificate without VPN Phones Services Interruption?
At some point, the ASA certificate needs to be change, due to any circumstances for example.
The certificate is about to expire
Tthe certificate is 3rd party signed and the Certificate Authority (CA) change, etc
There are some steps to follow in order to avoid the interruption of service for phones that are connected to CUCM via VPN with AnyConnect.
Caution: If the steps are not followed, the phones need to be provisioned on the internal network again before they can be deployed on an outside network.
Step 1. Generate the new ASA certificate but do not apply it yet to the interface.
The certificate could be self-signed or CA signed.
Note: For more information about ASA certificates refer to Configuring Digital Certificates
Step 2. Upload that certificate in CUCM as Phone VPN trust on the CUCM Publisher.
Login to Call Manager and navigate to Unified OS Administration > Security > Certificate Management > Upload Certificate > Select Phone-VPN-trust.
As a recommendation, upload the complte certificate chain, if the root and intermediate certificates are already uploaded on CUCM, go to the next step.
Caution: Please keep in mind If the old identity certificate and the new one have the same CN (Common Name) you need to follow the workaround for the bug CSCuh19734 in order to avoid the new certificate overwrites the older one. In that way, the new certificate is in the database for Phone VPN Gateway configuration but the old one is not overwritten.
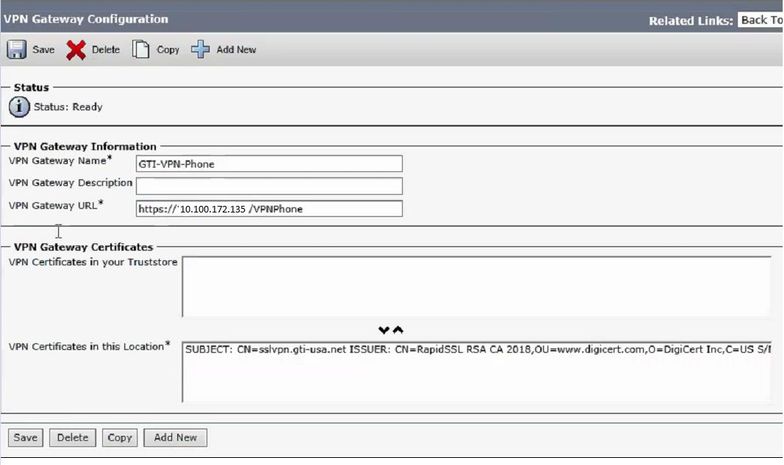
Step 3. On the VPN gateway, select both certificates (the old and new one).
Navigate to Cisco Unified CM Administration >Advanced Features > VPN > VPN Gateway.
Ensure you have both certificates in the VPN Certificates in this Location field.

Step 4. Check that the VPN group, profile and common phone profile are set correctly.
Step 5. Reset the phones.
This step allows the phones to download the new configuration settings and ensures the phones have both certificates hashes, so they can trust in the old and in the new certificate.
Step 6. Apply the new certificate on the ASA interface.
Once the certificate is applied on the ASA interface, the phones should trust in that new certificate since they have both certificate hashes from the previous step.
Verify
Use this section in order to confirm that you have followed the steps correctly.
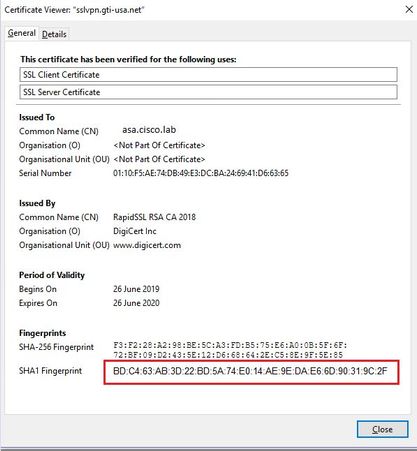
Step 1. Open the old and new ASA certificates and note down the SHA-1 fingerprint.

Step 2. Choose a Phone that should be connected via VPN and collect its configuration file.
Note: For more information on how to collect phone configuration file refer to Two Ways to Obtain a Phone's Configuration File from CUCM
Step 3. Once you have the configuration file, look for the section:
<vpnGroup>
<mtu>1290</mtu>
<failConnectTime>30</failConnectTime>
<authMethod>2</authMethod>
<pswdPersistent>0</pswdPersistent>
<autoNetDetect>1</autoNetDetect>
<enableHostIDCheck>0</enableHostIDCheck>
<addresses>
<url1> https://radc.cgsinc.com/Cisco_VOIP_VPN</url1>;
</addresses>
<credentials>
<hashAlg>0</hashAlg>
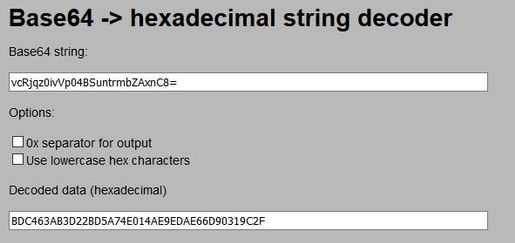
<certHash1>vcRjqz0ivVp04BSuntrmbZAxnC8=</certHash1>
<certHash2>SEnDU8oo49agcRObtMBACXdaiTI=</certHash2>
</credentials>
</vpnGroup>
Step 4. The hash in the configuration file is printed in Base 64 format and in the ASA certificate is printed in Hexadecimal format, so you can use a decoder from Base 64 to Hexadecimal to verify that both hashed (phone and ASA) match.

Related Information
For more information about AnyConnect VPN Phone feature:
https://www.cisco.com/c/en/us/support/docs/unified-communications/unified-communications-manager-callmanager/115785-anyconnect-vpn-00.html
