Configure CUCM for Secure LDAP (LDAPS)
Available Languages
Introduction
This document describes the procedure to update CUCM connections to AD from a non-secure LDAP connection to a secure LDAPS connection.
Prerequisites
Requirements
Cisco recommends that you have knowledge of these topics:
• AD LDAP Server
• CUCM LDAP Configuration
• CUCM IM & Presence Service (IM/P)
Components Used
The information in this document is based on CUCM release 9.x and higher.
The information in this document was created from the devices in a specific lab environment. All of the devices used in this document started with a cleared (default) configuration. If your network is live, ensure that you understand the potential impact of any command.
Background Information
It is the responsibility of the Active Directory (AD) Administrator to configure AD Lightweight Directory Access Protocol (LDAP) for Lightweight Directory Access Protocol (LDAPS) . This includes the installation of CA-signed certificates that meet the requirement of an LDAPS certificate.

Note: See this link for information in order to update from non-secure LDAP to secure LDAPS connections to AD for other Cisco Collaboration Applications: Software Advisory: Secure LDAP Mandatory for Active Directory Connections
Verify and Install LDAPS Certificates
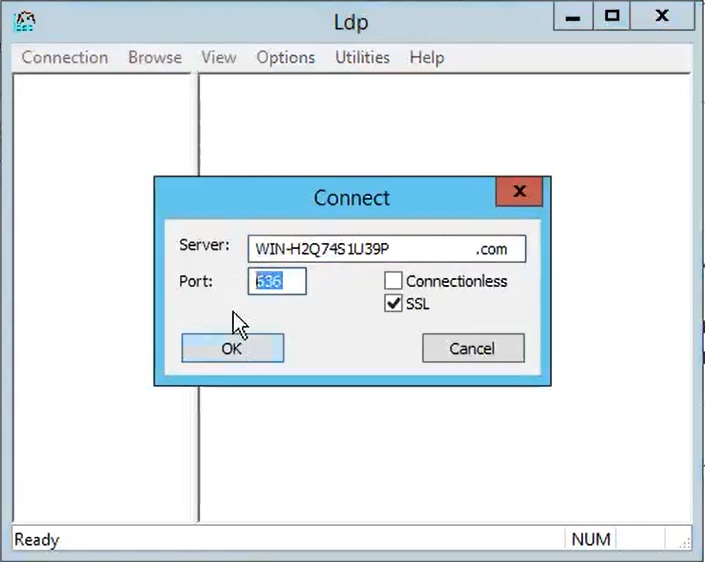
Step 1. After the LDAPS certificate has been uploaded to the AD server, verify that LDAPS is enabled on the AD server with the ldp.exe tool.
- Start the AD Administration Tool (Ldp.exe) on the AD server.
- On the Connection menu, select Connect.
- Enter the Fully Qualified Domain Name (FQDN) of the LDAPS server as the server.
- Enter 636 as the port number.
- Click OK, as shown in the image
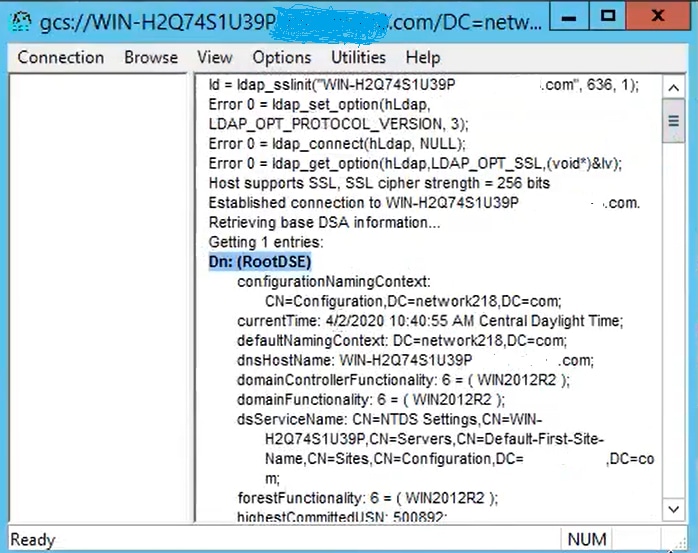
For a successful connection on port 636, RootDSE information prints out in the right pane, as shown in the image:

Repeat the procedure for port 3269, as shown in the image:

For a successful connection on port 3269, RootDSE information prints out in the right pane, as shown in the image:
Step 2. Obtain the root and any intermediate certificates that are part of the LDAPS server certificate and install these as tomcat-trust certificates on each of the CUCM and IM/P publisher nodes and as CallManager-trust on the CUCM publisher.
The root and intermediate certificates that are part of an LDAPS server certificate, <hostname>.<Domain>.cer, are shown in the image:

Navigate to CUCM publisher Cisco Unified OS Administration > Security > Certificate Management. Upload root as tomcat-trust (as shown in the image) and as CallManager-trust (not shown):

Upload intermediate as tomcat-trust (as shown in the image) and as CallManager-trust (not shown):

Step 3. Restart Cisco Tomcat from the CLI of each node (CUCM and IM/P) in clusters. Additionally, for the CUCM cluster, verify that the Cisco DirSync service on the publisher node is started.
In order to Restart the Tomcat service, you need to open a CLI session for each node and run the command utils service restart Cisco Tomcat, as shown in the image:

Step 4. Navigate to CUCM publisher Cisco Unified Serviceability > Tools > Control Center - Feature Services, verify that the Cisco DirSync service is activated and started (as shown in the image), and restart the Cisco CTIManager service on each node if this is used (not shown):

Configure Secure LDAP Directory
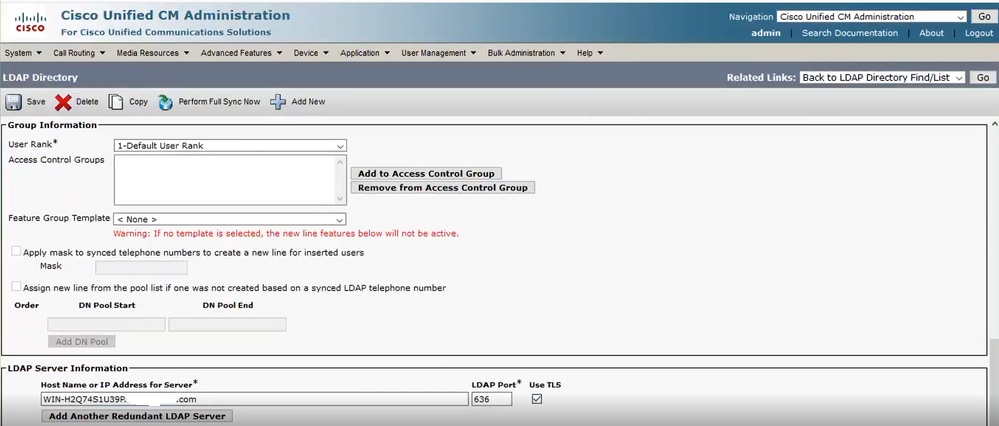
Step 1. Configure the CUCM LDAP Directory in order to utilize LDAPS TLS connection to AD on port 636.
Navigate to CUCM Administration > System > LDAP Directory. Type the FQDN or the IP address of the LDAPS server for LDAP Server Information. Specify the LDAPS port of 636 and check the box for Use TLS, as shown in the image:
Note: By default, after versions 10.5(2)SU2 and 9.1(2)SU3 FQDN configured in LDAP Server Information are checked against the Common Name of the certificate, in case the IP address is used instead of the FQDN, the command utils ldap config ipaddr is issued to stop the enforcement of FQDN to CN verification.
Step 2. In order to complete the configuration change to LDAPS, click Perform Full Sync Now, as shown in the image:

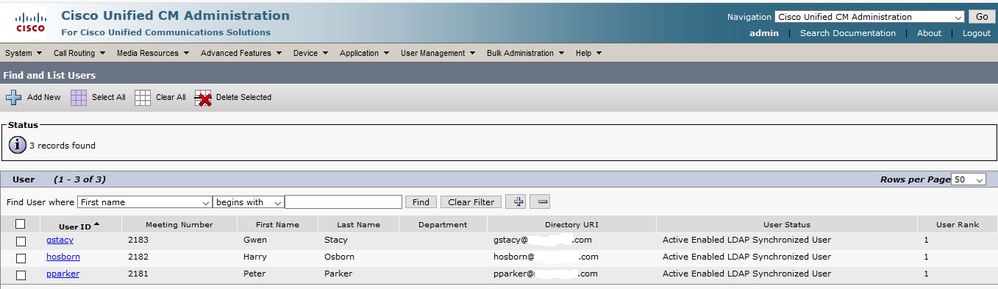
Step 3. Navigate to CUCM Administration > User Management > End User and verify that end-users are present, as shown in the image:
Step 4. Navigate to ccmuser page (https://<ip address of cucm pub>/ccmuser) in order to verify that the user log in is successful.
The ccmuser page for CUCM version 12.0.1 looks like this:

The user can successfully log in after LDAP credentials are entered, as shown in the image:
Configure Secure LDAP Authentication
Configure CUCM LDAP Authentication in order to utilize LDAPS TLS connection to AD on port 3269.
Navigate to CUCM Administration > System > LDAP Authentication. Type the FQDN of the LDAPS server for LDAP Server Information. Specify the LDAPS port of 3269 and check the box for Use TLS, as shown in the image:

Note: If you have Jabber clients, it is recommended to use port 3269 for LDAPS Authentication, since Jabber timeout for log in can occur if a secure connection to the global catalog server is not specified.
Configure Secure Connections to AD for UC Services
If you need to secure UC services that utilize LDAP, configure these UC services to utilize port 636 or 3269 with TLS.
Navigate to CUCM administration > User Management > User Settings > UC Service. Find Directory Service that points to AD. Type the FQDN of the LDAPS server as the Host Name/IP Address. Specify the port as 636 or 3269 and protocol TLS, as shown in the image:

Note: The Jabber client machines also need to have the tomcat-trust LDAPS certificates that were installed on CUCM installed in the certificate management trust store of the Jabber client machine in order to allow the Jabber client to establish an LDAPS connection to AD.
Verify
Use this section to confirm that your configuration works properly.
In order to verify the actual LDAPS certificate/certificate chain sent from the LDAP server to CUCM for the TLS connection, export the LDAPS TLS Certificate from a CUCM packet capture. This link provides information on how to export a TLS certificate from a CUCM packet capture: How to Export TLS Certificate from CUCM Packet Capture
Troubleshoot
There is currently no specific information available to troubleshoot this configuration.
Related Information
- This link provides access to a video that walks through the LDAPS configurations: Secure LDAP Directory and Authentication Walkthrough Video
- Technical Support & Documentation - Cisco Systems
Revision History
| Revision | Publish Date | Comments |
|---|---|---|
6.0 |
05-Jun-2026
|
Recertification |
4.0 |
05-Jun-2024
|
Updated Formatting. |
3.0 |
12-May-2023
|
Removed PII.
Added Alt Text.
Updated for Style Requirements, Machine Translation and Formatting. |
2.0 |
02-Feb-2023
|
Added image alt text.
Updated for formatting, style requirements and machine translation. |
1.0 |
23-Aug-2021
|
Initial Release |
 Feedback
Contact Cisco
- Open a Support Case

- (Requires a Cisco Service Contract)