Introduction
This document describes a step-by-step procedure to create certificate templates on Windows Server-based Certification Authorities (CA).
Prerequisites
Requirements
Cisco recommends that you have knowledge of these topics:
- CUCM version 11.5(1).
- Basic knowledge of Windows Server administration
Components Used
The information in this document is based on these software and hardware versions:
- CUCM Version 11.5(1).
- Microsoft Windows Server 2012 R2 with CA services installed.
The information in this document was created from the devices in a specific lab environment. All of the devices used in this document started with a cleared (default) configuration. If your network is live, ensure that you understand the potential impact of any command.
Background information
These certificate templates are compliant with X.509 extension requirements for every type of Cisco Unified Communications Manager (CUCM) certificate.
There are five types of certificates that can be signed by an external CA:
|
Certificate
|
Use
|
Impacted Services
|
|
Callmanager
|
Presented at secure device registration and can sign Certificate Trust List (CTL)/Internal Trust List (ITL) files, used for secure interactions with other servers such as secure Session Initiation Protocol (SIP) Trunks.
|
· Cisco Call Manager
· Cisco CTI Manager
· Cisco TFTP
|
|
tomcat
|
Presented for Secure Hypertext Transfer Protocol (HTTPS) interactions.
|
· Cisco Tomcat
· Single Sign-On (SSO)
· Extension Mobility
· Corporate Directory
|
|
ipsec
|
Used for backup file generation, as well as IP Security (IPsec) interaction with Media Gateway Control Protocol (MGCP) or H323 gateways.
|
· Cisco DRF Primary
· Cisco DRF Local
|
|
CAPF
|
Used to generate Locally Significant Certificates (LSC) for phones.
|
· Cisco Certificate Authority Proxy Function
|
|
TVS
|
Used to create a connection to the Trust Verification Service (TVS) when the phones are not able to authenticate an unknown certificate.
|
· Cisco Trust Verification Service
|
Note: ipsec certificate is not related to Cisco DRF Primary and Cisco DRF Local since 14, in newer versions, Tomcat certificate is used instead. There is no plan to add this change to 12.5 or earlier versions.
Each of these certificates has some X.509 extension requirements that need to be set, otherwise, you can encounter misbehavior on any of the aforementioned services:
|
Certificate
|
X.509 Key Usage
|
X.509 Extended Key Usage
|
|
Callmanager
|
· Digital Signature
· Key Encipherment
· Data Encipherment
|
· Web Server Authentication
· Web Client Authentication
|
|
tomcat
|
· Digital Signature
· Key Encipherment
· Data Encipherment
|
· Web Server Authentication
· Web Client Authentication
|
|
ipsec
|
· Digital Signature
· Key Encipherment
· Data Encipherment
|
· Web Server Authentication
· Web Client Authentication
· IPsec End System
|
|
CAPF
|
· Digital Signature
· Certificate Sign
· Key Encipherment
|
· Web Server Authentication
· Web Client Authentication
|
|
TVS
|
· Digital Signature
· Key Encipherment
· Data Encipherment
|
· Web Server Authentication
· Web Client Authentication
|
For more information, reference the Security Guide for Cisco Unified Communications Manager
Configure
Step 1. On the Windows Server, navigate to Server Manager > Tools > Certification Authority, as shown in the image.

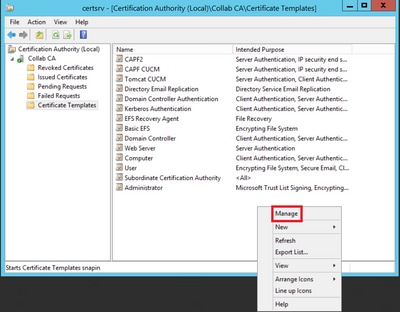
Step 2. Select your CA, then navigate to Certificate Templates, right-click on the list and select Manage, as shown in the image.
Callmanager / Tomcat / TVS Template
The next images display only the creation of the CallManager template; but the same steps can be followed to create the certificate templates for the Tomcat and the TVS services. The only difference is to ensure the respective service name is used for each new template in step 2.
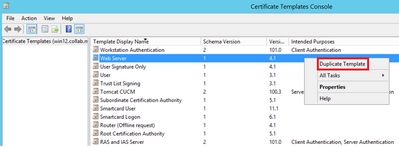
Step 1. Find the Web Server template, right-click on it and select Duplicate Template, as shown in the image.
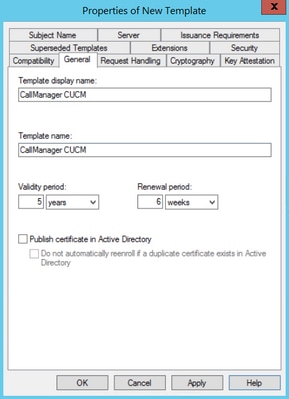
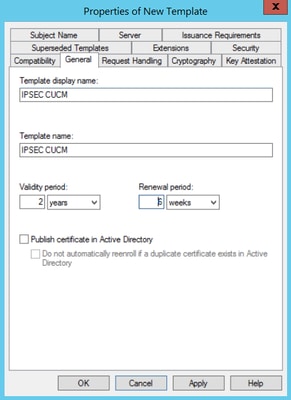
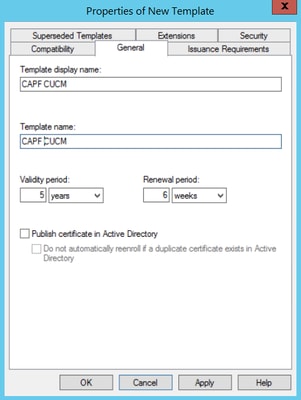
Step 2. Under General, you can change the certificate template's name, display name, validity, and some other variables.
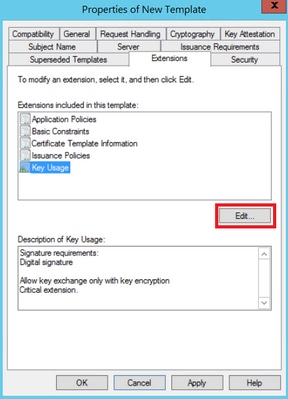
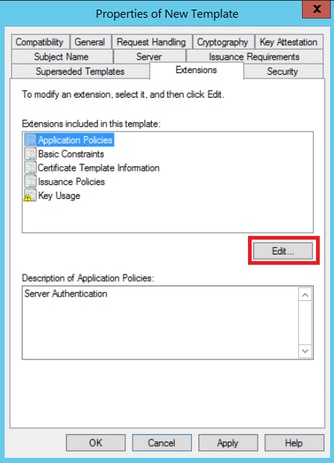
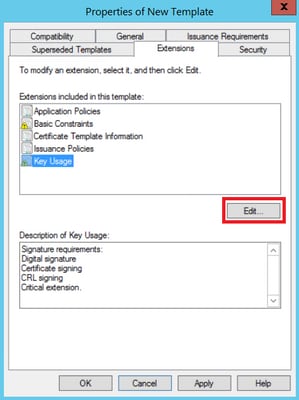
Step 3. Navigate to Extensions > Key Usage > Edit, as shown in the image.
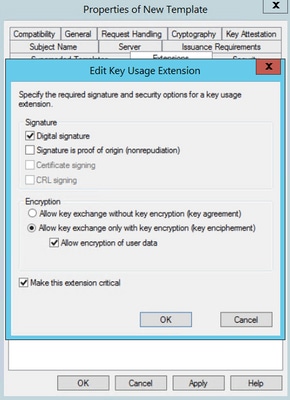
Step 4. Select these options and select OK, as shown in the image.
- Digital signature
- Allow key exchange only with key encryption (key encipherment)
- Allow encryption of user data

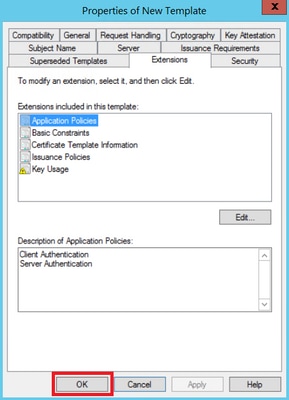
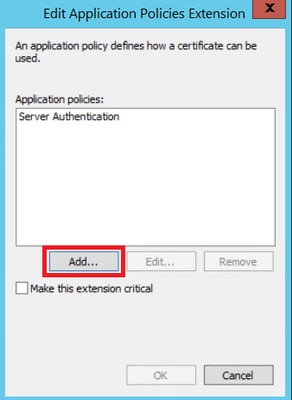
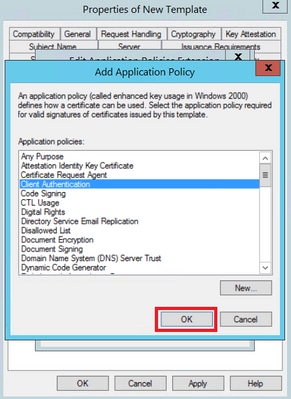
Step 5. Navigate to Extensions > Application Policies > Edit > Add, as shown in the image.


Step 6. Search for Client Authentication, select it and select OK on both this window and the previous one, as shown in the image.

Step 7. Back on the template, select Apply and then OK.
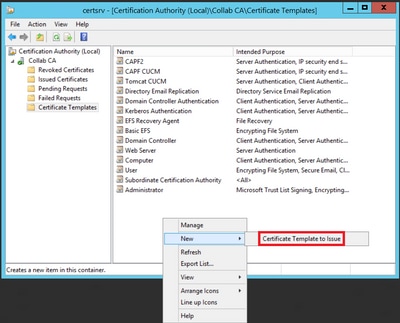
Step 8. Close the Certificate Template Console window, and back on the very first window, navigate to New > Certificate Template to Issue, as shown in the image.

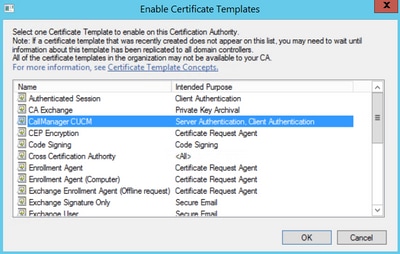
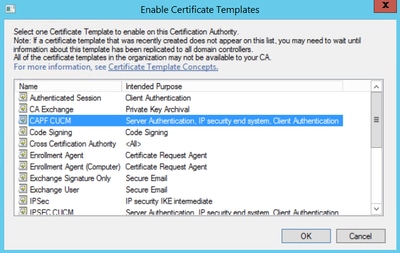
Step 9. Select the new CallManager CUCM template and select OK, as shown in the image.
Step 10. Repeat all previous steps to create certificate templates for the Tomcat and TVS services as needed.
IPsec Template
Step 1. Find the Web Server template, right-click on it and select Duplicate Template, as shown in the image.

Step 2. Under General, you can change the certificate template’s name, display name, validity, and some other vairiables.
Step 3. Navigate to Extensions > Key Usage > Edit, as shown in the image.

Step 4. Select these options and select OK, as shown in the image.
- Digital signature
- Allow key exchange only with key encryption (key encipherment)
- Allow encryption of user data

Step 5. Navigate to Extensions > Application Policies > Edit > Add, as shown in the image.
Step 6. Search for Client Authentication, select it and then OK, as shown in the image.
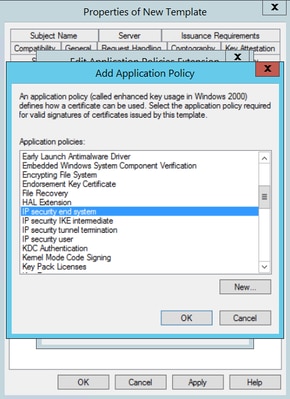
Step 7. Select Add again, search for IP security end system, select it and then select OK on this and on the previous window as well.

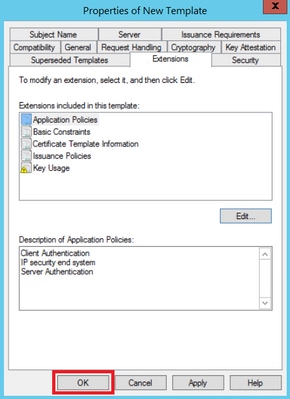
Step 8. Back on the template, select Apply and then OK, as shown in the image.
Step 9. Close the Certificate Templates Console window, and back on the very first window, navigate to New > Certificate Template to Issue, as shown in the image.

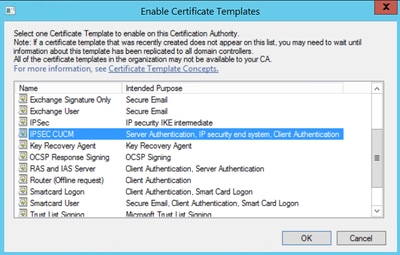
Step 10. Select the new IPSEC CUCM template and select OK, as shown in the image.
CAPF Template
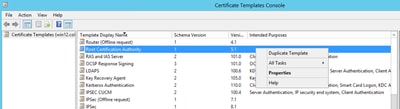
Step 1. Find the Root CA template and right-click on it. Then select Duplicate Template, as shown in the image.
Step 2. Under General, you can change the certificate template’s name, display name, validity, ans some other variables.
Step 3. Navigate to Extensions > Key Usage > Edit, as shown in the image.
Step 4. Select these options and select OK, as shown in the image.
- Digital signature
- Certificate signing
- CRL signing
Step 5. Navigate to Extensions > Application Policies > Edit > Add, as shown in the image.


Step 6. Search for Client Authentication, select it and then select OK, as shown in the image.

Step 7. Select Add again, search for IP security end system, select it and then select OK on this and on the previous window as well, as shown in the image.
Step 8. Back on the template, select Apply and then OK, as shown in the image.

Step 9. Close the Certificate Templates Console window, and back on the very first window, navigate to New > Certificate Template to Issue, as shown in the image.
Step 10. Select the new CAPF CUCM template and select OK, as shown in the image.
Generate a Certificate Signing Request
Use this example in order to generate a CallManager certificate with the use of the newly created templates. The same procedure can be used for any certificate type, you just need to select the certificate and template types accordingly:
Step 1. On CUCM, navigate to OS Administration > Security > Certificate Management > Generate CSR.
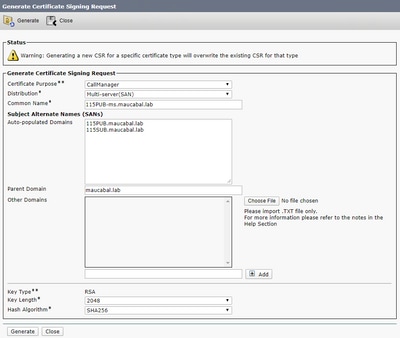
Step 2. Select these options and select Generate, as shown in the image.
- Certificate Purpose: CallManager
- Distribution: <This can either be just for one server or Multi-SAN>
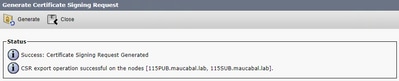
Step 3. A confirmation message is generated, as shown in the image.
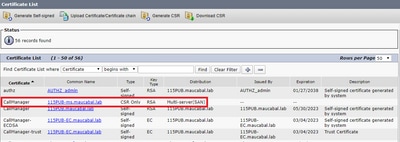
Step 4. On the certificate list, look for the entry with type CSR Only and select it, as shown in the image.
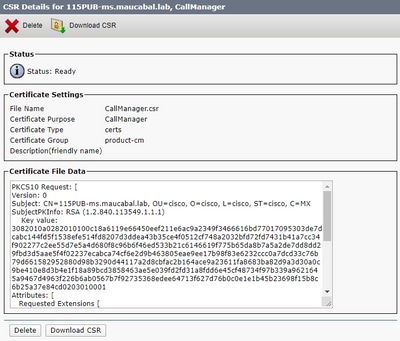
Step 5. On the pop-up window, select Download CSR, and save the file on your computer.
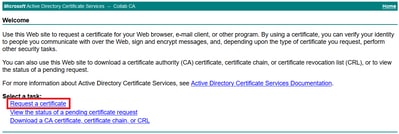
Step 6. On your browser, navigate to this URL, and enter your domain controller administrator credentials: https://<yourWindowsServerIP>/certsrv/.
Step 7. Navigate to Request a certificate > advanced certificate request, as shown in the image.

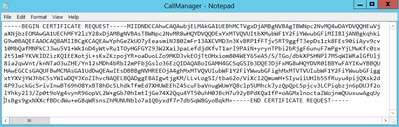
Step 8. Open the CSR file and copy all its contents:
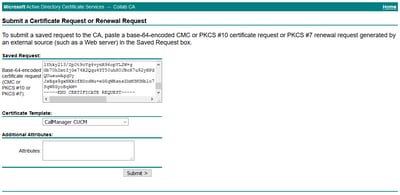
Step 9. Paste the CSR in the Base-64-encoded certificate request field. Under Certificate Template, select the correct template and select Submit, as shown in the image.
Step 10. Finally, select Base 64 encoded and Download certificate chain. The generated file can now be uploaded to the CUCM.

Verify
The verification procedure is actually part of the configuration process.
Troubleshoot
There is currently no specific troubleshoot information available for this configuration.
 Feedback