Introduction
This document describes how to manage bulk certification between Cisco Unified Communications Manager (CUCM) clusters for phone migration.
Prerequisites
Requirements
Cisco recommends that you have knowledge of these topics:
• Secure File Transfer Protocol (SFTP) server
• CUCM Certificates
Components Used
The information in this document is based on CUCM 10.X.
The information in this document was created from the devices in a specific lab environment. All of the devices used in this document started with a cleared (default) configuration. If your network is live, ensure that you understand the potential impact of any command.
Background Information
Note: This procedure is also outlined in the Manage Bulk Certificates Section of the Administration Guide for CUCM Release 12.5(1)
Bulk Certificate Management allows a set of certificates to be shared between CUCM clusters. This step is a requirement for system functions of individual clusters that need a trust to be established between them, such as for Extension Mobility Cross Cluster (EMCC), as well as for phone migration between clusters.
As part of the procedure, a Public Key Cryptography Standards #12 (PKCS12) file that contains certificates from all nodes in a cluster is created. Every cluster must export its certificates to the same SFTP directory on the same SFTP server. Bulk certificate management configurations must be done manually on the CUCM publisher of both the source and destination clusters. The source and destination clusters must be up and operational so that the phones to be migrated have connectivity to both of these clusters. The source cluster phones are migrated to the destination cluster.
Bulk Certificate Management Procedure
Export Destination Cluster Certificates
Step 1. Configure the SFTP server for Bulk Certificate Management on CUCM publisher of the destination cluster.
In this example, the destination cluster CUCM version is 11.5.1.
Navigate to Cisco Unified OS Adminstration > Security > Bulk Certificate Management. Enter the SFTP server details and click Export.
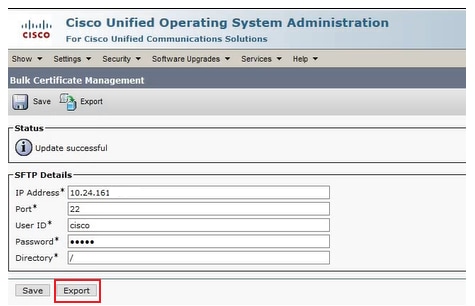 Enter the SFTP Server Details and Click Export.
Step 2. Export all certificates from all nodes in the destination cluster to SFTP server.
In the Bulk Certificate Export popup window, select All for Certificate Type and then click Export.
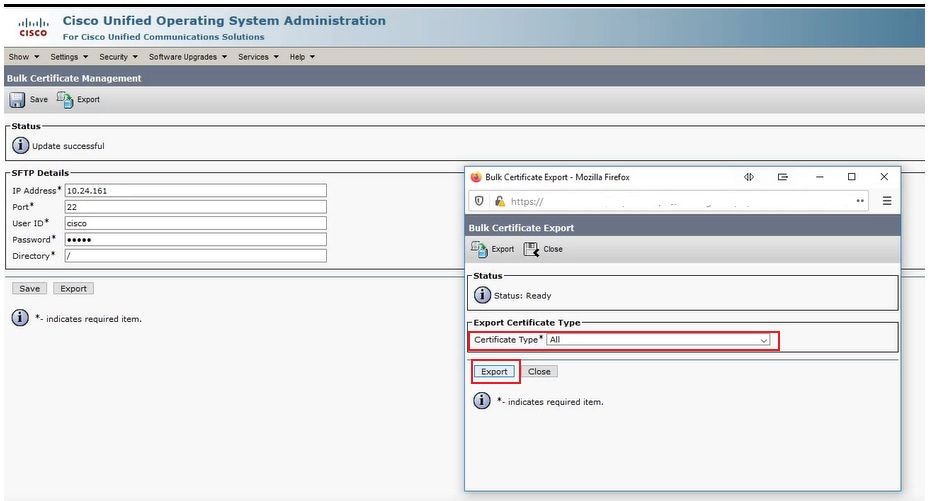 Select All for Certificate Type and then Click Export
Close the window and Bulk Certificate Management updates with the PKCS12 files created for each of the nodes in the destination cluster, the web page refreshes with this information, as shown in the image.
 Bulk Certificate Management Updates with the PKCS12 Files
Export Source Cluster Certificates
Step 1. Configure the SFTP server for Bulk Certificate Management on CUCM publisher of the source cluster.
In this example, the source cluster CUCM version is 10.5.2.
Navigate to Cisco Unified OS Adminstration > Security > Bulk Certificate Management enter the SFTP server details and click Export.
Note: The PKCS12 files exported from the destination cluster to the SFTP server shows on the source cluster CUCM publisher Bulk Certificate Management web page when accessed.
 Enter the SFTP Server Details and Click Export
Step 2. Export all certificates from all nodes in source cluster to SFTP server.
In the Bulk Certificate Export popup window, select All for Certificate Type and then click Export:
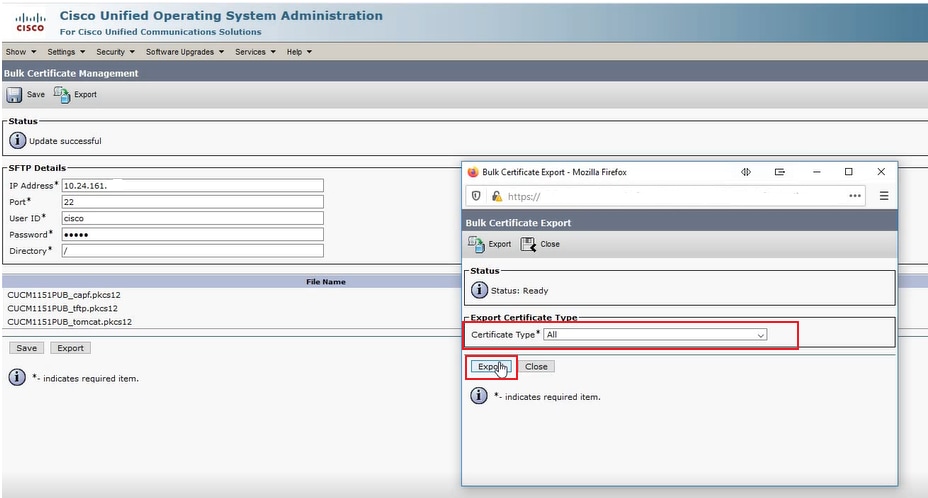 Export Certificate Type All
Click Close to close this window. The Bulk Certificate Management updates with the PKCS12 files created for each of the nodes in the source cluster, the web page refreshes with this information. The web page for Bulk Certificate Management of the source cluster now shows both source and destination PKCS12 files exported to SFTP.
 PKCS12 Files Exported to SFTP.
Consolidate Source and Destination PKCS12 Files
Note: Whereas Bulk Certificate Management export is done on both the source and destination clusters, consolidation is done through the CUCM publisher on only one of the clusters.
Step 1. Return to the Bulk Certificate Management page of the CUCM publisher of the source cluster and click Consolidate:
 Click Consolidate
In the Bulk Certificate Consolidate popup window, select All for Certificate Type and then click Consolidate. Click Close to close this window.
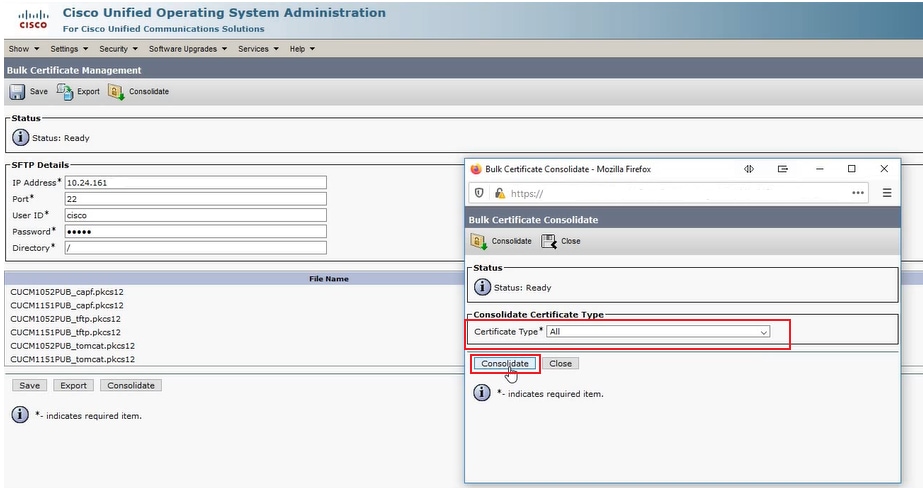 Consolidate All Certificate Types
At any time, you can check the SFTP directory to verify the pkcs12 files that are contained for both the source and destination clusters. The contents of the SFTP directory after the export of all certificates, from both destination and source clusters, has been completed. This is shown in the next images.
 Contents of the SFTP Directory after the Export of all Certificates
 Contents of the SFTP Directory
Import Certificates to Destination and Source Clusters
Step 1. Import certificates to the destination cluster.
On the CUCM publisher of the destination cluster navigate to Cisco Unified OS Administration > Security > Bulk Certificate Management and let the page refresh, then click Import:
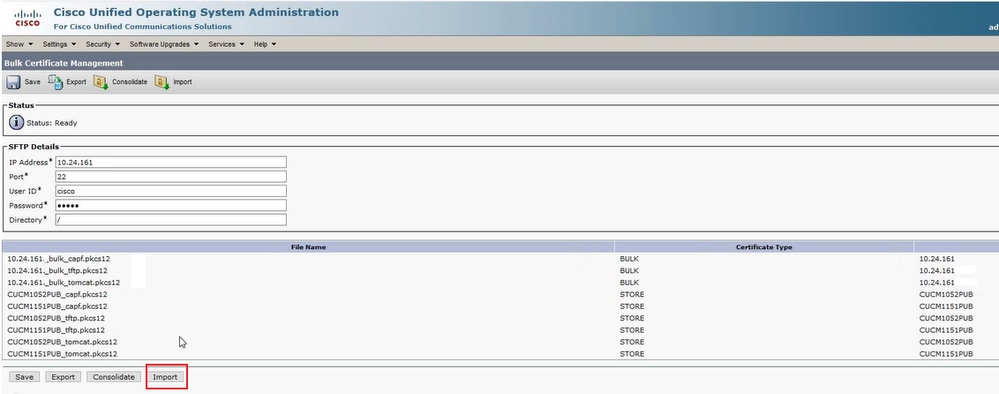
In the Bulk Certificate Import popup window, select All for Certificate Type and then click Import. Click Close to close this window.
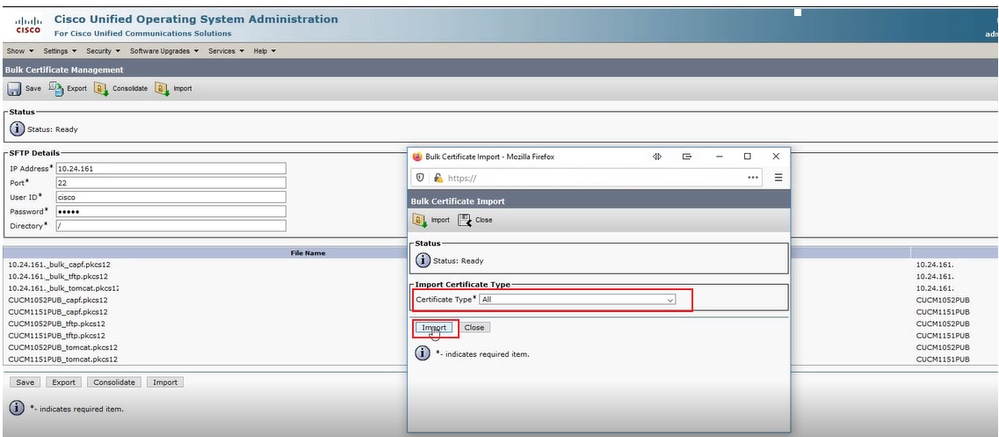 Select All and then Import
Step 2. Repeat Step 1 for the source cluster.
Note: When bulk certificate import is performed, the certificates are uploaded to the remote cluster in this way:
- The Certificate Authority Proxy Function (CAPF) certificate is uploaded as a CallManager-trust.
- The Tomcat certificate is uploaded as a tomcat-trust
- The CallManager certificate is uploaded as Phone-SAST-trust and CallManager-trust.
- The Identity Trust List Recovery (ITLRecovery) certificate is uploaded as Phone-SAST-trust and CallManager-trust.
Configure Source Cluster Phones with Destination Cluster TFTP Server Information
Configure DHCP scope for source cluster phones with Trivial File Transfer Protocol (TFTP) Option 150 to point to destination cluster CUCM TFTP servers.
Reset Source Cluster Phones to Obtain Destination Cluster ITL/CTL File to Complete Migration Process
As part of the migration process, the source cluster phones attempt to setup a secure connection to the source cluster Cisco Trust Verification Service (TVS) to verify the destination cluster CallManager or ITLRecovery certificate.
Note: Either the source clusters CallManager certificate from a CUCM server that runs the TFTP service (also known as TFTP certificate) or its ITLRecovery certificate signs a source cluster CUCM node Certificate Trust List (CTL) and/or Identity Trust List (ITL) file. Similarly, either the destination cluster CallManager certificate from a CUCM server that runs the TFTP service or its ITLRecovery certificate signs a destination cluster CUCM node CTL and/or ITL file. CTL and ITL files are created on CUCM nodes that run the TFTP service. If a destination cluster CTL and/or ITL file are not validated by the source cluster TVS, phone migration to the destination cluster fails.
Note: Before you start the source cluster phone migration process, confirm that these phones have a valid CTL and/or ITL file installed. Also, ensure that the enterprise feature Prepare Cluster for Rollback to Pre 8.0 is set to False for the source cluster. Additionally, verify that the destination cluster CUCM nodes that run the TFTP service have valid CTL and/or ITL files installed.
This is the process without secure cluster for source phones to obtain destination cluster ITL file to complete migration of phones:
Step1. Neither the CallManager nor the ITLRecovery certificate contained in the destination cluster ITL file, that is presented to the source cluster phone on reset, can be used to validate the currently install ITL file. This causes the source cluster phone to establish a connection to the TVS of the source cluster to validate the destination cluster ITL file.
Step 2. The phone establishes a connection to the source cluster TVS on tcp port 2445.
Step 3. The source cluster TVS presents its certificate to the phone. The phone validates the connection and request the source cluster TVS validate the destination cluster CallManager or ITLRecovery certificate to allow the phone to download the destination cluster ITL file.
Step 4. After validation and installation of the destination cluster ITL file, the source cluster phone can now validate and download signed configuration files from the destination cluster.
This is the process with secure cluster for source phones to obtain destination cluster CTL file to complete migration of phones:
Step 1. The phone boots and attempts to download the CTL file from the destination cluster.
Step 2. The CTL file is signed by the destination cluster CallManager or ITLRecovery certificate which is not in the phone current CTL or ITL file.
Step 3. As a result, the phone reaches out to TVS on the source cluster to verify the CallManager or ITLRecovery certificate.
Note: At this point, the phone still has its old configuration which contains the IP address of the source cluster TVS service. The TVS servers specified in the phones configuration is the same as the phones CallManager group.
Step 4. The phone sets up an Transport Layer Security (TLS) connection to the TVS on the source cluster.
Step 5. When the source cluster TVS presents its certificate to the phone, the phone verifies this TVS certificate against the certificate in its current ITL file.
Step 6. If they are the same, the handshake completes successfully.
Step 7. The source phone requests that the source cluster TVS verify the CallManager or ITLRecovery certificate from the destination cluster CTL file.
Step 8. The source TVS service finds the destination cluster CallManager or ITLRecovery in its certificate store, validates it and the source cluster phone proceeds to update with the destination cluster CTL file.
Step 9. The source phone downloads the destination cluster ITL file which is validated against the destination cluster CTL file it now contains. Since the source phone CTL file now contains the destination cluster CallManager or ITLRecovery certificate, the source phone can now verify the CallManager or ITLRecovery certificate without need to contact the source cluster TVS.
Verify
There is currently no verification procedure available for this configuration.
Troubleshoot
There is currently no specific troubleshooting information available for this configuration.
Configuration Video
This link provides access to a video that walks through the Bulk Certificate Management between CUCM Clusters:
Bulk Certificate Management Between CUCM Clusters
Related Information


 Feedback