Introduction
This document describes the procedure for the integration of Microsoft Office 365 with Cisco Unity Connection (CUC).
Prerequisites
Requirements
Cisco recommends that you have knowledge of Cisco Unity Connection (CUC), Release 8.x and later.
Components Used
The information in this document is based on CUC Release 8.x and later.
The information in this document was created from the devices in a specific lab environment. All of the devices used in this document started with a cleared (default) configuration. If your network is live, ensure that you understand the potential impact of any command.
Background Information
The implementation of this feature is documented in the Unified Messaging Guide for Cisco Unity Connection Release 12.x.
Configure
This section provides the procedure to integrate Unity Connection with Office 365. This document provides only the minimum required steps.
Office 365
The steps required on Office 365 are:
- Log in to the Office 365 portal with an Admin account.
- From the Admin drop-down list, choose Office 365.

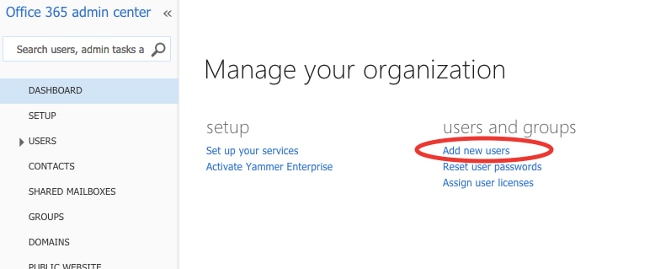
- On the Dashboard, click Add new users.
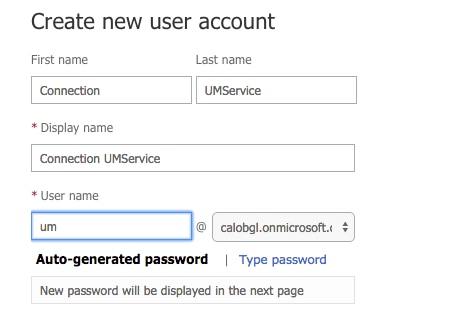
- Create a new User account. This is the Unified Messaging Service account used by CUC in order to access the User mailbox.
- Choose Users > Active Users in order to locate the User account.

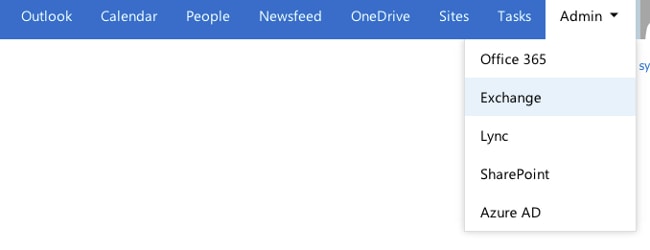
- From the Admin drop-down list, choose Exchange in order to set the Application Impersonation rights.
- In the Exchange Admin Center, choose permissions. Click admin roles and then click the + symbol in order to add a new admin role group membership.

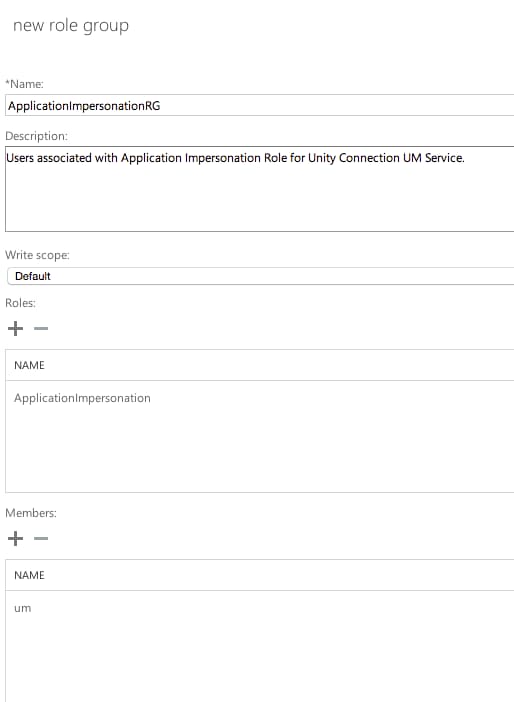
- Create the new Role Group.
- In the Name field, enter a name. Call it ApplicationImpersonationRG for ease of identification.
- In the Description field, enter a description. This is an optional field
- In the Roles section, click the + symbol and choose ApplicationImpersonation.
- In the Members section, click the + symbol and choose um. This is the user created earlier for the Unified Messaging Service Account.
Unity Connection
The steps required on CUC are listed here. The same procedure is documented in the Unified Messaging Guide for Cisco Unity Connection Release 12.x and Later.
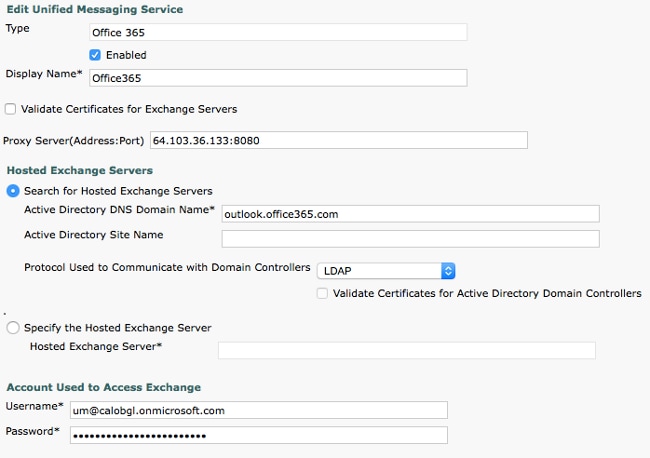
- Create a Unified Messaging (UM) Service.
- Choose Unified Messaging > Unified Messaging Services. Click Add New.
- In the Type field, enter Office 365.
- In the Display Name field, enter a Display Name in order to identify this UM Service.
- In the Proxy Server (Address:Port) field, enter a Proxy Server address if the Unity Connection server cannot access the Office 365 servers in the cloud.
- In the Hosted Exchange Servers section, choose Search for Hosted Exchange Servers. This is mandatory. Specify the Hosted Exchange Server is not supported since the IP Address or the Hostname of the server in the cloud is not known.
- In the Active Directory DNS Domain Name field, enter the domain name provided by Office 365. See the Select the Active Directory DNS Domain Name section for more information.
- In the Account Used to Access Exchange section, enter the Unified Messaging Service Account information created previously.
- Leave the selections under Service Capabilities section as is and Save.
Note: You can configure up to 1800 users with a single Office 365 Unified Messaging Service. To allow more than 1800 users to use Office 365, create additional Unified Messaging services.
- Associate the User with the Unified Messaging Service.
- Choose Users > Users. Choose the User.
- Choose Edit > Unified Messaging Account. Click Add New.
- In the Unified Messaging Service field, select the newly created service from the drop-down list.
- In the User This Email Address field, enter the email address of the Office 365 mailbox. This email address can be either user@<OrganizationDomainName>.onmicrosoft.com or user@<OrganizationDomainName>.com based on the deployment model.
- Click Save.
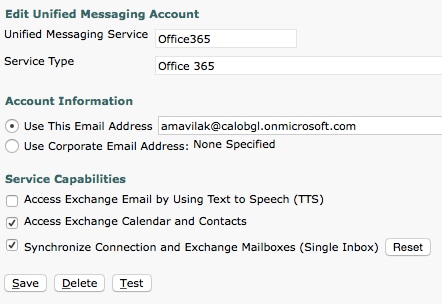
- Validate the configuration with the test option.

- Repeat the same procedure for all users. You can also use the Bullk Administration Tool in order to update all users in bulk. Read the Unity Connection FAQ: How do I Bulk Assign Unified Messaging in Cisco Unity Connection document for more information.
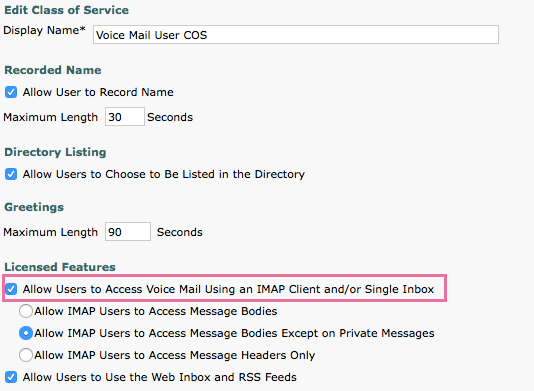
- Enable UM.
- Choose Class Of Service > Class of Service.
- In the Display Name drop-down list, choose Voice Mail User COS. This is the default Class of Service (CoS) associated with all users. If users are associated with a different CoS, choose the appropriate selection.
- Check the Allow Users to Access Voicemail Using and IMAP Client and/or Single Inbox checkbox.
- Save.
Select the Active Directory DNS Domain Name
The Domain name is the one that is provided by Office 365. It can be in the form of <name>.onmicrosoft.com. In this example, the mailboxes are in the calobgl.onmicrosoft.com domain.
In the Unified Messaging Services configuration, use either calobgl.onmicrosoft.com or outlook.office365.com as the domain name. Either one can work fine. The only difference is in the Autodiscover URL that Unity Connection uses in order to discover the mailbox.
Troubleshoot
There are no steps to troubleshoot this configuration.
Verify
There is currently no verification procedure available for this configuration.
Related Information


 Feedback