Upgrading Analog Telephone Adaptors (ATAs)
Available Languages
Contents
Introduction
This document provides an explanation and examples for the two methods used to upgrade the Analog Telephone Adapter (ATA). This document augments the information contained in Upgrading the Cisco ATA 186 Software.
Prerequisites
Requirements
Cisco recommends that you have knowledge of basic operational characteristics of the ATA. Refer to the Cisco ATA 186 Basic Configuration for further background information.
Components Used
The information in this document is based on these software and hardware versions:
-
ATA Software versions lower than 2.xx only support Executable File upgrade method.
-
ATA Software versions higher than 2.xx support both the Executable File and TFTP upgrade procedure methods.
Note: You cannot upgrade from the 2.15 (020726a) boot load image to the 3.0.0. Refer to Cisco bug ID CSCed78906 (registered customers only) for additional details.
Note: If you use the ATAs shipped after March 2004, those ATAs cannot be downgraded to any image earlier than 3.1.0 because of the hardware difference. The new ATAs must run version 3.1 or later. They cannot run version 2.xx. The software that ships with each ATA is a boot load image only and must be upgraded to the latest SCCP, SIP, or other image from Cisco.com as per Configuring the Cisco ATA for SCCP.
With Cisco CallManager 3.1, the ATA is configured as a Cisco 7960 IP phone. With Cisco CallManager 3.2 and later the ATAs appear in the drop down box on the Cisco CallManager configuration page. Refer to the Important Cisco CallManager Registration Change for SCCP section of the Release Notes for the Cisco ATA 186 and Cisco ATA 188 Release 2.16.ms.
The information in this document was created from the devices in a specific lab environment. All of the devices used in this document started with a cleared (default) configuration. If your network is live, make sure that you understand the potential impact of any command.
Conventions
Refer to Cisco Technical Tips Conventions for more information on document conventions.
Upgrade Methods for the ATA 186
There are two ways to upgrade the software in an ATA device:
Both of these methods are simple once understood. The first method involves a degree of manual interaction while the second method is more automated.
A common mistake is to leave the TFTP enabled when you manually upgrade an ATA. After a reboot, the ATA fetches the profile from the specified TFTP server and overrides the manual upgrade. Check the UseTftp parameter and make sure it is set to 0 prior to the manual upgrade.
Note: ATA software version 1.xx does not support the TFTP upgrade method. You need to use the Executable File method to upgrade ATA with versions lower than 2.xx. In addition, there are two important rules you need to know before you upgrade a system:
-
If the ATA runs version 1.34 or earlier you cannot upgrade directly to version 2.10 or later. You need to use the transition.zup image discussed later in this document. First upgrade to this intermediate version and then to your target image.
-
It is very important that you do not power-down the ATA during the upgrade/downgrade process. Powering-down the unit during upgrade could permanently damage the ATA and will require that the unit be returned to Cisco for replacement. If you wish to power cycle the unit, first unplug the Ethernet cable, wait for 20 seconds, and then it should be safe to power-down the unit.
Executable File
For the Executable File method, all you need is a PC where you can store the ATA image files and where you can run the ata186us.exe upgrade utility. The only requirement is that the ATA device has IP connectivity to the PC. There is no need for an FTP or TFTP server.
Note: For Windows XP users, there have been some cases noted where executable file method upgrades fail when using the ata186us.exe upgrade utility on a PC running Windows XP. Refer to Upgrading ATAs: Problem with The Executable File Upgrade Method with Windows XP for more information on this problem.
There are two types of files that you can use for this method of upgrading the system. The .zup files contain the image that runs in the ATA (equivalent to the Cisco IOS®) and the .kup images contain the languages used by the ATA for Interactive Voice Response (IVR). These two images can be loaded separately and one can be upgraded without requiring the upgrade of the other. It is rare to upgrade .kup images, and in most cases only the .zup file needs to be considered. However, please always read the Cisco ATA186 Terminal Adapter Software (registered customers only) and Release Notes in case of changes.
Both the .zup image files and the ata186us.exe upgrade utility can be downloaded from the download location on Cisco.com. Among the files available at this site, these .zip files are available:
-
.zip files with names that start with ata186-v and end with characters that reflect the image version and build date. These files contain .zup image files. There is a different .zup file for each version and VoIP protocol that includes H.323 and Media Gateway Control Protocol/Simple Gateway Control Protocol (MGCP/SGCP). Other files that give more information are also included in the .zip files.
-
The ata186us.exe upgrade utility is included in the ata186us1.zip file.
The ata186us.txt file includes more information on the steps and commands required to perform the upgrade.
The steps needed to upgrade an ATA 186 using the upgrade utility executable file are outlined here. In this example, a unit from version 2.xx to version 2.13 is upgraded.
-
Check the present level of software in the ATA.
The software level dictates if you need to use the transition.zup file or not. If needed, the transition.zup file can be found in the .zip file that you can download from the Cisco ATA186 Terminal Adapter Software (registered customers only) download location. This file is included in .zip files for image versions 2.10 and later. You can find the current version of the ATA in these two ways:
-
Use the dialpad of your telephone attached to your Cisco ATA 186 and enter 123#. The IVR announces the version number to you.
-
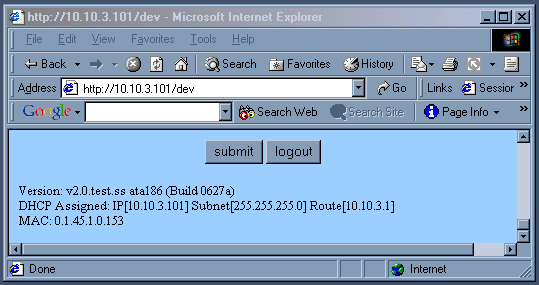
Locate the version number in the bottom left corner of the ATA's configuration web page at http://<ip_of_ATA>/dev. An example of the left hand corner of this page is shown here.
-
-
It is becoming much less common to require the use of the transition.zup file. In this example, since the upgrade is from ATA version 2.xx to 2.13, there is no need for it. If it is needed, the process is the same except in two steps transitioning via the transition.zup image.
-
Once you know the image name, you need to prepare the PC for the upgrade. The .zup image files should be copied into a directory (in this case C:\ATA). IP connectivity also needs to be verified with ping as this DOS box shows.
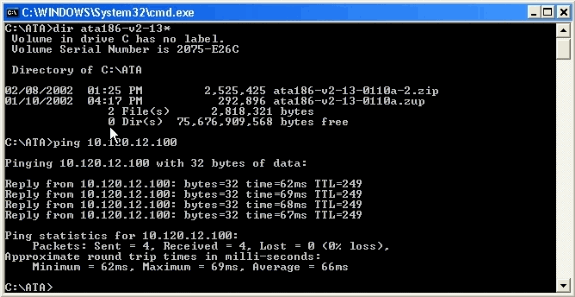
This window shows the results of executing the file.
-
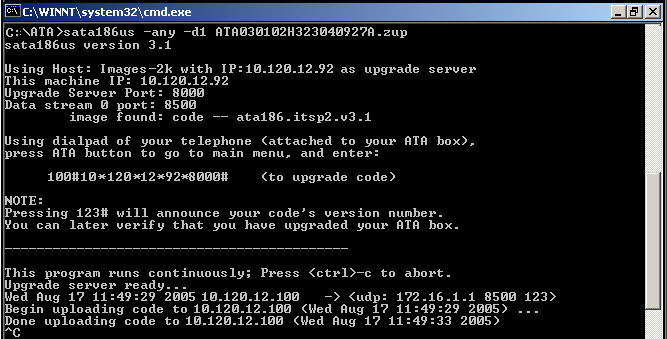
Run the ata186us executable to get the PC ready for the request from the ATA. The -d(1,2,3) parameter sets the level of detailed description for debugging while the -any(2) parameter specifies the suitability of the software to be downloaded. Refer to Upgrading the Cisco ATA 186 Software for more information.
-
As the window in step 3 shows, the application tells you exactly what needs to be entered in the telephone. Next, lift up the phone and enter the string 100#127*18*106*8000#.
-
Once the upgrade is finished, the PC indicates it with the Done uploading code message. This message is followed by the IP address of the ATA and the date/time.
-
Once the upgrade process is finished, the ATA resets itself. There is no need to power off.
TFTP
The second method used to upgrade the ATA system is by using TFTP. In this way, there is no interaction between the administrator and the particular ATA device every time an upgrade takes place. The ATA device is initially configured to verify with a TFTP server if any changes in configuration, software version, or language version need to take place. The frequency with which the ATA polls the TFTP server is configurable. There is a unique file (profile) for each ATA that contains the specific information for each device.
These are the steps needed to upgrade an ATA 186 from version 2.xx to 2.13 using the TFTP method.
-
Create the profile for the ATA.
There is an example_uprofile.txt file included in the .zip file that can be downloaded from the Cisco ATA 186 Terminal Adapter Software (registered customers only) download location. This file should be changed to match the particular requirements (software and configuration) for the ATA. The fields changed for this test are those listed in the table.
For an explanation of all of these parameters, refer to the example_uprofile.txt file, with particular reference to the Firmware Upgrade Parameters section, or to Upgrading the Cisco ATA 186 Software.
example_uprofile.txt Parameters UseTftp:1 TftpURL:172.18.106.10 cfgInterval:120 EncryptKey:0 !--- This field was not changed but is listed for emphasis. !--- The EncryptKey parameter must be set to zero (0) !--- if the profile is not encrypted. !--- Make sure the EncryptKey parameter is identical !--- in both of the ATA's existing configuration !--- and the profile created. Otherwise, the ATA is !--- not able to decrypt the profile. ToConfig:0 upgradecode:3,0x301,0x0400,0x0200,172.18.106.10,69, 0x020521a,ata186-v2-14-020521a.zup !--- For an upgrade to an image build earlier than 010907, !--- the above line needs to be !--- changed to something similar to this next line !--- (depending on the specific build date): !--- Note: If you have accidentally specified the !--- firmware filename in both the upgradecode and upgradelang !--- parameters, there is no way to recover from this !--- situation because the Flash is corrupted. upgradecode:3,0x301,0x0400,0x0200,172.18.106.10,69, 0x010803a,ata186-v2-13-0110a.kxz !--- Note that .zup files are used for TFTP upgrades as !--- well as executable file upgrades. !--- However, .zup files are only supported for TFTP !--- upgrades with images of build date !--- later than 010907 (see step 6). When this !--- test upgrade was performed, the .kxz !--- file was the only file type supported for TFTP !--- upgrades. This file was !--- included in the .zip file downloaded from Cisco.com. !--- The Cisco.com .zip file no longer includes !--- the .kxz file, and the .zup file is now the only !--- image file type you use. Dhcp:0 StaticIp:10.120.13.100 StaticRoute:10.120.13.1 StaticNetMask:255.255.255.0 GateWay:10.120.11.100 UID0:105 UID1:106 TimeZone:20 NTPIP:172.18.10Note: The ATA checks that the new software image is different from the image that already runs in order to allow the TFTP upgrade method to occur automatically and not waste bandwidth with continual upgrade attempts. It performs this check by comparing the IMAGEIDs of the two software images. If the two values are the same, the ATA does not attempt to download the new software image.
All software upgrade images have their build date included. Before the start of 2002, the software images included only the month and day (for example, 0803a). At the start of 2002, all releases also include the year (for example, 020521a).
A unique IMAGEID can be derived from the build date in the new software name by prepending the build date with 0x to form a hex number. In the example table, the software name is ata186-v2-14-020521a.zup, and the IMAGEID is 0x020521a.
The ATA can check its currently running software IMAGEID directly. However, for the new software build date, it relies on the value you enter into the IMAGEID field of the UpgradeCode parameter. You need to derive the IMAGEID of the new software to enter this value correctly. In reality, any IMAGEID allows the upgrade to work provided it is different from the current one. However, to reduce unnecessary TFTP activity, it is worthwhile to enter the correct IMAGEID.
Look at the lower left hand corner of the configuration page of the ATA at http://<ip_of_ATA>/dev to verify the software version that currently runs on your ATA.
-
Once you make the changes, save the file as a fifteen character name that uniquely identifies it amongst all your ATAs.
The format of the name must be ataxxxxxxxxxxxx where each xx is the two digit lower case hex representation of each integer in the MAC address of your ATA. For example, if the ATA has the MAC address 1.2.3.4.5.6, the file name is ata010203040506. The MAC address can be retrieved via the IVR#24 option or at the bottom left section of the configuration webpage of the ATA at http://<ip_of_ATA>/dev.
In ATA versions later than 2.11, the name of the file can be found through an IVR#84 option in the menu or at the bottom left section of the configuration webpage of the ATA at http://<ip_of_ATA>/dev. If you run ATA version 2.11 or earlier, the MAC address needs to be manually converted to the correct format or use the atapname.exe tool to generate the filename as shown here.

-
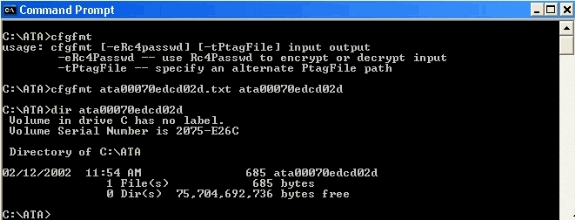
Once this text file exists with the appropriate name, it needs to be converted to binary so the ATA device can read it. This formatting is done using the cfgfmt.exe command. This executable file is included in the .zip file that can be downloaded from the Cisco ATA186 Terminal Adapter Software (registered customers only) download location.
-
The new file (or profile) needs to be moved to the TFTP server.
This profile is retrieved by the ATA device which uses the information contained in it to configure or upgrade itself.
-
The next step is to move the required image files onto the TFTP server in the same directory as the profile file.
The image file name depends on the build date of the software:
-
Software with a build date earlier than 010907 supports only the .kxz images for the TFTP upgrade method. The build of the software used in the test was prior to this date and the .kxz file was required. This file was included in the .zip file that was downloaded from the Cisco ATA186 Terminal Adapter Software (registered customers only) download location. Though rarely needed, TFTP method upgrade images for ATA IVR language have .kbx extensions.
-
Software with a build date later than 010907 supports both .kxz/.kbx and .zup/.kup image files for the TFTP upgrade method. Therefore, the .zup/.kup images can now be used for both Executable File and TFTP upgrade methods. Consequently, .kxz/.kbx images are no longer included in the .zip file.
-
-
Once the profile and the image(s) are ready, instruct the ATA to start to check with the TFTP server for updates.
This can be done via Dynamic Host Configuration Protocol (DHCP), IVR menus, or via the web browser. The fields in question on the configuration web page of the ATA at http://<ip_of_ATA>/dev are shown here.
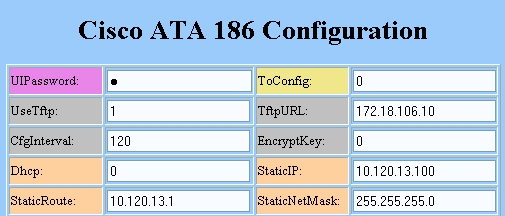
In this case, the ATA is configured to contact the TFTP server at IP address 172.18.106.10 every two minutes. If you want to force the ATA to check with the TFTP server before the CfgInterval, type http://<ATA_IP_ADDR>/refresh on your web browser.
-
Run an executable file on your PC that is included in the .zip file to assist in troubleshooting. You can download this from the Cisco ATA186 Terminal Adapter Software (registered customers only) download location.
This debug file (prserv.exe) serves as an upgrade server that captures debug information sent by the ATA software to the IP address/port number of your PC. It compiles the information from the ATA into a readable log file. This file can include call setup, dialed digits, and other relevant information that is beyond the scope of this document.
This is the output from the prserv.exe log and shows hellos from the ATA to the TFTP server and indicates that the upgrade was successful.
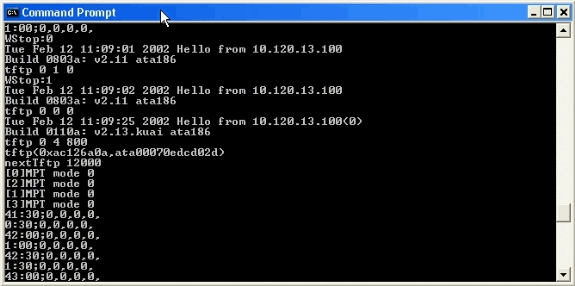
Since this log output shows communications between the PC and the ATA, it does not show the .exe that is started on your PC. The screen shot of the log shows these stages:
-
Two hellos from the ATA with IP address 10.120.13.100 and build ID 0803a. Notice that the information included in these hellos includes IP address, build ID, as well as other information related to the TFTP process.
-
Another hello over twenty seconds later from ATA with the same IP address but a different build ID 0110a. This change means that the upgrade has been successful. Note that other information has been included in this hello such as the profile name (00070edcd02d), and that the next TFTP check is in 120 seconds (nextTftp 12000).
-
Other lines, such as 41: 30;0,0,0,0, that indicate session keepalives.
Refer to Configuring and Troubleshooting an ATA 186 with Cisco IOS Gatekeepers and Configuring and Troubleshooting an ATA 186 with a Cisco IOS Gateway for more information and troubleshooting examples using prserv.exe.
-
Upgrade All Cisco ATAs Simultaneously
This feature is supported in Cisco CallManager version 3.2 or later and is the Cisco-recommended method for SCCP. These requirements must be met:
-
XML support must be turned on in the Cisco ATA (default is on). XML support is configured with Bit 31 of the ConnectMode parameter. Refer to ConnectMode for more information.
-
This procedure can only be performed by the Cisco CallManager administrator.
Obtain the latest signaling image from the Cisco web site. Refer to Setting Up the TFTP Server with Cisco ATA Software for instructions on where to find the software on the Cisco web site and how to place the files onto the Cisco CallManager TFTP server. The image file has the extension of .zup. Complete these steps in order to upgrade all Cisco ATAs simultaneously:
-
Download the latest Cisco ATA release software for SCCP from the Cisco web site, and store the files on the Cisco CallManager TFTP server. Refer to Setting Up the TFTP Server with Cisco ATA Software for more information.
-
Go to the main Cisco CallManager Administration screen.
-
From the System menu, choose Device Defaults. The Device Defaults screen appears.
-
In the Device Type list, find the Cisco ATA 186 device type. In the Load Information field next to the device type of Cisco ATA 186, enter the name of the signaling image to use to upgrade the Cisco ATAs.. The signaling image has an extension of .zup, for example, ATA186-v2-15-ms-020812a.zup.
-
Click the Update button at the top of the Device Defaults screen.
-
From the Device menu, choose Phone. The Find and List Phones screen appears.
-
In the area next to the Find button, enter the letters ata, then click Find. The Find and List Phones screen reappears, and now contains all the Cisco ATAs connected to your Cisco CallManager.
-
Check the box to the left of the Device Name column in order to select all the Cisco ATAs shown.
-
Click the Reset Selected button at the bottom of the Find and List Phones screen.
-
The Reset Device pop-up window appears. Click Reset Device. The Reset Device popup window appears. Click Reset to complete the procedure.
-
A confirmation box appears. Click OK. The function button on each Cisco ATA blinks during its upgrade.
Once the button stops blinking, the upgrade is complete and the device re-registers to the Cisco CallManager.
Related Information
- Cisco ATA 186 Basic Configuration
- Configuring and Troubleshooting an ATA 186 with Cisco IOS Gatekeepers
- Configuring and Troubleshooting an ATA 186 with a Cisco IOS Gateway
- Cisco ATA 186 FAQ and Common Issues
- Voice Technology Support
- Voice and Unified Communications Product Support
- Troubleshooting Cisco IP Telephony

- Technical Support & Documentation - Cisco Systems


 Feedback