Remote Monitoring on Cisco Unified Contact Center Express 8.x
Available Languages
Contents
Introduction
The Unified Contact Center Express (CCX) Remote Monitoring feature allows a supervisor to call to any site, where the supervisor has a Unified Communications Manager (CM) user profile, and monitor an agent’s conversation.
When you, as a supervisor, monitor a conversation, you can hear all parties on the call. The parties will have no indication that you are monitoring the call. You cannot join the call or be heard by the parties. This is referred to as silent monitoring.
Prerequisites
Requirements
Cisco recommends that you have knowledge of these topics:
-
Cisco Unified Communications Manager
-
Cisco Unified Contact Center Express
Components Used
The information in this document is based on these software and hardware versions:
-
Cisco Unified Contact Center Express 8.x
The information in this document was created from the devices in a specific lab environment. All of the devices used in this document started with a cleared (default) configuration. If your network is live, make sure that you understand the potential impact of any command.
Conventions
Refer to Cisco Technical Tips Conventions for more information on document conventions.
Remote Monitoring
This application, available when you purchase Unified CCX Premium, allows a supervisor to monitor an agent’s conversation. With Remote Monitoring, you can choose to monitor a call in either of these ways:
-
By resource (agent)—In this case, you identify the resource by agent extension. If the agent is on a call, monitoring will begin immediately. If the agent is not on a call, monitoring will begin when the agent is presented with a call (that is, when the agent’s phone rings) or when the agent initiates a call (that is, when the agent’s phone goes off-hook).
-
By Contact Service Queue (CSQ)—In this case, you will monitor the call of an agent who belongs to the CSQ. When you monitor by CSQ, you select the CSQ from a menu. When a call is presented to an agent who belongs to the selected CSQ, monitoring will begin for that agent and call.
Configure Remote Monitoring Application
You must configure Remote Monitoring applications when you want to use the Remote Monitoring feature to allow a supervisor to monitor an agent’s conversation. Complete these steps in order to accomplish the task:
-
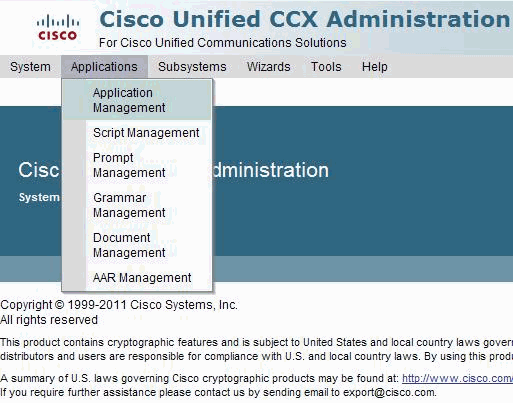
From the Unified CCX Administration menu bar, choose Applications > Application Management.
-
Click Add New.
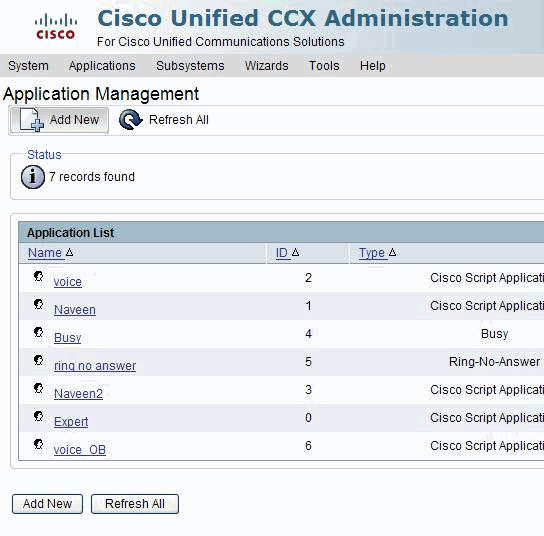
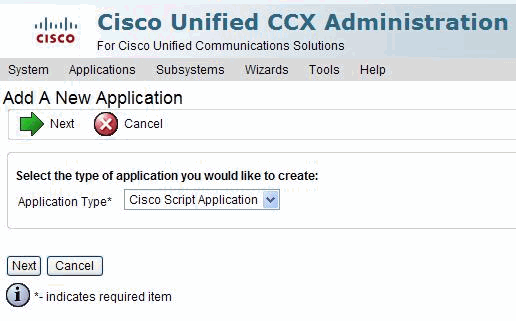
The Add a New Application web page opens.
-
Choose Cisco Script Application from the Application Type drop-down menu, then click Next.
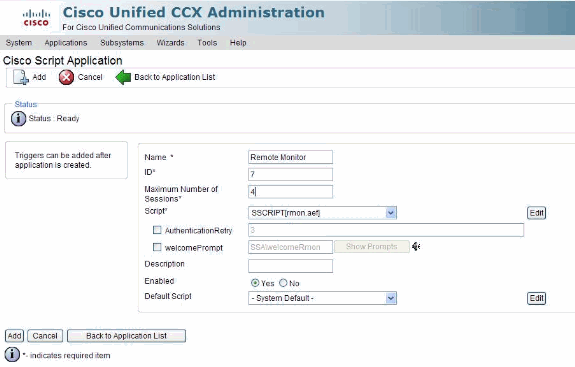
The Cisco Script Application web page appears.
-
Use this web page to specify these fields:
-
Name—A name for the application. This is a mandatory field.
-
ID—Accept the automatically-generated ID, or enter a unique ID. This is a mandatory field.
-
Maximum Number of Sessions—The maximum amount of simultaneous sessions that monitoring sessions allow. This is a mandatory field.
-
Script—Select a customized Remote Monitor script or rmon.aef from the drop-down list.
-
Description—Use the Tab key to automatically populate this field.
-
Enabled—(Radio button) Accept Yes (the default).
-
Default Script—Accept System Default. The default script is executed if an error occurs with the configured application script.
-
-
Click Add.
The Remote Monitoring web page refreshes displaying the following message under the Status bar and the Add New Trigger hyperlink appears on the left navigation bar:
The operation has been executed successfully
Add Application Triggers
After adding a new Cisco application, you need to add one or more triggers so that the application can respond to Unified CM/Unified CME Telephony calls and HTTP requests. Triggers are specified signals that invoke application scripts in response to incoming contacts. The Unified CCX system uses Unified CM/Unified CME Telephony triggers to trigger responses to telephone calls and HTTP triggers to respond to HTTP requests.
You can use either of two methods to add a trigger to an application:
-
Add the trigger from the Cisco Application web page.
-
Add the trigger from the Unified CM/Unified CME Telephony or HTTP Triggers web pages available from the Subsystem menu.
An HTTP trigger is the relative URL a user enters into the client browser to start the application. You can upload either eXtensible Style Language Transformation (XSLT) templates or Java Server Pages (JSP) templates to serve as your HTTP trigger.
This path is an example of an HTTP-triggered request (using the HTTP trigger name “/hello”):
http://www.appserver.acme.com:9080/hello
In this example, the URL starts the application with the HTTP trigger “/hello” on a web server running on port 9080 with the host name www.appserver.acme.com. You can add the HTTP trigger from the Cisco Script Application web page or add the trigger from the HTTP subsystem.
Note: The next step is to create a Remote Monitoring Supervisor and assign Resources and CSQs to the Supervisor.
Create a Remote Monitoring Supervisor
Complete these steps in order to create a Remote Monitoring Supervisor:
-
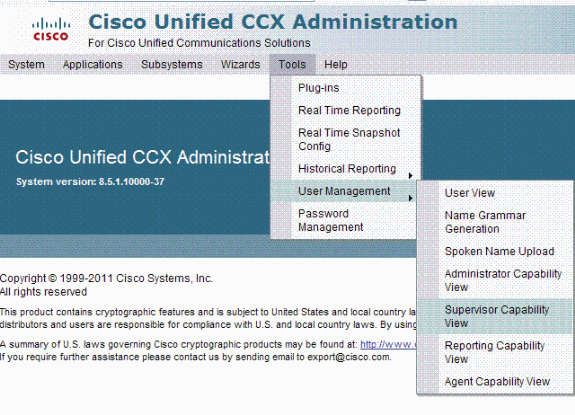
From the Unified CCX Administration menu bar, choose Tools > User Management > Supervisor Capability View.
-
The User Configuration web page opens displaying the list in two panes. The left pane displays the list of existing Unified CCX Supervisors and the right pane displays the list of Available Users.
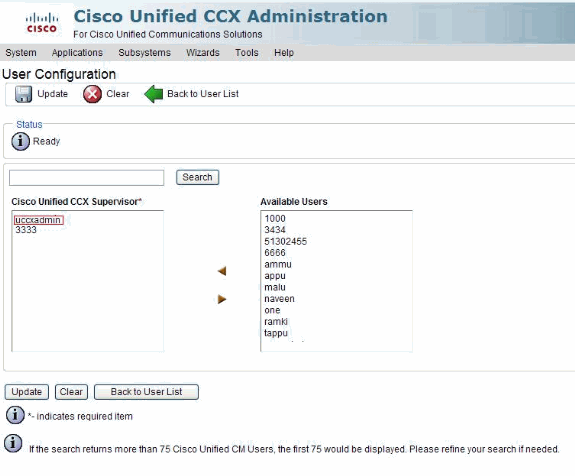
Change the users as required using the arrow in either direction.Your changes are dynamically displayed in this page and are effective immediately.
-
Repeat this process as needed to assign the Supervisor capability for more than one user.
Assign Resources and CSQs to a Supervisor
For Assigning Resources and CSQs to a supervisor, use the Remote Monitor configuration web page. From this page, you can assign a supervisor a list of Resources and CSQs that he/she is allowed to monitor. Complete these steps in order to accomplish the task:
-
From the Unified CCX Administration menu bar, choose Subsystems > RmCm > Remote Monitor.
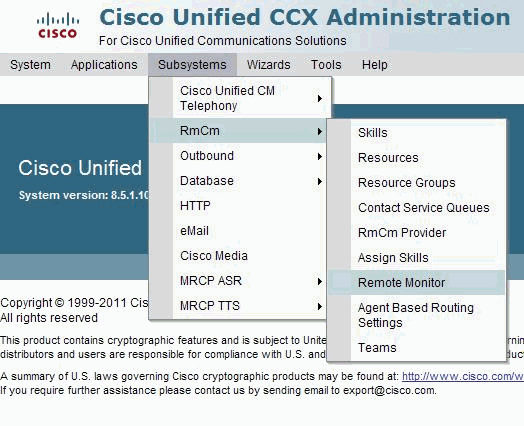
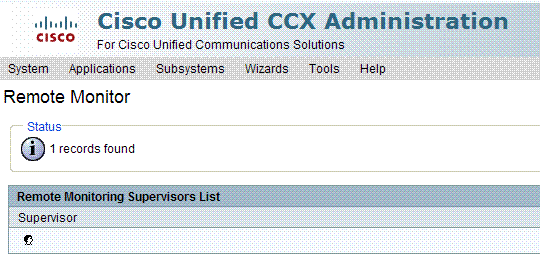
Note: The Remote Monitor web page opens to display the Supervisor, Name, and User ID of Unified CM users who are Unified CCX Supervisors.
-
Click a User ID value. This is a Unified CM user configured as a Unified CCX Supervisor.
-
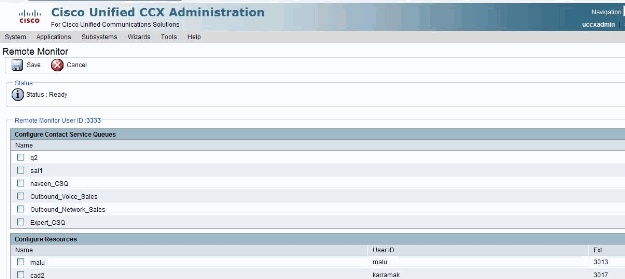
Use this web page to specify these fields:
-
Contact Service Queues Name—(Check box.) CSQ names the supervisor can monitor.
-
Resources—(Check box.) User IDs of agents the supervisor can monitor.
-
-
Click Update to apply the changes. The supervisor can now access the Unified CCX Supervisor web page and view the allowed CSQs and agents.
Note: When running the Remote Monitoring script, you might need to provide a CSQ ID. This ID is internally generated and is only visible on the Unified CCX Supervisor page.
View CSQ IDs from the Unified CCX
Complete thse steps in order to view CSQ IDs from the Unified CCX Supervisor web page:
-
From the Unified CCX Supervisor web page, log in as the Remote Monitoring Supervisor.
-
Choose Tools > Plug-ins from the Unified CCX Administration menu bar.
-
Click the Cisco Unified CCX Desktop Suites hyperlink.
-
Click the View CSQ hyperlink to view allowed CSQs.

The CSQ ID column shows the ID value that you should enter for the CSQ that you selected in the Start Monitor step.
Start Monitor Step
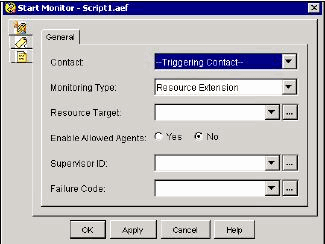
From the Customer Response Solutions application, use the Start Monitor step to begin a remote monitoring session.
-
Contact—Contact that will perform remote monitoring.
-
Monitoring type:
-
Resource Extension—Remote monitoring will be performed by the agent extension.
-
Contact Service Queue—Remote monitoring will be performed by the CSQ.
-
-
Resource Target—Variable or expression indicating the Resource extension or the Contact Service Queue to be monitored.
-
Enable allowed agents—Check box enabling/disabling the security feature which allows only the agents associated with the remote supervisor to be monitored. Default setting is that no agents can be monitored.
-
Supervisor ID—User ID identifying the supervisor.
-
Failure Code—Variable used for storing the reason code in the event of step failure.
Issues on Call Monitoring and Recording
Problem
Intermittent issues with call recording and the monitoring tool are experienced. When a call is active on the agent desktop, and when you click on the task button to record the call, there is a delay. This delay is followed by an error message stating that an error occurred. Refer to the logs for more information.
Solution
Complete these steps in order to resolve the issue:
-
If there is more than one IPCC server make sure the LDAP information for one of the IPPC servers is getting populated in calabrio ldap.
-
Stop the VOIP monitor service in the second node.
-
Restart the VOIP monitor service in the first node.
-
Start the VOIP monitor service in the second node.
-
Restart the Desktop Recording and Statistics services also in both the nodes.
Related Information
Contact Cisco
- Open a Support Case

- (Requires a Cisco Service Contract)


 Feedback