CRS Historical Reports - Schedule and Session Establishment
Available Languages
Contents
Introduction
This document describes some schedule and session establishment issues for the Historical Report client with respect to the Cisco Customer Response Solutions (CRS) server that generates historical reports.
Prerequisites
Requirements
Readers of this document should have knowledge of these topics:
-
Cisco CallManager
-
Cisco CRS
-
Cisco CRS Historical Reporting client
Components Used
The information in this document is based on these software and hardware versions:
-
Cisco CallManager version 3.x and later
-
Cisco CRS version 3.x and later
The information in this document was created from the devices in a specific lab environment. All of the devices used in this document started with a cleared (default) configuration. If your network is live, make sure that you understand the potential impact of any command.
Conventions
For more information on document conventions, refer to the Cisco Technical Tips Conventions.
Background
As CRS runs, it stores call activity data in databases on the CRS server or the Historical Reports Database Server, if one is set up. The Cisco Historical Reports client is used to create historical reports based on this data.
To schedule a historical report means the Cisco CRS Historical Reports client needs to be instructed to automatically generate the report in the future.
Schedule Historical Reports
When you check the schedule for historical reports, watch these common issues:
-
the report you need is not scheduled
-
the report you need daily is configured incorrectly
Report Not Scheduled
Complete this procedure to resolve these issues:
-
Verify the schedule(s) for the report you plan to run is listed in the Historical Report client. The verification procedure follows:
-
Select Start > Programs > Cisco CRA Historical Reports > Cisco CRA Historical Reports, to launch the Historical Report client.
-
Click Settings from the menu bar.
-
Select Scheduler in the drop-down box, as shown in Figure 1. The Scheduled Reports window appears.
Figure 1: Historical Report Client - Scheduler
-
Verify the scheduled report is in the list, as shown in Figure 2.
Figure 2: Historical Report Client - Scheduled Reports
-
Daily Report Configured Incorrectly
For daily reports, verify these possible issues:
-
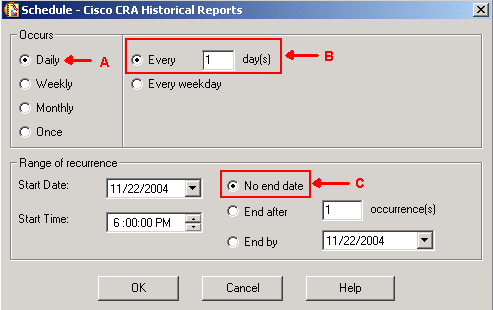
Check the Daily radio button in the Occurs section, indicated by the A arrow in Figure 3.
-
Check the Every radio button and enter 1 on the blank field next to Every in the Occurs section, as shown by the B arrow in Figure 3.
-
Check the No End Date radio button in the Range of recurrence section, as indicated by the C arrow in Figure 3.
If a specific report only prints once, then quits, the most likely reason is the No End Date radio button is not selected. This radio button means the report will print indefinitely.
Figure 3: Schedule CRS Historical Reports 
Session Connection for Scheduled Historical Reports Fail to Run
When scheduled historical reports fail to run, there are two common issues:
-
HTTP proxy server
-
TCP port 6293 is blocked
HTTP Proxy Server
The most common of the two issues is the HTTP proxy server. The HTTP proxy server is not supported by the CRS server. The Historical Report client must communicate with the CRS server directly. In such an environment, the CRS server has to be excluded from the HTTP proxy server. The procedure follows:
-
Start the Internet Explorer browser.
-
Select Tools from the menu options.
-
Click Internet Options ....
-
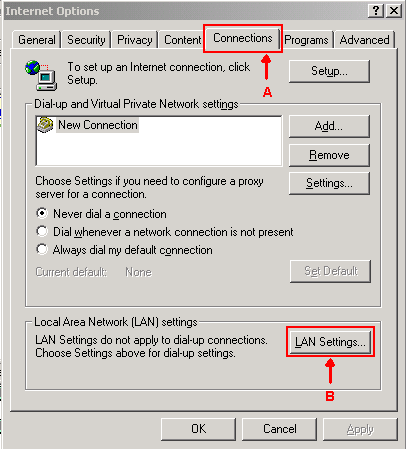
Select the Connections tab, indicated by the A arrow in Figure 4.
-
Click LAN Settings, indicated by the B arrow in Figure 4.
Figure 4: Internet Options
-
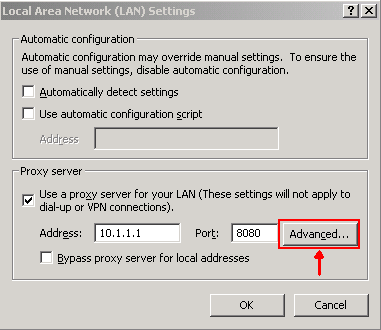
Select the Use a proxy server for your LAN.
-
Click Advanced..., as shown in Figure 5.
Figure 5: Local Area Network (LAN) Settings
-
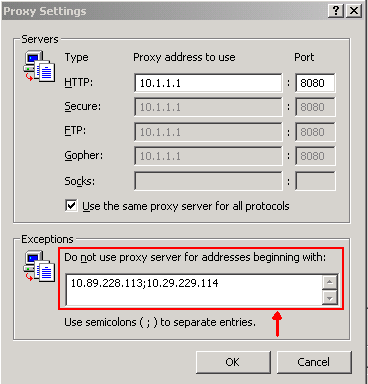
Enter the IP address or the fully qualified domain name of the CRS server in the Do not use proxy server for addresses beginning with field in the Exceptions section, as shown in Figure 6.
Figure 6: Proxy Setting
TCP Port 6293 is Blocked
The TCP port number used between the CRS server and the Historical Report client can be either TCP port 80 or 6293, this depends on the report generation method. If historical reports are generated through the Historical Report client, the TCP port 80 on the CRS server has to be open and available by default. However, when scheduled historical reports run, the TCP port 6293 has to be open and available. If a firewall exists between the CRS server and the Historical Report client, a conduit for TCP port 80 or 6293 on the firewall must be established.
You can test the TCP port availability, run telnet. To test the TCP port 6293, complete this procedure:
-
Select Start > Run.
-
Type cmd.
-
Run telnet < IP address or Fully Qualified Domain Name of the CRS server > 6293 to check the TCP port 6293 availability, as shown by the A arrow in Figure 7.
Figure 7: Checking the Availability of TCP Port 6293
-
If telnet fails with Connect failed, as shown by B in Figure 7, identify the reason and correct it, see Using the Trace Route Utility.
Related Information
Revision History
| Revision | Publish Date | Comments |
|---|---|---|
1.0 |
07-Jan-2005 |
Initial Release |
Contact Cisco
- Open a Support Case

- (Requires a Cisco Service Contract)


 Feedback