An Example to Use the Set Enterprise Call Info Step
Available Languages
Contents
Introduction
This document demonstrates an example to use the Set Enterprise Call Info step when you configure the Expanded Call Context (ECC) variables and the Call Peripheral variables with the help of the Cisco Desktop Administrator and the Cisco Customer Response Solutions (CRS) Editor.
Prerequisites
Requirements
Cisco recommends that you have knowledge of these topics:
-
Cisco CallManager
-
Cisco CRS Script
Components Used
The information in this document is based on these software and hardware versions:
-
Cisco CallManager version 4.x
-
Cisco CRS version 4.x
The information in this document was created from the devices in a specific lab environment. All of the devices used in this document started with a cleared (default) configuration. If your network is live, make sure that you understand the potential impact of any command.
Conventions
Refer to Cisco Technical Tips Conventions for more information on document conventions.
Background Information
Use the Set Enterprise Call Info step to send data from one part of your system to another. You can set these enterprise call variables:
-
Call.CallerEnteredDigits
-
Call.PeripheralVariable1 to Call.PeripheralVariable10
-
Call.AccountNumber
-
Expanded Call Context (ECC) Variables
How to Perform the Set Enterprise Call Info Step
List of Variables
This example demonstrates the addition of these ECC variables and Call Peripheral variables:
-
User.ecc—ECC Variable (Field)
-
Newlayout—ECC Variable (Layout)
-
Call Variable 1
-
Call Variable 2
Step-by-step Procedure
Complete these steps to set the four variables listed in the List of Variables section:
-
Use Cisco Desktop Administrator to create one ECC variable named usr.ecc. Complete these steps:
-
Select Start > Programs > Cisco > Desktop > Desktop Administrator (see Figure 1).
Figure 1 – Sequence to Bring Up Cisco Desktop Administrator
The Cisco Desktop Administrator appears (see Figure 2).
-
Expand the left pane.
-
Select Enterprise Data Configuration > Enterprise Data (see arrow A in Figure 2). The Field List and Layout List appear on the right pane.
Figure 2 – Cisco Desktop Administrator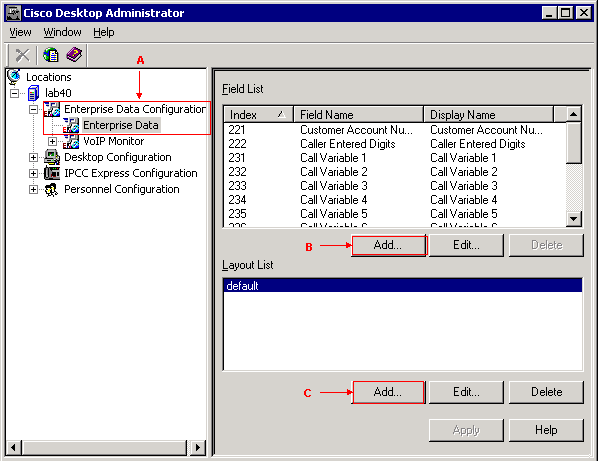
-
Click Add in the Field List section (see arrow B in Figure 2). The Field Editor window appears (see Figure 3).
Figure 3 – Field Editor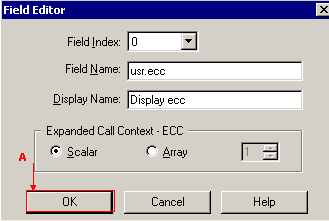
-
Select the appropriate value from the Field Index list. The valid field index number is 0 through 199.
-
Type usr.ecc in the Field Name field.
-
Type Display ecc in the Display Name field.
-
Select the Scalar radio button in the Expanded Call Context - ECC section.
-
Click OK (see arrow A in Figure 3).
-
Click Apply in Cisco Desktop Administrator.
-
-
Use Cisco Desktop Administrator to create a new layout named newlayout. Complete these steps:
-
Select Start > Programs > Cisco > Desktop > Desktop Administrator (see Figure 1). The Cisco Desktop Administrator appears (see Figure 2).
-
Expand the left pane.
-
Select Enterprise Data Configuration > Enterprise Data (see arrow A in Figure 2). The Field List and Layout List appear on the right pane.
-
Click Add in the Layout List section (see arrow C in Figure 2). The Layout Editor window appears (see Figure 4).
Figure 4 – Layout Editor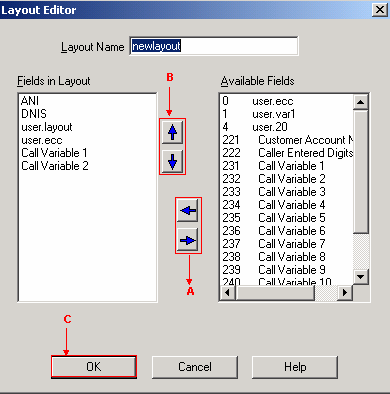
-
Type newlayout in the Layout Name field.
-
Move the necessary variables from the Available Fields list to the Fields in Layout section with the help of the left and right arrows (see arrow A in Figure 4).
Figure 4 displays six selected variables or fields, namely, ANI, DNIS, user.layout, user.ecc, Call Variable 1 and Call Variable 2.
-
Specify the correct order for these variables in the Fields in Layout section with the help of the up and down arrows (see arrow B in Figure 4).
-
Click OK (see arrow C in Figure 4).
-
Click Apply in Cisco Desktop Administrator.
-
-
Configure ECC variables for the Set Enterprise Call Info step. In this example, the two ECC variables are user.ecc and newlayout. Complete these steps:
-
Run the Cisco CRS Editor to edit the specific script with the Set Enterprise Call Info step.
-
Right-click the Set Enterprise Call Info step, and select Properties. The Set Enterprise Call Info window appears (see Figure 5).
Figure 5 – Set Enterprise Call Info: Expanded Call Variable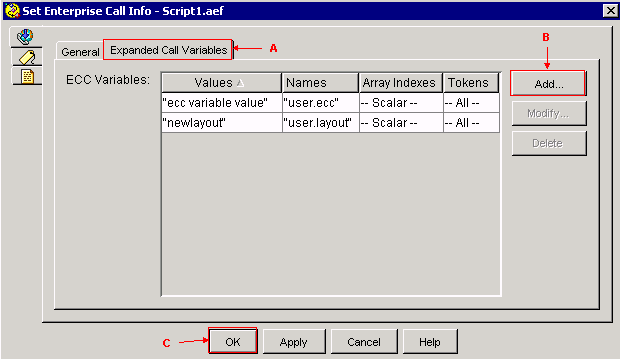
-
Select the Expanded Call Variables tab (see arrow A in Figure 5).
-
Click Add (see arrow B in Figure 5). The Add ECC Variable window appears (see Figure 6).
Figure 6 – Add ECC Variable: user.ecc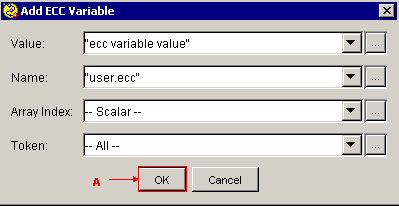
-
Specify "ecc variable value" in the Value field.
-
Specify "user.ecc" in the Name field.
-
Select Scalar from the Array Index list.
-
Select All in the Token list.
-
Click OK (see arrow A in Figure 6).
-
Click OK (see arrow C in Figure 5).
-
Click Add (see arrow B in Figure 5). The Add ECC Variable window appears (see Figure 7).
Figure 7 – Add ECC Variable: newlayout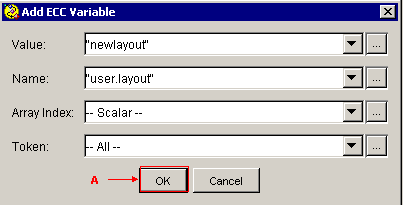
-
Specify "newlayout" in the Value field.
-
Specify "user.layout" in the Name field.
-
Select Scalar from the Array Index list.
-
Select All in the Token list.
-
Click OK (see arrow A in Figure 7).
-
Click OK (see arrow C in Figure 5).
-
-
Configure the Set Enterprise Call Info step through the Cisco CRS Editor to set values for the pre-defined Call Peripheral variables. In this example, the two variables are Call.PeripheralVariable1 and CallPeripheralVariable 2. Complete these steps:
-
Run the Cisco CRS Ediitor to edit the specific script with the Set Enterprise Call Info step.
-
Right-click the Set Enterprise Call Info step, and select Properties . The Set Enterprise Call Info window appears (see Figure 8).
Figure 8 – Set Enterprise Call Info: General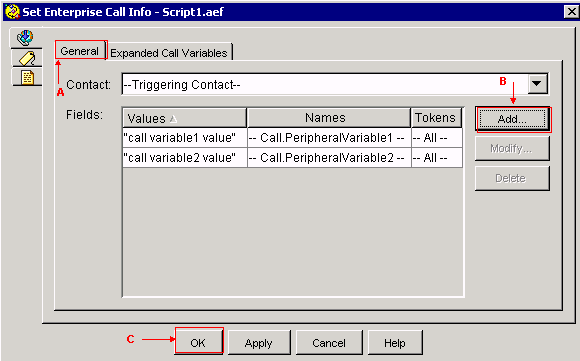
-
Select the General tab (see arrow A in Figure 8).
-
Click Add (see arrow B in Figure 8). The Add Field window appears (see Figure 9).
Figure 9 – Add Field: Call.PeripheralVariable1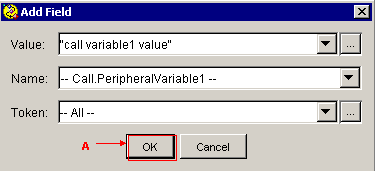
-
Specify "call variable1 value" in the Value field.
-
Select Call.PeripheralVariable1 in the Name list.
-
Select All in the Token list.
-
Click OK (see arrow A in Figure 9).
-
Click Add (see arrow B in Figure 8). The Add Field window appears (see Figure 10).
Figure 10 – Add Field: Call.PeripheralVariable2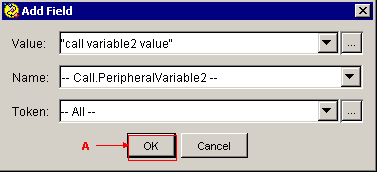
-
Specify "call variable2 value" in the Value field.
-
Select Call.PeripheralVariable2 from the Name list.
-
Select All in the Token list.
-
Click OK (see arrow A in Figure 10).
-
Click OK (see arrow C in Figure 8)
-
Figure 5 displays the list of ECC variables that you configured through the Set Enterprise Call Info step.
Figure 8 displays the list of Call Peripheral variables that you configured through the Set Enterprise Call Info step.
You can view the values that you set through the Set Enterprise Call Info step on the Cisco Agent Desktop (see Figure 11).
Figure 11 – Cisco Agent Desktop 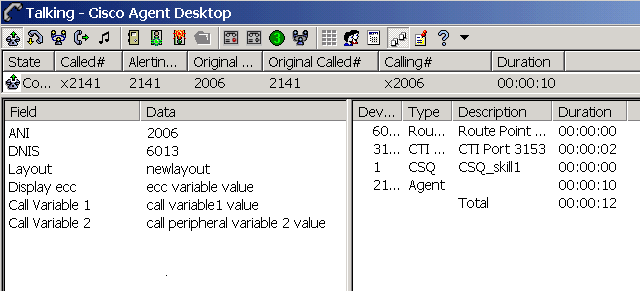
Troubleshoot
Error: Could Not Get Field Data from Enterprise Data Configuration
When you try to access the Enterprise Data Configuration link, you receive this error message: Could not get field data from Enterprise Data Configuration. Enterprise error returned :CORBA error.
Solution
In order to resolve this, perform these steps:
-
Make sure that the JTAPI and RmCm services are operative.
-
Restart the CRS Engine.
Related Information
Revision History
| Revision | Publish Date | Comments |
|---|---|---|
1.0 |
02-May-2006 |
Initial Release |
Contact Cisco
- Open a Support Case

- (Requires a Cisco Service Contract)


 Feedback