ISR Wireless Configuration Example
Available Languages
Contents
Introduction
This document describes how to tell the difference between Cisco Legacy and Next-Generation Integrated Services Routers (ISRs) and provides information about how to configure them.
Prerequisites
Requirements
There are no specific requirements for this document.
Components Used
This document is not restricted to specific software and hardware versions.
The information in this document was created from the devices in a specific lab environment. All of the devices used in this document started with a cleared (default) configuration. If your network is live, make sure that you understand the potential impact of any command.
Background Information
There are different types of Cisco ISRs, and only a few of them are integrated with the Cisco IOS® for routers. For example, with Legacy 851W, 857W, 871W, and 877W ISRs, you must access the router via Telnet/Secure Shell (SSH), or use the Security Device Manager (SDM) in order to access the wireless configurations. In comparison, some Next Generation ISRs, such as 861W, 881W, 891W, 1941W, 819W, come with Wireless Access Points (APs) already integrated, and can be accessed separately with the AP Bridge Virtual Interface (BVI) interface (with either the GUI or Telnet/SSH).
Identify Legacy and Next Generation ISRs
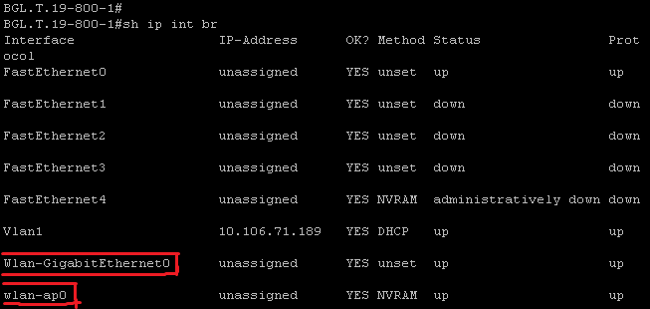
In order to identify the ISR, enter the show ip interface brief command on the router.
If interface WLAN-AP 0 and Interface WLAN Gig 0 are present on the interface list, then it means that it is a Next Generation router and has an Integrated Wireless AP inside the router. You can access this via the CLI with Telnet/SSH or from the GUI.

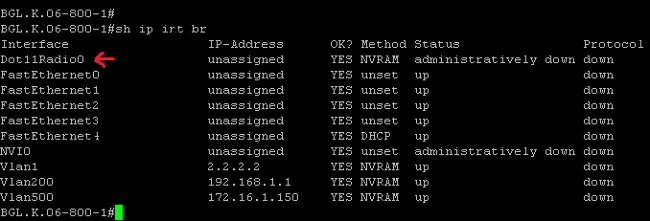
For Legacy routers, this is what appears when you enter the show ip int brief command:

As shown, for Legacy routers, you see only the Radio interface directly on the IOS.
Configure
There are different methods used in order to configure ISRs. In order to configure Legacy routers, where the router IOS supports wireless, you must configure the router via the BVI interface for each VLAN. Also, you must bridge traffic with the Radio interface and VLAN interface bridge via the BVI. If you use multiple Service Set Identifiers (SSIDs), then each SSID must be mapped to each VLAN, and each VLAN must be mapped to a unique Bridge Group (BG) through a separate BVI interface.
On the other hand, when you configure a Next Generation ISR, then the configuration is less complex. You must establish a connection between the router and the AP, and configure the AP just as any other stand-alone AP. There will be a single BVI interface, with multiple sub-interfaces, that helps communicate between multiple SSIDs and VLANs.
Next Generation ISRs can be synched with the Cisco Unified Wireless Manager (CUWM) architecture as well. The AP module inside the router can be converted to Light Weight Access Point Protocol (LWAPP)/Control and Provisioning of Wireless Access Points (CAPWAP) mode, which is registered to the Wireless LAN Controller (WLC). This section describes how to convert the AP module from Autonomous and LWAPP.
Legacy ISR Configuration Example

This configuration example uses two VLANS (VLAN 1 and VLAN 2) that are each mapped to a different SSID with WIFI-Protected Access - Pre Shared Key (WPA-PSK) security:
en
conf t

vlan 2 mapped to GUESTRITS SSID..Use the vlan
  as per the network configuration


dot11 ssid GUESTRITS
vlan 2
mbssid
authentication open
authentication key-management wpa
wpa-psk ascii 0 cisco123


dot11 ssid INTERNAL
vlan 1                               >> vlan 1 mapped to INTERNAL SSID
authentication open
mbssid
authentication key-management wpa
wpa-psk ascii 0 cisco123
!

!
bridge irb                          <<< Enables IRB. Allows bridging of
                                        traffic
!

interface Dot11Radio0
no ip address
mbssid
!
encryption vlan 1 mode ciphers tkip  << Encryption
!
encryption vlan 2 mode ciphers tkip
!
ssid GUESTRITS
!
ssid INTERNAL
!
speed basic-1.0 basic-2.0 basic-5.5 6.0 9.0
  basic-11.0 12.0 18.0 24.0 36.0 48.0 54.0
station-role root
!
interface Dot11Radio0.1             <<< Corresponding Sub Interface
encapsulation dot1Q 1 native            configuration for Radio
bridge-group 1                      <<< Bridging between VLAN 1 and
bridge-group 1 subscriber-loop-control  Dot11 0.1
bridge-group 1 spanning-disabled
bridge-group 1 block-unknown-source
no bridge-group 1 source-learning
no bridge-group 1 unicast-flooding
!


interface Dot11Radio0.2               <<< Corresponding Sub Interface
encapsulation dot1Q 2                     configuration for Radio
bridge-group 2                        <<< Bridging between VLAN 2 and
bridge-group 2 subscriber-loop-control    Dot11 0/2
bridge-group 2 spanning-disabled
bridge-group 2 block-unknown-source
no bridge-group 2 source-learning
no bridge-group 2 unicast-flooding
!


interface Vlan1
no ip address
bridge-group 1                        <<< Bridging between VLAN 1 and
                                          Dot11 0/1


interface Vlan2
no ip address
bridge-group 2                        <<< Bridging between VLAN 2 and
!                                         Dot11 0.2


interface BVI1                         << BVI 1 for VLAN 1
ip address 10.0.0.2 255.255.255.0
!
interface BVI2                         << BVI 2 for VLAN 2
ip address 192.168.1.1 255.255.255.0
!

!
bridge 1 protocol ieee                <<< Mandatory Bridging commands
bridge 1 route ip
bridge 2 protocol ieee
bridge 2 route ip
!
Next Generation ISR Configuration Example
Complete these steps in order to configure Next Generation routers:
- Establish connectivity between the router and the AP with the reverse console interface that is available on the router (Interface WLAN-AP 0). Use the IP address for this interface (you can assign the IP address, or use the IP unnumbered VLAN X command) in order to assign the IP.
Here is an example where the IP unnumbered VLAN command is used:
en
conf t
int wlan-ap 0
ip unnumbered vlan 1
no shut
This appears when you enter the show ip int br command:
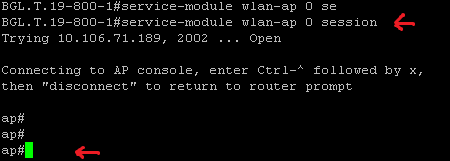
This helps you log in to the AP module. - Enter the service module WLAN-ap 0 session command in order to log in to the AP.

Follow the same process used in order to configure the stand-alone AP. For additional configuration examples, see the Configuration Examples and TechNotes index page.
If your deployment consists of multiple VLANs or SSIDs, you must set the WLAN-GIG 0 interface as a trunk port that allows the required VLANs on the router.
Upgrade an ISR AP from Lightweight to Autonomous
When the integrated AP runs the LWAPP image, such as AP801-RCVK9W8-M, AP801-RCVK9 "W8" -M (indicates LWAPP), or W7 (indicates an autonomous image), the Config t command does not work; the AP should use the autonomous image in order to run the commands. In order to resolve this issue, you must upgrade the ISR AP from lightweight to autonomous.
Enter these commands:
Router>en
Router#config t
Router(config t)#service-module wlan-ap0 bootimage autonomous
With these commands, you can change the AP mode. If you want the AP to load and run an autonomous image, use Autonomous in the previous command. If you want the AP to load and boot with an LWAPP image, then type Unified and reload the AP with this command:
Router(config t)#service-module wlan-ap 0 reload
This sets the AP to autonomous. The process works for the majority of cases. However, if you encounter issues, you can use the manual process:
- Download TFTPd32 onto your laptop and install it. Download the latest IOS image for the AP801 Series:
- Navigate to Cisco.com.
- Click the Support tab near the top of the screen.
- Click Download Software.
- Select Wireless, and then select Integrated routers and switches from the product drop-down list.
- Select the Router Model.
- Select the appropriate IOS image: 12.4(21a)JY (or later, as desired).
- Log in to the AP module from the router, and enter these commands:
- AP>en
- AP#debug capwap console cli OR debug lwapp console cli
- AP#config t (this configuration command now works)
- AP(config-t)#int GIG 0 or int FA 0
- AP(config - int)#ip addresss <address > <mask> (ensure that you have connectivity to your laptop IP address, and that they are both in the same subnet)
- AP(config - int)#no shut
- AP(config - int)#end
- Enter the archive download commands in order to upgrade the AP to autonomous:
- AP#archive download-sw /force-reload /overwrite tftp://<TFTP ip address (laptops IP)>/<Autonomous image.tar>
- AP#archive download-sw /overwrite /force-reload tftp://10.0.0.4/ap801-k9w7-tar.124-21a.JY.tar
This completes the manual configuration process.
Verify
There is currently no verification procedure available for this configuration.
Troubleshoot
There is currently no specific troubleshooting information available for this configuration.
Related Information
Revision History
| Revision | Publish Date | Comments |
|---|---|---|
1.0 |
30-Sep-2013 |
Initial Release |
Contact Cisco
- Open a Support Case

- (Requires a Cisco Service Contract)


 Feedback