LWAPP Decodes Enablement on WildPackets OmniPeek and EtherPeek 3.0 Software
Available Languages
Contents
Introduction
WildPackets OmniPeek (and EtherPeek) have Lightweight Access Point Protocol (LWAPP) decodes available, but they are not plugged in. This document explains how to enable the LWAPP decodes and use the software to look at LWAPP. This document uses the procedure for EtherPeek 3.0 and OmniPeek 5.0.
Note: The procedure for OmniPeek 3.0 is the same as that of EtherPeek 3.0.
Note: The only difference between OmniPeek and EtherPeek softwares is the location of the files.
-
The path for OmniPeek is C:/Program Files/WildPackets/OmniPeek.
-
The path for EtherPeek is C:/Program Files/WildPackets/EtherPeek.
Prerequisites
Requirements
Cisco recommends that you have knowledge of the EtherPeek, and OmniPeek 3.0 and 5.0 softwares. For information on EtherPeek, refer to EtherPeek FAQ ![]() . For information on OmniPeek, refer to Introducing Omni
. For information on OmniPeek, refer to Introducing Omni ![]() .
.
Components Used
The information in this document is based on these software and hardware versions:
-
OmniPeek 3.0
-
EtherPeek 3.0
-
OmniPeek 5.0
Conventions
Refer to Cisco Technical Tips Conventions for more information on document conventions.
Modify the LWAPP Decode File
In order to modify the LWAPP decode file, add "ETHR 0 0 90 c2 AP Identity:;" to the LWAPP function. This is directly under the "LABL 0 0 0 b1 Light Weight Access Point Protocol\LWAPP:;" line in the LWAPP-light_weight_...protocol.dcd file (C:\Program Files\WildPackets\EtherPeek\Decodes).
Modify TCP_UDP_Ports.dcd
In the file TCP_UDP_Ports.dcd (C:\Program Files\WildPackets\EtherPeek\Decodes), you must include these two lines:
0x2fbe | LWAPP;
0x2fbf | LWAPP;
Note: No ports are opened on the host computer as a result of this process. Therefore, this step does not expose the host computer to any security risks.
In this way, the two ports 12222 and 12223 are included.
Modify the Pspecs.xml File
Complete these steps:
-
In the User Datagram Protocol (UDP) section of the file pspecs.xml (C:\Program Files\WildPackets\EtherPeek\1033), add these lines:
Note: Make sure to back up the original file first.
<PSpec Name="LWAPP"> <PSpecID>6677</PSpecID> <LName>LWAPP</LName> <SName>LWAPP</SName> <Desc>LWAPP</Desc> <Color>color_1</Color> <CondSwitch>12222</CondSwitch> <CondSwitch>12223</CondSwitch> <PSpec Name="LWAPP Data"> <PSpecID>6688</PSpecID> <LName>LWAPP Data</LName> <SName>LWAPP-D</SName> <DescID>6677</DescID> <CondExp><![CDATA[(SrcPort == 12222) || (DestPort == 12222)]]></CondExp> </PSpec> <PSpec Name="LWAPP Control"> <PSpecID>6699</PSpecID> <LName>LWAPP Control</LName> <SName>LWAPP-C</SName> <DescID>6677</DescID> <CondExp><![CDATA[(SrcPort == 12223) || (DestPort == 12223)]]></CondExp> </PSpec> </PSpec> -
Restart OmniPeek or EtherPeek in order for your changes to take effect.
LWAPP Decode in OmniPeek 5.0
OmniPeek version 5.0 is the next generation capture tool for OmniPeek version 3.0. In the 5.0 version, LWAPP decodes are inbuilt by default. Thus, there is no need for any further changes in the file. However, here is an example which shows how to define a Protocol filter in the 5.0 version using an IP address and the Port number:
-
Open up the OmniPeek 5.0 application.
-
From the Start page, click File > New in order to open a New Packet Capture Window.
A small window named Capture Options appears. It contains the list of options for a packet capture.
-
From the Adapter option, choose an adapter to Capture Packets using that adapter. The description about the adapter is shown below as you highlight the adapter. Choose Local Area Connection to capture packets using the local ethernet adapter.
-
Click OK.
The New Capture window appears.
-
Click the Start Capture button.
The tool starts to capture packets for the protocols defined in the software. In order to view the packets captured, click the Packets option below the Capture menu on the left.
-
Right click any of the packets captured and click Make Filter in order to define a new protocol.
The Insert Filter window appears.
-
Enter a name inside the Filter box to identify the protocol.
-
Enable the Address filter.
-
Choose the Type as IP to capture packets to and from specific IP addresses.
-
For the Address1 enter the source IP address.
-
For the Address 2 enter an IP address if the destination has a static IP.
-
Choose the Option as Any Address if the destination receives an IP address through DHCP.
-
In order to specify the direction of the packet flow click the Both directions button and choose either of the three options. The Arrow Mark on the button indicates the direction chosen.
-
Enable the Port filter.
-
Choose the Type for the port used by the protocol, for example TCP.
-
For the Port 1 enter a port used in the source.
-
For the Port 2 enter a port number if the destination uses a standard well-defined port.
-
Otherwise, choose the Any port option if the destination uses a port on a random basis.
-
Choose a direction from the Both Directions button based on your requirement.
-
-
Repeat these steps to define any new custom protocol.
Verify
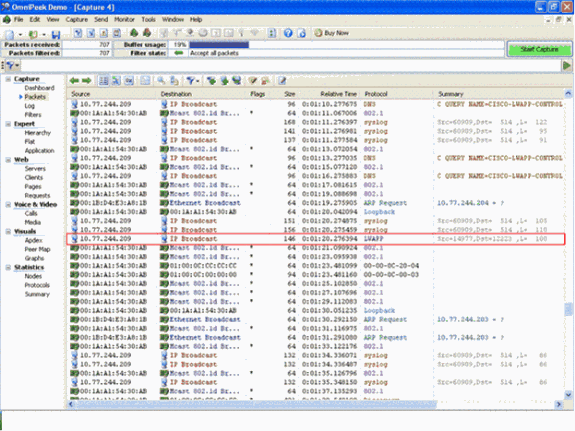
With OmniPeek 5.0, you can verify from the Capture Screen that the tool captures the LWAPP protocol by default when an LWAPP event is triggered. Figure 1 shows the LWAPP protocol capture during the Discovery Request made by the LAP.
Figure 1 
Double click on the packet to view the details about the packet.
Related Information
Revision History
| Revision | Publish Date | Comments |
|---|---|---|
1.0 |
17-Nov-2008 |
Initial Release |
Contact Cisco
- Open a Support Case

- (Requires a Cisco Service Contract)
 Feedback