Configure Dynamic VLAN Assignment with ISE and Catalyst 9800 Wireless LAN Controller
Available Languages
Download Options
Bias-Free Language
The documentation set for this product strives to use bias-free language. For the purposes of this documentation set, bias-free is defined as language that does not imply discrimination based on age, disability, gender, racial identity, ethnic identity, sexual orientation, socioeconomic status, and intersectionality. Exceptions may be present in the documentation due to language that is hardcoded in the user interfaces of the product software, language used based on RFP documentation, or language that is used by a referenced third-party product. Learn more about how Cisco is using Inclusive Language.
Contents
Introduction
This document describes how to configure the Catalyst 9800 WLC and Cisco ISE to assign Wireless LAN (WLAN).
Requirements
Cisco recommends that you have knowledge of these topics:
- Have basic knowledge of the Wireless LAN Controller (WLC and Lightweight Access Points (LAPs).
- Have functional knowledge of the AAA server such as Identity Services Engine (ISE).
- Have a thorough knowledge of wireless networks and wireless security issues.
- Have functional knowledge on dynamic Virtual LAN (VLAN) assignment.
- Have basic knowledge of Control and Provisioning for Wireless Access Point (CAPWAP).
Components Used
The information in this document is based on these software and hardware versions:
- Cisco Catalyst 9800 WLC (Catalyst 9800-CL) that runs firmware release 16.12.4a.
- Cisco 2800 Series LAP in local mode.
- Native Windows 10 supplicant.
- Cisco ISE that runs version 2.7.
- Cisco 3850 series switch that runs firmware release 16.9.6.
The information in this document was created from the devices in a specific lab environment. All of the devices used in this document started with a cleared (default) configuration. If your network is live, ensure that you understand the potential impact of any command.
Background Information
Dynamic VLAN Assignment with RADIUS Server
This document describes the concept of dynamic VLAN assignment and how to configure the Catalyst 9800 wireless LAN controller (WLC) and Cisco Identity Service Engine (ISE) to assign wireless LAN (WLAN) in order to accomplish this for the wireless clients.
In most Wireless Local Area Network (WLAN) systems, each WLAN has a static policy that applies to all clients associated with a Service Set Identifier (SSID). Although powerful, this method has limitations because it requires clients to associate with different SSIDs to inherit different QoS and security policies.
However, the Cisco WLAN solution supports identity networking. This allows the network to advertise a single SSID and allows specific users to inherit different QoS or security policies based on the user credential.
Dynamic VLAN assignment is one such feature that places a wireless user into a specific VLAN based on the credentials supplied by the user. The task to assign users to a specific VLAN is handled by a RADIUS authentication server, such as Cisco ISE. This can be used, for example, to allow the wireless host to remain on the same VLAN as it moves within a campus network.
Therefore, when a client attempts to associate to a LAP registered with a controller, the WLC passes the credentials of the user to the RADIUS server for validation. Once the authentication is successful, the RADIUS server passes certain Internet Engineering Task Force (IETF) attributes to the user. These RADIUS attributes decide the VLAN ID that must be assigned to the wireless client. The SSID of the client does not matter because the user is always assigned to this predetermined VLAN ID.
The RADIUS user attributes used for the VLAN ID assignment are:
- IETF 64 (Tunnel Type)—Set this to VLAN.
- IETF 65 (Tunnel Medium Type)—Set this to 802.
- IETF 81 (Tunnel Private Group ID)—Set this to VLAN ID.
The VLAN ID is 12-bits and takes a value between 1 and 4094, inclusive. Because the Tunnel-Private-Group-ID is of type string, as defined in RFC2868 for use with IEEE 802.1X, the VLAN ID integer value is encoded as a string. When these tunnel attributes are sent, it is necessary to enter them in the Tag field.
Configure
In this section, you are presented with the information to configure the features described in this document.
Network Diagram
This document uses this network setup:
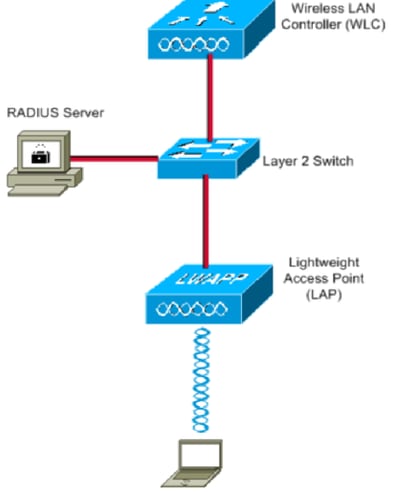
These are the configuration details of the components used in this diagram:
- The IP address of Cisco ISE (RADIUS) server is 10.10.1.24.
- The Management Interface address of the WLC is 10.10.1.17.
- The internal DHCP server on the controller is used to assign the IP address to wireless clients.
- This document uses 802.1x with PEAP as the security mechanism.
- VLAN102 is used throughout this configuration. The username smith -102 is configured to be placed into the VLAN102 by the RADIUS server.
Configuration Steps
This configuration is separated into three categories:
- Cisco ISE Configuration.
- Configure the Switch for Multiple VLANs.
- Catalyst 9800 WLC Configuration.
Cisco ISE Configuration
This configuration requires these steps:
- Configure the Catalyst WLC as an AAA Client on the Cisco ISE Server.
- Configure Internal users on Cisco ISE.
- Configure the RADIUS (IETF) attributes used for dynamic VLAN Assignment on Cisco ISE.
Step 1. Configure the Catalyst WLC as an AAA Client on the Cisco ISE server
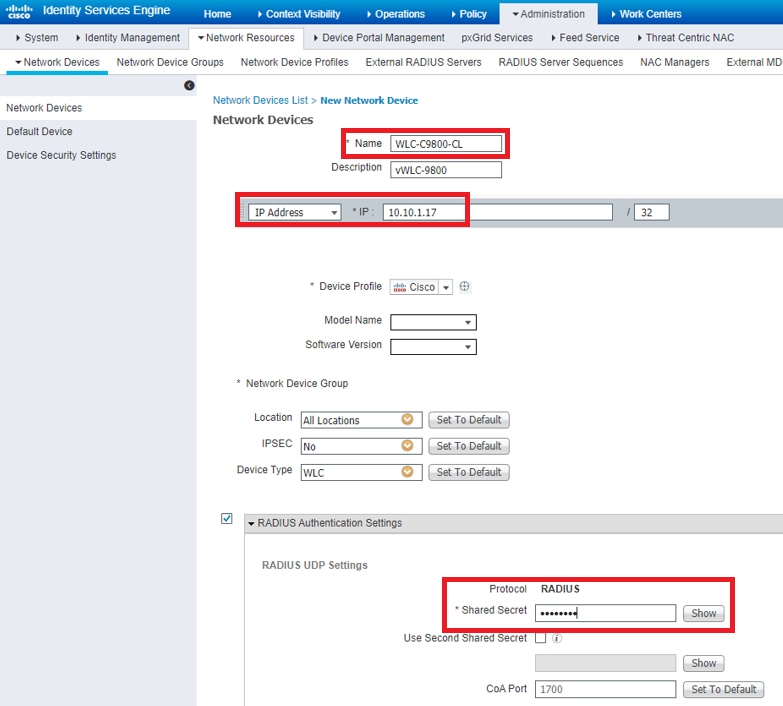
This procedure explains how to add the WLC as a AAA client on the ISE server so that the WLC can pass the user credentials to ISE.
Complete these steps:
- From the ISE GUI, navigate to
Administration > Network Resources > Network Devicesand selectAdd. - Complete the configuration with the WLC management IP address and RADIUS shared secret between WLC and ISE as shown in the image:
Step 2. Configure internal users on Cisco ISE
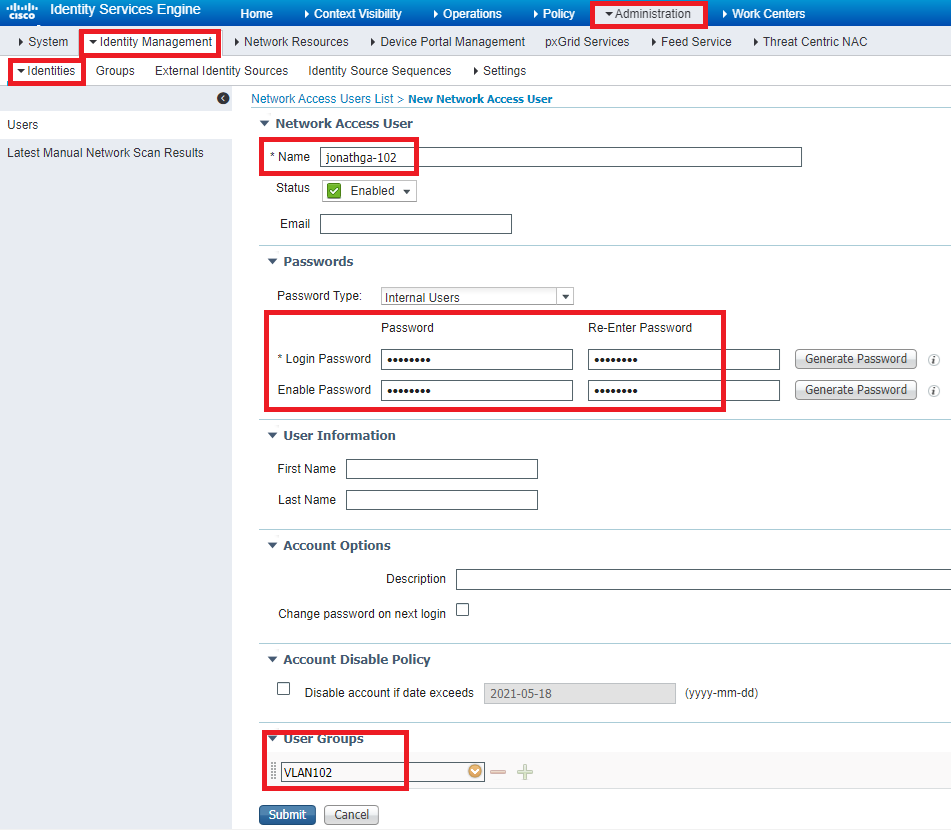
This procedure explains how to add the users on the internal user database of Cisco ISE.
Complete these steps:
- From the ISE GUI, navigate to
Administration > Identity Management > Identitiesand selectAdd. - Complete the configuration with the username, password, and user group as shown in the image:
Step 3. Configure the RADIUS (IETF) attributes used for dynamic VLAN Assignment
This procedure explains how to create an authorization profile and an authentication policy for wireless users.
Complete these steps:
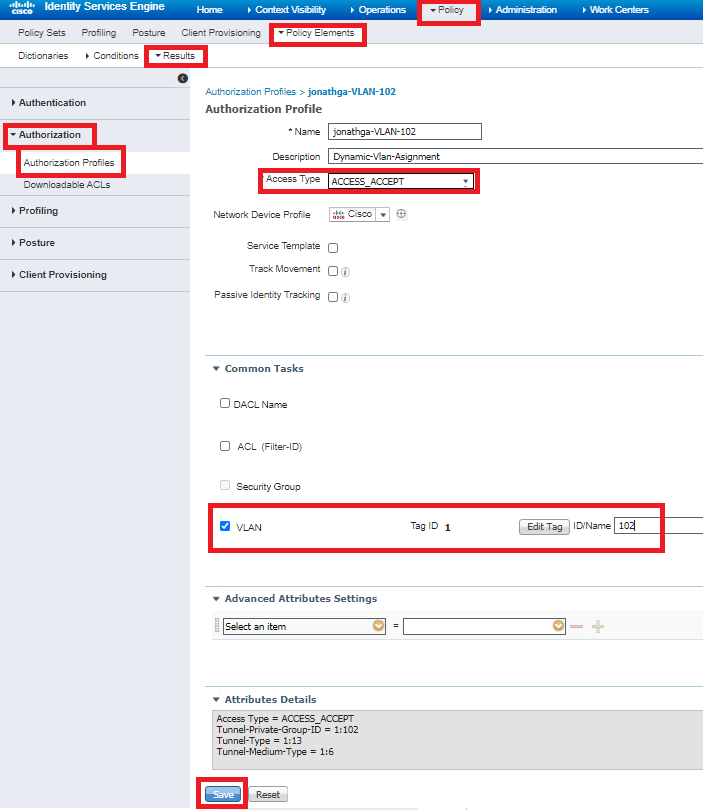
- From the ISE GUI, navigate to
Policy > Policy Elements > Results > Authorization > Authorization profilesand selectAddto create a new profile. - Complete the authorization profile configuration with VLAN information for the respective group. This image shows
jonathga-VLAN-102group configuration settings.
After the authorization profiles are configured, an authentication policy for wireless users needs to be created. You can use a new Custom policy or modify the Default Policy set. In this example, a custom profile is created.
- Navigate to
Policy > Policy Setsand selectAddto create a new policy as shown in the image:


Now you need to create authorization policies for users in order to assign a respective authorization profile based on group membership.
- Open the
Authorization policysection and create policies to accomplish that requirement as shown in the image:

Configure the Switch for Multiple VLANs
To allow multiple VLANs through the switch, you need to issue these commands to configure the switch port connected to the controller:
Switch(config-if)#switchport mode trunk
Switch(config-if)#switchport trunk encapsulation dot1q
Note: By default, most of the switches allow all VLANs created on that switch via the trunk port. If a wired network is connected to the switch, then this same configuration can be applied to the switch port that connects to the wired network. This enables the communication between the same VLANs in the wired and wireless network.
Catalyst 9800 WLC Configuration
This configuration requires these steps:
- Configure the WLC with the Details of the Authentication Server.
- Configure the VLANs.
- Configure the WLANs (SSID).
- Configure the Policy Profile.
- Configure the Policy tag.
- Assign the Policy tag to an AP.
Step 1. Configure the WLC with the Details of the Authentication Server
It is necessary to configure the WLC so it can communicate with the RADIUS server to authenticate the clients.
Complete these steps:
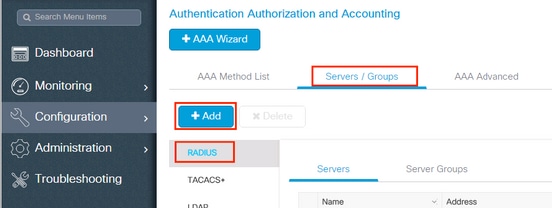
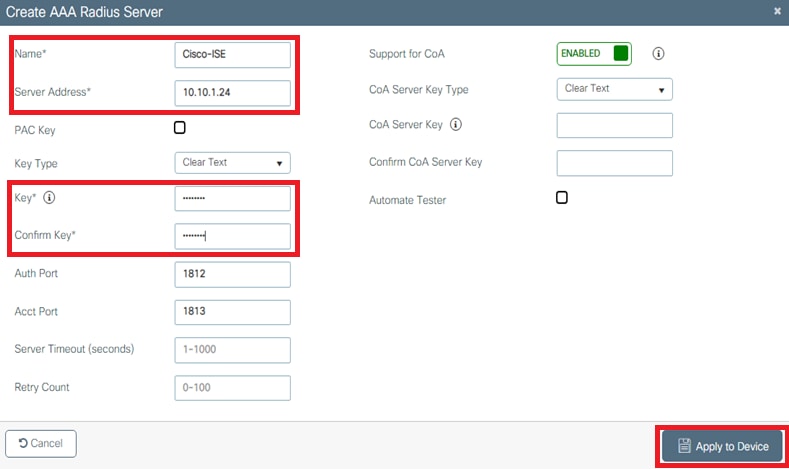
- From the controller GUI, navigate to
Configuration > Security > AAA > Servers / Groups > RADIUS > Servers > + Addand enter the RADIUS server information as shown in the image:
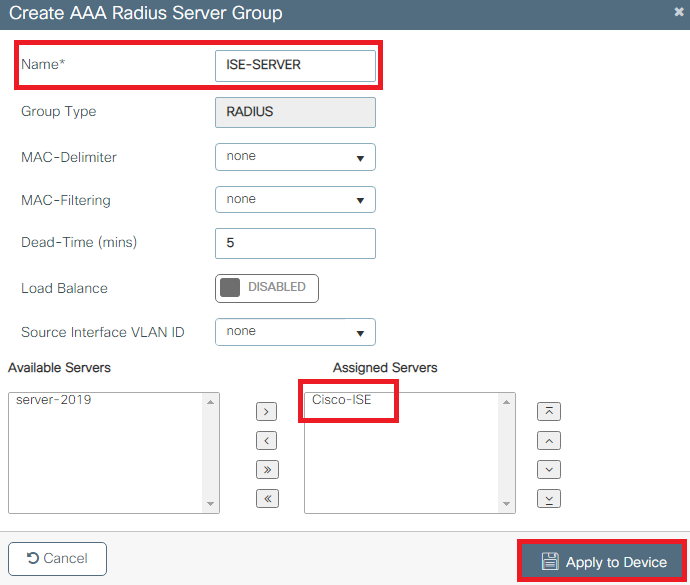
- In order to add the RADIUS server to a RADIUS group, navigate to
Configuration > Security > AAA > Servers / Groups > RADIUS > Server Groups > + Addas shown in the image:
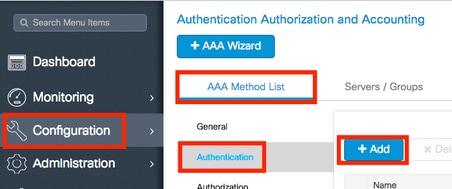
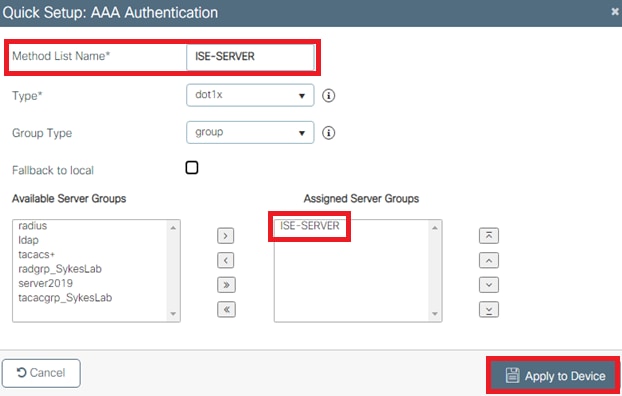
- In order to create an Authentication Method List, navigate to
Configuration > Security > AAA > AAA Method List > Authentication > + Addas shown in the images:
Step 2. Configure the VLANs
This procedure explains how to configure VLANs on the Catalyst 9800 WLC. As explained earlier in this document, the VLAN ID specified under the Tunnel-Private-Group ID attribute of the RADIUS server must also exist in the WLC.
In the example, the user smith-102 is specified with the Tunnel-Private-Group ID of 102 (VLAN =102) on the RADIUS server.
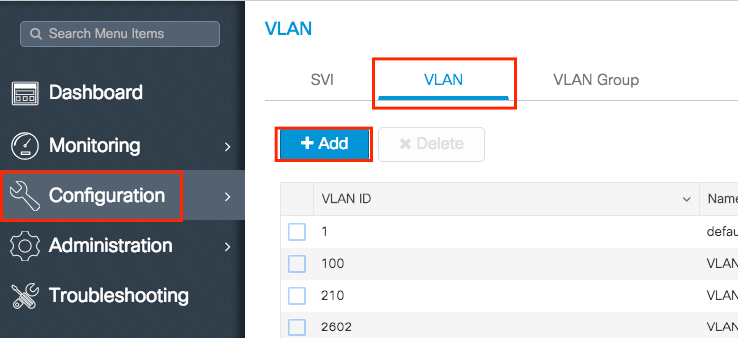
- Navigate to
Configuration > Layer2 > VLAN > VLAN > + Addas shown in the image:
- Enter the needed information as shown in the image:
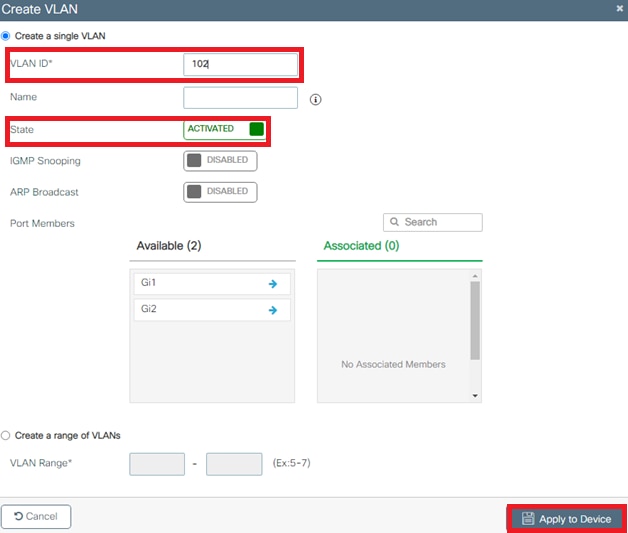
Note: If you do not specify a name, the VLAN automatically gets assigned the name of VLANXXXX, where XXXX is the VLAN ID.
Repeat steps 1 and 2 for all the needed VLANs, once done you can continue to step 3.
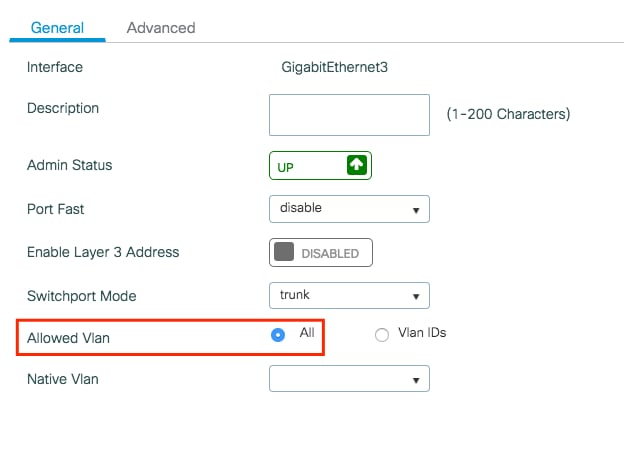
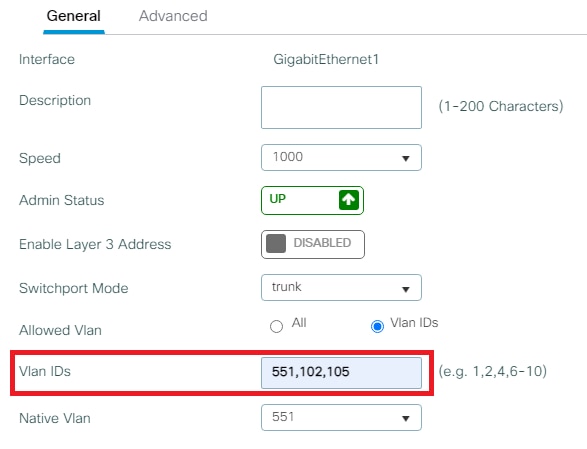
- Verify the VLANs are allowed in your data interfaces.
- If you have a port channel in use, navigate to
Configuration > Interface > Logical > PortChannel name > General. If you see it configured asAllowed VLAN = Allyou are done with the configuration. If you seeAllowed VLAN = VLANs IDs, add the needed VLANs and after that selectUpdate & Apply to Device. - If you do not have port channel in use, navigate to
Configuration > Interface > Ethernet > Interface Name > General. If you see it configured asAllowed VLAN = Allyou are done with the configuration. If you seeAllowed VLAN = VLANs IDs, add the needed VLANs and after that selectUpdate & Apply to Device.
- If you have a port channel in use, navigate to
This images show the configuration related to the interface setup if you use All or specific VLAN IDs.
Step 3. Configure the WLANs (SSID)
This procedure explains how to configure the WLANs in the WLC.
Complete these steps:
- In order to create the WLAN. Navigate to
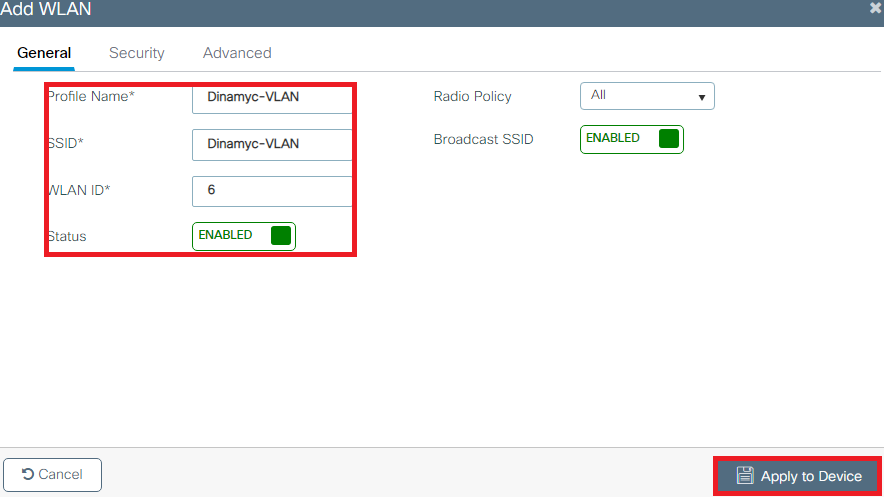
Configuration > Wireless > WLANs > + Addand configure the network as needed, as shown in the image:

- Enter the WLAN information as shown in the image:
- Navigate to
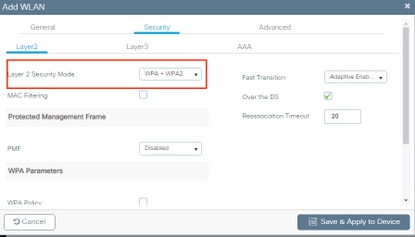
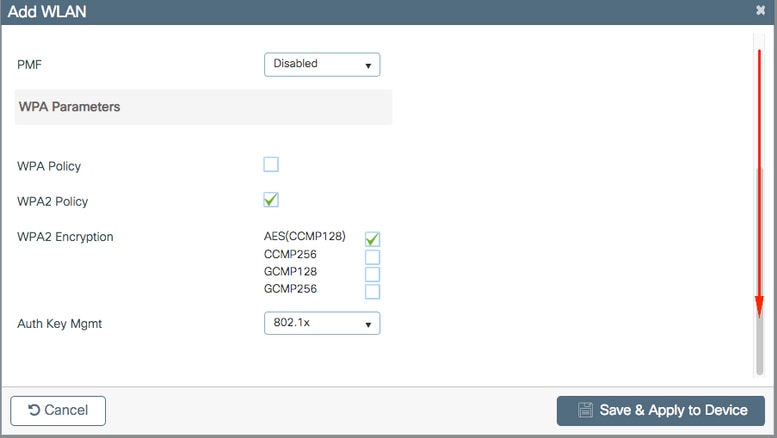
Securitytab and select the needed security method. In this case WPA2 + 802.1x as shown in the images:
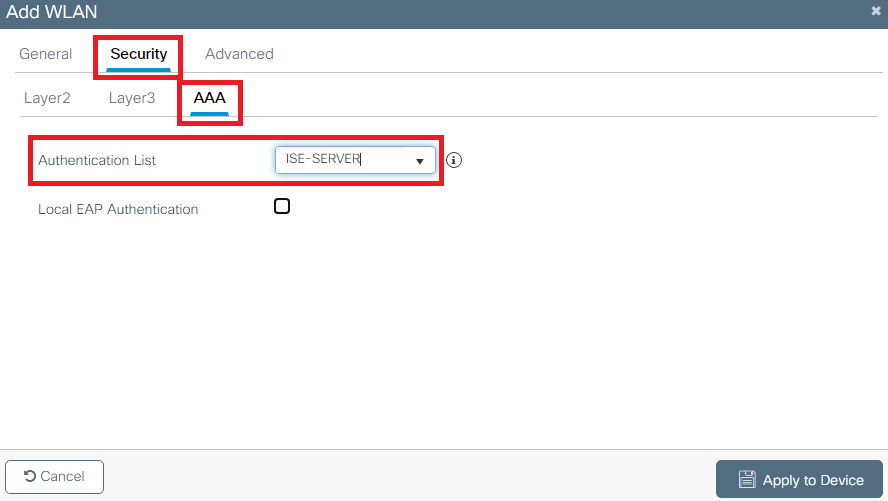
FromSecurity > AAA tab, select the authentication method created on step 3 from Configure the WLC with the Details of the Authentication Server section as shown in the image:
Step 4. Configure the Policy Profile
This procedure explains how to configure the Policy Profile in the WLC.
Complete these steps:
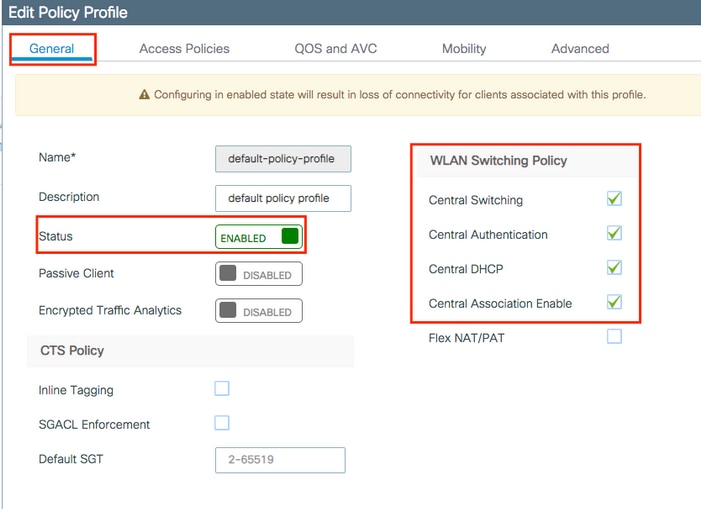
- Navigate to
Configuration > Tags & Profiles > Policy Profileand either configure yourdefault-policy-profileor create a new one as shown in the images:

- From the
Access Policiestab assign the VLAN to which the wireless clients are assigned when they connect to this WLAN by default as shown in the image:
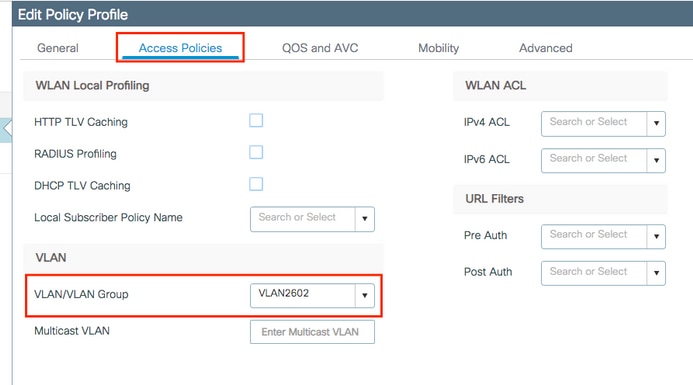
Note: In the example provided, it is the job of the RADIUS server to assign a wireless client to a specific VLAN upon successful authentication, therefore the VLAN configured on the policy profile can be a black hole VLAN, the RADIUS server overrides this mapping and assigns the user that comes through that WLAN to the VLAN specified under the user Tunnel-Group-Private-ID field in the RADIUS server.
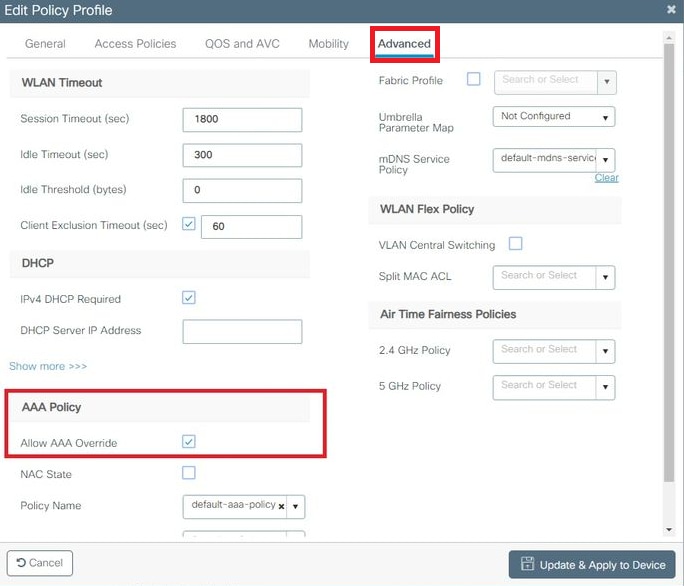
- From the
Advancetab, enable theAllow AAA Overridecheck box to override the WLC configuration when the RADIUS server returns the attributes needed to place the client on the proper VLAN as shown in the image:
Step 5. Configure the Policy Tag
This procedure explains how to configure the Policy tag in the WLC.
Complete these steps:
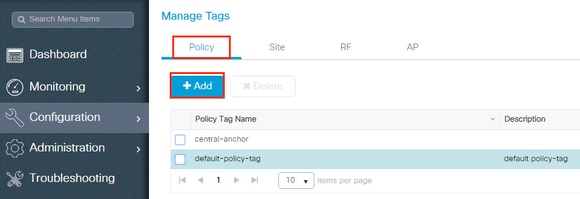
- Navigate to
Configuration > Tags & Profiles > Tags > Policyand add a new one if needed as shown in the image:
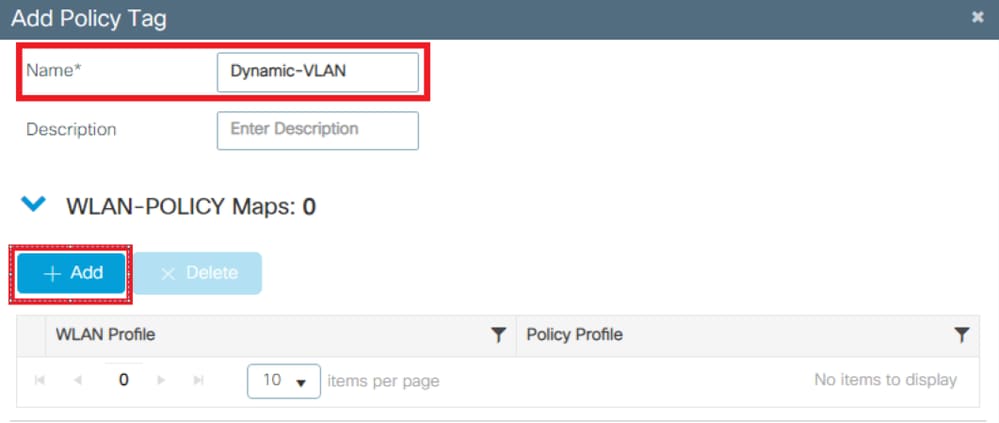
- Add a name to the Policy Tag and select
+Add, as shown in the image:
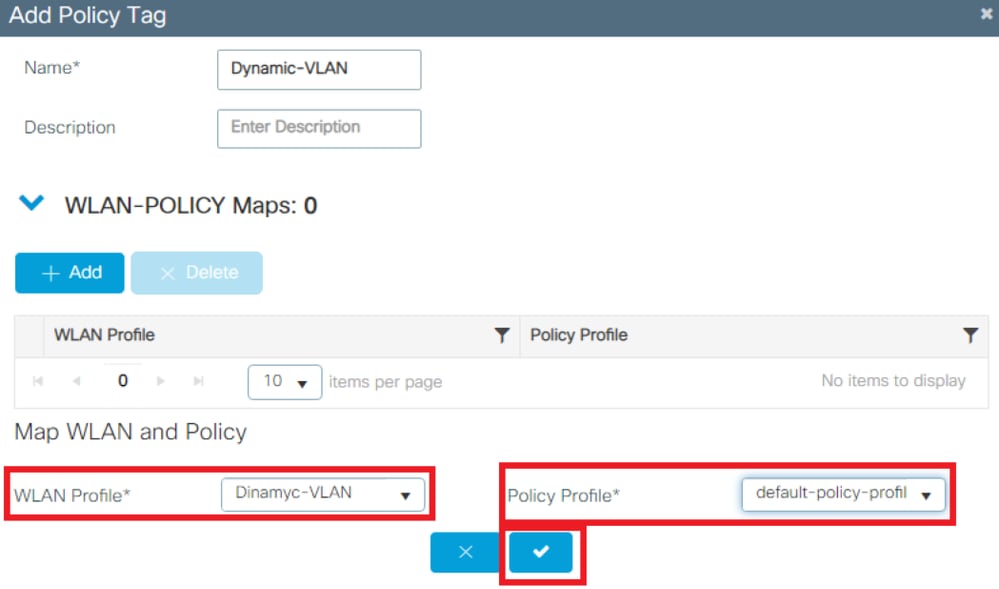
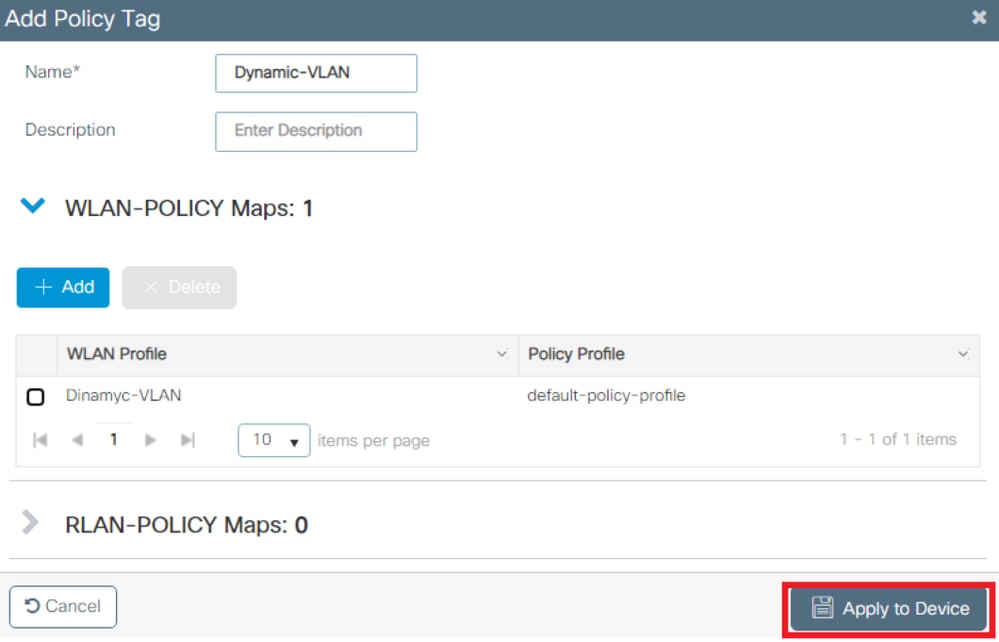
- Link your WLAN Profile to the desired Policy Profile as shown in the images:
Step 6. Assign the Policy Tag to an AP
This procedure explains how to configure the Policy tag in the WLC.
Complete these steps:
- Navigate to
Configuration > Wireless > Access Points > AP Name > General Tagsand assign the relevant policy tag and then selectUpdate & Apply to Deviceas shown in the image:
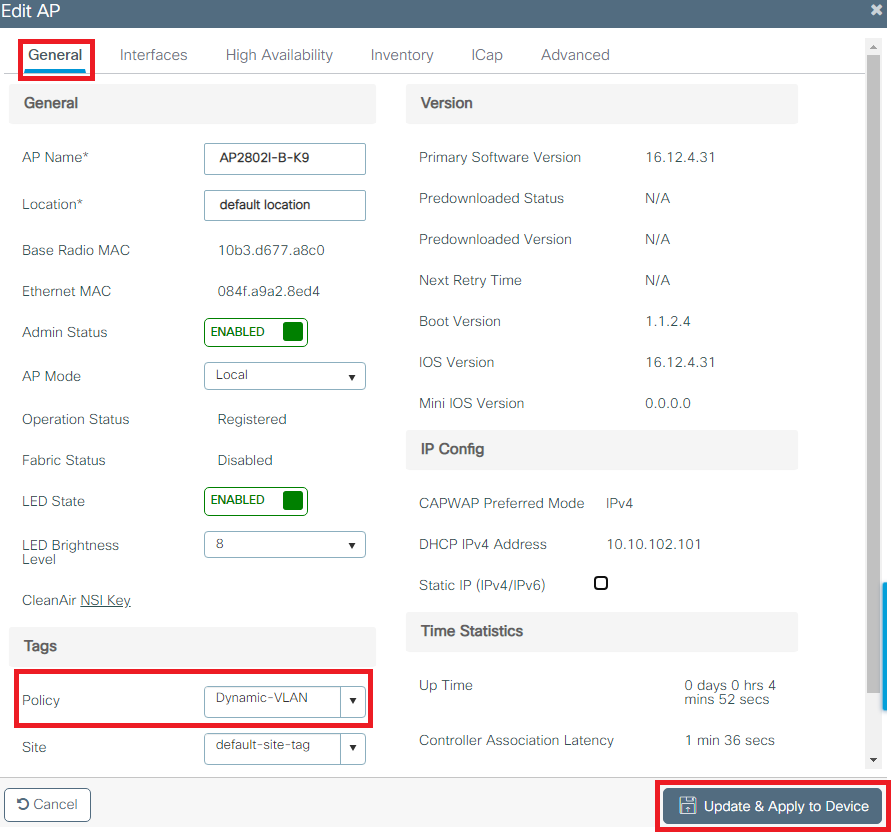
Caution: Be aware that changing the policy tag on an AP results in the AP disconnecting from the WLC and then reconnecting.
Flexconnect
The Flexconnect feature allows APs to send wireless client data to egress through the AP LAN port when configured as a trunk. This mode, known as Flexconnect Local Switching, allows the AP to segregate client traffic by tagging it in separate VLANs from its management interface. This section provides instructions on how to configure Dynamic VLAN assignment for the local switching scenario.

Note: The steps outlined in the previous section are applicable to the Flexconnect scenario as well. To complete the configuration for Flexconnect, please do the additional steps provided in this section.
Configure the Switch for Multiple VLANs
To allow multiple VLANs through the switch, you need to issue the next commands to configure the switch port connected to the AP:
- Switch(config-if)#switchport mode trunk
- Switch(config-if)#switchport trunk encapsulation dot1q

Note: By default, most of the switches allow all VLANs created on the switch via the trunk port.
Flexconnect Policy Profile configuration
- Navigate to Configuration > Tags & Profiles > Policy Profile > +Add and create a new policy.
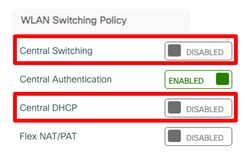
- Add the name, unselect the Central Switching and Central DHCP check box. With this configuration, the controller handles client authentication, while the FlexConnect Access Point switches client data packets and DHCP locally.
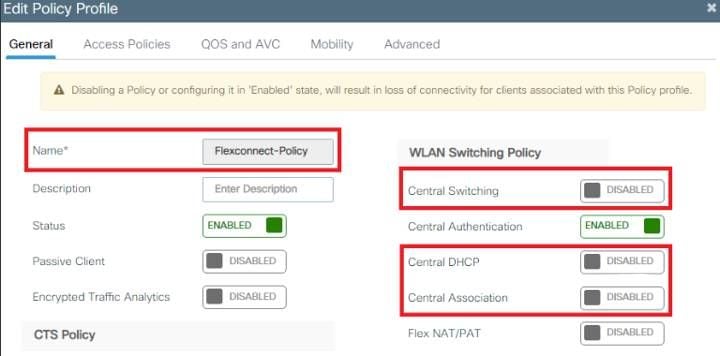

Note: Starting with the 17.9.x code, the policy-profile appearance has been updated as depicted in the picture.
- From the Access Policies tab assign the VLAN to which the wireless clients are assigned when they connect to this WLAN by default.
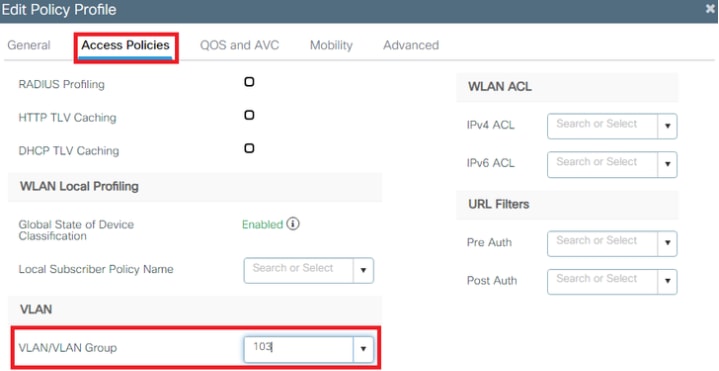

Note: The VLAN configured on this step is not required to be present on the VLAN list of the WLC. Necessary VLANs are added on the Flex-Profile later, which creates the VLANs on the AP itself.
- From the Advance tab, enable the Allow AAA Override check box to override the WLC configurations by the RADIUS server.
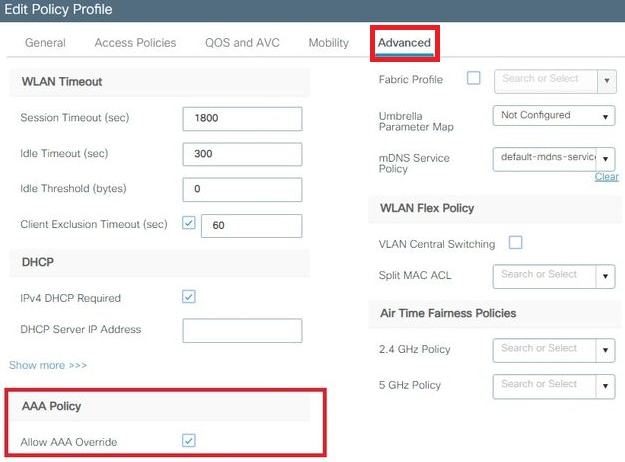
Assign the Flexconnect policy profile to a WLAN and Policy tag

Note: A Policy Tag is used to link the WLAN with the Policy Profile. You can either create a new Policy Tag or use the default-policy tag.
- Navigate to Configuration > Tags & Profiles > Tags > Policy and add a new one if needed.
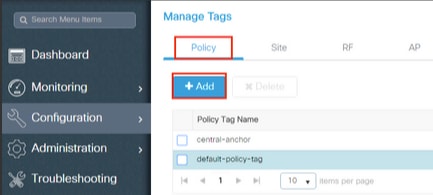
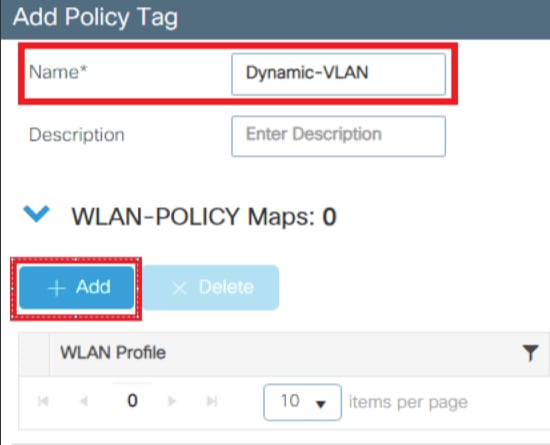
- Enter a name for the Policy Tag and click on the “add” button.
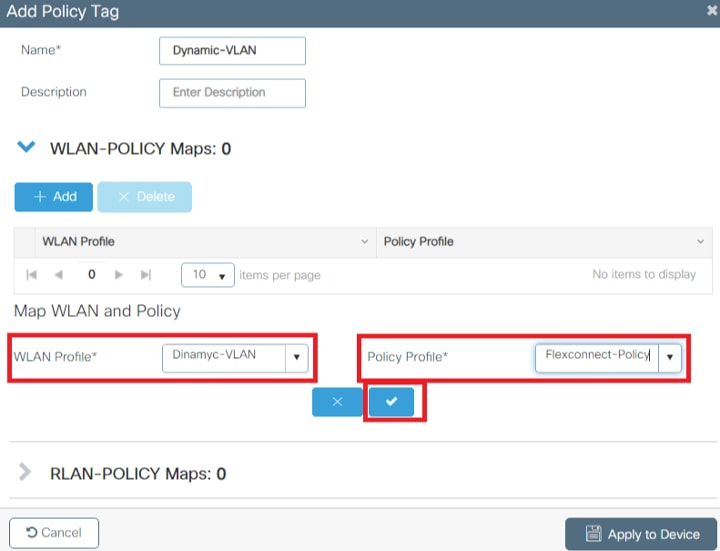
- Link your WLAN Profile to the desired Policy Profile.
- Click on the Apply to Device button.
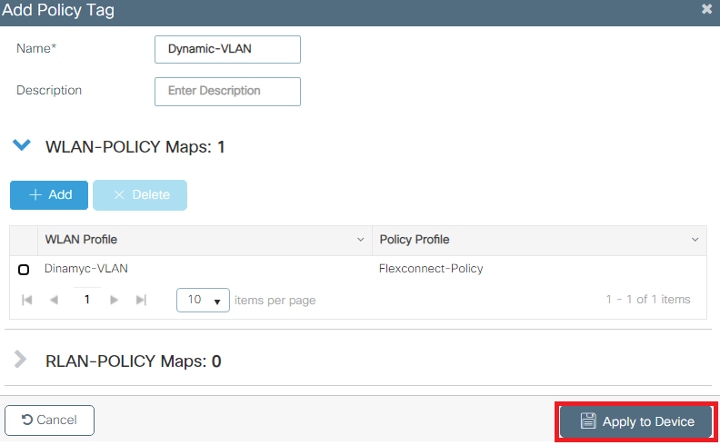
Configure the Flex Profile
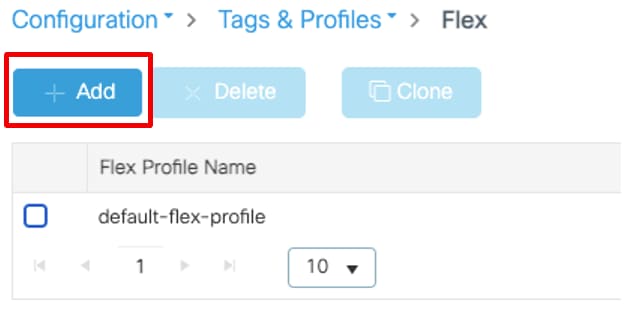
To dynamically assign a VLAN ID via RADIUS on a FlexConnect AP, it is necessary for the VLAN ID mentioned in the Tunnel-Private-Group ID attribute of the RADIUS response to be present on the access points. The VLANs are configured on the Flex profile.
- Navigate to Configuration > Tags & Profiles > Flex > + Add.
- Click on the General tab, assign a name for the Flex profile, and configure a native VLAN ID for the AP.
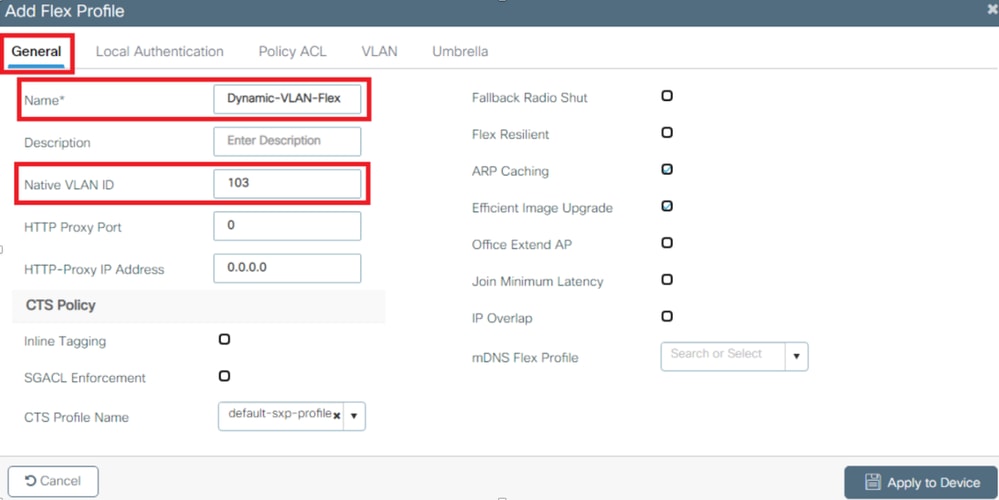

Note: The native VLAN ID refers management VLAN for the AP, so it must match the native VLAN configuration of the switch the AP is connected to
- Navigate to the VLAN tab and click on the “Add” button to enter all the necessary VLANs.
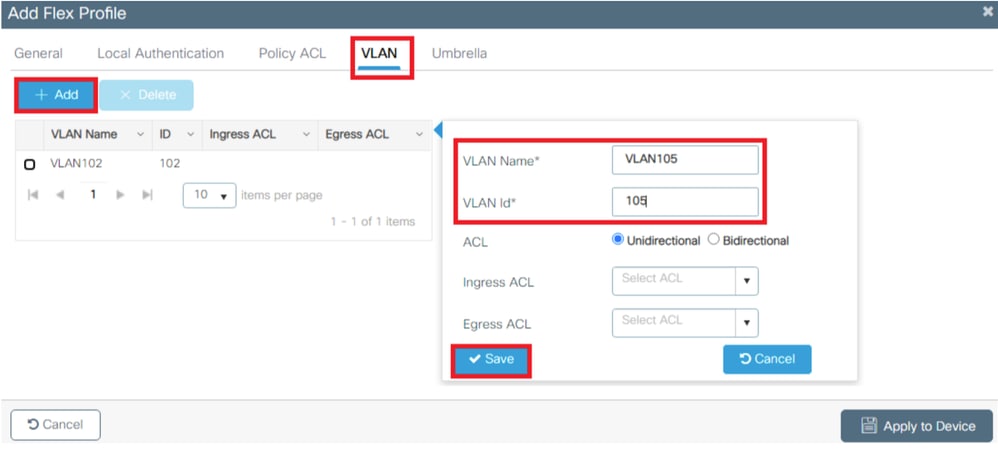

Note: In step 3 of the section Flexconnect Policy Profile Configuration, you configured the default VLAN assigned to the SSID. If you use a VLAN name on that step, ensure that you use the same VLAN name on the Flex Profile configuration, otherwise, clients are not able to connect to the WLAN.
Flex Site tag configuration
- Navigate to Configuration > Tags & Profiles > Tags > Site > +Add, to create a new site tag.
- Unselect the Enable Local Site box to allow APs to switch the client data traffic locally and add the Flex Profile created on the Configure the Flex Profile section.
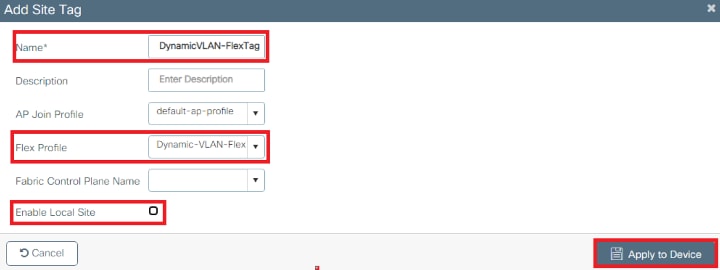
Assign the Policy and Site Tag to an AP.
- Navigate to Configuration > Wireless > Access Points > AP Name > General Tags, assign the relevant policy and site tag and then click Update & Apply to Device.


Caution: Be aware that changing the policy and site tag on an AP results in the AP disconnecting from the WLC and then reconnecting.

Note: If the AP is configured in Local mode (or any other mode) and then it gets a Site Tag with the "Enable Local Site" setting disabled, the AP reboots and comes back in FlexConnect mode
Verify
Use this section to confirm that your configuration works properly.
Configure the test client SSID profile using the proper EAP protocol and credentials defined in ISE that can return a Dynamic VLAN assignment. Once you are prompted for a username and password, enter the information of the user mapped to a VLAN on ISE.
In the previous example, notice that smith-102 is assigned to the VLAN102 as specified in the RADIUS server. This example uses this username to receive authentication and to be assigned to a VLAN by the RADIUS server:
Once the authentication is completed, you need to verify that your client is assigned to the proper VLAN as per the RADIUS attributes sent. Complete these steps to accomplish this task:
- From the controller GUI, navigate to
Monitoring > Wireless > Clients > Select the client MAC address > General > Security Informationand look for the VLAN field as shown in the image:
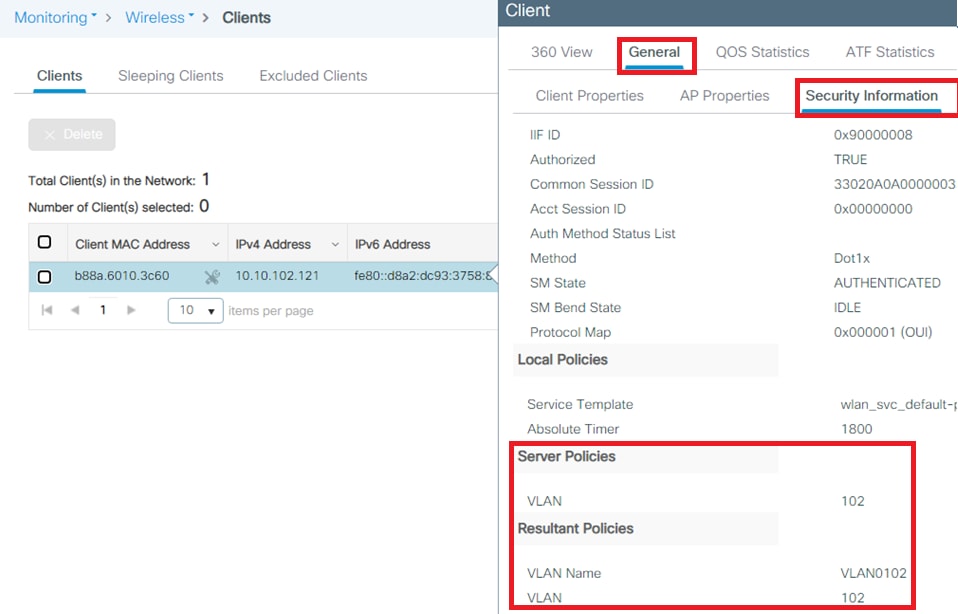
From this window, you can observe that this client is assigned to VLAN102 as per the RADIUS attributes configured on the RADIUS server.
From the CLI you can use the
show wireless client summary detailto view the same information as shown in the image: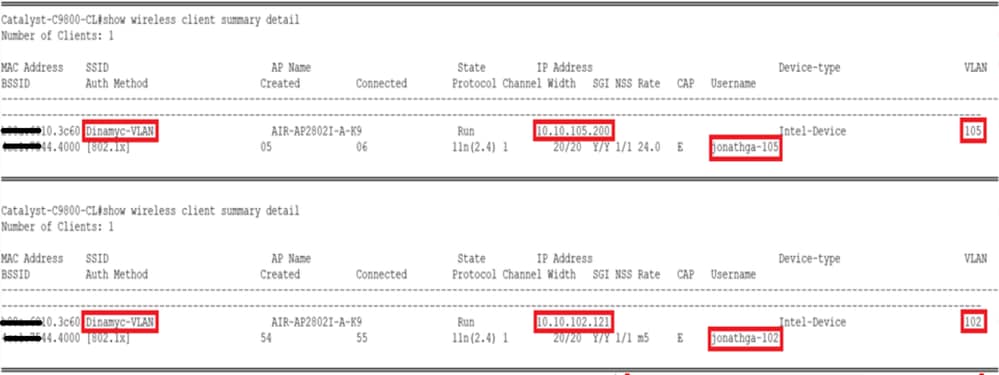
- It is possible to enable the
Radioactive tracesto ensure successful transfer of the RADIUS attributes to the WLC. In order to do so, do these steps:- From the controller GUI, navigate to
Troubleshooting > Radioactive Trace > +Add. - Enter the Mac Address of the wireless client.
- Select
Start. - Connect the client with the WLAN.
- Navigate to
Stop > Generate > Choose 10 minutes > Apply to Device > Select the trace file to download the log.
- From the controller GUI, navigate to
This portion of the trace output ensures a successful transmission of RADIUS attributes:
2021/03/21 22:22:45.236 {wncd_x_R0-0}{1}: [radius] [25253]: (info): RADIUS: Received from id 1812/60 10.10.1.24:0, Access-Accept, len 352
2021/03/21 22:22:45.236 {wncd_x_R0-0}{1}: [radius] [25253]: (info): RADIUS:  authenticator e5 5e 58 fa da 0a c7 55 - 53 55 7d 43 97 5a 8b 17
2021/03/21 22:22:45.236 {wncd_x_R0-0}{1}: [radius] [25253]: (info): RADIUS:  User-Name           [1]     13  "smith-102"
2021/03/21 22:22:45.236 {wncd_x_R0-0}{1}: [radius] [25253]: (info): RADIUS:  State               [24]    40  ...
2021/03/21 22:22:45.236 {wncd_x_R0-0}{1}: [radius] [25253]: (info): RADIUS:  Class               [25]    54  ...
2021/03/21 22:22:45.236 {wncd_x_R0-0}{1}: [radius] [25253]: (info): 01:
2021/03/21 22:22:45.236 {wncd_x_R0-0}{1}: [radius] [25253]: (info): RADIUS:  Tunnel-Type         [64]     6  VLAN                   [13]
2021/03/21 22:22:45.236 {wncd_x_R0-0}{1}: [radius] [25253]: (info): 01:
2021/03/21 22:22:45.236 {wncd_x_R0-0}{1}: [radius] [25253]: (info): RADIUS:  Tunnel-Medium-Type  [65]     6  ALL_802                [6]
2021/03/21 22:22:45.236 {wncd_x_R0-0}{1}: [radius] [25253]: (info): RADIUS:  EAP-Message         [79]     6  ...
2021/03/21 22:22:45.236 {wncd_x_R0-0}{1}: [radius] [25253]: (info): RADIUS:  Message-Authenticator[80]    18  ...
2021/03/21 22:22:45.236 {wncd_x_R0-0}{1}: [radius] [25253]: (info): 01:
2021/03/21 22:22:45.236 {wncd_x_R0-0}{1}: [radius] [25253]: (info): RADIUS:  Tunnel-Private-Group-Id[81]     6  "102"
2021/03/21 22:22:45.236 {wncd_x_R0-0}{1}: [radius] [25253]: (info): RADIUS:  EAP-Key-Name        [102]   67  *
2021/03/21 22:22:45.237 {wncd_x_R0-0}{1}: [radius] [25253]: (info): RADIUS:   MS-MPPE-Send-Key   [16]    52  *
2021/03/21 22:22:45.237 {wncd_x_R0-0}{1}: [radius] [25253]: (info): RADIUS:   MS-MPPE-Recv-Key   [17]    52  *
2021/03/21 22:22:45.238 {wncd_x_R0-0}{1}: [eap-auth] [25253]: (info): SUCCESS for EAP method name: PEAP on handle 0x0C000008

2021/03/21 22:22:46.700 {wncd_x_R0-0}{1}: [aaa-attr-inf] [25253]: (info): [ Applied attribute :            username   0 "smith-102" ]
2021/03/21 22:22:46.700 {wncd_x_R0-0}{1}: [aaa-attr-inf] [25253]: (info): [ Applied attribute :               class   0 43 41 43 53 3a 33 33 30 32 30 41 30 41 30 30 30 30 30 30 33 35 35 36 45 32 32 31 36 42 3a 49 53 45 2d 32 2f 33 39 33 33 36 36 38 37 32 2f 31 31 32 36 34 30  ]
2021/03/21 22:22:46.700 {wncd_x_R0-0}{1}: [aaa-attr-inf] [25253]: (info): [ Applied attribute :         tunnel-type   1 13 [vlan] ]
2021/03/21 22:22:46.700 {wncd_x_R0-0}{1}: [aaa-attr-inf] [25253]: (info): [ Applied attribute :  tunnel-medium-type   1 6 [ALL_802] ]
2021/03/21 22:22:46.700 {wncd_x_R0-0}{1}: [aaa-attr-inf] [25253]: (info): [ Applied attribute :tunnel-private-group-id   1 "102" ]
2021/03/21 22:22:46.700 {wncd_x_R0-0}{1}: [aaa-attr-inf] [25253]: (info): [ Applied attribute :             timeout   0 1800 (0x708) ]
2021/03/21 22:22:46.700 {wncd_x_R0-0}{1}: [auth-mgr-feat_wireless] [25253]: (info): [0000.0000.0000:unknown] AAA override is enabled under policy profile
Troubleshoot
There is currently no specific troubleshooting information available for this configuration.
Related Information
Revision History
| Revision | Publish Date | Comments |
|---|---|---|
3.0 |
11-Apr-2024 |
Recertification |
2.0 |
02-Jun-2022 |
Resized images |
1.0 |
14-Apr-2021 |
Initial Release |
Contributed by Cisco Engineers
- Jonathan de Jesus GarciaCisco TAC Engineer
- Jose Pablo MunozCisco TAC Engineer
Contact Cisco
- Open a Support Case

- (Requires a Cisco Service Contract)
 Feedback