Introduction
This article will explain how to transfer and install various patches on CMX 10.6 and above. Patch installation is commonly needed to fix certain bugs (like CSCvp92122  ) or to gain root access (usually needed for advanced TAC troubleshooting) which was removed starting with 10.6.0 due to FIPS/CC/UCAPL compliance. In order to obtain the patches, you must open a case Cisco TAC.
Components used
All tests and examples were performed on CMX 10.6.1 running on Cisco 3375 appliance, MacOS 10.14 and Windows 10, 1903 build.
Transfer a file to CMX
File transferring to CMX will be done using SCP. It requires port 22 to be allowed between CMX and the machine that the file will be transferred from. Windows users can GUI based tools like WinSCP, while MacOS and most Linux distributions support SCP natively.
Windows
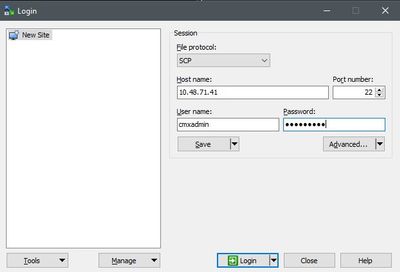
Open WinSCP, set protocol to SCP and specify IP address and credentials of the CMX:

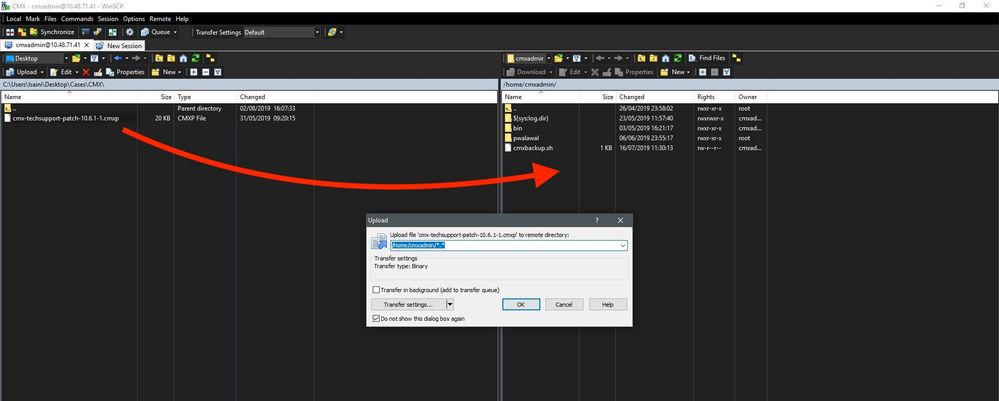
Once logged in, drag and drop the CMX patch file from left to right side:

Note: Once you SCP into the CMX, you will not be able to navigate through the folders as command "cd" is restricted for cmxadmin user, causing the following error to pop up:

MacOS & Linux
From terminal, run the following command:
$ scp <file_path_and_name_on_local_machine> cmxadmin@<cmx_ip_address>:/home/cmxadmin
Example:
$ scp /Users/vaperovi/cmx-techsupport-patch-10.6.1-1.cmxp cmxadmin@10.48.71.41:/home/cmxadmin
cmxadmin@10.48.71.41's password:
cmx-techsupport-patch-10.6.1-1.cmxp                                                  100%   20KB 200.3KB/s   00:00
Patch installation
Patch will be installed using cmxos patch install command:
[cmxadmin@mse3375 ~]$ cmxos patch install
Please enter the patch file name: cmx-techsupport-patch-10.6.1-1.cmxp

** Checking patch file integrity

Patch file integrity passed.

** Extract patch file contents.
Verifying patch signature.
Verification signature output: Verified OK

Patch file verification successful for /home/cmxadmin/cmx-techsupport-patch-10.6.1-1.cmxp.

** Installing patch RPM: /opt/image/patches/cmx-techsupport-patch-10.6.1-1.x86_64.rpm extracted from patch file: /home/cmxadmin/cmx-techsupport-patch-10.6.1-1.cmxp

** Patch installed successfully

** Patch completed successfully.
Note: Root patches are specific to CMX version, meaning 10.6.0 root patch cannot be installed on CMX 10.6.1 and vice versa
Installing the root patch on CMX 10.6.3
Starting CMX 10.6.3, there is an additional step that needs to be taken while installing the patch. Once the "cmxos patch install" command is initiated and the filename of the root patch for 10.6.3 is entered, you will be prompted to enter the root password. This is because the version 10.6.3 does not ask the user to enter the root password during the initial deployment of the CMX like in earlier releases.
In case of High Availability
Patches install only on the appliance you install them on and are not automatically rolled over to the secondary appliance. It is advised to install feature patches (patches fixing a specific feature or issue) on both appliances at the same time to avoid replication issues.
A root patch is fine to install only on one appliance though as it touches things that do not pertain to replication. There is no need to actually break the HA configuration/pairing, unless the patch you are installing is fixing HA issues.
Note: Upgrades (e.g. from 10.6.1 to 10.6.2) are not considered as patches and do require to break the HA
