Local EAP Authentication on the Wireless LAN Controller with EAP-FAST and LDAP Server Configuration Example
Available Languages
Contents
Introduction
This document explains how to configure Extensible Authentication Protocol (EAP) - Flexible Authentication via Secure Tunneling (FAST) Local EAP authentication on a Wireless LAN Controller (WLC). This document also explains how to configure Lightweight Directory Access Protocol (LDAP) server as the backend database for Local EAP to retrieve user credentials and authenticate the user.
Prerequisites
Requirements
There are no specific requirements for this document.
Components Used
The information in this document is based on these software and hardware versions:
-
Cisco 4400 Series WLC that runs firmware 4.2
-
Cisco Aironet 1232AG Series Lightweight Access Point (LAP)
-
Microsoft Windows 2003 server configured as domain controller, LDAP server as well as Certificate Authority server.
-
Cisco Aironet 802.11 a/b/g Client Adapter that runs firmware release 4.2
-
Cisco Aironet Desktop Utility (ADU) that runs firmware version 4.2
The information in this document was created from the devices in a specific lab environment. All of the devices used in this document started with a cleared (default) configuration. If your network is live, make sure that you understand the potential impact of any command.
Conventions
Refer to the Cisco Technical Tips Conventions for more information on document conventions.
Background Information
Local EAP authentication on Wireless LAN Controllers was introduced with Wireless LAN Controller version 4.1.171.0.
Local EAP is an authentication method that allows users and wireless clients to be authenticated locally on the controller. It is designed for use in remote offices that want to maintain connectivity to wireless clients when the backend system becomes disrupted or the external authentication server goes down. When you enable local EAP, the controller serves as the authentication server and the local user database, so it removes dependence on an external authentication server. Local EAP retrieves user credentials from the local user database or the LDAP backend database to authenticate users. Local EAP supports LEAP, EAP-FAST, EAP-TLS, P EAPv0/MSCHAPv2, and PEAPv1/GTC authentication between the controller and wireless clients.
Local EAP can use an LDAP server as its backend database to retrieve user credentials.
An LDAP backend database allows the controller to query an LDAP server for the credentials (username and password) of a particular user. These credentials are then used to authenticate the user.
The LDAP backend database supports these Local EAP methods:
-
EAP-FAST/GTC
-
EAP-TLS
-
PEAPv1/GTC.
LEAP, EAP-FAST/MSCHAPv2, and PEAPv0/MSCHAPv2 are also supported, but only if the LDAP server is set up to return a clear-text password. For example, Microsoft Active Directory is not supported because it does not return a clear-text password. If the LDAP server cannot be configured to return a clear-text password, LEAP, EAP-FAST/MSCHAPv2, and PEAPv0/MSCHAPv2 are not supported.
Note: If any RADIUS servers are configured on the controller, the controller tries to authenticate the wireless clients using the RADIUS servers first. Local EAP is attempted only if no RADIUS servers are found, either because the RADIUS servers timed out or no RADIUS servers were configured. If four RADIUS servers are configured, the controller attempts to authenticate the client with the first RADIUS server, then the second RADIUS server, and then local EAP. If the client attempts to then reauthenticate manually, the controller tries the third RADIUS server, then the fourth RADIUS server, and then local EAP.
This example uses EAP-FAST as the Local EAP method on the WLC, which in turn is configured to query the LDAP backend database for user credentials of a wireless client.
Configure
This document uses EAP-FAST with certificates on both the client and the server side. For this, the setup uses Microsoft Certificate Authority (CA) server to generate the client and server certificates.
The user credentials are stored in the LDAP server so that on successful certificate validation, the controller queries the LDAP server in order to retrieve the user credentials and authenticates the wireless client.
This document assumes that these configurations are already in place:
-
A LAP is registered to the WLC. Refer to Lightweight AP (LAP) Registration to a Wireless LAN Controller (WLC) for more information on the registration process.
-
A DHCP server is configured to assign an IP address to the wireless clients.
-
Microsoft Windows 2003 server is configured as domain controller as well as CA server. This example uses wireless.com as the domain.
Refer to Configuring Windows 2003 as a Domain Controller for more information on configuring a Windows 2003 server as a domain controller.
Refer to Install and Configure the Microsoft Windows 2003 Server as a Certificate Authority (CA) Server in order to configure Windows 2003 server as Enterprise CA server.
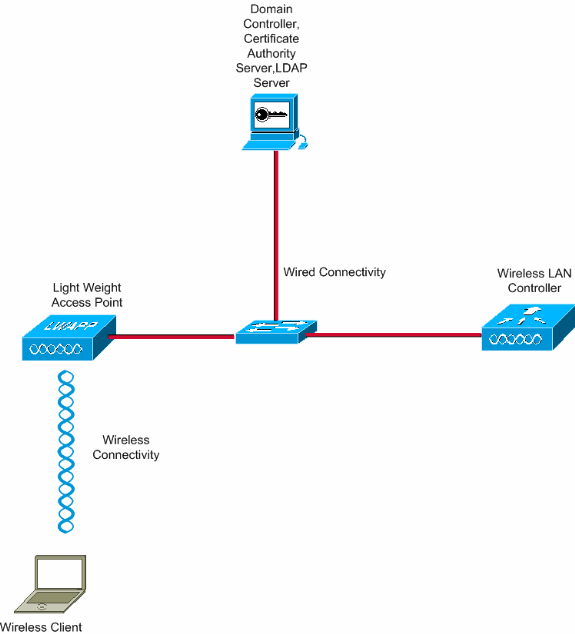
Network Diagram
This document uses this network setup:
Configurations
Complete these steps in order to implement this configuration:
Configure EAP-FAST as Local EAP Authentication Method on the WLC
As mentioned earlier, this document uses EAP-FAST with certificates on both the client and the server side as the Local EAP authentication method. The first step is to download and install the following certificates to the server (WLC, in this case) and the client.
The WLC and the client each need these certificates to be downloaded from the CA server:
-
Device Certificate (one for the WLC and one for the client)
-
Root Certificate of the Public Key Infrastructure (PKI) for the WLC, and CA Certificate for the client
Generate a Device Certificate for the WLC
Perform these steps in order to generate a device certificate for the WLC from the CA server. This device certificate is used by the WLC to authenticate to the client.
-
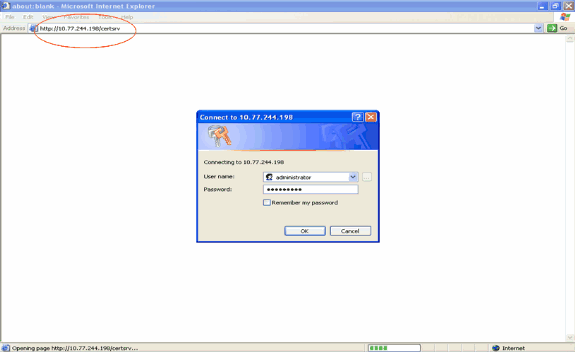
Go to http://<IP address of CA server>/certsrv from your PC which has a network connection to the CA server. Log in as the administrator of the CA server.
-
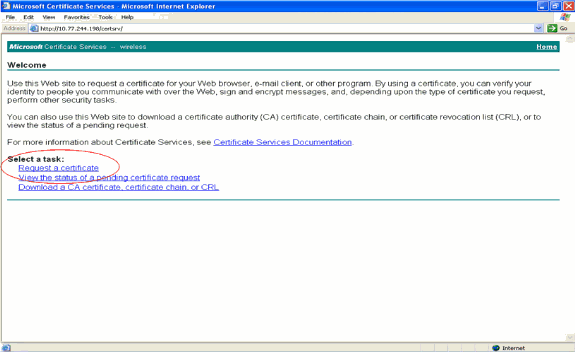
Select Request a certificate.
-
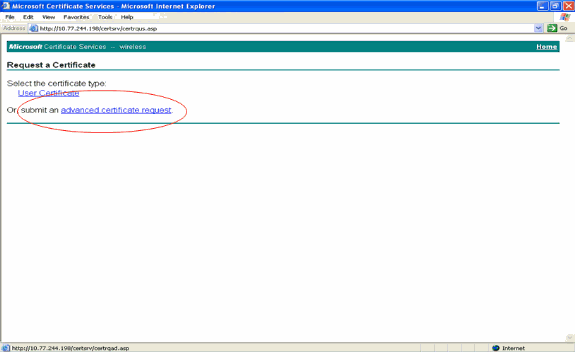
In the Request a Certificate page, click advanced certificate request.
-
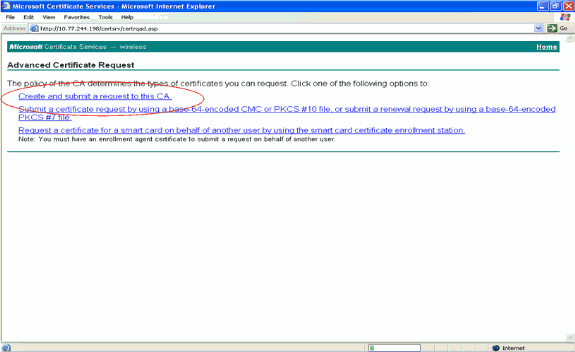
In the Advanced Certificate Request page, click Create and submit a request to this CA. This takes you to the Advanced certificate request form.
-
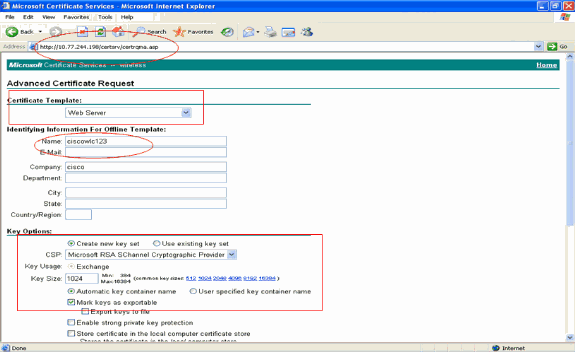
In the Advanced Certificate request form, choose Web Server as the Certificate Template. Then, specify a name to this device certificate.
This examples uses the certificate name as ciscowlc123. Fill in the other identifying information as per your requirement.
-
Under the Key Options section, select the Mark Keys as Exportable option. Sometimes, this particular option will be greyed out and cannot be enabled or disabled if you choose a web server template. In such cases, click Back from the browser menu to go one page back and again come back to this page. This time the Mark Keys as Exportable option should be available.
-
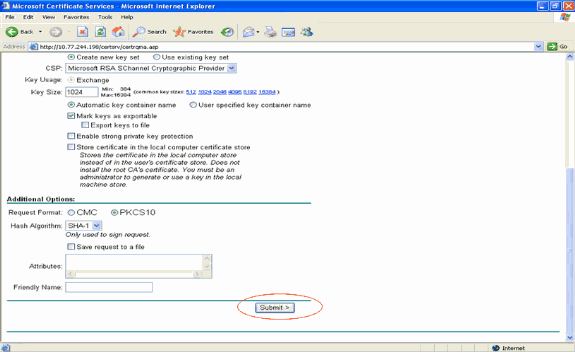
Configure all the other necessary fields and click Submit.
-
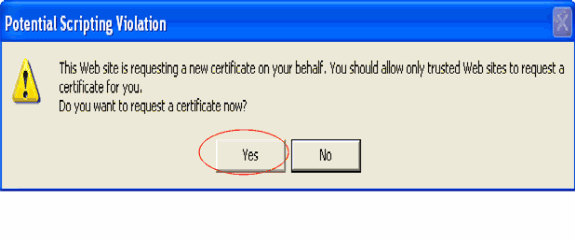
Click Yes in the next window in order to allow the certificate request process.
-
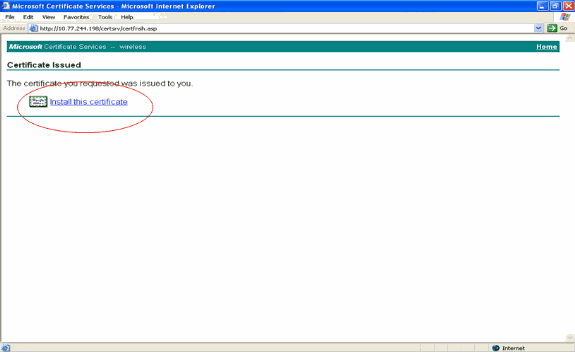
The Certificate Issued window appears which indicates a successful certificate request process. The next step is to install the issued certificate to the certificate store of this PC. Click Install this certificate.
-
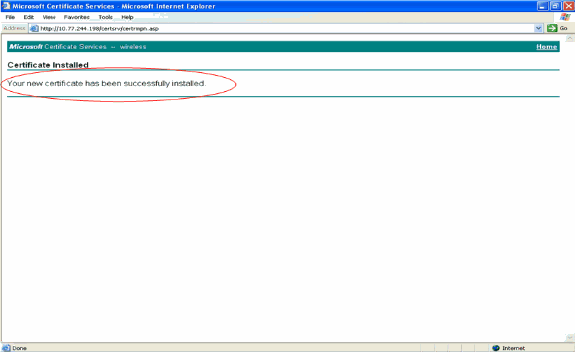
The new certificate is installed successfully to the PC from where the request is generated to the CA server.
-
The next step is to export this certificate from the certificate store to the hard disk as a file. This certificate file will later be used to download the certificate to the WLC.
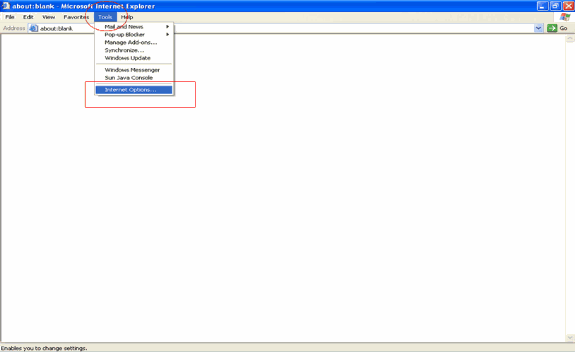
In order to export the certificate from the certificate store, open the Internet Explorer browser, then click Tools > Internet Options.
-
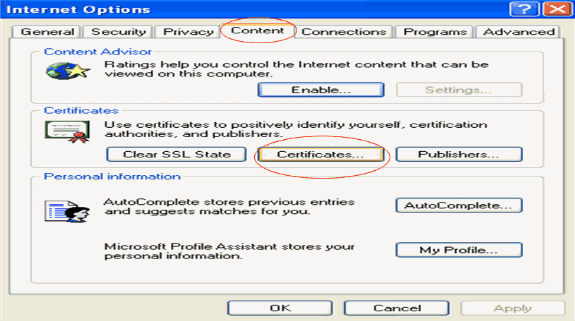
Click Content > Certificates in order to go to the certificate store where the certificates are installed by default.
-
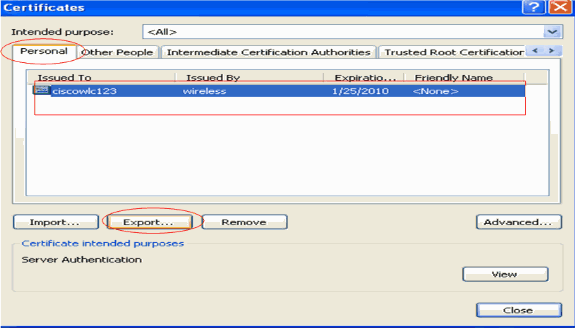
The device certificates are usually installed under the Personal certificate list. Here, you should see the newly installed certificate. Select the certificate and click Export.
-
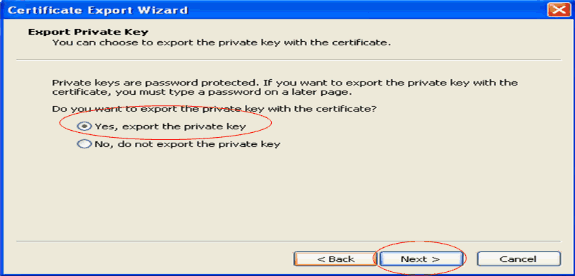
Click Next in the following windows. Choose the Yes, export the private key option in the Certificate Export Wizard window. Click Next.
-
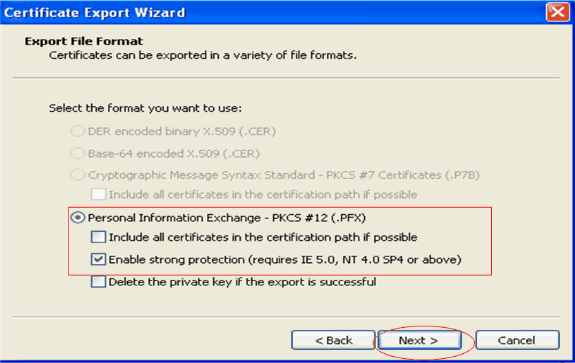
Choose the export file format as .PFX and choose the Enable strong protection option. Click Next.
-
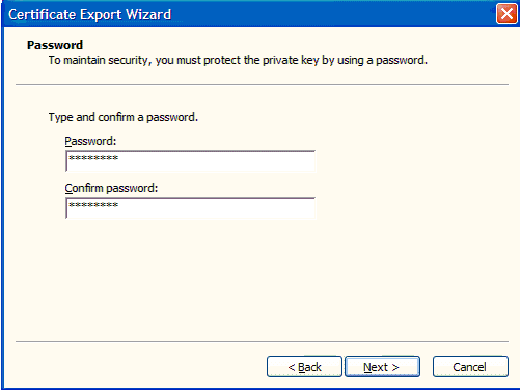
In the Password window, enter a password. This example uses cisco as the password.
-
Save the certificate file (.PFX file) to your hard disk. Click Next and finish the export process successfully.
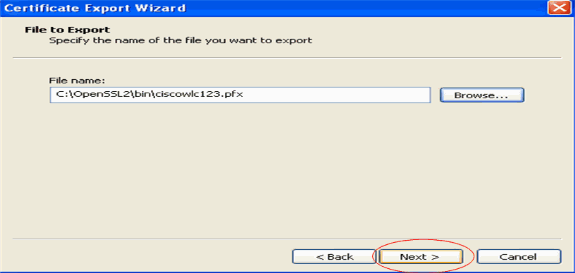
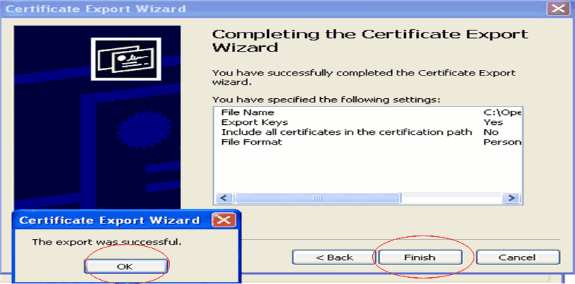
Downloading the Device Certificate onto the WLC
Now that the WLC device certificate is available as a .PFX file, the next step is to download the file to the controller. Cisco WLCs accept certificates only in .PEM format. Therefore, you need to first convert the .PFX or PKCS12 format file to a PEM file using the openSSL program.
Convert the Certificate in PFX to PEM Format Using the openSSL Program
You can copy the certificate to any PC where you have openSSL installed to convert it to PEM format. Enter these commands on the Openssl.exe file in the bin folder of the openSSL program:
Note: You can download openSSL from the OpenSSL ![]() website.
website.
openssl>pkcs12 -in ciscowlc123.pfx  -out ciscowlc123.pem


!--- ciscowlc123 is the name used in this example for the exported file. !--- You can specify any name to your certificate file.

Enter Import Password : cisco

!--- This is the same password that is mentioned in step 16 of the previous section.

 MAC verified Ok
 Enter PEM Pass phrase   :  cisco

!--- Specify any passphrase here. This example uses the PEM passphrase as cisco.

 Verifying - PEM pass phrase : cisco
The certificate file is converted to PEM format. The next step is to download the PEM format device certificate to the WLC.
Note: Before that, you need a TFTP server software on your PC from where the PEM file is going to be downloaded. This PC should have connectivity to the WLC. The TFTP server should have its current and base directory specified with the location where the PEM file is stored.
Download the Converted PEM Format Device Certificate to the WLC
This example explains the download process through the CLI of the WLC.
-
Login to the controller CLI.
-
Enter the transfer download datatype eapdevcert command.
-
Enter the transfer download serverip 10.77.244.196 command.
10.77.244.196 is the IP address of the TFTP server.
-
Enter the transfer download filename ciscowlc.pem command.
ciscowlc123.pem is the file name used in this example.
-
Enter the transfer download certpassword command to set the password for the certificate.
-
Enter the transfer download start command to view the updated settings.
Then, answer y when prompted to confirm the current settings and start the download process.
This example shows the download command output:
(Cisco Controller) >transfer download start Mode............................................. TFTP Data Type........................................ Vendor Dev Cert TFTP Server IP................................... 10.77.244.196 TFTP Packet Timeout.............................. 6 TFTP Max Retries................................. 10 TFTP Path........................................ TFTP Filename.................................... ciscowlc.pem This may take some time. Are you sure you want to start? (y/N) y TFTP EAP CA cert transfer starting. Certificate installed. Reboot the switch to use the new certificate. Enter the reset system command to reboot the controller. The controller is now loaded with the device certificate. -
Enter the reset system command to reboot the controller. The controller is now loaded with the device certificate.
Install the Root Certificate of PKI into the WLC
Now that the device certificate is installed in the WLC, the next step is to install the Root Certificate of the PKI to the WLC from the CA server. Perform these steps :
-
Go to http://<IP address of CA server>/certsrv from your PC which has a network connection to the CA server. Login as the administrator of the CA server.
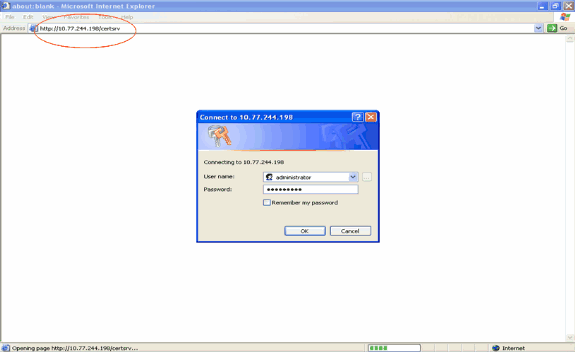
-
Click Download a CA certificate, certificate chain, or CRL.
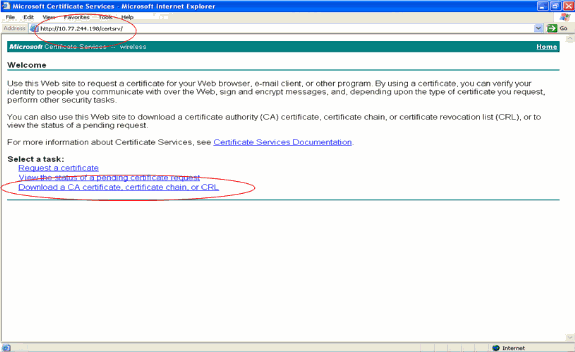
-
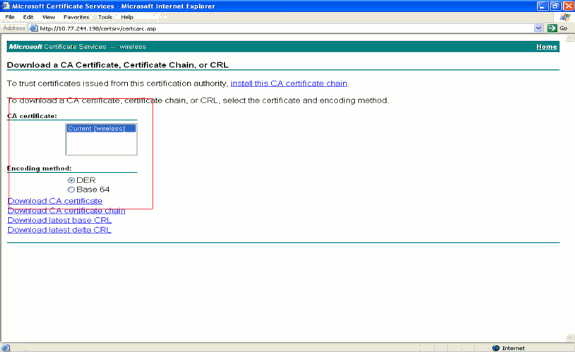
In the resultant page, you can see the current CA certificates available on the CA server under the CA certificate box. Choose DER as the Encoding method and click Download CA certificate.
-
Save the certificate as a .cer file. This example uses certnew.cer as the file name.
-
The next step is to convert the .cer file to PEM format and download it to the controller. In order to perform these steps, repeat the same procedure explained in the Downloading the Device Certificate to the WLC section with these changes:
-
The openSSL "-in" and "-out" files are certnew.cer and certnew.pem.
Also, no PEM pass phrase or import passwords are required in this process.
-
Also, the openSSL command to convert the .cer file to the .pem file is:
x509 -in certnew.cer -inform DER -out certnew.pem -outform PEM
-
In step 2 of the Download the Converted PEM Format Device Certificate to the WLC section, the command to download the certificate to the WLC is:
(Cisco Controller)>transfer download datatype eapcacert
-
The file to be downloaded to the WLC is certnew.pem.
-
You can verify whether the certificates are installed on the WLC from the controller GUI as follows:
-
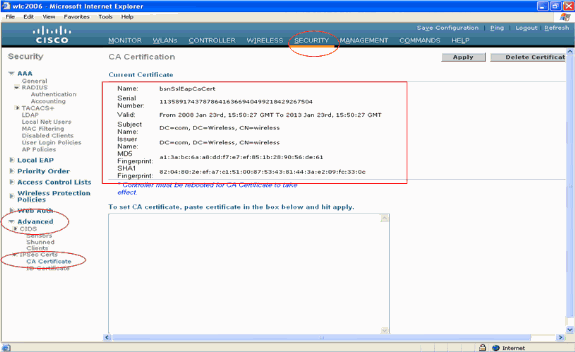
From the WLC GUI, click Security. In the Security page, click Advanced > IPSec Certs from the tasks that appear on the left. Click CA Certificate in order to view the CA certificate installed. Here is the example:
-
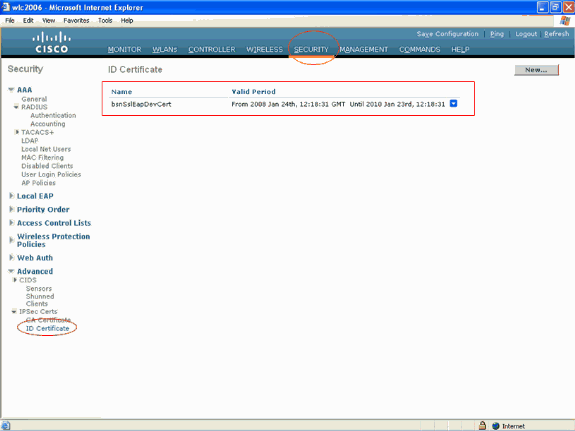
In order to verify whether the device certificate is installed on the WLC, from the WLC GUI, click Security. In the Security page, click Advanced > IPSec Certs from the tasks that appear on the left. Click ID Certificate in order to view the device certificate installed. Here is the example:
Generate a Device Certificate for the Client
Now that the device certificate and the CA certificate are installed on the WLC, the next step is to generate these certificates for the client.
Perform these steps in order to generate the device certificate for the client. This certificate will be used by the client to authenticate to the WLC. This document explains the steps involved in generating certificates for Windows XP professional client.
-
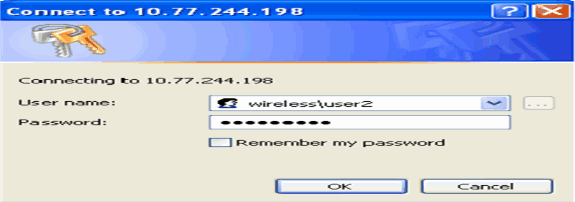
Go to http://<IP address of CA server>/certsrv from the client that requires the certificate to be installed. Login as domain name\username to the CA server. The username should be the name of the user who is using this XP machine, and the user should already be configured as part of the same domain as the CA server.
-
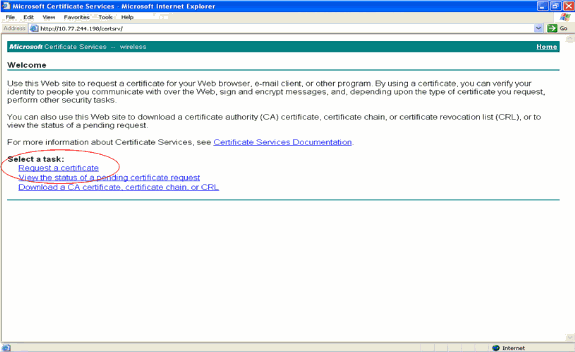
Select Request a certificate.
-
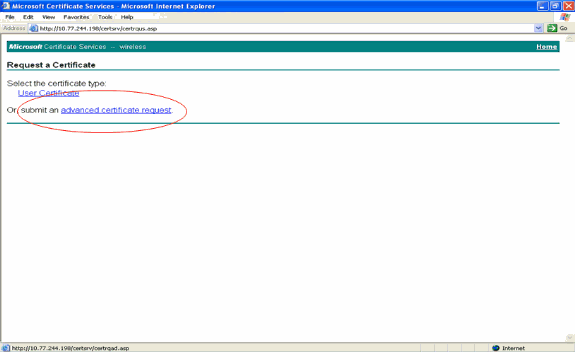
In the Request a Certificate page, click advanced certificate request.
-
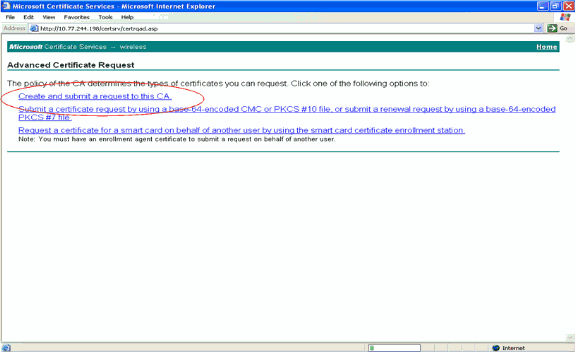
In the Advanced Certificate Request page, click Create and submit a request to this CA. This takes you to the Advanced Certificate request form.
-
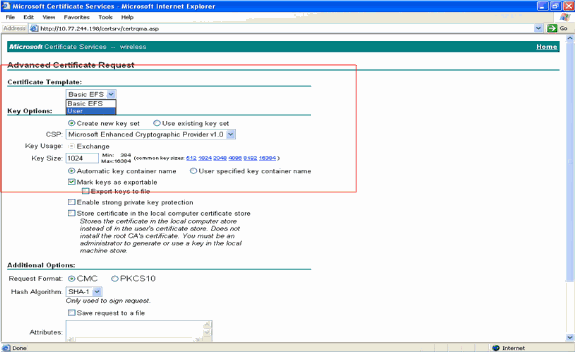
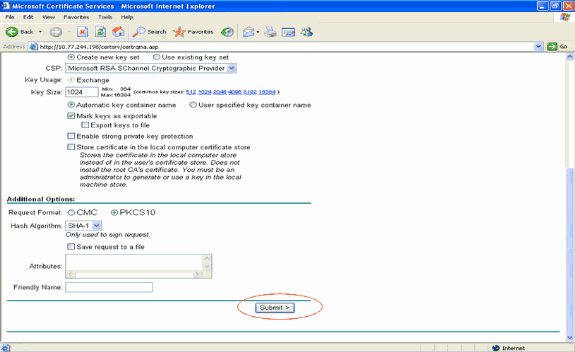
In the Advanced Certificate request form, choose User from the Certificate Template drop-down menu.
Under the Key options section, choose these parameters:
Enter the Key Sizein the Key Size field. This example uses 1024.
Check the Mark Keys as Exportable option.
-
Configure all the other necessary fields and click Submit.
-
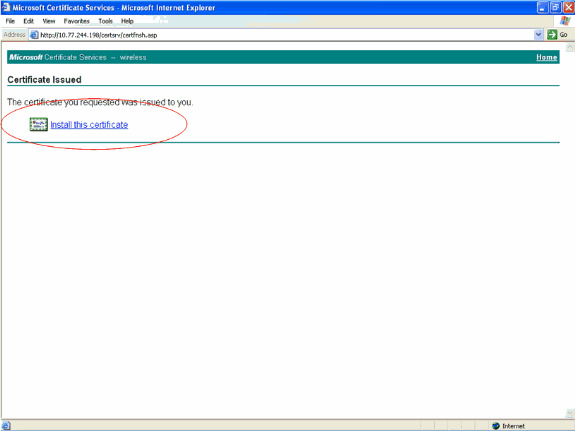
The client's device certificate is now generated as per the request. Click Install the certificate in order to install the certificate to the certificate store.
-
You should be able to find the client's device certificate installed under the Personal certificate list under Tools > Internet Options > Content > Certificates on the client's IE browser.
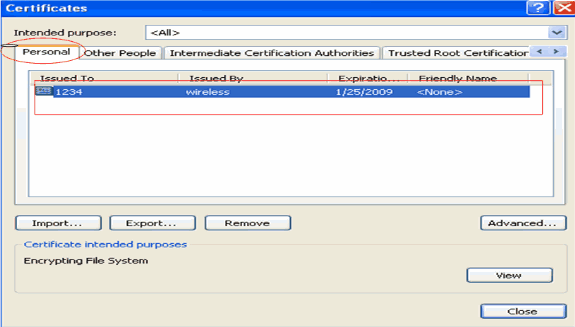
The device certificate for the client is installed on the client.
Generate the Root CA Certificate for the Client
The next step is to generate the CA certificate for the client. Complete these steps from the client PC:
-
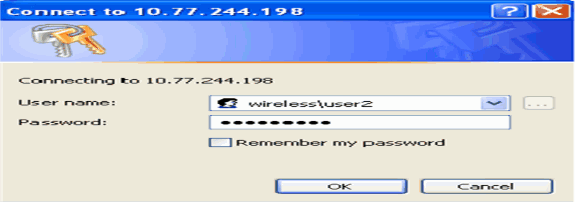
Go to http://<IP address of CA server>/certsrv from the client that requires the certificate to be installed. Login as domain name\username to the CA server. The username should be the name of the user who is using this XP machine, and the user should already be configured as part of the same domain as the CA server.
-
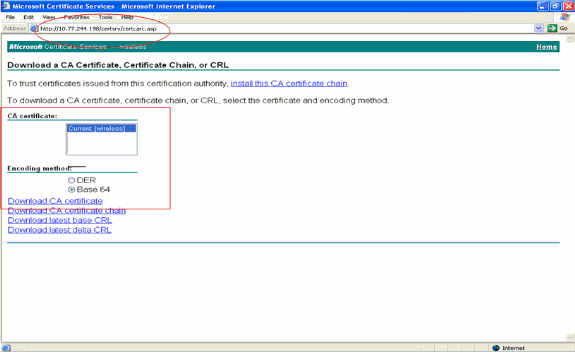
In the resultant page, you can see the current CA certificates available on the CA server under the CA certificate box. Choose Base 64 as the Encoding method. Then, click Download CA certificate and save the file to the client's PC as a .cer file. This example uses rootca.cer as the file name.
-
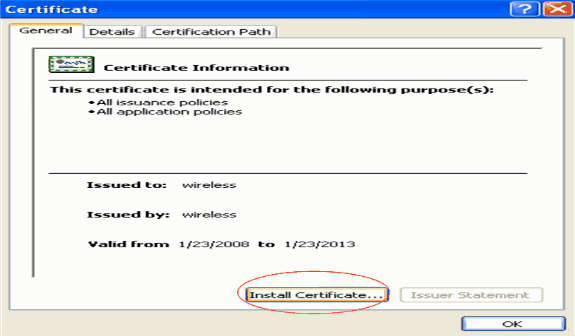
Next, install the CA certificate saved in .cer format to the client's certificate store. Double-click on the rootca.cer file and click Install Certificate.
-
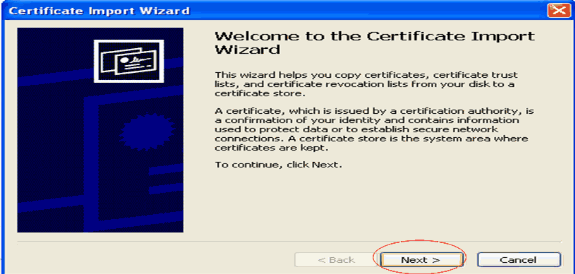
Click Next in order to import the certificate from the client's hard disk to the certificate store.
-
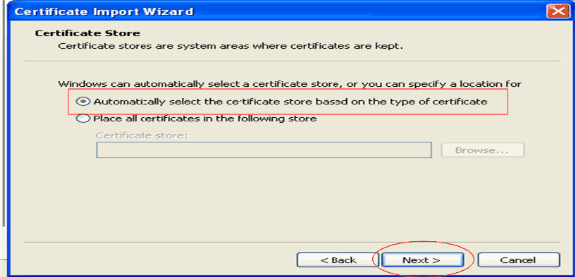
Choose Automatically select the certificate store based on the type of certificate and click Next.
-
Click Finish in order to finish the Import process.
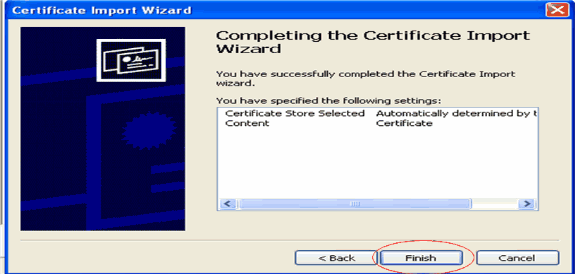
-
By default, CA certificates are installed under the Trusted Root Certification Authorities list on the client's IE browser under Tools > Internet Options > Content > Certificates. Here is the example:
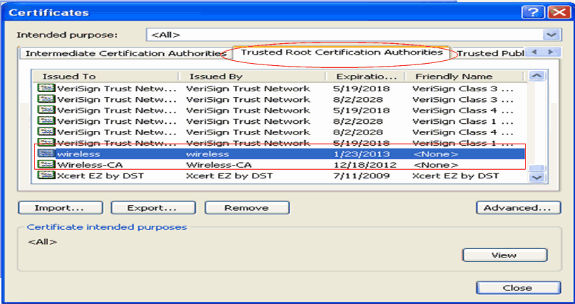
All the certificates required are installed on the WLC as well as the client for EAP-FAST Local EAP authentication. The next step is to configure the WLC for Local EAP authentication.
Configure Local EAP on the WLC
Complete these steps from the WLC GUI mode in order to configure Local EAP authentication on the WLC:
-
Click Security > Local EAP.
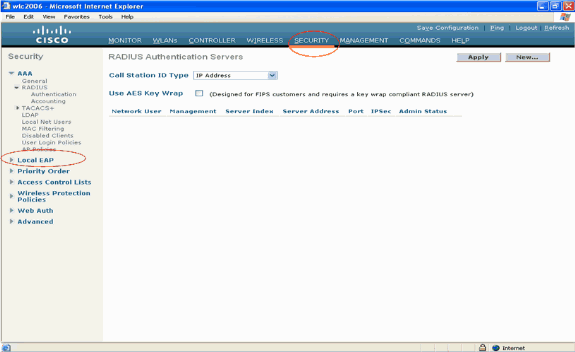
-
Under Local EAP, click Profiles in order to configure the Local EAP profile.
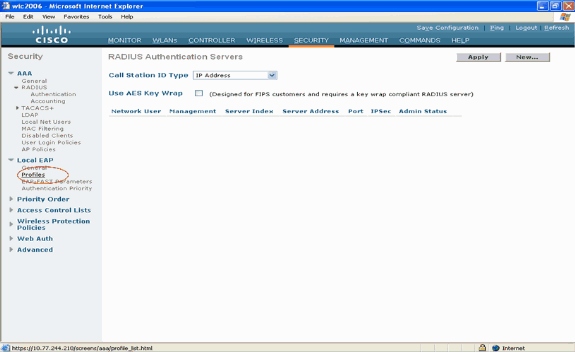
-
Click New in order to create a new Local EAP profile.
-
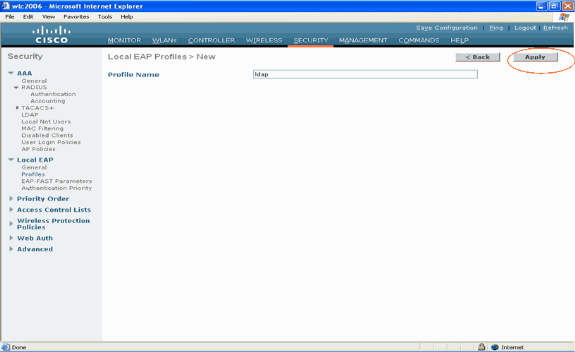
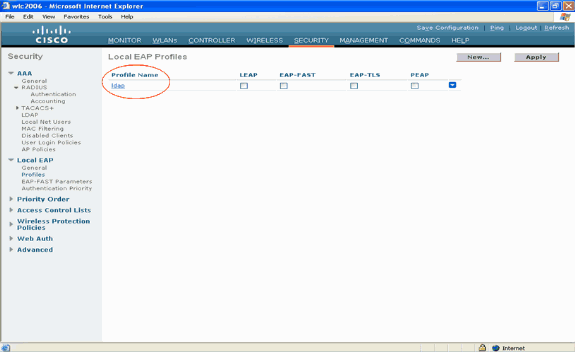
Configure a name for this profile and click Apply. In this example, the profile name is ldap. This takes you to the Local EAP Profiles created on the WLC.
-
Click the ldap profile that was just created, which appears under the Profile Name field of the Local EAP Profiles page. This takes you to the Local EAP Profiles > Edit page.
-
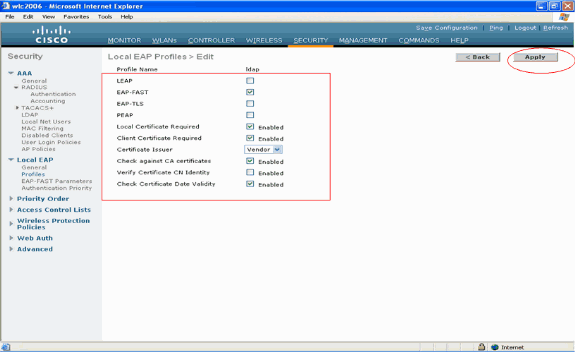
Configure the parameters specific to this profile on the Local EAP Profiles > Edit page.
-
Choose EAP-FAST as the Local EAP authentication method.
-
Enable the check boxes next to Local Certificate Required and Client Certificate Required.
-
Choose Vendor as the Certificate Issuer because this document uses a third party CA server.
-
Enable the check box next to Check against CA certificates in order to allow the incoming certificate from the client to be validated against the CA certificates on the controller.
-
If you want the common name (CN) in the incoming certificate to be validated against the CA certificates' CN on the controller, check the Verify Certificate CN Identity check box. The default setting is disabled. In order to allow the controller to verify that the incoming device certificate is still valid and has not expired, check the Check Certificate Date Validity check box.
Note: Certificate date validity is checked against the current UTC (GMT) time that is configured on the controller. Time zone offset is ignored.
Click Apply.
-
-
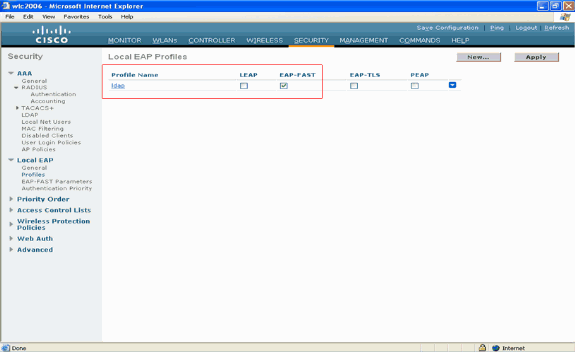
The Local EAP profile with EAP-FAST authentication is now created on the WLC.
-
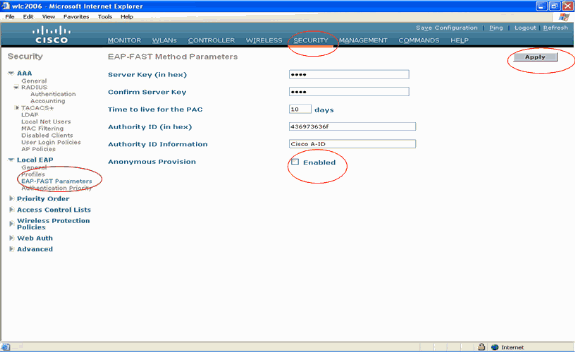
The next step is to configure EAP-FAST specific parameters on the WLC. In the WLC Security page, click Local EAP > EAP-FAST Parameters in order to move to the EAP-FAST Method Parameters page.
Uncheck the Anonymous Provision check box because this example explains EAP-FAST using certificates. Leave all other parameters at their defaults. Click Apply.
Configure WLC with Details of LDAP Server
Now that the WLC is configured with the Local EAP profile and related information, the next step is to configure the WLC with details of the LDAP server. Complete these steps on the WLC:
-
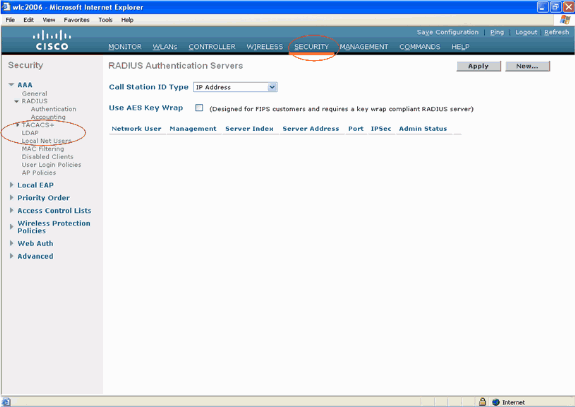
In the Security page of the WLC, select AAA > LDAP from the left side task pane in order to move to the LDAP server configuration page. In order to add an LDAP server, click New. The LDAP Servers > New page appears.
-
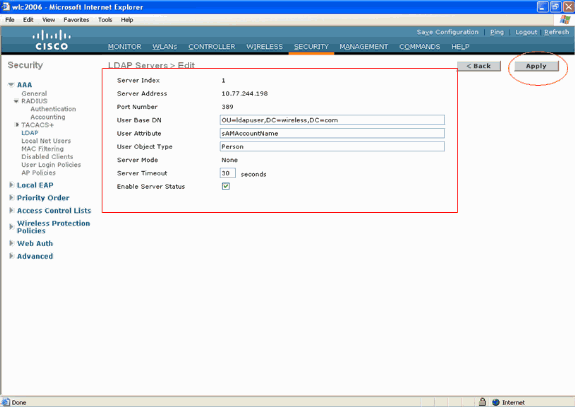
In the LDAP Servers Edit page, specify the details of the LDAP server such as IP address of LDAP server, Port Number, Enable Server status and so on.
-
Choose a number from the Server Index (Priority) drop-down box to specify the priority order of this server in relation to any other configured LDAP servers. You can configure up to seventeen servers. If the controller cannot reach the first server, it tries the second one in the list and so on.
-
Enter the IP address of the LDAP server in the Server IP Address field.
-
Enter the LDAP server's TCP port number in the Port Number field. The valid range is 1 to 65535, and the default value is 389.
-
In the User Base DN field, enter the distinguished name (DN) of the subtree in the LDAP server that contains a list of all the users. For example, ou=organizational unit, .ou=next organizational unit, and o=corporation.com. If the tree containing users is the base DN, enter o=corporation.com or dc=corporation, dc=com.
In this example, the user is located under the Organizational Unit (OU) ldapuser which in turn is created as part of the Wireless.com domain.
The User Base DN should point the full path where the user information (user credential as per EAP-FAST authentication method) is located. In this example, the user is located under the base DN OU=ldapuser, DC=Wireless, DC=com.
More details on OU, as well as user configuration, are explained in the Creating Users on the Domain Controller section of this document.
-
In the User Attribute field, enter the name of the attribute in the user record that contains the username.
In the User Object Type field, enter the value of the LDAP objectType attribute that identifies the record as a user. Often, user records have several values for the objectType attribute, some of which are unique to the user and some of which are shared with other object types.
Note: You can obtain the value of these two fields from your directory server with the LDAP browser utility, which comes as part of the Windows 2003 support tools. This Microsoft LDAP browser tool is called LDP. With the help of this tool, you can know the User Base DN, User Attribute, and User Object Type fields of this particular user. Detailed information about using LDP to know these User specific attributes is discussed in the Using LDP to Identify the User Attributes section of this document.
-
Choose Secure from the Server Mode drop-down box if you want all LDAP transactions to use a secure TLS tunnel. Otherwise, choose None, which is the default setting.
-
In the Server Timeout field, enter the number of seconds between retransmissions. The valid range is 2 to 30 seconds, and the default value is 2 seconds.
-
Check the Enable Server Status check box to enable this LDAP server, or uncheck it to disable. The default value is disabled.
-
Click Apply to commit your changes.
Here is an example already configured with this information:
Now that details about the LDAP server are configured on the WLC, the next step is to configure LDAP as the priority backend database so that the WLC first looks to the LDAP database for user credentials rather than any other databases.
-
Configure LDAP as the Priority Backend Database
Complete these steps on the WLC in order to configure LDAP as the priority backend database:
-
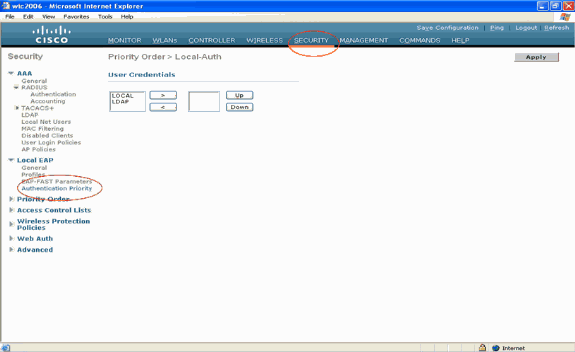
In the Security page, click Local EAP > Authentication Priority. In the Priority Order > Local-Auth page, you can find two databases (Local and LDAP) that can store the user credentials.
In order to make LDAP as the priority database, choose LDAP from the left side user credentials box and click the > button in order to move LDAP to the priority order box on the right side.
-
This example clearly illustrates that LDAP is chosen on the left side box and the > button is selected. As the result, LDAP is moved to the box on the right side that decides the priority. The LDAP database is chosen as the Authentication-priority database.
Click Apply.
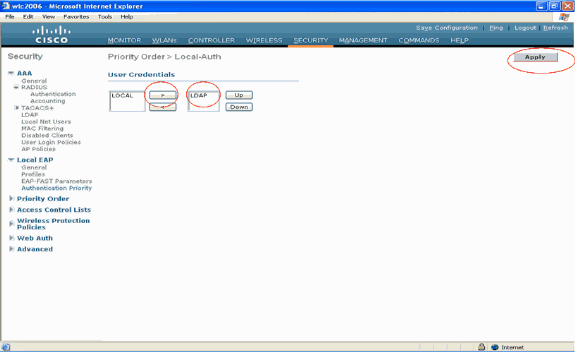
Note: If both LDAP and LOCAL appear in the right User Credentials box with LDAP on the top and LOCAL on the bottom, Local EAP attempts to authenticate clients using the LDAP backend database and fails over to the local user database if the LDAP servers are not reachable. If the user is not found, the authentication attempt is rejected. If LOCAL is on the top, Local EAP attempts to authenticate using only the local user database. It does not fail over to the LDAP backend database.
Configure WLAN on the WLC with Local EAP Authentication
The last step in the WLC is to configure a WLAN that uses Local EAP as its authentication method with LDAP as its backend database. Perform these steps:
-
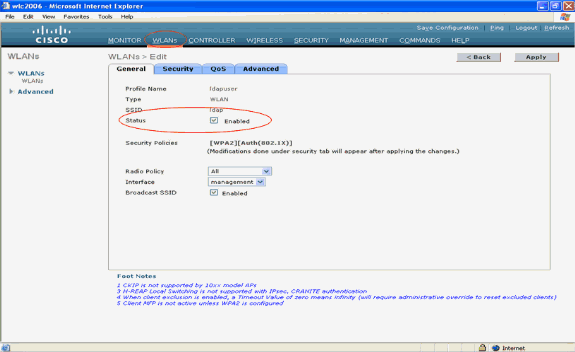
From the Controller Main menu, click WLANs in order to move to the WLANs configuration page. In the WLANs page, click New in order to create a new WLAN. This example creates a new WLAN ldap.
Click Apply The next step is to configure the WLAN parameters in the WLANs > Edit page .
-
In the WLAN edit page, enable the status of this WLAN. Configure all the other necessary parameters.
-
Click Security in order to configure the security related parameters for this WLAN. This example uses Layer 2 security as 802.1x with 104 bits dynamic WEP.
Note: This document uses 802.1x with dynamic WEP as an example. It is recommended to use more secure authentication methods, such as WPA/ WPA2.
-
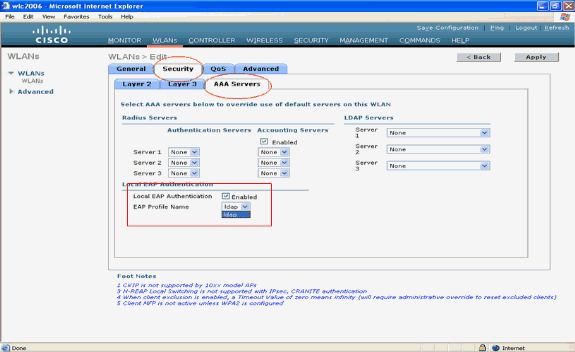
In the WLAN Security configuration page, click theAAA servers tab. In the AAA servers page, enable the Local EAP Authentication method and choose ldap from the drop-down box that corresponds to the EAP Profile Name parameter. This is the Local EAP profile created in this example.
-
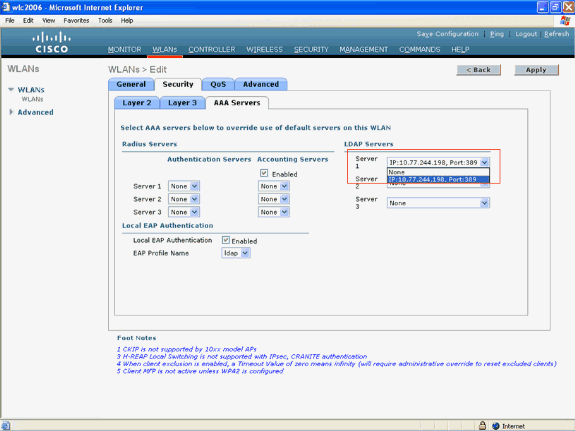
Choose the LDAP server(that was previously configured on the WLC) from the drop-down box . Make sure that the LDAP server is reachable from the WLC.
Click Apply.
-
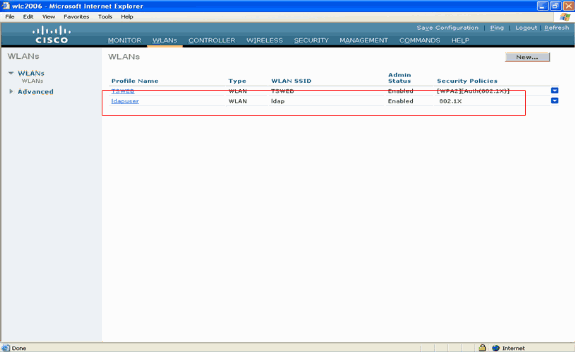
The new WLAN ldaphas been configured on the WLC. This WLAN authenticates clients with Local EAP Authentication (EAP-FAST in this case) and queries an LDAP backend database for client credential validation.
Configure LDAP Server
Now that Local EAP is configured on the WLC, the next step is to configure the LDAP server which serves as a backend database to authenticate the wireless clients upon successful certificate validation.
The first step in configuring the LDAP server is to create a user database on the LDAP server so that the WLC can query this database to authenticate the user.
Creating Users on the Domain Controller
In this example, a new OU ldapuser is created and the user user2 is created under this OU. By configuring this user for LDAP access, the WLC can query this LDAP database for user authentication.
The domain used in this example is wireless.com.
Create a User Database Under an OU
This section explains how to create a new OU in your domain and create a new user on this OU.
-
In the domain controller, click Start > Programs > Administrative Tools > Active Directory Users and Computers in order to launch the Active Directory Users and Computers management console.
-
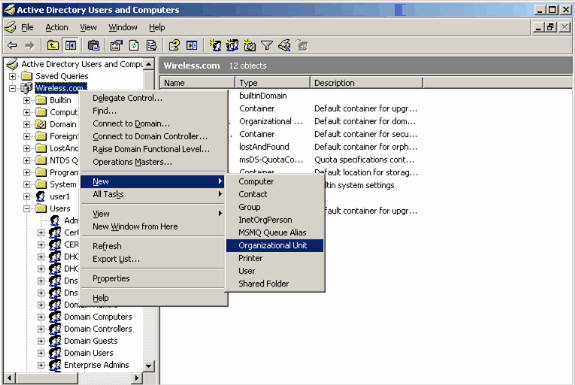
Right-click on your domain name (wireless.com, in this example), then select New > Organizational Unit from the context menu in order to create a new OU.
-
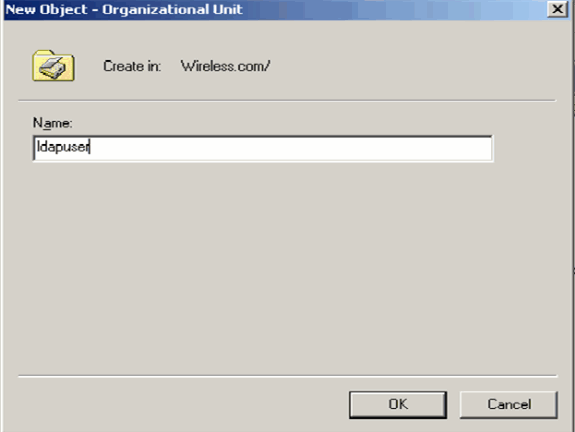
Assign a name to this OU and click OK.
Now that the new OU ldapuser is created on the LDAP server, the next step is to create user user2 under this OU. In order to achieve this, complete these steps:
-
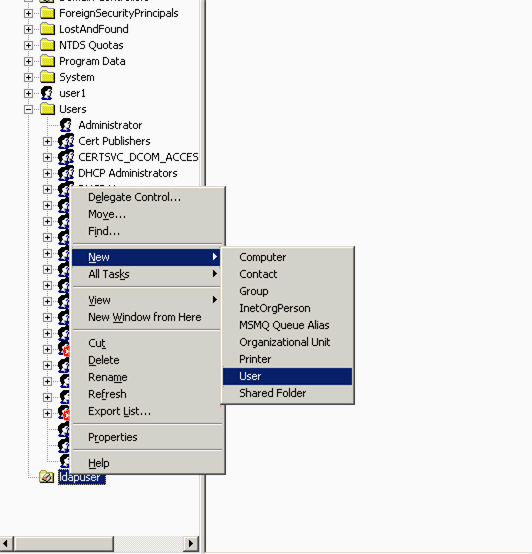
Right-click on the new OU created. Select New > User from the resultant context menus in order to create a new user.
-
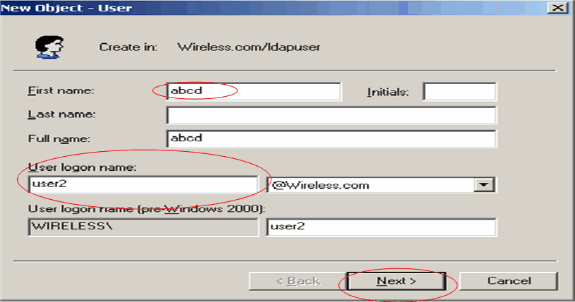
In the User setup page, fill in the required fields as shown in this example. This example has user2 as the User logon name.
This is the username that will be verified in the LDAP database for authenticating the client. This example uses abcd as the First name and Last Name. Click Next.
-
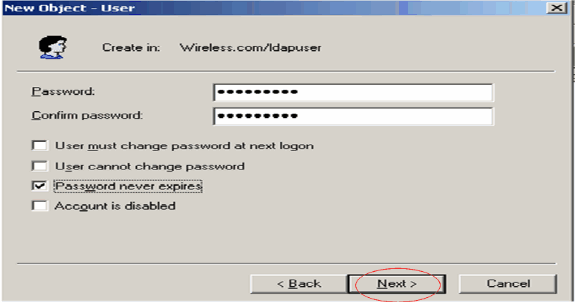
Enter a password and confirm the password. Choose the Password never expires option and click Next.
-
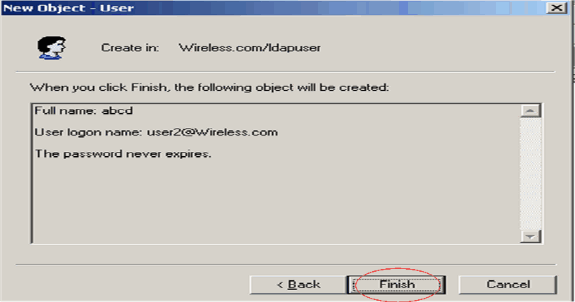
Click Finish.
A new user user2 is created under the OU ldapuser. The user credentials are:
-
username: user2
-
password: Laptop123
-
Now that the user under an OU is created, the next step is to configure this user for LDAP access.
Configure the User for LDAP Access
Perform the steps in this section in order to configure a user for LDAP access.
Enable Anonymous Bind Feature on the Windows 2003 Server
For any third party applications to access Windows 2003 AD on the LDAP, the Anonymous Bind feature should be enabled on Windows 2003. By default, anonymous LDAP operations are not permitted on Windows 2003 domain controllers.
Perform these steps in order to enable Anonymous Bind feature:
-
Launch the ADSI Edit tool from the location Start > Run > Type: ADSI Edit.msc. This tool is part of Windows 2003 support tools.
-
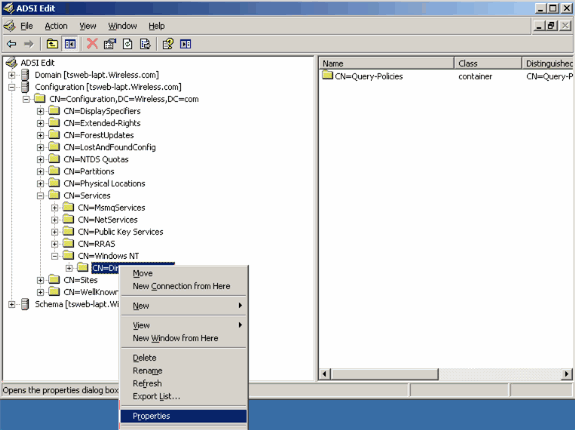
In the ADSI Edit window, expand the Root domain (Configuration [tsweb-lapt.Wireless.com]).
Expand CN=Services > CN=Windows NT > CN=Directory Service. Right-click the CN=Directory Service container and select properties from the context menu.
-
In the CN=Directory Service Properties window, click the dsHeuristics attribute under the Attribute field and choose Edit. In the String Attribute Editor window of this attribute, enter the value 0000002 and click Apply and OK. The Anonymous Bind feature is enabled on Windows 2003 server.
Note: The last (seventh) character is the one that controls the way you can bind to LDAP service. "0" or no seventh character means that anonymous LDAP operations are disabled. Setting the seventh character to "2" enables Anonymous Bind feature.
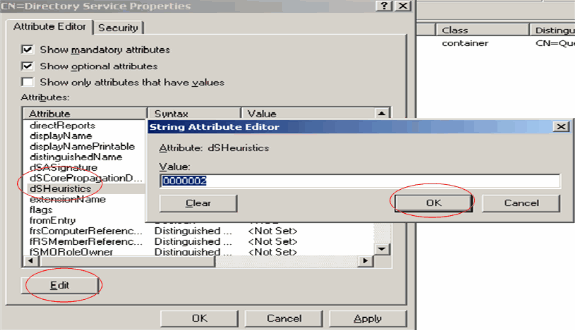
Note: If this attribute already contains a value, make sure you are changing only the seventh character from the left. This is the only character that needs to be changed in order to enable anonymous binds. For example, if the current value is "0010000", you will need to change it to "0010002". If the current value is less than seven characters, you will need to put zeros in the places not used: "001" will become "0010002".
Granting ANONYMOUS LOGON Access to the User "user2"
The next step is to grant ANONYMOUS LOGON access to the user user2. Complete these steps in order to achieve this:
-
Open Active Directory Users and Computers.
-
Make sure View Advanced Features is checked.
-
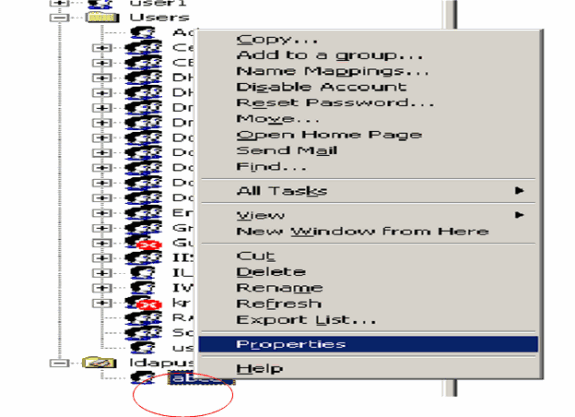
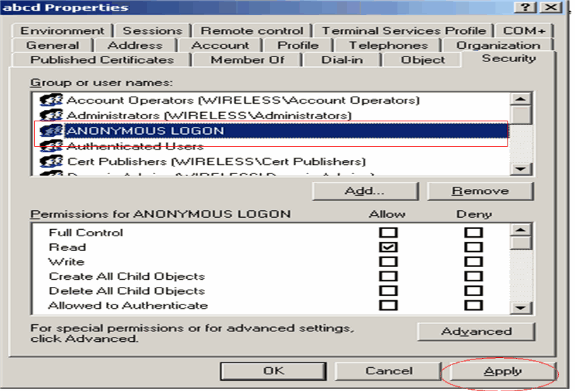
Navigate to the user user2 and right-click it. Select Properties from the context menu. This user is identified with the first name "abcd".
-
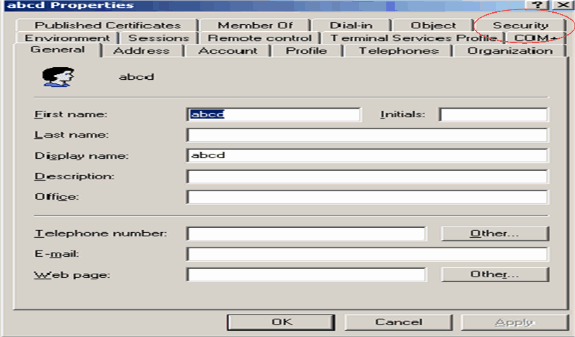
Go to Security in the abcd Properties window.
-
Click Add in the resultant window.
-
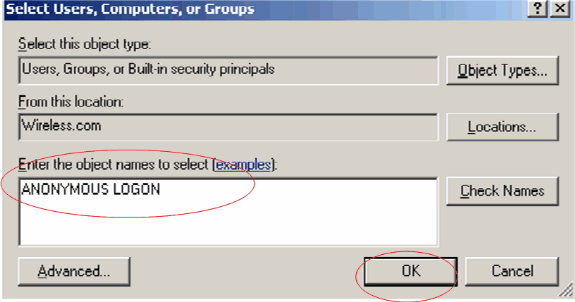
Enter ANONYMOUS LOGON under the Enter the object names to select box and acknowledge the dialog.
-
In the ACL, you will notice that ANONYMOUS LOGON has access to some property sets of the user. Click OK. The ANONYMOUS LOGON access is granted on this user.
Granting List Contents Permission on the OU
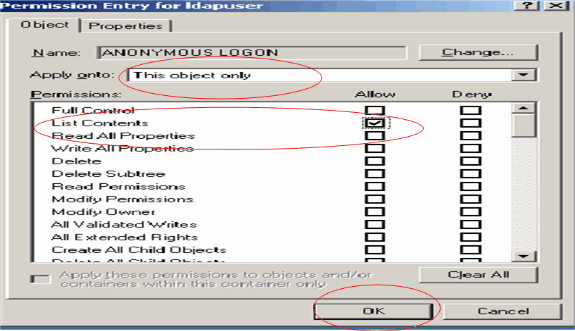
The next step is to grant at least List Contents permission to the ANONYMOUS LOGON on the OU that the user is located. In this example, "user2" is located on the OU "ldapuser". Complete these steps in order to achieve this:
-
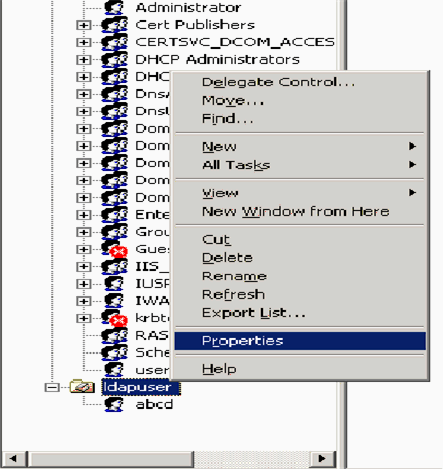
In Active Directory Users and Computers, right-click the OU ldapuser and choose Properties.
-
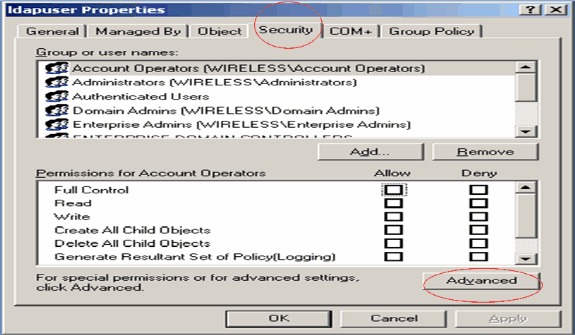
Click Security and then Advanced.
-
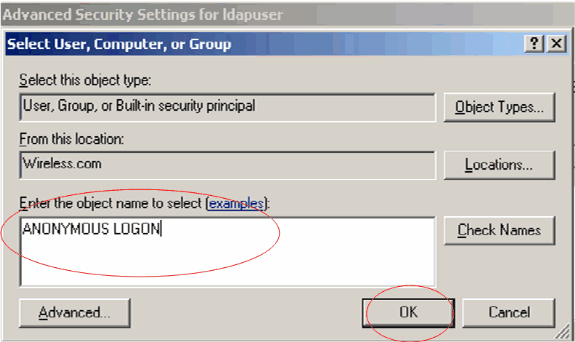
Click Add. In the dialog that opens, enter ANONYMOUS LOGON.
-
Acknowledge the dialog. This opens a new dialog window.
-
In the Apply onto drop-down box, choose This object only and enable the List Contents Allow check box.
Using LDP to Identify the User Attributes
This GUI tool is a LDAP client that allows users to perform operations (such as connect, bind, search, modify, add, delete) against any LDAP-compatible directory, such as Active Directory. LDP is used to view objects stored in Active Directory along with their metadata, such as security descriptors and replication metadata.
The LDP GUI tool is included when you install Windows Server 2003 Support Tools from the product CD. This section explains using the LDP utility to identify the specific attributes associated to the user user2. Some of these attributes are used to fill in the LDAP server configuration parameters on the WLC, such as User Attribute type and User Object type.
-
On the Windows 2003 server (even on the same LDAP server), click Start > Run and enter LDP in order to access the LDP browser.
-
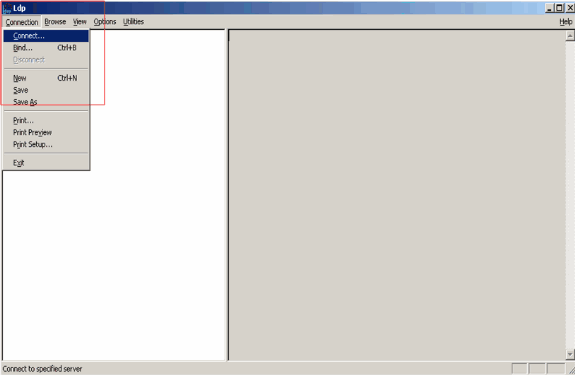
In the LDP main window, click Connection > Connect and connect to the LDAP server by entering the IP address of the LDAP server.
-
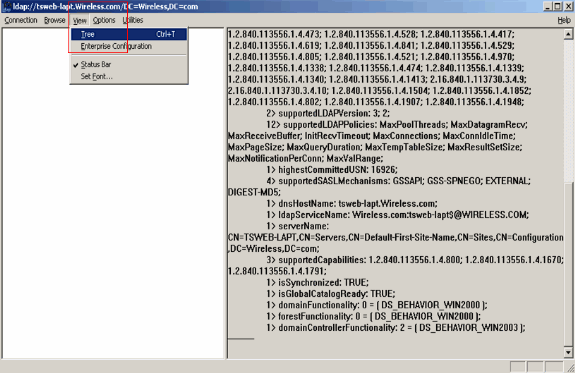
Once connected to the LDAP server, select View from the main menu and click Tree.
-
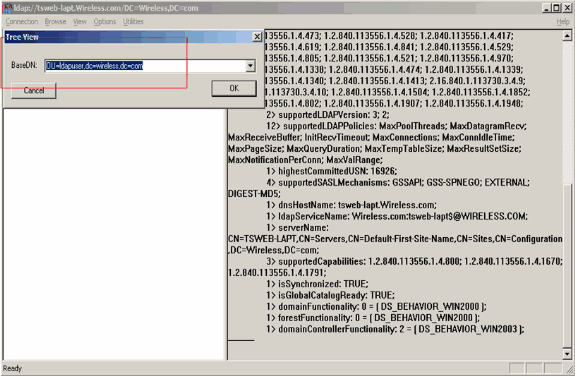
In the resultant Tree View window, enter the BaseDN of the user. In this example, user2 is located under the OU "ldapuser" under the domain Wireless.com. Therefore, the BaseDN for user user2 is OU=ldapuser, dc=wireless, dc=com. Click OK.
-
The left side of the LDP browser displays the entire tree that appears under the specified BaseDN (OU=ldapuser, dc=wireless, dc=com). Expand the tree to locate the user user2. This user can be identified with the CN value that represents the first name of the user. In this example, it is CN=abcd. Double-click CN=abcd. In the right-side pane of the LDP browser, LDP will display all the attributes associated with user2. This example explains this step:
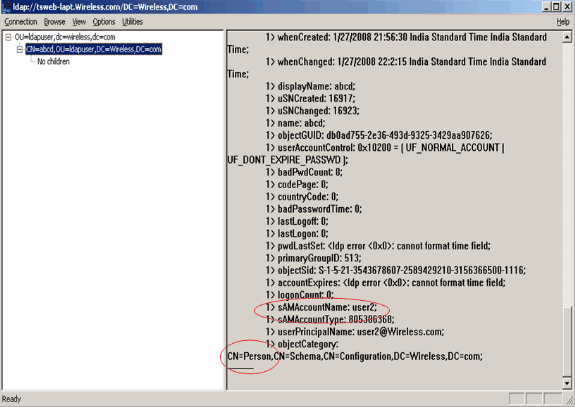
In this example, observe the encircled fields on the right.
-
As mentioned in the Configure WLC with Details of LDAP Server section of this document, in the User Attribute field, enter the name of the attribute in the user record that contains the username.
From this LDP output, you can see that sAMAccountName is one attribute that contains the username "user2". Therefore, enter the sAMAccountName attribute that corresponds to the User Attribute field on the WLC.
-
In the User Object Type field, enter the value of the LDAP objectType attribute that identifies the record as a user. Often, user records have several values for the objectType attribute, some of which are unique to the user and some of which are shared with other object types.
In the LDP output, CN=Person is one value that identifies the record as a user. Therefore, specify Person as the User Object Type attribute on the WLC.
Configure Wireless Client
The last step is to configure the wireless client for EAP-FAST authentication with client and server certificates. Complete these steps in order to achieve this:
-
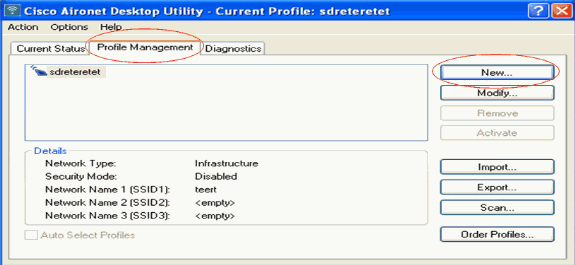
Launch the Cisco Aironet Desktop Utility (ADU). In the ADU main window, click Profile Management > New in order to create a new wireless client profile.
-
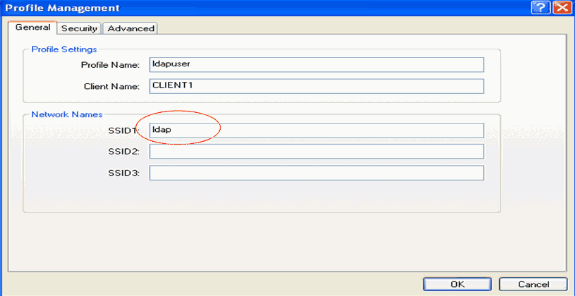
Specify a profile name and assign an SSID name to this profile. This SSID name should be the same configured on the WLC. In this example, the SSID name is ldap.
-
Click the Security tab and choose 802.1x/EAP as the Layer 2 Security. Choose EAP-FAST as the EAP method and click Configure.
-
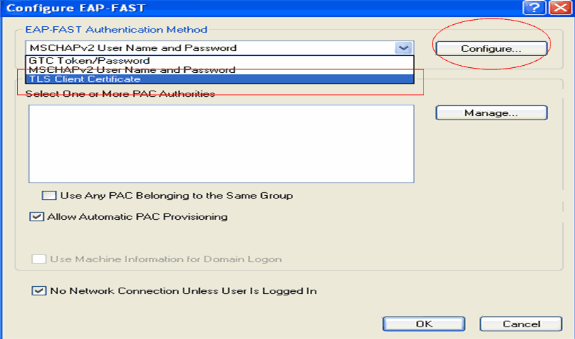
In the EAP-FAST configuration page, choose TLS Client Certificate from the EAP-FAST Authentication Method drop-down box and click Configure.
-
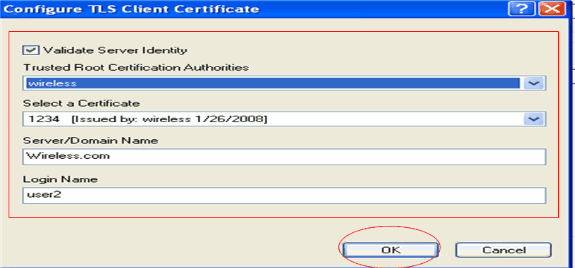
In the TLS Client certificate configuration window:
-
Enable the Validate Server Identity check box and select the CA certificate installed on the client (explained in the Generate the Root CA certificate for the Client section of this document) as the Trusted Root Certification Authority.
-
Select the device certificate installed on the client (explained in the Generate a Device Certificate for the Client section of this document) as the client certificate.
-
Click OK.
This example explains this step:
-
The wireless client profile is created.
Verify
Perform these steps in order to verify whether your configuration works properly.
-
Activate the ldap SSID on the ADU.
-
Click Yes or OK as required on the next windows. You should be able to see all steps of client authentication as well as association to be successful on the ADU.
Use this section to confirm that your configuration works properly. Use the WLC CLI mode.
-
In order to verify whether WLC is able to communicate with the LDAP server and locate the user, specify the debug aaa ldap enable command from the WLC CLI. This example explains a successful communication LDAP process:
Note: Some of the output in this section has been moved to second lines due to space consideration.
(Cisco Controller) >debug aaa ldap enable
Sun Jan 27 09:23:46 2008: AuthenticationRequest: 0xba96514
Sun Jan 27 09:23:46 2008:       Callback.....................................0x8
344900
Sun Jan 27 09:23:46 2008:       protocolType.................................0x0
0100002
Sun Jan 27 09:23:46 2008:       proxyState...................................00:
40:96:AC:E6:57-00:00
Sun Jan 27 09:23:46 2008:       Packet contains 2 AVPs (not shown)
Sun Jan 27 09:23:46 2008: ldapTask [1] received msg 'REQUEST' (2) in state 'IDLE' (1)
Sun Jan 27 09:23:46 2008: LDAP server 1 changed state to INIT
Sun Jan 27 09:23:46 2008: ldapInitAndBind [1] called lcapi_init (rc = 0 - Success)
Sun Jan 27 09:23:46 2008: ldapInitAndBind [1] called lcapi_bind (rc = 0 - Success)
Sun Jan 27 09:23:46 2008: LDAP server 1 changed state to CONNECTED
Sun Jan 27 09:23:46 2008: LDAP server 1 now active
Sun Jan 27 09:23:46 2008: LDAP_CLIENT: UID Search (base=OU=ldapuser,DC=wireless,
DC=com, pattern=(&(objectclass=Person)(sAMAccountName=user2)))
Sun Jan 27 09:23:46 2008: LDAP_CLIENT: Returned msg type 0x64
Sun Jan 27 09:23:46 2008: ldapAuthRequest [1] called lcapi_query base="OU=ldapus
er,DC=wireless,DC=com" type="Person" attr="sAMAccountName" user="user2" (rc = 0
- Success)
Sun Jan 27 09:23:46 2008: LDAP ATTR> dn = CN=abcd,OU=ldapuser,DC=Wireless,DC=com
 (size 38)
Sun Jan 27 09:23:46 2008: Handling LDAP response Success
From the highlighted information in this debug output, it is clear that the LDAP server is queried by the WLC with the User Attributes specified on the WLC and the LDAP process is successful.
-
In order to verify whether Local EAP authentication is successful, specify the debug aaa local-auth eap method events enable command from the WLC CLI. Here is an example:
(Cisco Controller) >debug aaa local-auth eap method events enable
Sun Jan 27 09:38:28 2008: eap_fast.c-EVENT: New context
(EAP handle = 0x1B000009)

Sun Jan 27 09:38:28 2008: eap_fast.c-EVENT: Allocated new EAP-FAST context
(handle = 0x22000009)

Sun Jan 27 09:38:28 2008: eap_fast_auth.c-AUTH-EVENT: Process Response
(EAP handle = 0x1B000009)

Sun Jan 27 09:38:28 2008: eap_fast_auth.c-AUTH-EVENT: Received Identity

Sun Jan 27 09:38:28 2008: eap_fast_tlv.c-AUTH-EVENT: Adding PAC A-ID TLV
(436973636f0000000000000000000000)

Sun Jan 27 09:38:28 2008: eap_fast_auth.c-AUTH-EVENT: Sending Start

Sun Jan 27 09:38:29 2008: eap_fast.c-AUTH-EVENT: Process Response, type: 0x2b

Sun Jan 27 09:38:29 2008: eap_fast_auth.c-AUTH-EVENT: Process Response
(EAP handle = 0x1B000009)

Sun Jan 27 09:38:29 2008: eap_fast_auth.c-AUTH-EVENT:
Received TLS record type: Handshake in state: Start

Sun Jan 27 09:38:29 2008: eap_fast_auth.c-AUTH-EVENT: Local certificate found

Sun Jan 27 09:38:29 2008: eap_fast_auth.c-AUTH-EVENT: Reading Client Hello handshake

Sun Jan 27 09:38:29 2008: eap_fast_auth.c-AUTH-EVENT:
TLS_DHE_RSA_AES_128_CBC_SHA proposed...

Sun Jan 27 09:38:29 2008: eap_fast.c-EVENT: Proposed ciphersuite(s):

Sun Jan 27 09:38:29 2008: eap_fast.c-EVENT:     TLS_DHE_RSA_WITH_AES_128_CBC_SHA

Sun Jan 27 09:38:29 2008: eap_fast.c-EVENT:     TLS_RSA_WITH_AES_128_CBC_SHA

Sun Jan 27 09:38:29 2008: eap_fast.c-EVENT:     TLS_RSA_WITH_RC4_128_SHA

Sun Jan 27 09:38:29 2008: eap_fast.c-EVENT: Selected ciphersuite:

Sun Jan 27 09:38:29 2008: eap_fast.c-EVENT:     TLS_DHE_RSA_WITH_AES_128_CBC_SHA

Sun Jan 27 09:38:29 2008: eap_fast_auth.c-AUTH-EVENT: Building Provisioning Server Hello

Sun Jan 27 09:38:29 2008: eap_fast_crypto.c-EVENT:
Starting Diffie Hellman phase 1 ...

Sun Jan 27 09:38:30 2008: eap_fast_crypto.c-EVENT:
Diffie Hellman phase 1 complete

Sun Jan 27 09:38:30 2008: eap_fast_auth.c-AUTH-EVENT: DH signature length = 128

Sun Jan 27 09:38:30 2008: eap_fast_auth.c-AUTH-EVENT: Sending Provisioning Serving Hello

Sun Jan 27 09:38:30 2008: eap_fast.c-EVENT: Tx packet fragmentation required

Sun Jan 27 09:38:30 2008: eap_fast.c-AUTH-EVENT: eap_fast_rx_packet():
EAP Fast NoData (0x2b)

Sun Jan 27 09:38:30 2008: eap_fast.c-AUTH-EVENT: eap_fast_rx_packet():
EAP Fast NoData (0x2b)

Sun Jan 27 09:38:30 2008: eap_fast.c-AUTH-EVENT: eap_fast_rx_packet():
EAP Fast NoData (0x2b)

Sun Jan 27 09:38:32 2008: eap_fast.c-AUTH-EVENT: Process Response, type: 0x2b

Sun Jan 27 09:38:32 2008: eap_fast.c-EVENT: Reassembling TLS record

Sun Jan 27 09:38:32 2008: eap_fast.c-EVENT: Sending EAP-FAST Ack

............................................................................

..............................................................................

..............................................................................

Sun Jan 27 09:38:32 2008: eap_fast_auth.c-AUTH-EVENT:
Received TLS record type: Handshake in state: Sent provisioning Server Hello

Sun Jan 27 09:38:32 2008: eap_fast_auth.c-AUTH-EVENT:
Reading Client Certificate handshake

Sun Jan 27 09:38:32 2008: eap_fast.c-EVENT: Added certificate 1 to chain

Sun Jan 27 09:38:32 2008: eap_fast.c-EVENT: Added certificate 2 to chain

Sun Jan 27 09:38:32 2008: eap_fast.c-EVENT: Successfully validated received certificate

Sun Jan 27 09:38:32 2008: eap_fast_auth.c-AUTH-EVENT: Rx'd I-ID:
"EAP-FAST I-ID" from Peer Cert

Sun Jan 27 09:38:32 2008: eap_fast_auth.c-AUTH-EVENT:
Reading Client Key Exchange handshake

Sun Jan 27 09:38:32 2008: eap_fast_crypto.c-EVENT:
Starting Diffie Hellman phase 2 ...

Sun Jan 27 09:38:32 2008: eap_fast_crypto.c-EVENT:
Diffie Hellman phase 2 complete.

Sun Jan 27 09:38:32 2008: eap_fast_auth.c-AUTH-EVENT:
Reading Client Certificate Verify handshake

Sun Jan 27 09:38:32 2008: eap_fast_crypto.c-EVENT:
Sign certificate verify succeeded (compare)

............................................................................................

............................................................................................

............................................................................................

.............................................................................................
-
The debug aaa local-auth db enable command is also very useful. Here is an example:
(Cisco Controller) >debug aaa local-auth db enable
Sun Jan 27 09:35:32 2008: LOCAL_AUTH: EAP: Received an auth request

Sun Jan 27 09:35:32 2008: LOCAL_AUTH: Creating new context

Sun Jan 27 09:35:32 2008: LOCAL_AUTH: Local auth profile name for context 'ldapuser'

Sun Jan 27 09:35:32 2008: LOCAL_AUTH: Created new context eap session handle fb000007

Sun Jan 27 09:35:32 2008: LOCAL_AUTH: (EAP:8) Sending the Rxd EAP packet
(id 2) to EAP subsys

Sun Jan 27 09:35:32 2008: LOCAL_AUTH: Found matching context for id - 8

Sun Jan 27 09:35:32 2008: LOCAL_AUTH: (EAP) Sending user credential
request username 'user2' to LDAP

Sun Jan 27 09:35:32 2008: LOCAL_AUTH: Found context matching MAC address - 8


........................................................................................

........................................................................................

........................................................................................

........................................................................................


Sun Jan 27 09:35:36 2008: LOCAL_AUTH: (EAP:8) Sending the Rxd EAP packet
(id 12) to EAP subsys

Sun Jan 27 09:35:36 2008: LOCAL_AUTH: Found matching context for id - 8

Sun Jan 27 09:35:36 2008: LOCAL_AUTH: (EAP:8) ---> [KEY AVAIL] send_len 64, recv_len 0

Sun Jan 27 09:35:36 2008: LOCAL_AUTH: (EAP:8) received keys waiting for success

Sun Jan 27 09:35:36 2008: LOCAL_AUTH: Found matching context for id - 8

Sun Jan 27 09:35:36 2008: LOCAL_AUTH: (EAP:8) Received success event

Sun Jan 27 09:35:36 2008: LOCAL_AUTH: (EAP:8) Processing keys success
-
In order to view the certificates installed in the WLC to be used for local authentication, issue the show local-auth certificates command from the WLC CLI. Here is an example:
(Cisco Controller) >show local-auth certificates
Certificates available for Local EAP authentication: Certificate issuer .............................. vendor CA certificate: Subject: DC=com, DC=Wireless, CN=wireless Issuer: DC=com, DC=Wireless, CN=wireless Valid: 2008 Jan 23rd, 15:50:27 GMT to 2013 Jan 23rd, 15:50:27 GMT Device certificate: Subject: O=cisco, CN=ciscowlc123 Issuer: DC=com, DC=Wireless, CN=wireless Valid: 2008 Jan 24th, 12:18:31 GMT to 2010 Jan 23rd, 12:18:31 GMT Certificate issuer .............................. cisco CA certificate: Subject: O=Cisco Systems, CN=Cisco Manufacturing CA Issuer: O=Cisco Systems, CN=Cisco Root CA 2048 Valid: 2005 Jun 10th, 22:16:01 GMT to 2029 May 14th, 20:25:42 GMT Device certificate: Not installed. -
In order to view the local authentication configuration on the WLC from the CLI mode, issue the show local-auth config command. Here is an example:
(Cisco Controller) >show local-auth config
User credentials database search order:

    Primary ..................................... LDAP


Timer:

    Active timeout .............................. 300


Configured EAP profiles:

    Name ........................................ ldapuser

      Certificate issuer ........................ vendor

      Peer verification options:

        Check against CA certificates ........... Enabled

        Verify certificate CN identity .......... Disabled

        Check certificate date validity ......... Disabled

      EAP-FAST configuration:

        Local certificate required .............. Yes

        Client certificate required ............. Yes

      Enabled methods ........................... fast

      Configured on WLANs ....................... 2


EAP Method configuration:

    EAP-FAST:

--More-- or (q)uit

      Server key ................................ <hidden>

      TTL for the PAC ........................... 10

      Anonymous provision allowed ............... No

      .............................................

      .............................................

      Authority Information ..................... Cisco A-ID
Troubleshoot
You can use these commands to troubleshoot your configuration:
-
debug aaa local-auth eap method events enable
-
debug aaa all enable
-
debug dot1x packet enable
Related Information
- EAP-FAST Authentication with Wireless LAN Controllers and External RADIUS Server Configuration Example
- PEAP Under Unified Wireless Networks with Microsoft Internet Authentication Service (IAS)
- Dynamic VLAN Assignment with WLCs based on ACS to Active Directory Group Mapping Configuration Example
- Cisco Wireless LAN Controller Configuration Guide - Configuring Security Solutions
- Cisco Wireless LAN Controller Configuration Guide - Managing Controller Software and Configurations
- EAP Authentication with WLAN Controllers (WLC) Configuration Example
- Wireless LAN Controller (WLC) Design and Features FAQ
- Cisco Secure Services Client with EAP-FAST Authentication
- Wireless LAN Controller (WLC) FAQ
- Controllers Wireless LAN Controller (WLC) Error and System Messages FAQ
- Technical Support & Documentation - Cisco Systems
Revision History
| Revision | Publish Date | Comments |
|---|---|---|
1.0 |
29-Jan-2008 |
Initial Release |
Contact Cisco
- Open a Support Case

- (Requires a Cisco Service Contract)


 Feedback