Wireless LAN Controller Splash Page Redirect Configuration Example
Available Languages
Contents
Introduction
This document describes how to configure the splash page redirect feature on the Wireless LAN Controllers.
Prerequisites
Requirements
Ensure that you meet these requirements before you attempt this configuration:
-
Knowledge of LWAPP Security Solutions
-
Knowledge of how to configure Cisco Secure ACS
Components Used
The information in this document is based on these software and hardware versions:
-
Cisco 4400 Series Wireless LAN Controller (WLC) that runs firmware version 5.0
-
Cisco 1232 Series Light Weight Access Point (LAP)
-
Cisco Aironet 802.a/b/g Wireless Client Adapter that runs firmware version 4.1
-
Cisco Secure ACS server that runs version 4.1
-
Any third-party external web server
The information in this document was created from the devices in a specific lab environment. All of the devices used in this document started with a cleared (default) configuration. If your network is live, make sure that you understand the potential impact of any command.
Conventions
Refer to Cisco Technical Tips Conventions for more information on document conventions.
Background Information
Splash Page Web redirect is a feature introduced with Wireless LAN Controller Version 5.0. With this feature, the user is redirected to a particular web page after 802.1x authentication has completed. The redirect occurs when the user opens a browser (configured with a default home page) or tries to access a URL. After the redirect to the web page is complete, the user has full access to the network.
You can specify the redirect page on the Remote Authentication Dial-In User Service (RADIUS) server. The RADIUS server should be configured to return the Cisco av-pair url-redirect RADIUS attribute to the Wireless LAN Controller upon successful 802.1x authentication.
The Splash page web redirect feature is available only for WLANs configured for 802.1x or WPA/WPA2 Layer 2 security.
Network Setup
In this example, a Cisco 4404 WLC and a Cisco 1232 Series LAP are connected through a Layer 2 switch. The Cisco Secure ACS server (which acts as an external RADIUS server) is also connected to the same switch. All the devices are in the same subnet.
The LAP is initially registered to the controller. You must create two WLANs: one for the Admin Department users and the other for the Operations Department users. Both Wireless LANs use WPA2/ AES (EAP-FAST is used for authentication). Both WLANs use the Splash Page Redirect feature in order to redirect users to the appropriate Home page URLs (on external web servers).
This document uses this network setup:
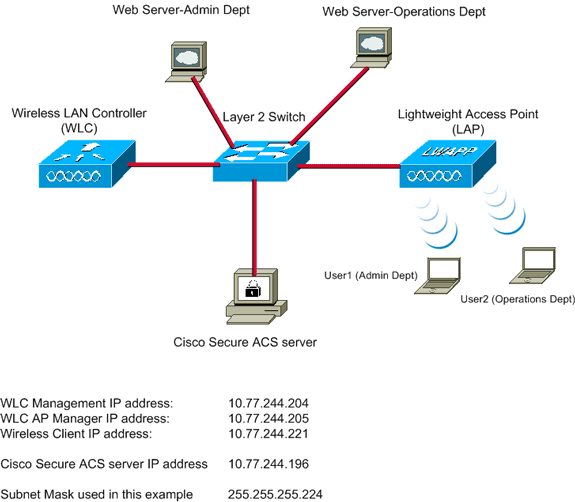
The next section explains how to configure the devices for this setup.
Configure
In this section, you are presented with the information to configure the features described in this document.
Note: Use the Command Lookup Tool (registered customers only) to obtain more information on the commands used in this section.
Complete these steps in order to configure the devices to use the splash page redirect feature:
-
Configure the WLC for RADIUS authentication through the Cisco Secure ACS server.
-
Configure the WLANs for the Admin and Operations departments.
-
Configure the Cisco Secure ACS to support the splash page redirect feature.
Step 1. Configure the WLC for RADIUS authentication through the Cisco Secure ACS server.
The WLC needs to be configured in order to forward the user credentials to an external RADIUS server.
Complete these steps in order to configure the WLC for an external RADIUS server:
-
Choose Security and RADIUS Authentication from the controller GUI in order to display the RADIUS Authentication Servers page.
-
Click New in order to define a RADIUS server.
-
Define the RADIUS server parameters on the RADIUS Authentication Servers > New page.
These parameters include:
-
RADIUS Server IP Address
-
Shared Secret
-
Port Number
-
Server Status
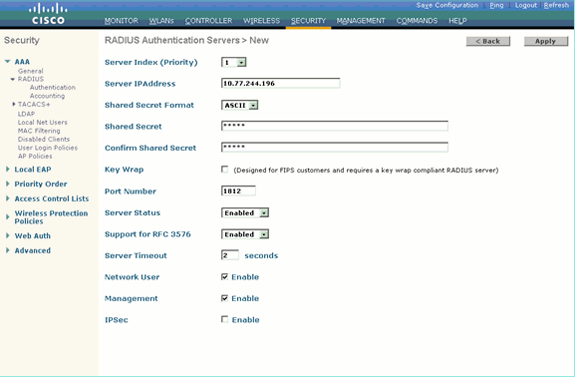
This document uses the ACS server with an IP address of 10.77.244.196.
-
-
Click Apply.
Step 2. Configure the WLANs for the Admin and Operations department.
In this step, you configure the two WLANs (one for the Admin department and the other for the Operations department) that the clients will use in order to connect to the wireless network.
The WLAN SSID for the Admin department will be Admin. The WLAN SSID for the Operations department will be Operations.
Use EAP-FAST authentication in order to enable WPA2 as the Layer 2 security mechanism on both WLANs and the Web policy - Splash Page Web Redirect feature as the Layer 3 Security method.
Complete these steps in order to configure the WLAN and its related parameters:
-
Click WLANs from the GUI of the controller in order to display the WLANs page.
This page lists the WLANs that exist on the controller.
-
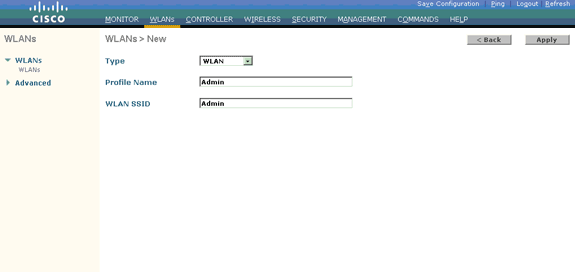
Click New in order to create a new WLAN.
-
Enter the WLAN SSID name and the Profile name on the WLANs > New page.
-
Click Apply.
-
First let us create the WLAN for the Admin department.
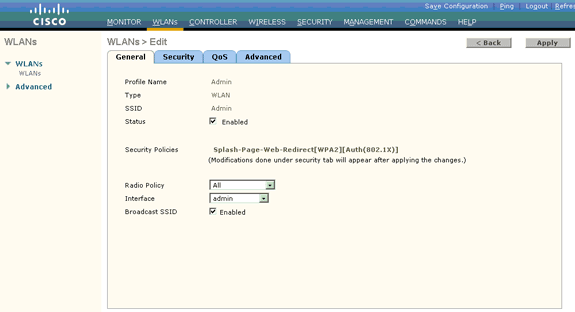
Once you create a new WLAN, the WLAN > Edit page for the new WLAN appears. On this page, you can define various parameters specific to this WLAN. This includes General Policies, Security Policies, QOS policies, and Advanced parameters.
-
Under General Policies, check the Status check box in order to enable the WLAN.
-
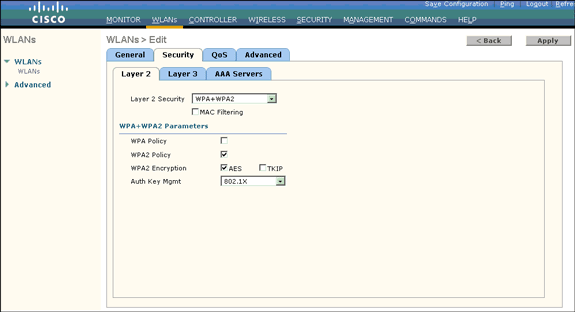
Click the Security tab, and then click the Layer 2 tab.
-
Choose WPA+WPA2 from the Layer 2 Security drop-down list.
This step enables WPA authentication for the WLAN.
-
Under WPA+WPA2 Parameters, check the WPA2 Policy and AES Encryption check boxes.
-
Choose 802.1x from the Auth Key Mgmt drop-down list. This option enables WPA2 with 802.1x/EAP authentication and AES encryption for the WLAN.
-
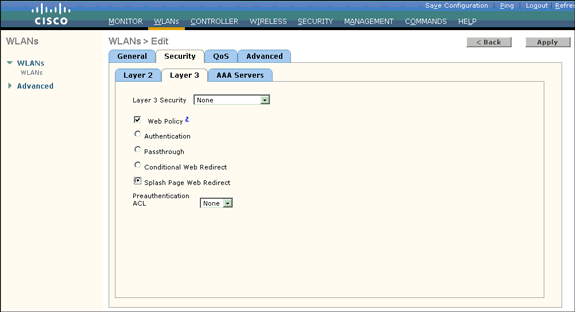
Click the Layer 3 Security tab.
-
Check the Web Policy box, and then click the Splash Page Web Redirect radio button.
This option enables the splash page web Redirect feature.
-
Click the AAA Servers tab.
-
Under Authentication Servers, choose the appropriate server IP address from the Server 1 drop-down list.
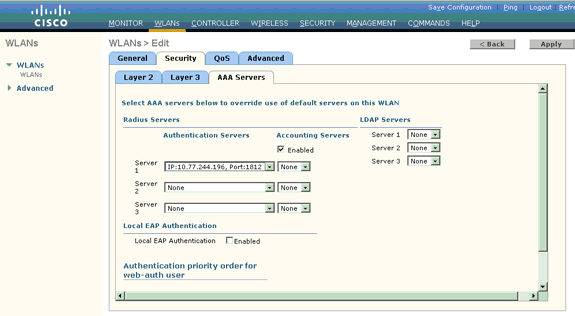
In this example, 10.77.244.196 is used as the RADIUS server.
-
Click Apply.
-
Repeat steps 2 through 15 in order to create the WLAN for the Operations department.
The WLANs page lists the two WLANs that you created.
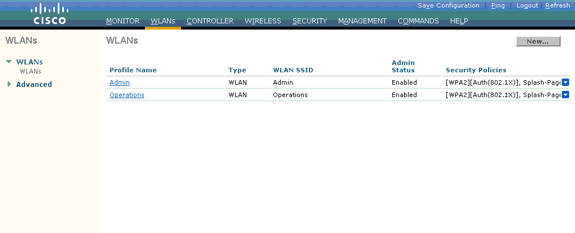
Notice that the security policies include the splash page redirect.
Step 3. Configure the Cisco Secure ACS to support the Splash page redirect feature.
The next step is to configure the RADIUS server for this feature. The RADIUS server needs to perform EAP-FAST authentication in order to validate the client credentials, and upon successful authentication, to redirect the user to the URL (on the external web server) specified in the Cisco av-pair url-redirect RADIUS attribute.
Configure the Cisco Secure ACS for EAP-FAST authentication
Note: This document assumes that the Wireless LAN Controller is added to the Cisco Secure ACS as an AAA client.
Complete these steps in order to configure EAP-FAST authentication in the RADIUS server:
-
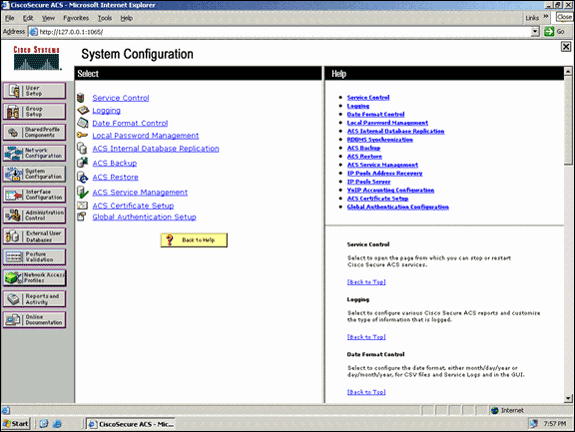
Click System Configuration from the RADIUS server GUI, and then choose choose Global Authentication Setup from the System Configuration page.
-
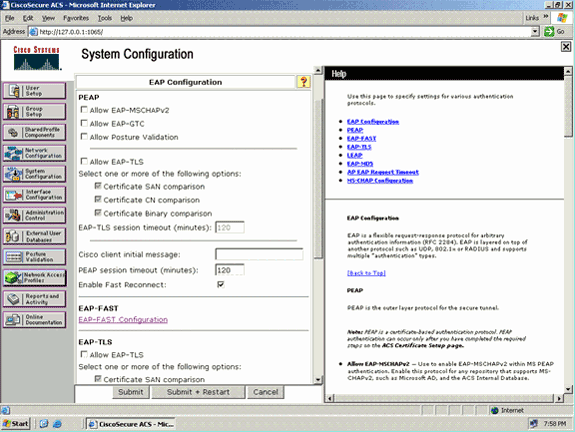
From the Global Authentication setup page, click EAP-FAST Configuration in order to go to the EAP-FAST settings page.
-
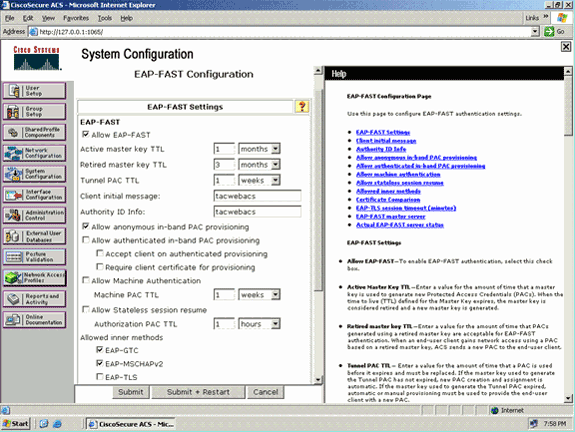
From the EAP-FAST Settings page, check the Allow EAP-FAST check box in order to enable EAP-FAST in the RADIUS server.
-
Configure the Active/Retired master key TTL (Time-to-Live) values as desired, or set it to the default value as shown in this example.
The Authority ID Info field represents the textual identity of this ACS server, which an end user can use to determine which ACS server to be authenticated against. Filling in this field is mandatory.
The Client initial display message field specifies a message to be sent to users who authenticate with an EAP-FAST client. Maximum length is 40 characters. A user will see the initial message only if the end-user client supports the display.
-
If you want the ACS to perform anonymous in-band PAC provisioning, check the Allow anonymous in-band PAC provisioning check box.
-
The Allowed inner methods option determines which inner EAP methods can run inside the EAP-FAST TLS tunnel. For anonymous in-band provisioning, you must enable EAP-GTC and EAP-MS-CHAP for backward compatibility. If you select Allow anonymous in-band PAC provisioning, you must select EAP-MS-CHAP (phase zero) and EAP-GTC (phase two).
-
Click Submit.
Note: For detailed information and examples about how to configure EAP FAST with Anonymous In-band PAC Provisioning and Authenticated In-band Provisioning, refer to EAP-FAST Authentication with Wireless LAN Controllers and External RADIUS Server Configuration Example.
Configure the User database and define the url-redirect RADIUS attribute
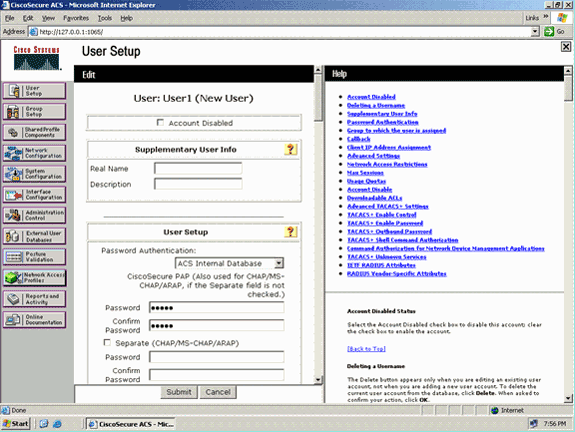
This example configures username and password of the wireless client as User1 and User1, respectively.
Complete these steps in order to create a user database:
-
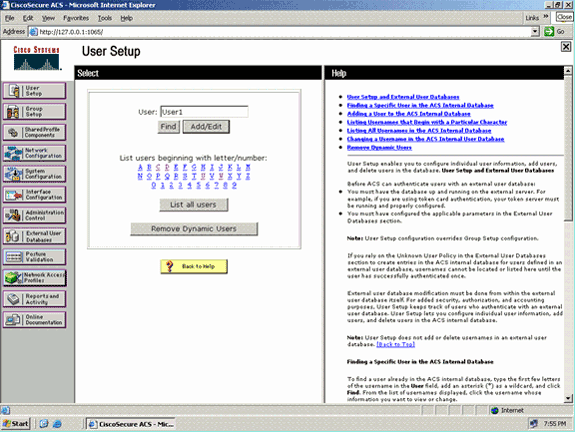
From the ACS GUI in the navigation bar, choose User Setup.
-
Create a new user wireless, and then click Add/Edit in order to go to the Edit page of this user.
-
From the User Setup Edit page, configure Real Name and Description, as well as the Password settings, as shown in this example.
This document uses ACS Internal Database for Password Authentication.
-
Scroll down the page to modify the RADIUS attributes.
-
Check the [009\001] cisco-av-pair check box.
-
Enter this Cisco av-pairs in the [009\001] cisco-av-pair edit box in order to specify the URL to which the user is redirected:
url-redirect=http://10.77.244.196/Admin-Login.html
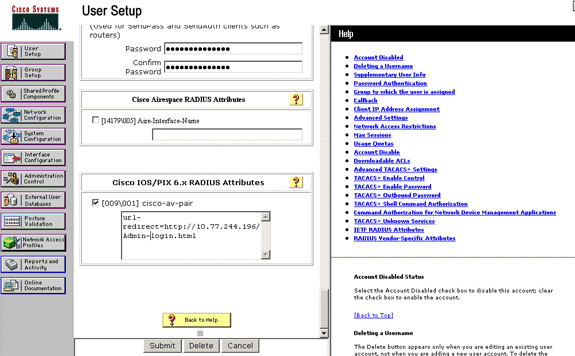
This is the home page of the Admin department users.
-
Click Submit.
-
Repeat this procedure in order to add User2 (Operations department user).
-
Repeat steps 1 through 6 in order to add more Admin department users and Operations department users to the database.
Note: The RADIUS attributes can be configured at the user level or the group level on the Cisco Secure ACS.
Verify
In order to verify the configuration, associate a WLANs client from the Admin department and the Operations department to their appropriate WLANs.
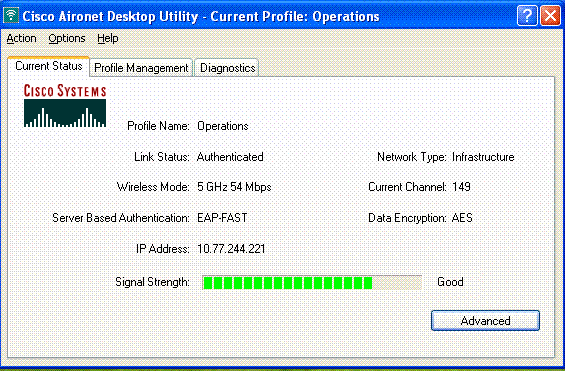
When a user from the Admin department connects to the Wireless LAN Admin, the user is prompted for 802.1x credentials (EAP-FAST credentials in our case). Once the user provides the credentials, the WLC passes those credentials to the Cisco Secure ACS server. The Cisco Secure ACS server validates the user's credentials against the database, and upon successful authentication, returns the url-redirect attribute to the Wireless LAN Controller. The authentication is complete at this stage.
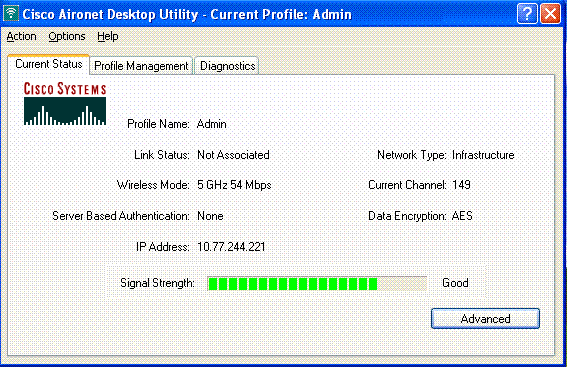
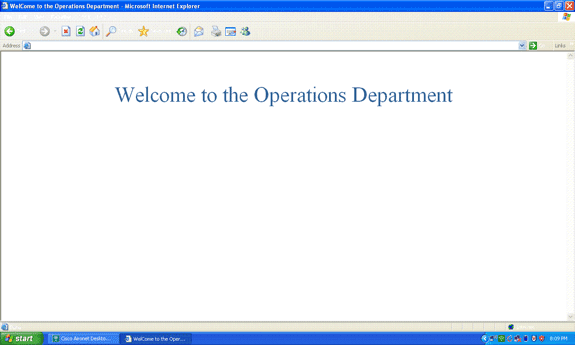
When the user opens a web browser, the user is redirected to the home page URL of the Admin department. (This URL is returned to the WLC through the cisco-av-pair attribute). After the redirect, the user has full access to the network. Here are the screenshots:
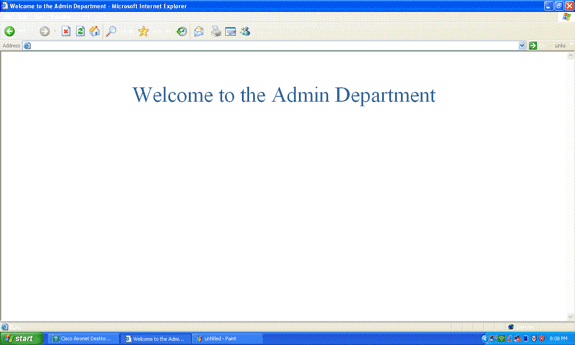
The same sequences of events occur when a user from the Operations department connects to the WLAN Operations.
Troubleshoot
This section provides information you can use to troubleshoot your configuration.
Note: Refer to Important Information on Debug Commands before you use debug commands.
You can use the following commands to troubleshoot your configuration.
-
show wlan wlan_id—Displays the status of the web redirect features for a particular WLAN.
Here is an example:
WLAN Identifier.................................. 1
Profile Name..................................... Admin
Network Name (SSID).............................. Admin
...
Web Based Authentication......................... Disabled
Web-Passthrough.................................. Disabled
Conditional Web Redirect......................... Disabled
Splash-Page Web Redirect......................... Enabled
-
debug dot1x events enable—Enables the debug of 802.1x packet messages.
Here is an example:
Fri Feb 29 10:27:16 2008: 00:40:96:ac:dd:05 Sending EAP Request from AAA to mobile 00:40:96:ac:dd:05 (EAP Id 16) Fri Feb 29 10:27:16 2008: 00:40:96:ac:dd:05 Received EAPOL EAPPKT from mobile 00:40:96:ac:dd:05 Fri Feb 29 10:27:16 2008: 00:40:96:ac:dd:05 Received EAP Response from mobile 00:40:96:ac:dd:05 (EAP Id 16, EAP Type 43) Fri Feb 29 10:27:16 2008: 00:40:96:ac:dd:05 Processing Access-Challenge for mobile 00:40:96:ac:dd:05 Fri Feb 29 10:27:16 2008: 00:40:96:ac:dd:05 Setting re-auth timeout to 1800 seconds, got from WLAN config. Fri Feb 29 10:27:16 2008: 00:40:96:ac:dd:05 Station 00:40:96:ac:dd:05 setting dot1x reauth timeout = 1800 Fri Feb 29 10:27:16 2008: 00:40:96:ac:dd:05 Creating a new PMK Cache Entry for station 00:40:96:ac:dd:05 (RSN 2) Fri Feb 29 10:27:16 2008: 00:40:96:ac:dd:05 Adding BSSID 00:1c:58:05:e9:cf to PMKID cache for station 00:40:96:ac:dd:05 Fri Feb 29 10:27:16 2008: New PMKID: (16) Fri Feb 29 10:27:16 2008: [0000] 79 ee 88 78 9c 71 41 f0 10 7d 31 ca fb fa 8e 3c Fri Feb 29 10:27:16 2008: 00:40:96:ac:dd:05 Disabling re-auth since PMK lifetime can take care of same. Fri Feb 29 10:27:16 2008: 00:40:96:ac:dd:05 Sending EAP-Success to mobile 00:40:96:ac:dd:05 (EAP Id 17) Fri Feb 29 10:27:16 2008: Including PMKID in M1 (16) Fri Feb 29 10:27:16 2008: [0000] 79 ee 88 78 9c 71 41 f0 10 7d 31 ca fb fa 8e 3c Fri Feb 29 10:27:16 2008: 00:40:96:ac:dd:05 Sending EAPOL-Key Message to mobile 00:40:96:ac:dd:05 state INITPMK (message 1), replay counter 00.00.00.00.00.00.00.00 Fri Feb 29 10:27:16 2008: 00:40:96:ac:dd:05 Received Auth Success while in Authenticating state for mobile 00:40:96:ac:dd:05 -
debug aaa events enable—Enables the debug output of all aaa events.
Here is an example:
Thu Feb 28 07:55:18 2008: 00:40:96:ac:dd:05 Successful transmission of
    Authentication Packet (id 103) to 10.77.244.196:1812, proxy state
    00:40:96:ac:dd:05-00:00
Thu Feb 28 07:55:18 2008: ****Enter processIncomingMessages: response code=11
Thu Feb 28 07:55:18 2008: ****Enter processRadiusResponse: response code=11
Thu Feb 28 07:55:18 2008: 00:40:96:ac:dd:05 Access-Challenge received from
    RADIUS server 10.77.244.196 for mobile 00:40:96:ac:dd:05 receiveId = 3
Thu Feb 28 07:55:18 2008: 00:40:96:ac:dd:05 Successful transmission of
    Authentication Packet (id 104) to 10.77.244.196:1812, proxy state
    00:40:96:ac:dd:05-00:00
Thu Feb 28 07:55:18 2008: ****Enter processIncomingMessages: response code=2
Thu Feb 28 07:55:18 2008: ****Enter processRadiusResponse: response code=2
Thu Feb 28 07:55:18 2008: 00:40:96:ac:dd:05 Access-Accept received from
    RADIUS server 10.77.244.196 for mobile 00:40:96:ac:dd:05 receiveId = 3
Thu Feb 28 07:55:18 2008: 00:40:96:ac:dd:05 AAA Override Url-Redirect
    'http://10.77.244.196/Admin-login.html' set
Thu Feb 28 07:55:18 2008: 00:40:96:ac:dd:05 Applying new AAA override for
    station 00:40:96:ac:dd:05
Thu Feb 28 07:55:18 2008: 00:40:96:ac:dd:05 Override values for station
    00:40:96:ac:dd:05
       source: 4, valid bits: 0x0
       qosLevel: -1, dscp: 0xffffffff, dot1pTag: 0xffffffff, sessionTimeout: -1
       dataAvgC: -1, rTAvgC: -1, dataBurstC: -1, rTimeBurstC: -1
       vlanIfName: '', aclName: '
Related Information
Revision History
| Revision | Publish Date | Comments |
|---|---|---|
1.0 |
29-Feb-2008 |
Initial Release |
Contact Cisco
- Open a Support Case

- (Requires a Cisco Service Contract)


 Feedback