WLC and NAC Guest Server (NGS) Integration Guide
Available Languages
Contents
Introduction
This document provides a guideline to integrate the NAC Guest Server and Wireless LAN Controllers.
Prerequisites
Requirements
There are no specific requirements for this document.
Components Used
The information in this document is based on these software and hardware versions:
-
Cisco Wireless LAN Controller (WLC) 4.2.61.0
-
Catalyst 3560 with IOS® Version 12.2(25)SEE2
-
Cisco ADU Version 4.0.0.279
-
NAC Guest Server Version 1.0
The information in this document was created from the devices in a specific lab environment. All of the devices used in this document started with a cleared (default) configuration. If your network is live, make sure that you understand the potential impact of any command.
Conventions
Refer to Cisco Technical Tips Conventions for more information on document conventions.
Background Information
The Cisco NAC Guest Server is a complete provisioning and reporting system that provides temporary network access for guests, visitors, contractors, consultants, or customers. The Guest Server works alongside Cisco NAC Appliance or Cisco Wireless LAN Controller, which provides the captive portal and enforcement point for guest access.
Cisco NAC Guest Server allows any user with privileges to easily create temporary guest accounts and sponsor guests. Cisco NAC Guest Server performs full authentication of sponsors, the users who create guest accounts, and allows sponsors to provide account details to the guest by printout, email, or SMS. The entire experience, from user account creation to guest network access, is stored for audit and reporting.
When guest accounts are created, they are either provisioned within the Cisco NAC Appliance Manager (Clean Access Manager) or stored within the built-in database on the Cisco NAC Guest Server. When you use the built-in database of the Guest Server, external network access devices, such as the Cisco Wireless LAN Controller, can authenticate users against the Guest Server with the Remote Authentication Dial In User Service (RADIUS) protocol.
The Cisco NAC Guest Server provisions the guest account for the amount of time specified when the account is created. Upon expiry of the account, the Guest Server either deletes the account directly from the Cisco NAC Appliance Manager or sends a RADIUS message that notifies the network access device (NAD) of the amount of valid time that remains for the account before the NAD must remove the user.
The Cisco NAC Guest Server provides vital guest network access accounting by consolidation of the entire audit trail from guest account creation to guest use of the account so that reports can be performed through a central management interface.
Guest Access Concepts
Cisco NAC Guest Server makes use of a number of terms to explain the components needed to provide guest access.
Guest User
The guest user is the person who needs a user account to access the network.
Sponsor
The Sponsor is the person who creates the guest user account. This person is often an employee of the organization that provides the network access. Sponsors can be specific - 3 - individuals with certain job roles, or can be any employee who can authenticate against a corporate directory such as Microsoft Active Directory (AD).
Network Enforcement Device
These devices are the network infrastructure components that provide the network access. Additionally, network enforcement devices push guest users to a captive portal, where they can enter their guest account details. When a guest enters his or her temporary user name and password, the network enforcement device checks those credentials against the guest accounts created by the Guest Server.
Guest Server
This is the Cisco NAC Guest Server, which ties together all the pieces of guest access. The Guest Server links these together: the sponsor that creates the guest account, the account details passed to the guest, the guest authentication against the network enforcement device, and the verification of the network enforcement device of the guest with the Guest Server. Additionally, the Cisco NAC Guest Server consolidates accounting information from network enforcement devices to provide a single point of guest access reports.
Detailed documentation on NGS is available in CCO.
http://www.cisco.com/en/US/docs/security/nac/guestserver/configuration_guide/10/nacguestserver.html
Lab Topology Overview
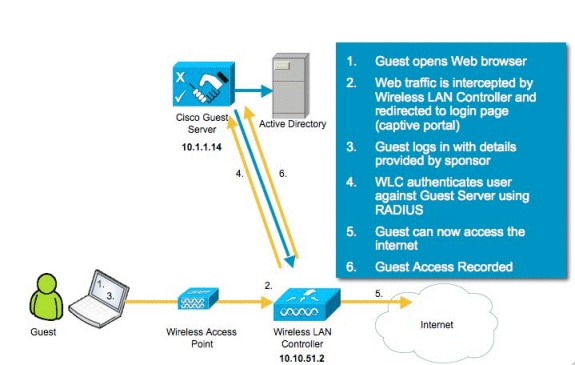
Configure the Wireless LAN Controller (WLC)
Follow these steps to configure the WLC:
-
Initialize the controller and access point.
-
Configure the controller interfaces.
-
Configure RADIUS.
-
Configure the WLAN settings.
Initialization
For the initial configuration, use a console connection like HyperTerminal and follow the setup prompts to populate login and interface information. The reset system command also initiates these prompts.
Welcome to the Cisco Wizard Configuration Tool
Use the '-' character to backup
System Name [Cisco_44:36:c3]: WLC
Enter Administrative User Name (24 characters max): admin
Enter Administrative Password (24 characters max): admin
Service Interface IP Address Configuration [none][DHCP]: <ENTER>
Enable Link Aggregation (LAG) [yes][NO]:no
Management Interface IP Address: 10.10.51.2
Management Interface Netmask: 255.255.255.0
Management Interface Default Router: 10.10.51.1
Management Interface VLAN Identifier (0 = untagged): 0
Management Interface Port Num [1 to 2]: 1
Management Interface DHCP Server IP Address: 10.10.51.1
AP Transport Mode [layer2][LAYER3]: layer3
AP Manager Interface IP Address: 10.10.51.3
AP-Manager is on Management subnet, using same values
AP Manager Interface DHCP Server (10.10.5<X>.1):<ENTER>
Virtual Gateway IP Address: 1.1.1.1
Mobility/RF Group Name: mobile-1
Enable Symmetric Mobility Tunneling: No
Network Name (SSID): wireless-1
Allow Static IP Addresses [YES][no]:<ENTER>
Configure a RADIUS Server now? [YES][no]:<ENTER>
Enter the RADIUS Server's Address: 10.1.1.12
Enter the RADIUS Server's Port [1812]:<ENTER>
Enter the RADIUS Server's Secret: cisco
Enter Country Code (enter 'help' for a list of countries) [US]:<ENTER>
Enable 802.11b Network [YES][no]:<ENTER>
Enable 802.11a Network [YES][no]:<ENTER>
Enable 802.11g Network [YES][no]:<ENTER>
Enable Auto-RF [YES][no]:<ENTER>
Configure a NTP server now? [YES][no]: no
Configure the system time now? [YES][no]: yes
Enter the date in MM/DD/YY format: mm/dd/yy
Enter the time in HH:MM:SS format: hh:mm:ss
Cisco NAC Guest Server
The Cisco NAC Guest Server is a provisioning and reporting solution that provides temporary network access to clients such as guests, contractors, etc. The Cisco NAC Guest Server works with the Cisco Unified Wireless Network or Cisco NAC Appliance solutions. This document walks you through the steps to integrate the Cisco NAC Guest Server with a Cisco WLC, which creates a guest user account and verifies the temporary network access of the guest.
Follow these steps to complete the integration:
-
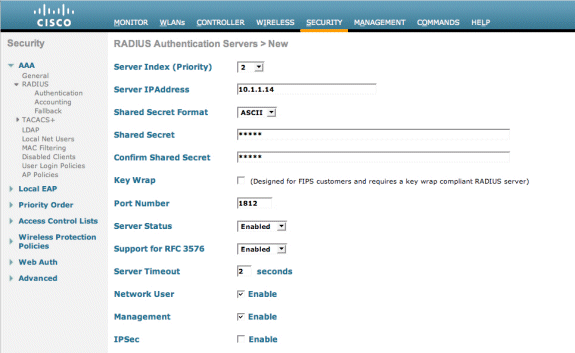
Add the Cisco NAC Guest Server as an Authentication Server in the WLC.
-
Browse to your WLC (https://10.10.51.2, admin/admin) to configure this.
-
Choose Security > RADIUS > Authentication.

-
Choose New.
-
Add the IP Address (10.1.1.14) for the Cisco NAC Guest Server.
-
Add the Shared Secret.
-
Confirm the Shared Secret.
-
Choose Apply.

-
-
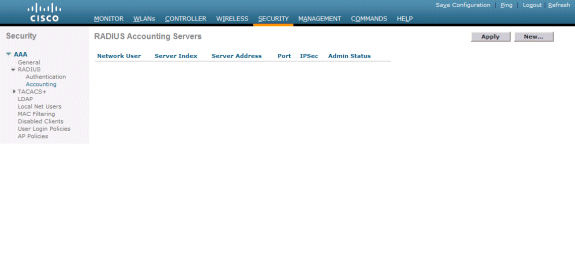
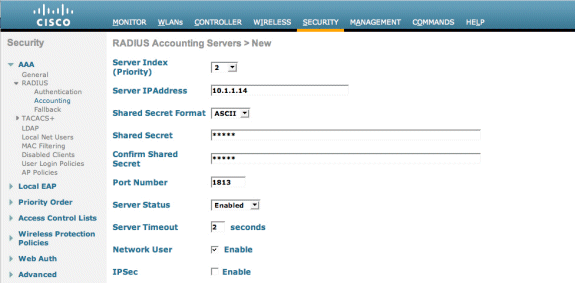
Add the Cisco NAC Guest Server as an accounting server in the WLC.
-
Choose Security > RADIUS >Accounting.
-
Choose New.
-
Add the IP Address (10.1.1.14) for the Cisco NAC Guest Server.
-
Add the Shared Secret.
-
Confirm the Shared Secret.
-
Choose Apply.

-
-
Modify the WLAN (wireless-x) to use the NAC Guest Server.
-
Edit the WLAN (wireless-x).
-
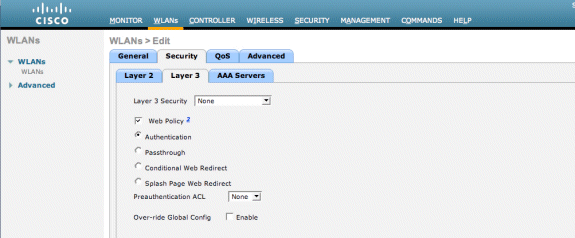
Choose the Security tab.
-
Change the Layer 2 Security to None and Layer 3 Security to use Web Authentication.
-
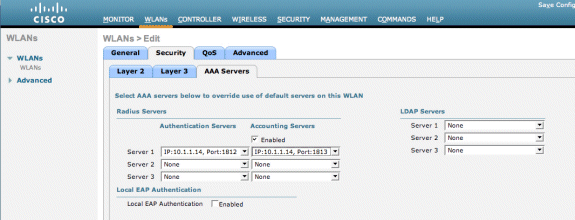
Choose the AAA Servers under the Security tab.
-
Under the Server 1 box, choose the RADIUS server (10.1.1.14).
-
Under the Server 1 box, choose the Accounting Server (10.1.1.14).
-
Choose the the Advanced tab.
-
Enable Allow AAA Override. This allows the per client session timeout to be set from the NAC Guest Appliance.
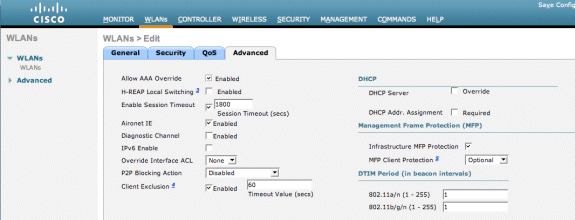
Note: When AAA override is enabled on the SSID, the remaining lifetime of the Guest User on NGS is pushed to the WLC as session timeout at the time of login of the guest user.
-
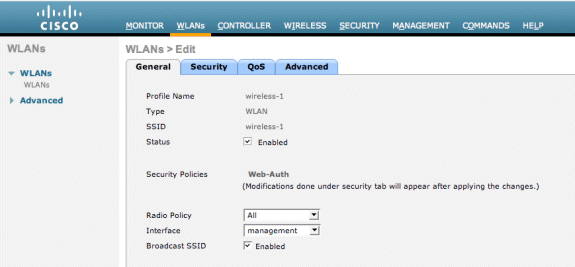
Choose Apply to save your WLAN configuration.
-
-
Verify whether the controller is added as a Radius Client in the Cisco NAC Guest Server.
-
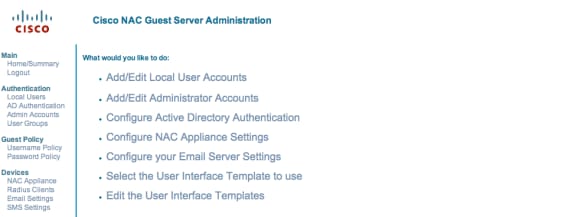
Browse to the NAC Guest Server (https://10.1.1.14/admin) to configure this.
Note: You get the Administration page if you specify the /admin in the URL.
-
Choose Radius Clients.
-
Choose Add Radius.
-
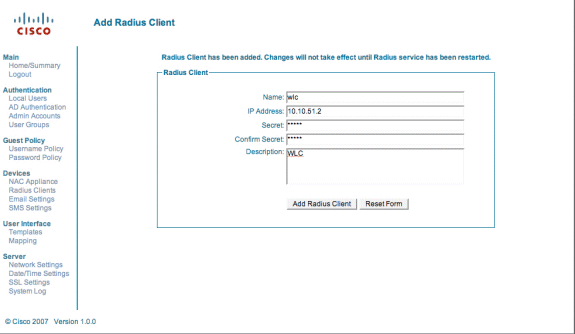
Enter the Radius Client information:
-
Enter a name: WLC system name.
-
Enter the IP address: IP address of WLC (10.10.51.2).
-
Enter the same shared secret that you entered in Step 1.
-
Confirm your shared secret.
-
Enter a description.
-
Choose Add Radius Client.
-
-
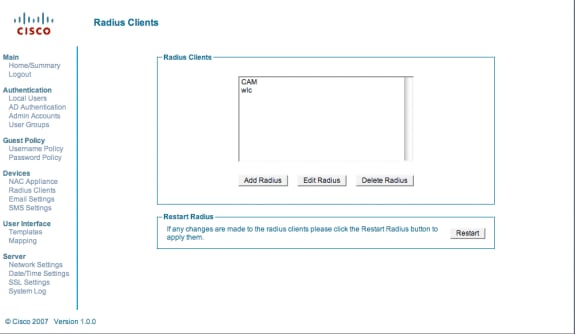
Restart the Radius Service in order for the changes to take effect.
-
Choose Radius Clients.
-
Choose Restart in the Restart Radius box.
-
-
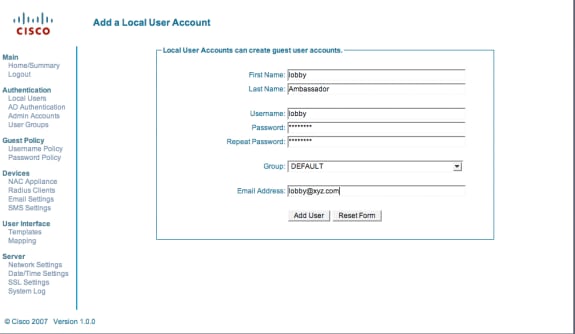
Create a Local User, that is, Lobby Ambassador, in the Cisco NAC Guest Server.
-
Choose Local Users.
-
Choose Add User.
Note: You must fill in all fields.
-
Enter a First Name: lobby.
-
Enter a Last Name: Ambassador.
-
Enter Username: lobby.
-
Enter a Password: password.
-
Leave Group as Default.
-
Enter Email Address: lobby@xyz.com.
-
Choose Add User.
-
-
Login as the Local User and create a guest account.
-
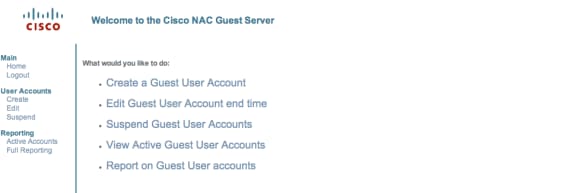
Browse to the NAC Guest Server (https://10.1.1.14), login with the user name/password you created in Step 5, and configure this:
-
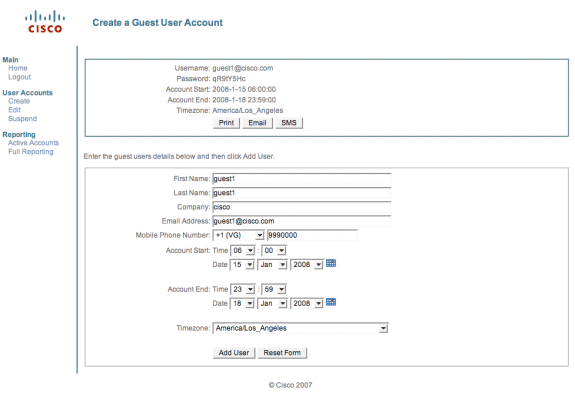
Choose Create for a guest user account.
Note: You must fill in all fields.
-
Enter a First Name.
-
Enter a Last Name.
-
Enter the Company.
-
Enter the Email Address.
Note: The email address is the Username.
-
Enter the Account End: Time.
-
Choose Add User.
-
-
Connect to the guest WLAN and login as the guest user.
-
Connect your wireless client to the guest WLAN (wireless-x).
-
Open the web browser to be redirected to the Web-Auth Login page.
Note: Alternatively, type https://1.1.1.1/login.html to be redirected to the Login page.
-
Enter the guest User Name that you created in Step 6.
-
Enter the Password that was auto-generated in Step 6.
-
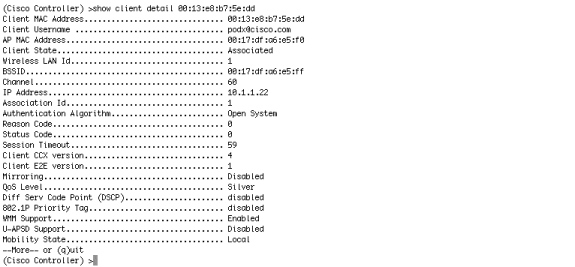
Telnet to the WLC and verify that the Session Timeout has been set with the show client detail command.
-
When the Session Timeout expires, the guest client is disconnected, and your ping stops.
-
Note: In order to set up web authentication from the Wireleass LAN Controller, WLC to the NAC Guest Server (NGS), you need to use the PAP mode authentication on the web-auth properties. If the web-authentication policy is set to CHAP, authentication fails because CHAP is not supported with NGS.
Related Information
- Cisco NAC Appliance - Clean Access Manager Installation and Configuration Guide, Release 4.1(3)
- Cisco NAC Appliance Switch and Wireless LAN Controller Support
- Cisco Wireless LAN Controller Configuration Guide, Release 7.0.116.0
- (Video) Integration of Cisco Identity Services Engine (ISE) and Wireless LAN Controller (WLC)

- NAC (Clean Access): Configure Guest Access
- Deployment Guide: Cisco Guest Access Using the Cisco Wireless LAN Controller, Release 4.1
- Technical Support & Documentation - Cisco Systems
Revision History
| Revision | Publish Date | Comments |
|---|---|---|
1.0 |
01-Aug-2008 |
Initial Release |
Contact Cisco
- Open a Support Case

- (Requires a Cisco Service Contract)


 Feedback