Ethernet Bridging in Point-Point Wireless Mesh Network Configuration Example
Available Languages
Contents
Introduction
This document provides a simple configuration example for how to configure Ethernet bridging on an outdoor wireless mesh network. This document explains point-to-point Ethernet bridging between the outdoor wireless mesh access points (APs).
Prerequisites
-
The wireless LAN controller (WLC) is configured for basic operation.
-
The WLC is configured in Layer 3 mode.
-
The switch for the WLC is configured.
Requirements
Ensure that you meet these requirements before you attempt this configuration:
-
Basic knowledge of the configuration of Lightweight Access Points (LAPs) and Cisco WLCs
-
Basic Knowledge on wireless mesh networking solution
-
Basic knowledge of Lightweight AP Protocol (LWAPP)
-
Basic configuration knowledge of Cisco switches
Components Used
The information in this document is based on these software and hardware versions:
-
Cisco 2000 Series WLC that runs firmware 4.0.217.0
-
Two (2) Cisco Aironet 1510 Series LAPs
-
Cisco Layer 2 Switch
The information in this document was created from the devices in a specific lab environment. All of the devices used in this document started with a cleared (default) configuration. If your network is live, make sure that you understand the potential impact of any command.
Conventions
Refer to the Cisco Technical Tips Conventions for more information on document conventions.
Background Information
The mesh networking solution, which is part of the Cisco unified wireless network solution, enables two or more Cisco Aironet lightweight mesh access points (hereafter called mesh access points) to communicate with each other over one or more wireless hops to join multiple LANs or to extend 802.11b wireless coverage. Cisco mesh access points are configured, monitored, and operated from and through any Cisco wireless LAN controller that is deployed in the mesh networking solution.
Supported mesh networking solution deployments are of one of three general types:
-
Point-to-point deployment
-
Point-to-multipoint deployment
-
Mesh deployment
This document focuses on how to configure point-to-point mesh deployment and Ethernet bridging on the same. In point-to-point mesh deployment, the mesh access points provide wireless access and backhaul to wireless clients, and can simultaneously support bridging between one LAN and a termination to a remote Ethernet device or another Ethernet LAN.
Refer to Mesh Networking Solution Deployments for detailed information on each of these deployment types.
The Cisco Aironet 1510 Series lightweight outdoor mesh AP is a wireless device designed for wireless client access and point-to-point bridging, point-to-multipoint bridging, and point-to-multipoint mesh wireless connectivity. The outdoor access point is a standalone unit that can be mounted on a wall or overhang, on a rooftop pole, or on a street light pole.
You can operate the Cisco Aironet 1510 remote edge lightweight access points and Cisco Aironet 1500 Series lightweight outdoor access points in one of these roles:
-
Roof-top Access Point (RAP)
-
Mesh Access Point (MAP), also called Pole-top Access Point (PAP)
RAPs have a wired connection to a Cisco wireless LAN controller. They use the backhaul wireless interface to communicate with nearby MAPs. RAPs are the parent node to any bridging or mesh network and connect a bridge or mesh network to the wired network, so there can be only one RAP for any bridged or mesh network segment.
MAPs have no wired connection to a Cisco Wireless LAN controller. They can be completely wireless and support clients that communicate with other MAPs or RAPs, or they can be used to connect to peripheral devices or a wired network. The Ethernet port is disabled by default for security reasons, but you can enable it for PAPs.
Configure
This configuration example explains how to configure Ethernet bridging between two 1510 Series lightweight outdoor mesh APs with one AP that acts as a RAP and the other AP that acts as a MAP.
In this setup, the AP with MAC address 00:0B:85:7F:47:00 is configured as a RAP, and the AP with MAC address 00:0B:85:71:1B:00 is configured as a MAP. A local Ethernet LAN A is connected at the RAP end, and Ethernet LAN B is connected at the MAP.
Network Diagram
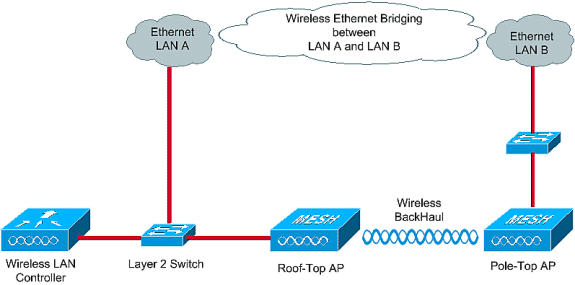
In order to configure out-of-box 1510 mesh APs for Ethernet bridging, perform these steps:
Assign IP Address to the APs
When any AP boots up, it first looks for an IP address. This IP address can be assigned dynamically with an External Internal DHCP like Microsoft Windows® DHCP server. The latest WLC version (4.0 and later) can assign the IP address to the APs with the Internal DHCP server on the controller itself. This example uses the Internal DHCP server on the controller to assign IP address to APs.
Complete these steps in order to assign an IP address to APs through the Internal DHCP server on the WLC.
-
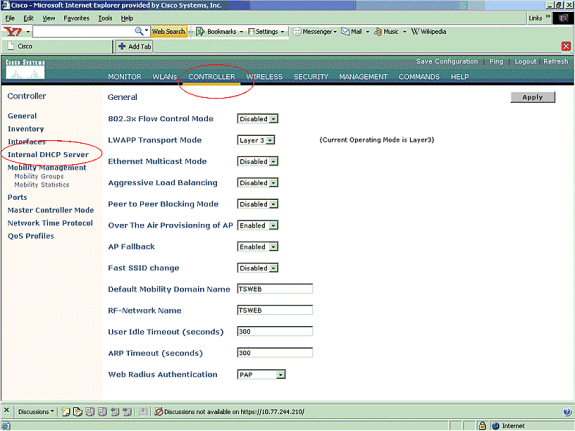
Click CONTROLLER from the main menu of WLC GUI. Choose Internal DHCP Server from the left side corner of the Controller Main page.
-
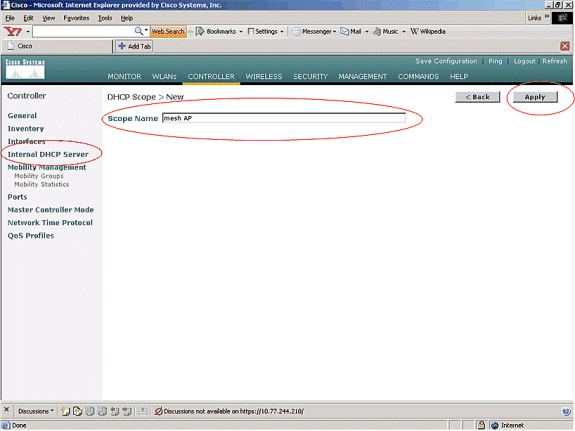
In the Internal DHCP Server page, clickNew in order to create a new DHCP scope. This example assigns the scope name as mesh AP. Click Apply. This takes you to the mesh AP DHCP Scope Edit page.
-
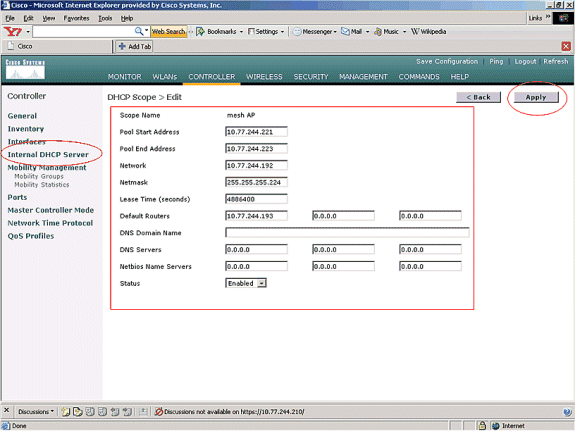
In the DHCP Scope > Edit page, configure the Pool Start Address, Pool End Address, Network and Netmask, Default Routers, and all the other necessary parameters as given in this example. Choose the status of DHCP server as Enabled from the Status drop-down box. Click Apply.
-
Now, the Internal DHCP server is configured to assign IP addresses to the mesh APs.
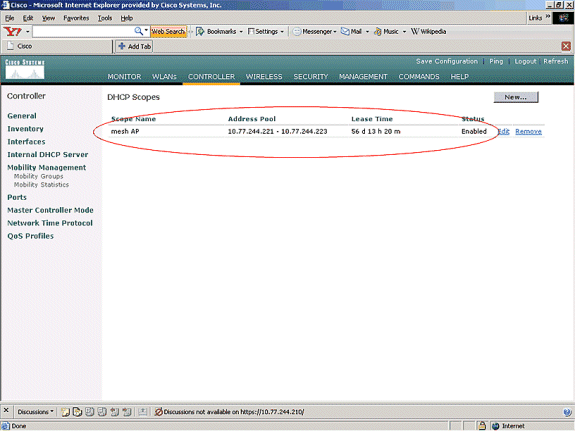
-
Once the APs are registered with the controller, assign the static IP address to the APs through the controller GUI. If you assign Static IP addresses to mesh APs, it provides faster convergence of the APs the next time they register with the controller.
Add the MAC Address of APs to the MAC Filtering List of the WLC
In order to register the mesh APs with the WLC, you need to first add the MAC address of APs to the MAC filtering list of the WLC. You can find the MAC address labeled on the top side of the mesh AP.
Complete these steps in order to add the AP to the MAC filtering list of the WLC.
-
Click SECURITY from the Controller main menu.
On the Security page, choose MAC filtering under the AAA section. This takes you to the MAC Filtering page. Click New in order to create MAC filters for the mesh APs.
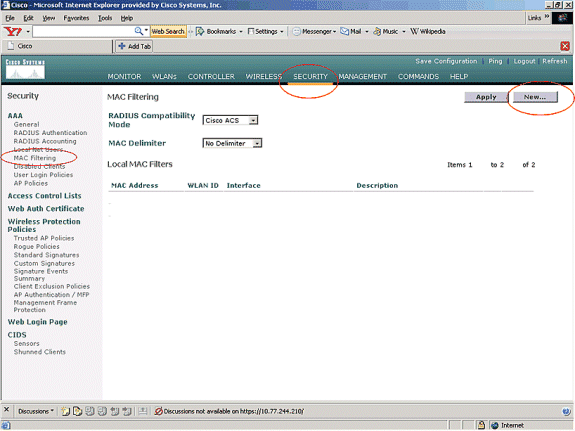
-
Enter the MAC Address of the AP and its description in the appropriate text boxes as given in this example. Also, choose a WLAN and dynamic interface from the WLAN ID and Interface Name drop-down menus, respectively. Click Apply.
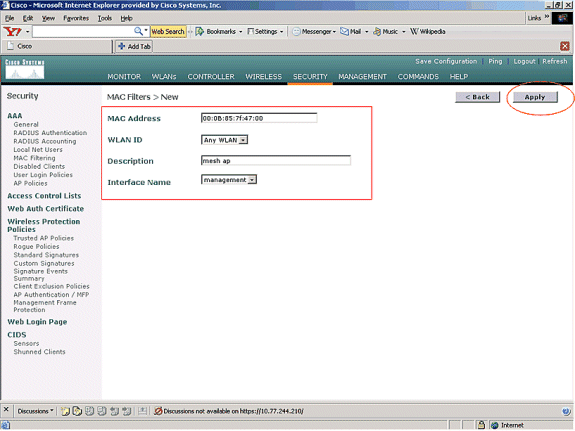
-
Repeat steps 1 and 2 for all the APs involved in this mesh network, so MAC filtering is configured to allow mesh APs to register with the controller.
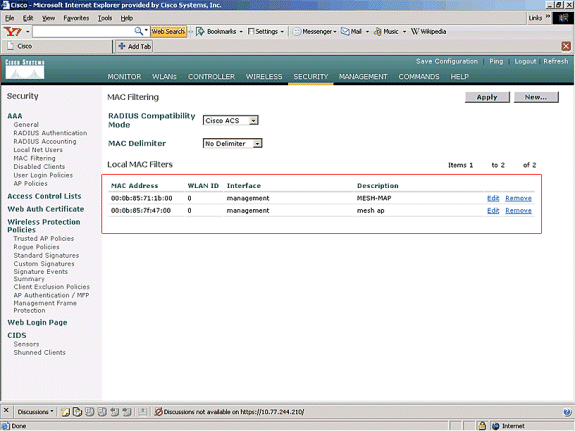
Register the AP with the WLC
The next step is to register the mesh APs with the WLC. There are several methods that an AP can register with the WLC. Refer to Lightweight AP Registration with WLC for details on how an AP registers with the WLC.
The first time you use the mesh APs, register all the APs directly connected with the WLC.
If you have failed to add the AP to the MAC filtering list of the controller, the APs are not able to join the WLC at the time of registration with WLC. The reason is authorization failure from the output of debug lwapp events enable command on the controller. Here is the example output that indicates authorization failure.
(Cisco Controller) >debug lwapp events enable

.Fri Oct 26 16:04:48 2007: 00:0b:85:71:1b:00 Received LWAPP DISCOVERY REQUEST from
AP 00:0b:85:71:1b:00 to 00:0b:85:33:52:80 on port '2'
Fri Oct 26 16:04:48 2007: 00:0b:85:71:1b:00 Successful transmission of LWAPP
Discovery-Response to AP 00:0b:85:71:1b:00 on Port 2
Fri Oct 26 16:04:48 2007: 00:0b:85:71:1b:00 Received LWAPP DISCOVERY REQUEST from
AP 00:0b:85:71:1b:00 to ff:ff:ff:ff:ff:ff on port '2'
Fri Oct 26 16:04:48 2007: 00:0b:85:71:1b:00 Successful transmission of LWAPP
Discovery-Response to AP 00:0b:85:71:1b:00 on Port 2
Fri Oct 26 15:52:40 2007: 00:0b:85:71:1b:00 Received LWAPP JOIN REQUEST from AP
00:0b:85:71:1b:00 to 00:0b:85:33:52:81 on port '2'
Fri Oct 26 15:52:40 2007: 00:0b:85:71:1b:00 AP ap:71:1b:00: txNonce  00:0B:85:33
:52:80 rxNonce  00:0B:85:71:1B:00
Fri Oct 26 15:52:40 2007: 00:0b:85:71:1b:00 LWAPP Join-Request MTU path from AP
00:0b:85:71:1b:00 is 1500, remote debug mode is 0
Fri Oct 26 15:52:40 2007: spamRadiusProcessResponse: AP Authorization failure for
00:0b:85:71:1b:00
In this output, you can see that the join request from the AP is not accepted by the controller because of the AP authorization failure.
Note: In normal mesh network deployments that primarily use 1500 Series mesh APs, it is recommended to disable the Allow Old Bridging APs To Authenticate setting on the controller. This can be done from the controller CLI mode with the command
Note: (Cisco Controller) > config network allow-old-bridge-aps disable
Note: The command has been removed in 4.1 and later, so this is not a problem with WLC 4.1 and later.
On the CLI, you can use the show ap summary command in order to verify that the APs are registered with the WLC:
(Cisco Controller) >show ap summary
AP Name             Slots  AP Model             Ethernet MAC       Location
     Port
------------------  -----  -------------------  -----------------  -------------
---
ap:5b:fb:d0          2     AP1010               00:0b:85:5b:fb:d0  default_locat
ion  2
ap:7f:47:00          2     LAP1510              00:0b:85:7f:47:00  default_locat
ion  2
ap:71:1b:00          2     LAP1510              00:0b:85:71:1b:00  default_locat
ion  2
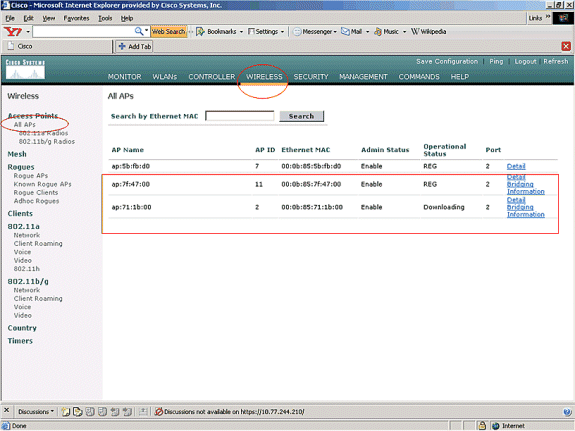
You can verify it from the GUI under the Wireless All APs page.
Configure the AP Role and Other Bridging Parameters
Once the APs are registered to the WLC, you need to configure the AP role and other bridging parameters. You need to configure the APs as RAPs and MAPs, as required.
Complete these steps in order to configure those AP parameters:
-
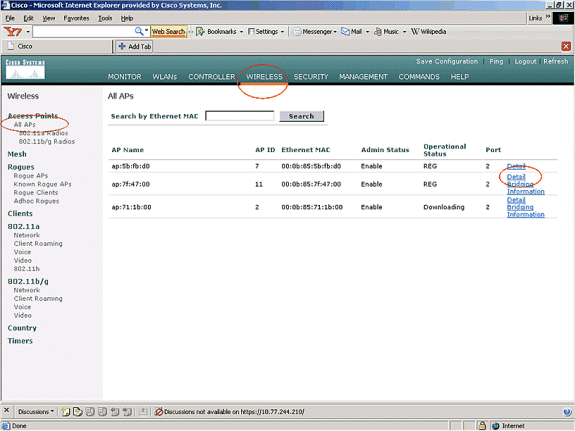
Click Wireless and then All APs under Access Points. The All APs page appears.
-
Click the Detail link for your AP1510 in order to access the Details page.
-
In the Details page of your 1510 AP, the AP Mode under General is automatically set to Bridge for APs that have bridge functionality, such as the AP1510. This page also shows this information under Bridging Information.
Under Bridging Information, choose one of these options in order to specify the role of this AP in the mesh network:
-
MeshAP (MAP)
-
RootAP (RAP)
The APs configured as RootAPs must have wired connection to the WLC at the time of implementation of the setup in your production environment. The AP configured as a mesh AP is connected wirelessly to the WLC through its parent AP (RAP). The 1510 APs, by default, assume the role of MAPs when they come up and register with the WLC.
While you configure the bridge role, an alert box displays this message: AP will reboot. Click OK to continue.

You can configure the AP role with the controller CLI with the command config ap role role .
-
-
Configure the Bridge Group Name parameter. This is a string of a maximum of 10 characters. Use bridge group names to logically group the mesh access points to avoid two networks on the same channel from communicating with each other. For the mesh access points to communicate, they must have the same bridge group name. A default mesh access point bridge group name is assigned at the manufacturing stage. It is not visible to you. The Bridge Group Name field appears blank in the GUI until you change it. The AP registers with the WLC for the first time with this default bridge group name.
This example uses the bridge group name cisco on all APs involved in this mesh network.
While you configure the bridge group name, an alert box displays this: Setting Bridge Group Name permanently restricts the AP to which it may connect." Click OK to continue.

You can configure the bridge group name with the controller CLI with the command config ap bridgegroupname set cisco .
Note: If you want to change the bridge group name of the APs after the RAP is deployed at its remote site, configure the Bridge Group Name parameter first on the MAP and then on the RAP. If the RAP is configured first, it causes serious connectivity issues since the MAP goes to default mode because its parent (RAP) is configured with a different bridge group name.
Note: For configurations with multiple RAPs, make sure that all RAPs have the same bridge group name to allow failover from one RAP to another. Conversely, for configurations where separate sectors are required, make sure that each RAP and associated PAPs have separate bridge group names.
-
The Bridge Data Rate is the rate at which data is shared between the mesh access points. This is fixed for a whole network. The default data rate is 18 Mbps, which you must use for the backhaul. Valid data rates for 802.11a are 6, 9, 12, 18, 24, 36, 48, and 54.
-
If you configure the AP as a RAP, the Backhaul Interface parameter shows a drop-down menu, but if you click the drop-down button you see only the 802.11a option. On the MAP there is no such drop-down menu available. Click Apply. Here is the screenshot that explains steps 3 to 6.
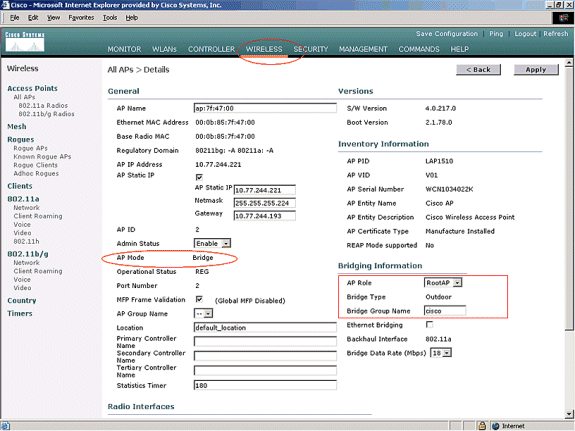
The configuration of RootAP (RAP) is shown here.
Enable Ethernet Bridging on the APs
The next step is to enable the Ethernet bridging on the RAP and all the MAPs whose Ethernet port is connected with an Ethernet device. One of the key features of mesh APs is the usage of an Ethernet port on the MAP to connect external devices and provide Ethernet bridging among all the Ethernet ports of the APs involved in the mesh network.
WLAN mesh can simultaneously carry two different traffic types, WLAN client traffic and MAP bridge traffic. WLAN client traffic terminates on the WLAN Controller, and the bridge traffic terminates on the Ethernet ports of the 1500 mesh APs. The Bridge traffic doesn't reach the WLC. If a mesh node is working as a MAP, then the Ethernet port on the MAP gets locked. This has been done for the security reasons. If someone wants to use Ethernet port for deploying point to point and point (P2P) to multipoint bridging (P2MP) networks or to connect external devices, one must enable it on the controller for each MAP.
Complete these steps in order to configure Ethernet bridging on the RAP and mesh APs:
-
Click Wireless and then All APs under Access Points. The All APs page appears.
-
Click the Detail link for your AP1510 in order to access the AP Details page.

-
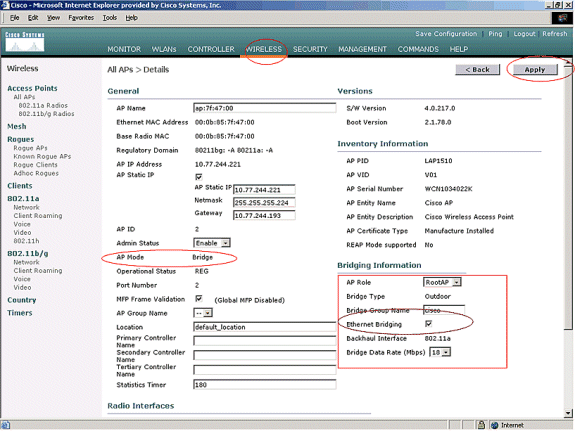
Under Bridging Information, check the box next to Ethernet Bridging. This enables Ethernet bridging on the AP.
If you use a point to multipoint mesh network, enable the Ethernet bridging on the RAPs and only on the MAPs to which Ethernet devices are connected. It is not necessary to enable Ethernet bridging on all MAPs in a mesh network.
If you have enabled Ethernet bridging to use the network for bridging (P2P or P2MP), you must enable Ethernet bridging on all the nodes (MAPs and RAPs). In the bridging scenario, a RAP that acts as a root bridge connects multiple MAPs as non-root bridges with their associated wired LANs.
You can enable the Ethernet bridging on the APs from the controller CLI with this command: config ap bridging Enable.
Note: Any attached switches to the Ethernet ports of your MAPs must NOT DO VLAN Trunking Protocol (VTP). VTP can reconfigure the trunked VLAN across your mesh and possibly cause a loss in connection for your RAP to its primary WLC. If improperly configured, it can take down your mesh deployment.
-
Enable Ethernet bridging and all bridging parameters explained in the previous section in MAP, as well.
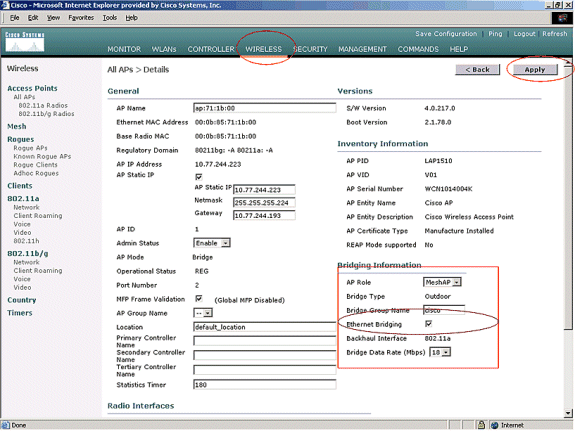
Once you finish the configurations of the bridge parameters and Ethernet ridging parameters on each AP, click Apply in order to save the settings. This causes the AP to unregister from the WLC, reboot, and reregister with the WLC.
Enable Zero-Touch Configuration on the WLC
Now you have configured your APs as RAPs and MAPs, as needed, as well as configured their bridging parameters. Enable Zero-Touch configuration on the WLC so that, once the MAP is removed from its wired connection with the WLC and taken to the production network (to the other end of the point-to-point mesh network), the MAP is able to establish a secured LWAPP connection with the WLC without any wired connection to the WLC. The default value for zero-touch configuration on the WLC is enabled (or checked).
Complete these steps in order to configure zero-touch configuration on the WLC.
-
From the controller GUI, Choose Wireless > Mesh and click Enable Zero Touch Configuration.
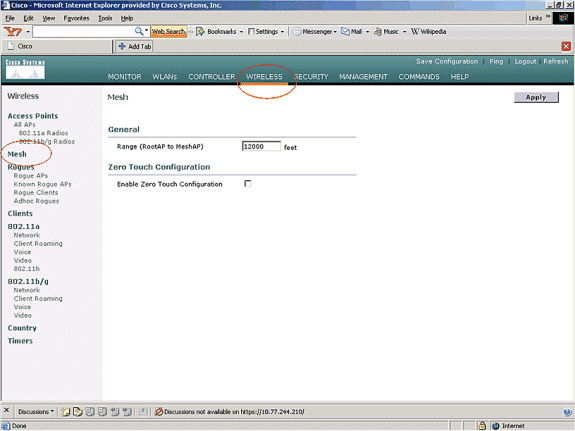
-
Choose the Key Format (ASCII or Hex).
-
Enter the bridging shared secret key.
This field is enabled only if the zero-touch configuration option is enabled. This is the key that is provided to the mesh access points (MAPs) for them to establish a secure LWAPP connection with the Cisco wireless LAN controller while the MAP connects wirelessly from the other end of the mesh network . The key must be at least 32 characters long in Hex or ASCII format. A default shared secret key is assigned at the manufacturing stage. It is not visible to you.
This example uses the bridging shared secret key cisco.
When you change the shared secret key, the Cisco wireless LAN controller automatically sends the change to all the RAPs, which causes the PAPs to lose connectivity until they are able to obtain the new shared secret key from the Cisco wireless LAN controller.
-
Enter the bridging shared secret key again in the Confirm Shared Secret Key field.
-
Click Apply. This screenshot explains steps 3 to 5.
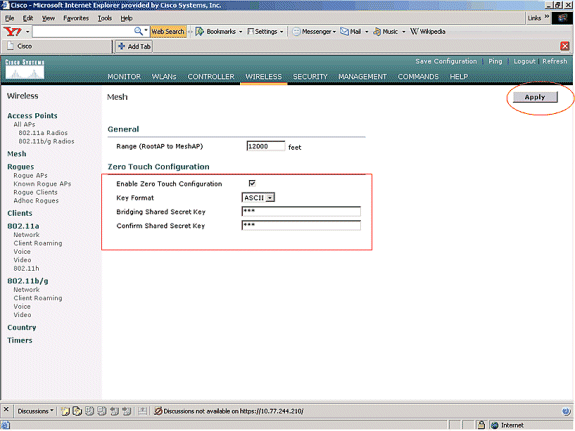
If zero-touch configuration is enabled on the Cisco wireless LAN controller and the MAP is moved to the other end of the mesh network, the RAP and MAPs do this to accomplish a secure zero-touch configuration:
-
If it is a RAP, it already has a secure LWAPP connection to the Cisco wireless LAN controller and uses the configured RAP backhaul interface (Default: 802.11a).
-
If it is a MAP, it scans the backhaul interfaces and channels for neighbor mesh access points. When it finds a neighbor mesh access point with the same bridge group name (configured as part of bridging parameters) and a path back to the Cisco wireless LAN controller, it makes that mesh access point its parent. If the MAP finds more than one neighbor mesh access point, it uses a least-cost algorithm to determine which parent has the best path back to the Cisco wireless LAN controller.
In order to set up a secure LWAPP connection with the Cisco wireless LAN controller, the MAP sends its default shared secret key, which is already available at the AP manufacturing stage, and MAC address to set up a temporary secured connection. The Cisco wireless LAN controller validates the MAC address against the the MAC filtering list and, if found, sends the shared secret key, which is configured as part of the Zero-Touch Configuration setting to the MAP and disconnects. The MAP stores the shared secret key and uses it to set up a secure LWAPP connection.
If a MAP loses connection to the Cisco wireless LAN controller, it searches for valid neighbors that use the mesh access point bridge group name and scans the backhaul interfaces and channels. When it finds a neighbor mesh access point, it makes that mesh access point its parent. If it already has a shared secret key, it uses that key and tries to set up a secure LWAPP connection to the Cisco wireless LAN controller. If the shared secret key does not work, it uses the shared default secret key and attempts to get a new shared secret key.
Verify
-
After all configurations, disconnect the MAP from the wired network attached to the WLC and move it to the other end of the Mesh. Power on the mesh. With all proper configurations, the MAP is able to locate the RAP as its parent and register with the controller wirelessly.
-
On the WLC CLI, you can use the show mesh path Cisco AP and show mesh neigh Cisco AP commands in order to verify that the APs registered with the WLC:
-
The command show mesh path AP name is used to verify the path from the controller to reach the specified AP. Here is an example:
(Cisco Controller) >show mesh path ap:71:1b:00


00:0B:85:7F:47:00 state UPDATED NEIGH PARENT BEACON
(86B), snrUp 10, snrDown 9, linkSnr 8
00:0B:85:7F:47:00 is RAP
This output says that to reach the AP ap:71:1b:00(MAP), the controller has the AP with MAC address 00:0B:85:7F:47:00 in its path, and this AP is a RAP.
(Cisco Controller) >show mesh path ap:7f:47:00


00:0B:85:7F:47:00 is RAP
This output says the AP ap:7f:47:00 is directly connected to the controller since this AP is a RAP.
-
The command show mesh neigh AP name displays the neighbor information of the specified AP. Here is an example:
(Cisco Controller) >show mesh neigh ap:7f:47:00


AP MAC : 00:0B:85:71:1B:00

FLAGS : 160 CHILD
worstDv 255, Ant 0, channel 0, biters 0, ppiters 10
Numroutes 0, snr 0, snrUp 0, snrDown 10, linkSnr 0
adjustedEase 0, unadjustedEase 0
txParent 0, rxParent 0
poorSnr  0
lastUpdate   1193504822 (Sat Oct 27 17:07:02 2007)
parentChange 0
Per antenna smoothed snr values: 0 0 0 0
Vector through 00:0B:85:71:1B:00
This output says the neighbor of the AP ap:7f:47:00 is MAP 00:0B:85:71:1B:00, and the MAP is a CHILD to this AP since this AP is a RAP.
(Cisco Controller) >show mesh neigh ap:71:1b:00


AP MAC : 00:0B:85:7F:47:00

FLAGS : 86A NEIGH PARENT BEACON
worstDv 0, Ant 0, channel 161, biters 0, ppiters 10
Numroutes 1, snr 0, snrUp 10, snrDown 10, linkSnr 8
adjustedEase 213, unadjustedEase 256
txParent 106, rxParent 5
poorSnr  5
lastUpdate   1193504822 (Sat Oct 27 17:07:02 2007)
parentChange 1009152029 (Mon Dec 24 00:00:29 2001)
Per antenna smoothed snr values: 8 0 0 0
Vector through 00:0B:85:7F:47:00
Vector ease 1 -1,  FWD:  00:0B:85:7F:47:00
This output says the neighbor of AP ap:71:1b:00 is RAP 00:0B:85:7F:47:00, and the RAP is a PARENT to this AP.
-
-
The command show mesh summary Ap name displays the mesh details of the specified AP. Here is an example:
(Cisco Controller) >show mesh summary ap:71:1b:00


00:0B:85:7F:47:00 state UPDATED NEIGH PARENT BEACON (86B),
 snrUp 10, snrDown 10, linkSnr 8
(Cisco Controller) >show mesh summary ap:7f:47:00 00:0B:85:71:1B:00 state CHILD (160), snrUp 0, snrDown 10, linkSnr 0 -
The same can be verified from the controller GUI with these steps:
-
From the WLC GUI, Click Wireless > All APs .
-
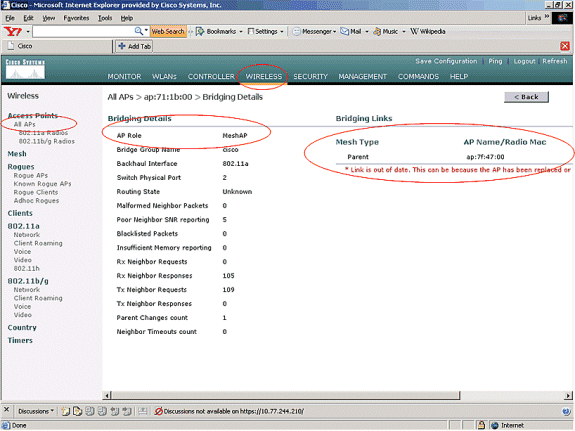
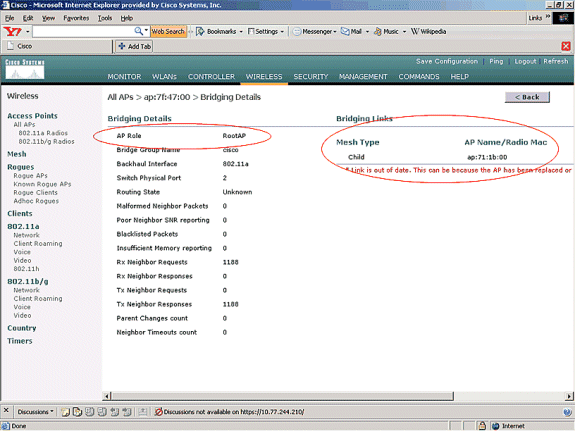
Click the Bridging Information link for your AP1510 in order to access the Bridging Information page of the AP.
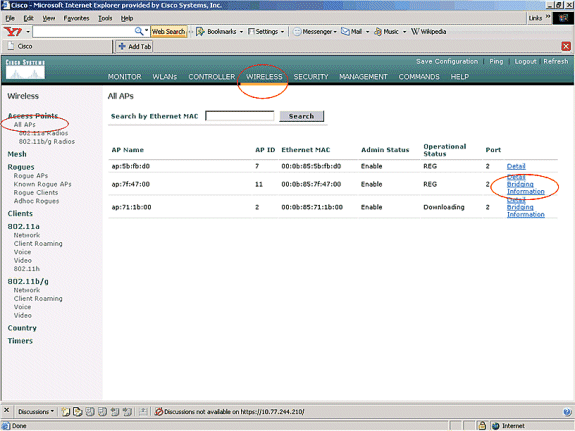
-
The AP Bridging Details page lists all the bridging details of this AP, such as the AP role and mesh type information.
-
On the WLC CLI, you can use the show mesh path Cisco AP and show mesh neigh Cisco AP commands in order to verify that the APs are registered with the WLC:
In order to verify whether your Ethernet bridging works properly, perform these steps:
-
Connect an Ethernet network (Ethernet LAN B as given in the network diagram) to the Ethernet port of the MAP through a switch. Ensure that the switch is properly configured as needed.
-
Verify connectivity between the Ethernet LAN B on the MAP and the wired network (Ethernet LAN A as given in the network diagram) connected at the RAP behind the WLC with the ping command. If ping is successful, it indicates that the Ethernet bridging works fine.
Troubleshoot
These troubleshooting commands can be helpful:
Troubleshooting Commands
-
debug lwapp errors enable—Shows the debug of LWAPP errors.
-
debug pm pki enable—Shows the debug of certificate messages that are passed between the AP and the WLC.
This command clearly shows if an AP cannot join the WLC because of certification validity period mismatch.
This is the output from the debug pm pki enable command on the controller:
Thu May 25 07:25:00 2006: sshpmGetIssuerHandles: locking ca cert table
Thu May 25 07:25:00 2006: sshpmGetIssuerHandles: calling x509_alloc()
   for user cert
Thu May 25 07:25:00 2006: sshpmGetIssuerHandles: calling x509_decode()
Thu May 25 07:25:00 2006: sshpmGetIssuerHandles: <subject> C=US, ST=California,
                          L=San Jose, O=Cisco Systems, CN=C1200-001563e50c7e,
                          MAILTO=support@cisco.com
Thu May 25 07:25:00 2006: sshpmGetIssuerHandles: <issuer>  O=Cisco Systems,
                          CN=Cisco Manufacturing CA
Thu May 25 07:25:00 2006: sshpmGetIssuerHandles: Mac Address in subject is
                          00:15:63:e5:0c:7e
Thu May 25 07:25:00 2006: sshpmGetIssuerHandles: Cert is issued by Cisco
   Systems.
.........................
.........................
..........................
..........................
Fri Apr 15 07:55:03 2005: ssphmUserCertVerify: calling x509_decode()
Fri Apr 15 07:55:03 2005: ssphmUserCertVerify: user cert verfied using
                          >cscoDefaultMfgCaCert<
Fri Apr 15 07:55:03 2005: sshpmGetIssuerHandles: ValidityString (current):
                          2005/04/15/07:55:03
Fri Apr 15 07:55:03 2005: sshpmGetIssuerHandles: Current time outside AP cert
                          validity interval: make sure the controller
                          time is set.
Fri Apr 15 07:55:03 2005: sshpmFreePublicKeyHandle: called with (nil)
In this output, notice the highlighted information. This information clearly shows that the controller time is outside the certificate validity interval of the AP, so the AP cannot register with the controller. Certificates installed in the AP have a predefined validity interval. The controller time must be set in such a way that it is within the certificate validity interval of the AP.
Refer to the LWAPP Upgrade Tools Troubleshoot Tips document for more information on possible issues in a LAP that registers with the controller.
Refer to Troubleshooting a Mesh Network for more information on troubleshooting a mesh network.
-
These are additional debug commands that can be useful:
-
debug pem state enable —Used to configure the access policy manager debug options.
-
debug pem events enable—Used to configure the access policy manager debug options.
-
debug dhcp message enable—Shows the debug of DHCP messages that are exchanged to and from the DHCP server.
-
debug dhcp packet enable—Shows the debug of DHCP packet details that are sent to and from the DHCP server.
-
Related Information
- Cisco Mesh Networking Solution Deployment Guide
- Mesh Access Point Installation and Configuration
- Wireless LAN Controller Mesh Network Configuration Example
- Quick Start Guide: Cisco Aironet 1500 Series Lightweight Outdoor Mesh Access Points
- Cisco Aironet 1500 Series Outdoor Mesh Access Point Hardware Installation Guide
- Cisco Aironet 1500 Series Access Point Power Injector Installation Instructions
- Cisco Aironet 1500 Series AP Q and A
- Lightweight AP (LAP) Registration to a Wireless LAN Controller (WLC)
- Wireless LAN Controller and Lightweight Access Point Basic Configuration Example
- Technical Support & Documentation - Cisco Systems
Revision History
| Revision | Publish Date | Comments |
|---|---|---|
1.0 |
01-Dec-2013 |
Initial Release |
Contact Cisco
- Open a Support Case

- (Requires a Cisco Service Contract)


 Feedback